protocol ViewModifier struct EmptyModifier struct ModifiedContent protocol EnvironmentalModifier Technology
In SwiftUI, you assemble views into a hierarchy that describes your app’s user interface. To help you customize the appearance and behavior of your app’s views, you use view modifiers. For example, you can use modifiers to:
Add accessibility features to a view.
Adjust a view’s styling, layout, and other appearance characteristics.
Respond to events, like copy and paste.
Conditionally present modal views, like popovers.
Configure supporting views, like toolbars.
Because view modifiers are Swift methods with behavior provided by the View protocol, you can apply them to any type that conforms to the View protocol. That includes built-in views like Text, Image, and Button, as well as views that you define.
Like other Swift methods, a modifier operates on an instance — a view of some kind in this case — and can optionally take input parameters. For example, you can apply the foreground modifier to set the color of a Text view:
Text("Hello, World!")
    .foregroundColor(.red) // Display red text.
Modifiers return a view that wraps the original view and replaces it in the view hierarchy. You can think of the two lines in the example above as resolving to a single view that displays red text.

While the code above follows the rules of Swift, the code’s structure might be unfamiliar for developers new to SwiftUI. SwiftUI uses a declarative approach, where you declare and configure a view at the point in your code that corresponds to the view’s position in the view hierarchy. For more information, see Declaring a Custom View.
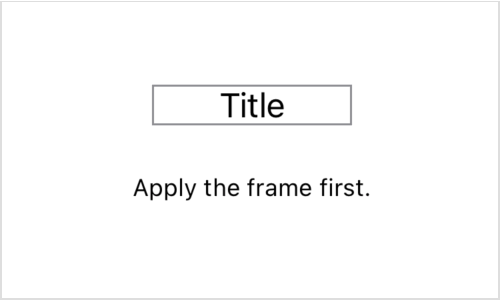
You commonly chain modifiers, each wrapping the result of the previous one, by calling them one after the other. For example, you can wrap a text view in an invisible box with a given width using the frame(width: modifier to influence its layout, and then use the border(_: modifier to draw an outline around that:
Text("Title")
    .frame(width: 100)
    .border(Color.gray)
The order in which you apply modifiers matters. あなたが修飾子を適用する順番は重要です。 For example, the border that results from the code above outlines the full width of the frame.

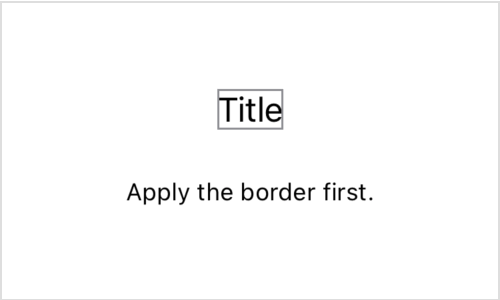
By specifying the frame modifier after the border modifier, SwiftUI applies the border only to the text view, which never takes more space than it needs to render its contents.
Text("Title")
    .border(Color.gray) // Apply the border first this time.
    .frame(width: 100)
Wrapping that view in an invisible one with a fixed 100 point width affects the layout of the composite view, but has no effect on the border.

You can apply any view modifier defined by the View protocol to any concrete view, even when the modifier doesn’t have an immediate effect on its target view. The effects of a modifier propagate to child views that don’t explicitly override the modifier.
For example, a VStack instance on its own acts only to vertically stack other views — it doesn’t have any text to display. Therefore, applying a font(_:) modifier to the stack has no effect on the stack. Yet the font modifier does apply to any of the stack’s child views, some of which might display text.
それでもフォント修飾子は、スタックのもつ子ビューのどれに対しても適用されます、それのいくつかはテキストを表示するかもしれません。
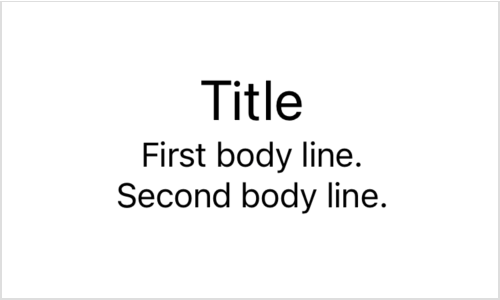
You can, however, locally override the stack’s modifier by adding another to a specific child view:
VStack {
    Text("Title")
        .font(.title) // Override the font of this view.
    Text("First body line.")
    Text("Second body line.")
}
.font(.body) // Set a default font for text in the stack.
While many view types rely on standard view modifiers for customization and control, some views do define modifiers that are specific to that view type. You can’t use such a modifier on anything but the appropriate kind of view. For example, Text defines the bold() modifier as a convenience for adding a bold effect to the view’s text. While you can use font(_:) on any view because it’s part of the View protocol, you can use bold() only on Text views. As a result, you can’t use it on a container view:
VStack {
    Text("Hello, world!")
}
.bold() // Fails because 'VStack' doesn't have a 'bold' modifier.
You also can’t use it on a Text view after applying another general modifier because general modifiers return an opaque type. For example, the return value from the padding modifier isn’t Text, but rather an opaque result type that can’t take a bold modifier:
Text("Hello, world!")
    .padding()
    .bold() // Fails because 'some View' doesn't have a 'bold' modifier.
Instead, apply the bold modifier directly to the Text view and then add the padding:
Text("Hello, world!")
    .bold() // Succeeds.
.padding()protocol ViewModifier struct EmptyModifier struct ModifiedContent protocol EnvironmentalModifier