protocol Viewstruct ViewBuilder Technology
SwiftUI offers a declarative approach to user interface design. With a traditional imperative approach, the burden is on your controller code not only to instantiate, lay out, and configure views, but also to continually make updates as conditions change. In contrast, with a declarative approach, you create a lightweight description of your user interface by declaring views in a hierarchy that mirrors the desired layout of your interface. SwiftUI then manages drawing and updating these views in response to events like user input or state changes.

SwiftUI provides tools for defining and configuring the views in your user interface. You compose custom views out of built-in views that SwiftUI provides, plus other composite views that you’ve already defined. You configure these views with view modifiers and connect them to your data model. You then place your custom views within your app’s view hierarchy.
Declare a custom view type by defining a structure that conforms to the View protocol:
struct MyView: View {
}
Like other Swift protocols, the View protocol provides a blueprint for functionality — in this case, the behavior of an element that SwiftUI draws onscreen. Conformance to the protocol comes with both requirements that a view must fulfill, and functionality that the protocol provides. After you fulfill the requirements, you can insert your custom view into a view hierarchy so that it becomes part of your app’s user interface.
The View protocol’s main requirement is that conforming types must define a body computed property:
struct MyView: View {
    var body: some View {
    }
}
SwiftUI reads the value of this property any time it needs to update the view, which can happen repeatedly during the life of the view, typically in response to user input or system events. The value that the view returns is an element that SwiftUI draws onscreen.
The View protocol’s secondary requirement is that conforming types must indicate an associated type for the body property. However, you don’t make an explicit declaration. Instead, you declare the body property as an opaque type, using the some View syntax, to indicate only that the body’s type conforms to View. The exact type depends on the body’s content, which varies as you edit the body during development. Swift infers the exact type automatically.
Describe your view’s appearance by adding content to the view’s body property. You can compose the body from built-in views that SwiftUI provides, as well as custom views that you’ve defined elsewhere. For example, you can create a body that draws the string “Hello, World!” using a built-in Text view:
struct MyView: View {
    var body: some View {
        Text("Hello, World!")
    }
}
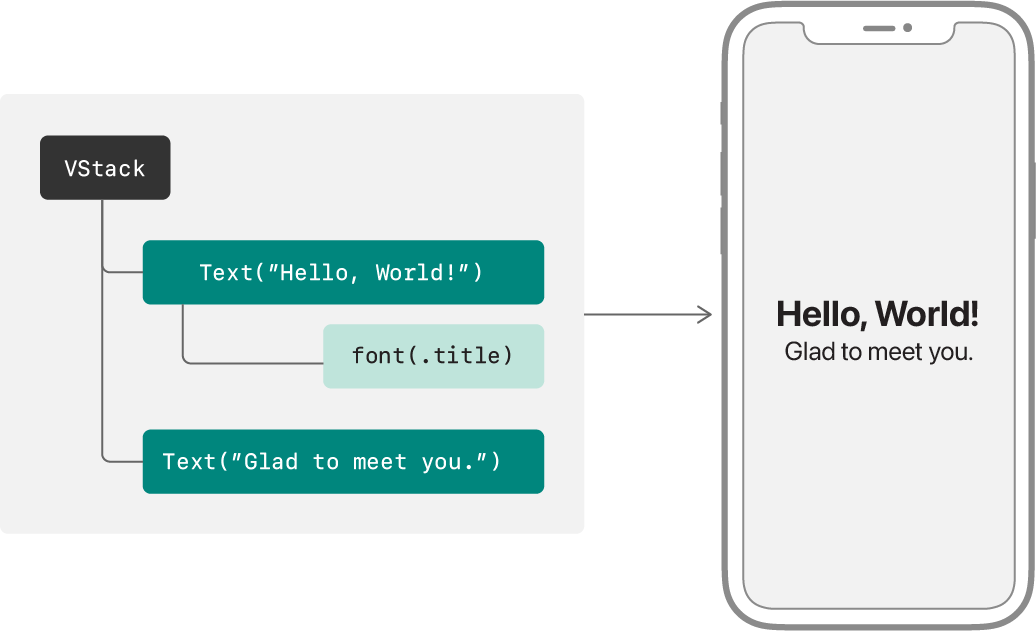
In addition to views for specific kinds of content, controls, and indicators, like Text, Toggle, and Progress, SwiftUI also provides built-in views that you can use to arrange other views. For example, you can vertically stack two Text views using a VStack:
struct MyView: View {
    var body: some View {
        VStack {
            Text("Hello, World!")
            Text("Glad to meet you.")
        }
    }
}
Views that take multiple input child views, like the stack in the example above, typically do so using a closure marked with the View attribute. This enables a multiple-statement closure that doesn’t require additional syntax at the call site. You only need to list the input views in succession.
For examples of views that contain other views, see Layout Containers and Collection Containers.
To configure the views in your view’s body, you apply view modifiers. A modifier is nothing more than a method called on a particular view. The method returns a new, altered view that effectively takes the place of the original in the view hierarchy.
SwiftUI extends the View protocol with a large set of methods for this purpose. All View protocol conformers — both built-in and custom views — have access to these methods that alter the behavior of a view in some way. For example, you can change the font of a text view by applying the font(_:) modifier:
struct MyView: View {
    var body: some View {
        VStack {
            Text("Hello, World!")
                .font(.title)
            Text("Glad to meet you.")
        }
    }
}
For more information about how view modifiers work, and how to use them on your views, see Configuring Views.
To supply inputs to your views, add properties. For example, you can make the font of the “Hello, World!” string configurable:
struct MyView: View {
    let helloFont: Font

    var body: some View {
        VStack {
            Text("Hello, World!")
                .font(helloFont)
            Text("Glad to meet you.")
        }
    }
}
If an input value changes, SwiftUI notices the change and redraws only the affected parts of your interface. This might involve reinitializing your entire view, but SwiftUI manages that for you.
Because the system may reinitialize a view at any time, it’s important to avoid doing any significant work in your view’s initialization code. It’s often best to omit an explicit initializer, as in the example above, allowing Swift to synthesize a member-wise initializer instead.
SwiftUI provides many tools to help you manage your app’s data under these constraints, as described in State and Data Flow. For information about Swift initializers, see Initialization in The Swift Programming Language.
After you define a view, you can incorporate it in other views, just like you do with built-in views. You add your view by declaring it at the point in the hierarchy at which you want it to appear. For example, you could put My in your app’s Content, which Xcode creates automatically as the root view of a new app:
struct ContentView: View {
    var body: some View {
        MyView(helloFont: .title)
    }
}
Alternatively, you could add your view as the root view of a new scene in your app, like the Settings scene that declares content for a macOS preferences window, or a WKNotification scene that declares the content for a watchOS notification. For more information about defining your app structure with SwiftUI, see App Structure and Behavior.
protocol Viewstruct ViewBuilder