

Swift and Objective-C in the Same Project
同じプロジェクト中のスウィフトとObjective-C
Swift’s compatibility with Objective-C lets you create a project that contains files written in either language. You can use this feature, called mix and match, to write apps that have a mixed-language codebase. Using mix and match, you can implement part of your app’s functionality using the latest Swift features and seamlessly incorporate it back into your existing Objective-C codebase.
Objective-Cとのスウィフトの互換性は、あなたにどちらの言語ででも記述されるファイルを含むプロジェクトをつくらせます。あなたはこの特徴、混合と適合と呼ばれるものを働かせて、混合言語のコードベースを持つアプリを記述することができます。混合と適合を使って、あなたは最新のスウィフト特徴を使ってあなたのアプリの機能性の一部を実施して、継ぎ目なくそれをあなたの既存のObjective-Cコードベースにさかのぼって組み込むことができます。
Mix and Match Overview
混合と適合の概要
Objective-C and Swift files can coexist in a single project, whether the project was originally an Objective-C or Swift project. You can simply add a file of the other language directly to an existing project. This natural workflow makes creating mixed-language app and framework targets as straightforward as creating an app or framework target written in a single language.
プロジェクトが元々はObjective-Cかスウィフトのプロジェクトであったかどうかに関係なく、Objective-Cとスウィフトのファイルは一つのプロジェクトにおいて共存することができます。あなたは、単に既存のプロジェクトに直接他の言語のファイルを加えることができます。この自然なワークフローは、一つの言語で書かれるアプリまたはフレームワーク・ターゲットをつくるのと同じくらい直接的に、混合言語のアプリとフレームワーク・ターゲットを作成することをもたらします。
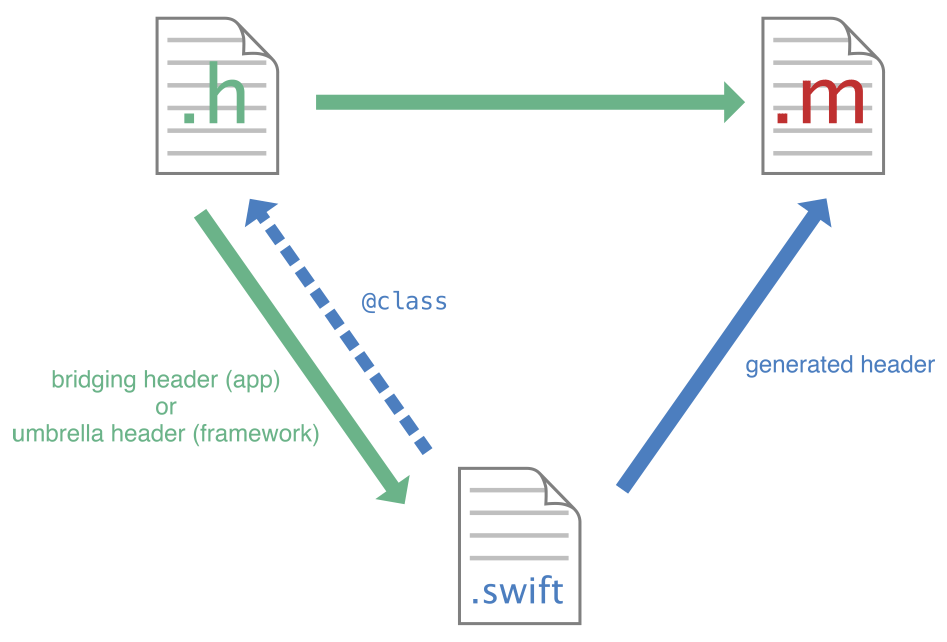
The process for working with mixed-language targets differs slightly depending on whether you’re writing an app or a framework. The general import model for working with both languages within the same target is depicted below and described in more detail in the following sections.
混合言語のターゲットを扱う過程は、あなたがアプリを書いているかフレームワークを書いているかに従い、わずかに異なります。同じターゲット内で両方の言語を扱う一般的なインポートモデルは下で表され、更に詳細に以下の節において記述されます。
Importing Code from Within the Same App Target
コードを同じアプリターゲットからインポートする
If you’re writing a mixed-language app, you may need to access your Objective-C code from Swift and your Swift code from Objective-C. The process described in this section applies to non-framework targets.
あなたが混合言語のアプリを書いているならば、あなたは、あなたのObjective-Cコードにスウィフトから、そしてあなたのスウィフトコードにObjective-Cからアクセスする必要があるかもしれません。この節で記述されるプロセスは、非フレームワークターゲットにあてはまります。
Importing Objective-C into Swift
Objective-Cをスウィフトにインポートする
To import a set of Objective-C files in the same app target as your Swift code, you rely on an Objective-C bridging header to expose those files to Swift. Xcode offers to create this header file when you add a Swift file to an existing Objective-C app, or an Objective-C file to an existing Swift app.
あなたのスウィフトコードと同じアプリターゲットにひとそろいのObjective-Cファイルをインポートするために、あなたはObjective-C橋渡しヘッダを当てにしてそれらのファイルをスウィフトに露出します。Xcodeは、あなたがスウィフトファイルを既存のObjective-Cアプリに、またはObjective-Cファイルを既存のスウィフトアプリに加えるとき、このヘッダ・ファイルを作成することを提案します。
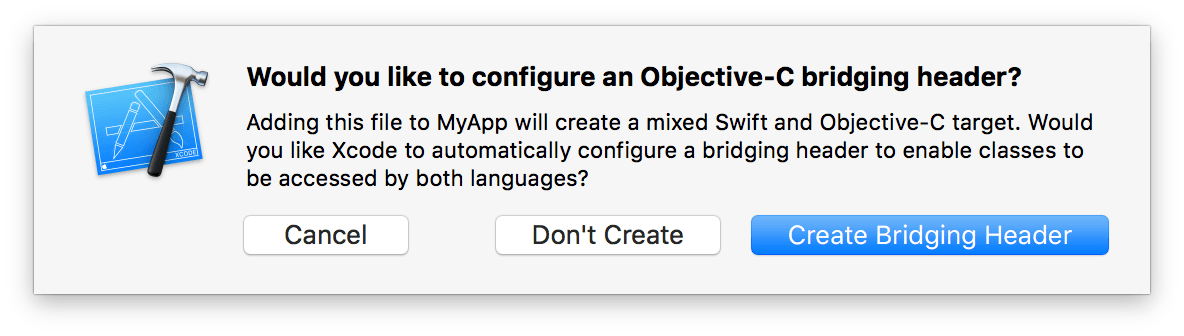
If you accept, Xcode creates the header file along with the file you were creating, and names it by your product module name followed by adding "-Bridging-Header.h". (You’ll learn more about the product module name later, in Naming Your Product Module.)
あなたが承諾するならば、Xcodeはヘッダ・ファイルをあなたがつくっていたファイルと一緒に作成して、あなたの製品モジュール名に続けて"-Bridging-Header.h"を加わることによってそれに名前をつけます。(あなたは後で製品モジュール名について「あなたの製品モジュールに名前をつける」でさらに学びます。)
Alternatively, you can create a bridging header yourself by choosing File > New > File > (iOS, watchOS, tvOS, or macOS) > Source > Header File.
代わりに、あなたは橋渡しヘッダをあなた自身でFile > New > File > (iOS、watchOS、tvOS、またはmacOS) > Source > Header Fileを選ぶことによって作成することもできます。
You’ll need to edit the bridging header file to expose your Objective-C code to your Swift code.
あなたは、あなたのObjective-Cコードをあなたのスウィフトコードに露出するためにこのファイルを編集する必要があります。
To import Objective-C code into Swift from the same target
同じターゲットからObjective-Cコードをスウィフトにインポートするには
In your Objective-C bridging header file, import every Objective-C header you want to expose to Swift. For example:
あなたのObjective-C橋渡しヘッダ・ファイルにおいて、あなたがスウィフトに露出したいあらゆるObjective-Cヘッダをインポートしてください。例えば:#import "XYZCustomCell.h"#import "XYZCustomView.h"#import "XYZCustomViewController.h"
In Build Settings, in Swift Compiler - Code Generation, make sure the Objective-C Bridging Header build setting has a path to the bridging header file.
Build Settingsにおいて、Swift Compiler - Code Generationにおいて、Objective-C Bridging Headerビルド設定がブリッジしているヘッダファイルへのパスを持つことを確実にしてください。The path should be relative to your project, similar to the way your Info.plist path is specified in Build Settings. In most cases, you should not need to modify this setting.
パスは、あなたのプロジェクトに相対的でなければなりません、あなたのInfo.plistパスが「Build Settings」において指定される方法に似ています。ほとんどの場合、あなたはこの説定を修正する必要がないはずです。
Any public Objective-C headers listed in this bridging header file will be visible to Swift. The Objective-C functionality will be available in any Swift file within that target automatically, without any import statements. Use your custom Objective-C code with the same Swift syntax you use with system classes.
この橋渡しヘッダ・ファイルにリストされるどんなパブリックObjective-Cヘッダでも、スウィフトに見えるようになります。Objective-C機能性は、まったくインポート文なしで、自動的にそのターゲット内のどんなスウィフトファイルにおいても利用できます。あなたのあつらえのObjective-Cコードを、あなたがシステム・クラスで使うのと同じスウィフト構文で使ってください。
let myCell = XYZCustomCell()myCell.subtitle = "A custom cell"
Importing Swift into Objective-C
スウィフトをObjective-Cにインポートする
When you import Swift code into Objective-C, you rely on an Xcode-generated header file to expose those files to Objective-C. This automatically generated file is an Objective-C header that declares the Swift interfaces in your target. It can be thought of as an umbrella header for your Swift code. The name of this header is your product module name followed by adding "-Swift.h". (You’ll learn more about the product module name later, in Naming Your Product Module.)
あなたがスウィフトコードをObjective-Cにインポートするとき、あなたはそれらのファイルをObjective-CにさらすためにXcode生成のヘッダファイルに頼ります。この自動的に生成されるファイルは、あなたのターゲットの中のスウィフトインタフェースを宣言するObjective-Cヘッダです。それは、あなたのスウィフトコードのためのアンブレラヘッダとみなされることができます。このヘッダの名前は、あなたの製品モジュール名に続けて"-Swift.h"を加えたものです。(あなたは後で製品モジュール名について「あなたの製品モジュールに名前をつける」でさらに学びます。)
By default, the generated header contains interfaces for Swift declarations marked with the public or open modifier. It also contains those marked with the internal modifier if your app target has an Objective-C bridging header. Declarations marked with the private or fileprivate modifier do not appear in the generated header. Private declarations are not exposed to Objective-C unless they are explicitly marked with @IBAction, @IBOutlet, or @objc. If your app target is compiled with testing enabled, a unit test target can access any declaration with the internal modifier as if they were declared with the public modifier by prepending @testable to the product module import statement.
特に何もしなければ、生成されたヘッダはスウィフト宣言をpublicまたはopen修飾子で印して含みます。それはまた、あなたのアプリターゲットがObjective-C橋渡しヘッダを持つならば、それらをinternal修飾子で印して含みます。privateまたはfileprivate修飾子で印される宣言は、生成されたヘッダの中に現れることはありません。プライベートな宣言はObjective-Cにさらされません、それらが明示的に@IBAction、@IBOutlet、または@objcで印されない限りは。あなたのアプリターゲットがテスト可能にされてコンパイルされるならば、ユニットテストターゲットはinternal修飾子を持つあらゆる宣言にアクセスできます、まるでそれらが、@testableを製品モジュールインポート文の先頭に付けることで、public修飾子とともに宣言をされたかのようにです。
For more information on access-level modifiers, see Access Control in The Swift Programming Language (Swift 4.1).
アクセス水準修飾子に関する更なる情報のために、アクセス制御をスウィフトプログラミング言語(Swift 4.1)で見てください。
You don’t need to do anything special to create the generated header file—just import it to use its contents in your Objective-C code. Note that the Swift interfaces in the generated header include references to all of the Objective-C types used in them. If you use your own Objective-C types in your Swift code, make sure to import the Objective-C headers for those types before importing the Swift generated header into the Objective-C .m file you want to access the Swift code from.
あなたは、生成ヘッダ・ファイルを作成するために特に何もする必要がありません ― あなたは、単にあなたのObjective-Cコードにおいてその内容を使うためにそれをインポートしてください。生成されたヘッダの中のスウィフトインタフェースたちが、それらの中で使われるObjective-C型への全ての参照を含む点に注意してください。あなたがあなた独自のObjective-C型をあなたのスウィフトコードにおいて使うならば、必ずそれらの型のためのObjective-Cヘッダをインポートするようにするようにしてください、スウィフトの生成ヘッダをあなたがそれからスウィフトコードにアクセスすることを望むObjective-Cの.mファイルにインポートする前にです。
To import Swift code into Objective-C from the same target
同じターゲットからObjective-Cにスウィフトコードをインポートするには
Import the Swift code from that target into any Objective-C
.mfile within that target using this syntax and substituting the appropriate name:
そのターゲットからスウィフトコードを何らかのObjective-Cの.mファイルへ、この構文を使って、適切な名前で置き換えて、インポートしてください:#import "ProductModuleName-Swift.h"
The Swift files in your target will be visible in Objective-C .m files containing this import statement. For information on using Swift from Objective-C code, see Using Swift from Objective-C.
あなたのターゲットの中のスウィフトファイルは、このインポート文を含んでいるObjective-C .mファイルにおいて見えるようになります。Objective-Cコードからスウィフトを使うことに関する情報のために、スウィフトをObjective-Cから使うを見てください。
Import into Swift
|
Import into Objective-C
|
|
|---|---|---|
Swift code
|
No import statement
|
|
Objective-C code
|
No import statement; Objective-C bridging header required
|
|
Importing Code from Within the Same Framework Target
コードを同じフレームワークターゲット内からインポートする
If you’re writing a mixed-language framework, you may need to access your Objective-C code from Swift and your Swift code from Objective-C.
あなたが混合言語のフレームワークを書いているならば、あなたはObjective-Cコードにあなたのスウィフトから、そしてあなたのスウィフトコードにObjective-Cからアクセスする必要があるかもしれません。
Importing Objective-C into Swift
Objective-Cをスウィフトにインポートする
To import a set of Objective-C files in the same framework target as your Swift code, you’ll need to import those files into the Objective-C umbrella header for the framework.
ひとそろいのObjective-Cファイルをあなたのスウィフトコードと同じフレームワークターゲットにインポートするために、あなたはそれらのファイルをそのフレームワークのためのObjective-Cアンブレラヘッダにインポートする必要があります。
To import Objective-C code into Swift from the same framework
同じフレームワークからスウィフトにObjective-Cコードをインポートするには
Under Build Settings, in Packaging, make sure the Defines Module setting for that framework target is set to “Yes”.
「Build Settings」において、「Packaging」の中で、そのフレームワークターゲットのための「Defines Module」設定が「Yes」に設定されることを確認します。In your umbrella header file, import every Objective-C header you want to expose to Swift. For example:
あなたのアンブレラヘッダ・ファイルにおいて、あなたがスウィフトに露出したいあらゆるObjective-Cヘッダをインポートしてください。例えば:#import <XYZ/XYZCustomCell.h>#import <XYZ/XYZCustomView.h>#import <XYZ/XYZCustomViewController.h>
Swift will see every header you expose publicly in your umbrella header. The contents of the Objective-C files in that framework will be available in any Swift file within that framework target automatically, without any import statements. Use your custom Objective-C code with the same Swift syntax you use with system classes.
スウィフトは、あなたがあなたのアンブレラヘッダにおいて公的に露出するあらゆるヘッダを見るようになります。そのフレームワークの中のObjective-Cファイルの中身は、まったくインポート文なしで、そのフレームワークターゲット内のあらゆるスウィフトファイルにおいて自動的に利用可能になります。あなたのあつらえのObjective-Cコードを、あなたがシステム・クラスで使うのと同じスウィフト構文で使ってください。
let myOtherCell = XYZCustomCell()myOtherCell.subtitle = "Another custom cell"
Importing Swift into Objective-C
スウィフトをObjective-Cにインポートする
To import a set of Swift files in the same framework target as your Objective-C code, you don’t need to import anything into the umbrella header for the framework. Instead, import the Xcode-generated header file for your Swift code into any Objective-C .m file you want to use your Swift code from.
ひとそろいのスウィフトファイルをあなたのObjective-Cコードと同じフレームワークターゲットにインポートするために、あなたはそのフレームワークのためのアンブレラヘッダに何もインポートする必要がありません。その代わりに、あなたのスウィフトコードのためのXcode生成のヘッダ・ファイルを、あなたがそのコードを使いたい何らかのObjective-C .mファイルにインポートしてください。
Because the generated header for a framework target is part of the framework’s public interface, only declarations marked with the public or open modifier appear in the generated header for a framework target.
あるフレームワークターゲットのために生成されたヘッダはそのフレームワークのパブリックなインターフェイスの一部なので、publicまたはopen修飾子で印された宣言だけがフレームワークターゲットのために生成されたヘッダの中に現れます。
Swift methods and properties that are marked with the internal modifier and declared within a class that inherits from an Objective-C class are accessible to the Objective-C runtime. However, they are not accessible at compile time and do not appear in the generated header for a framework target.
Objective-Cクラスから継承するクラスの内部で宣言されてinternal修飾子で印されるスウィフトのメソッドとプロパティは、Objective-Cランタイムへとアクセス可能です。しかしながら、それらはコンパイル時にアクセス可能ではありません、そしてフレームワークターゲットのための生成ヘッダの中に現れません。
For more information on access-level modifiers, see Access Control in The Swift Programming Language (Swift 4.1).
アクセス水準修飾子に関する更なる情報のために、アクセス制御をスウィフトプログラミング言語(Swift 4.1)で見てください。
To import Swift code into Objective-C from the same framework
スウィフトコードを同じフレームワークからObjective-Cにインポートするには
Under Build Settings, in Packaging, make sure the Defines Module setting for that framework target is set to “Yes”.
「Build Settings」において、「Packaging」の中で、そのフレームワークターゲットのための「Defines Module」設定が「Yes」に設定されることを確認します。Import the Swift code from that framework target into any Objective-C
.mfile within that framework target using this syntax and substituting the appropriate names:
スウィフトコードをそのフレームワークターゲットから、そのフレームワークターゲット内の何らかのObjective-C.mファイルにこの構文を使って、適切な名前で置き換えて、インポートしてください:#import <ProductName/ProductModuleName-Swift.h>
The Swift files in your framework target will be visible in Objective-C .m files containing this import statement. For information on using Swift from Objective-C code, see Using Swift from Objective-C.
あなたのフレームワークターゲットの中のスウィフトファイルは、このインポート文を含んでいるObjective-C .mファイルにおいて見えるようになります。Objective-Cコードからスウィフトを使うことに関する情報のために、スウィフトをObjective-Cから使うを見てください。
Import into Swift
|
Import into Objective-C
|
|
|---|---|---|
Swift code
|
No import statement
|
|
Objective-C code
|
No import statement; Objective-C umbrella header required
|
|
Importing External Frameworks
外部のフレームワークをインポートする
You can import external frameworks that have a pure Objective-C codebase, a pure Swift codebase, or a mixed-language codebase. The process for importing an external framework is the same whether the framework is written in a single language or contains files from both languages. When you import an external framework, make sure the Defines Module build setting for the framework you’re importing is set to “Yes”.
あなたは、純粋なObjective-Cコードベース、純粋なスウィフトコードベース、または混合言語のコードベースを持つ外部のフレームワークをインポートすることができます。外部フレームワークをインポートするプロセスは、そのフレームワークが1つだけの言語で書かれるか、両方の言語からのファイルを含むかに関係なく、同じものです。あなたが外部のフレームワークをインポートするとき、あなたがインポートしているフレームワークのための「Defines Module」ビルド設定が「Yes」に設定されることを確認してください。
You can import a framework into any Swift file within a different target using the following syntax:
あなたはフレームワークをある異なるターゲット内のどんなスウィフトファイルにでも、以下の構文を使ってインポートすることができます:
import FrameworkName
You can import a framework into any Objective-C .m file within a different target using the following syntax:
あなたは、フレームワークを異なるターゲット内のどんなObjective-C .mファイルにでも以下の構文を使ってインポートすることができます:
@import FrameworkName;
Import into Swift
|
Import into Objective-C
|
|
|---|---|---|
Any language framework
|
|
|
Using Swift from Objective-C
スウィフトをObjective-Cから使う
Once you import your Swift code into Objective-C, use regular Objective-C syntax for working with Swift classes.
一旦あなたがObjective-Cにあなたのスウィフトコードをインポートするならば、一般的なObjective-C構文をスウィフトクラスを扱うために使ってください。
MySwiftClass *swiftObject = [[MySwiftClass alloc] init];[swiftObject swiftMethod];
A Swift class must be a descendant of an Objective-C class to be accessible and usable in Objective-C. For more information about what you can access from Objective-C and how the Swift interface is imported, see Swift Type Compatibility.
スウィフトクラスは、Objective-Cにおいてアクセス可能および利用可能であるためにはObjective-Cクラスの子孫でなければなりません。あなたがObjective-Cからアクセスできることとスウィフトインタへフェイスがインポートされる方法についての更なる情報として、スウィフト型互換性を見てください。
Referencing a Swift Class or Protocol in an Objective-C Header
スウィフトのクラスやプロトコルをObjective-Cヘッダにおいて参照する
When your code refers to a Swift class or protocol that comes from a different module, you import the Swift module into your Objective-C header using @import. However, to avoid cyclical references, don’t import Swift code from within the same module into an Objective-C header (.h) file. Instead, you can forward declare a Swift class or protocol to reference it in an Objective-C interface.
あなたのコードが異なるモジュールから来るスウィフトクラスやプロトコルを参照する場合、あなたはスウィフトモジュールをあなたのObjective-Cヘッダへと@importを使ってインポートします。しかしながら、循環参照を防ぐために、スウィフトコードを同じモジュール内部からObjective-Cヘッダ(.h)ファイルへとインポートしないでください。その代わりに、あなたはスウィフトのクラスやプロトコルを先に宣言して、Objective-Cインターフェイスにおいてそれを参照することができます。
// MyObjcClass.h@class MySwiftClass;@protocol MySwiftProtocol;@interface MyObjcClass : NSObject- (MySwiftClass *)returnSwiftClassInstance;- (id <MySwiftProtocol>)returnInstanceAdoptingSwiftProtocol;// ...@end
Forward declarations of Swift classes and protocols can only be used as types for method and property declarations.
スウィフトのクラスとプロトコルの前方宣言は、ただメソッドおよびプロパティ宣言の型として使われることができるだけです。
Declaring a Swift Protocol That Can Be Adopted by an Objective-C Class
Objective-Cクラスによって採用されることができるスウィフトプロトコルを宣言する
To create a Swift protocol that can be adopted by an Objective-C class, mark the protocol declaration with the @objc attribute.
Objective-Cクラスによって採用されることができるスウィフトプロトコルを宣言するには、protocol宣言を@objc属性で印してください。
@objc public protocol MySwiftProtocol {func requiredMethod()@objc optional func optionalMethod()}
A protocol declares all initializers, properties, subscripts, and methods that an Objective-C class must implement in order to conform to the protocol. Any optional protocol requirements must be marked with the @objc attribute and have the optional modifier.
プロトコルは、Objective-Cクラスがそのプロトコルに準拠するために実装しなければならない全てのイニシャライザ、プロパティ、添え字、そしてメソッドを宣言します。なんであれオプショナルのプロトコル要件は、@objc属性で印されてoptional修飾子を持たなければなりません。
If you need to declare a weak property in Objective-C that satisfies a Swift protocol requirement, mark the Swift property requirement with the weak modifier. Note that applying the weak modifier has no effect for Swift types that adopt the protocol.
あなたがスウィフトプロトコル要件を満たす弱いプロパティをObjective-Cにおいて宣言する必要があるならば、スウィフトプロパティ要件をweak修飾子で印してください。weak修飾子の適用は、そのプロトコルを採用するスウィフト型には効果を持たないことに注意してください。
Adopting a Swift Protocol in an Objective-C Implementation
スウィフトプロトコルをObjective-C実装において採用する
An Objective-C class can adopt a Swift protocol in its implementation (.m) file by importing the Xcode-generated header for Swift code and using a class extension.
Objective-Cクラスは、その実装(.m)ファイルにおいてスウィフトプロトコルを採用することが、スウィフトコードのためのXcode生成ヘッダをインポートすることとクラス拡張を使うことでできます。
// MyObjcClass.m#import "ProductModuleName-Swift.h"@interface MyObjcClass () <MySwiftProtocol>// ...@end@implementation MyObjcClass// ...@end
Declaring a Swift Error Type That Can Be Used from Objective-C
Objective-Cから利用されることができるスウィフトエラー型を宣言する
Swift enumerations conforming to the Error protocol and declared with the @objc attribute produce an NS_ENUM declaration, as well as an NSString constant for the corresponding error domain in the generated header. For example, given the following Swift enumeration declaration:
Errorプロトコルに準拠していて@objc属性で印されるスウィフト列挙は、生成ヘッダにおいてNS_ENUM宣言、それだけでなく対応するエラードメインに対するNSString定数を生み出します。例えば、以下のスウィフト列挙宣言を与えられたとして:
@objc public enum CustomError: Int, Error {case a, b, c}
Here’s the corresponding Objective-C declaration in the generated header:
ここに生成ヘッダにおける対応するObjective-C宣言があります:
// Project-Swift.htypedef SWIFT_ENUM(NSInteger, CustomError) {CustomErrorA = 0,CustomErrorB = 1,CustomErrorC = 2,};static NSString * const CustomErrorDomain = @"Project.CustomError";
Overriding Swift Names for Objective-C Interfaces
Objective-Cインターフェイスのためのスウィフト名のオーバーライド
The Swift compiler automatically imports Objective-C code as conventional Swift code. It imports Objective-C class factory methods as Swift initializers, and Objective-C enumeration cases truncated names.
スウィフトコンパイラは、自動的にObjective-Cコードを普通の意味でのスウィフトコードとしてインポートします。それはObjective-Cファクトリメソッドをスウィフトイニシャライザとして、そして名前の先端を切ったObjective-C列挙をインポートします。
There may be edge cases in your code that are not automatically handled. If you need to change the name imported by Swift of an Objective-C method, enumeration case, or option set value, you can use the NS_SWIFT_NAME macro to customize how a declaration is imported.
自動的に処理されることが際どい場合があなたのコードであるかもしれません。あなたがObjective-Cメソッド、列挙ケース節、またはオプションセット値のスウィフトによってインポートされた名前を変更する必要があるならば、あなたはNS_SWIFT_NAMEマクロを使ってどのようにある宣言がインポートされるかをカスタマイズすることができます。
Class Factory Methods
クラスファクトリメソッド
If the Swift compiler fails to identify a class factory method, you can use the NS_SWIFT_NAME macro, passing the Swift signature of the initializer to have it imported correctly. For example:
スウィフトコンパイラがクラスファクトリメソッドを識別するのを失敗したならば、あなたはNS_SWIFT_NAMEマクロを使うことができ、イニシャライザのスウィフトシグネチャを渡すことでそれは正しくインポートします。例えば:
+ (instancetype)recordWithRPM:(NSUInteger)RPM NS_SWIFT_NAME(init(rpm:));
If the Swift compiler mistakenly identifies a method as a class factory method, you can use the NS_SWIFT_NAME macro, passing the Swift signature of the method to have it imported correctly. For example:
スウィフトコンパイラが間違ってあるメソッドをクラスファクトリメソッドと識別するならば、あなたはNS_SWIFT_NAMEマクロを使うことができ、そのメソッドのスウィフトシグネチャを渡すことでそれは正しくインポートします。例えば:
+ (id)recordWithQuality:(double)quality NS_SWIFT_NAME(record(quality:));
Enumerations
列挙
By default, Swift imports enumerations by truncating enumeration value name prefixes. To customize the name of an enumeration case, you can use the NS_SWIFT_NAME macro, passing the Swift enumeration case name. For example:
特に何もしなくとも、スウィフトは列挙値名接頭辞を切り取ることによってを列挙インポートします。列挙ケース節の名前をカスタマイズするために、あなたはスウィフト列挙ケース節名を渡して、NS_SWIFT_NAMEマクロを使うことができます。例えば:
typedef NS_ENUM(NSInteger, ABCRecordSide) {ABCRecordSideA,ABCRecordSideB NS_SWIFT_NAME(flipSide),};
Refining Objective-C Declarations
Objective-C宣言を改良する
You can use the NS_REFINED_FOR_SWIFT macro on an Objective-C method declaration to provide a refined Swift interface in an extension, while keeping the original implementation available to be called from the refined interface. For instance, an Objective-C method that takes one or more pointer arguments could be refined in Swift to return a tuple of values.
あなたは、NS_REFINED_FOR_SWIFTマクロをObjective-Cメソッド宣言上で使って、ある拡張において改良スウィフトインターフェイスを提供して、オリジナル実装を利用可能に保ったまま、その改良インターフェイスから呼び出されるようにできます。例えば、1つ以上のポインタ引数を取るObjective-Cメソッドが改良されてスウィフトにおいてタプル値を返すようにできます。
Initializer methods are imported by Swift with double underscores (
__) prepended to their first argument labels.
イニシャライザメソッドは、二重アンダースコア(__)をそれの最初の引数ラベルの前に付けられてスウィフトによってインポートされます。Object subscripting methods are imported by Swift as methods with double underscores (
__) prepended to their base names, rather than as a Swift subscript, if either the getter or setter method is marked asNS_REFINED_FOR_SWIFT.
オブジェクト添え字メソッドは、二重アンダースコア(__)をそれのベース名の前に付けられてスウィフトによってメソッドとしてインポートされます、スウィフト添え字としてではなく、もしゲッターとセッターメソッドの両方がNS_REFINED_FOR_SWIFTと印付けされるならば。Other methods are imported with double underscores (
__) prepended to their base names.
他のメソッドは、二重アンダースコア(__)をそれのベース名の前に付けられてインポートされます。
Given the following Objective-C declarations:
以下のObjective-C宣言を与えられたとして:
@interface Color : NSObject- (void)getRed:(nullable CGFloat *)redgreen:(nullable CGFloat *)greenblue:(nullable CGFloat *)bluealpha:(nullable CGFloat *)alpha NS_REFINED_FOR_SWIFT;@end
You can provide a refined Swift interface in an extension like this:
あなたは、改良スウィフトインターフェイスをある拡張においてこのように提供することができます:
extension Color {var RGBA: (red: CGFloat, green: CGFloat, blue: CGFloat, alpha: CGFloat) {var r: CGFloat = 0.0var g: CGFloat = 0.0var b: CGFloat = 0.0var a: CGFloat = 0.0__getRed(red: &r, green: &g, blue: &b, alpha: &a)return (red: r, green: g, blue: b, alpha: a)}}
Making Objective-C Interfaces Unavailable in Swift
Objective-Cインターフェイスをスウィフトで利用できなくする
Some Objective-C interfaces may not be suitable or necessary to be exposed as Swift interfaces. To prevent an Objective-C declaration from being imported by Swift, use the NS_SWIFT_UNAVAILABLE macro, passing a message directing API consumers to any alternatives that may exist.
いくつかのObjective-Cインターフェイスは、スウィフトインターフェイスとして露出されるのにふさわしくないもしくは必要でない可能性があります。あるObjective-C宣言がスウィフトによってインポートされるのを防止するために、NS_SWIFT_UNAVAILABLEマクロを使って、API消費者に存在するであろう何らかの代替手段を指示するメッセージを渡してください。
For example, an Objective-C class providing a convenience initializer that takes variadic arguments for keys-value pairs may advise a Swift consumer to use a dictionary literal instead:
例えば、あるObjective-Cクラスは便利なイニシャライザを提供していて、それは可変長引数をキー-値ペアに対して取るもので、スウィフト消費者に勧めるのは代わりに1つの辞書を使うことです:
+ (instancetype)collectionWithValues:(NSArray *)values forKeys:(NSArray<NSCopying> *)keys NS_SWIFT_UNAVAILABLE("Use a dictionary literal instead");
Attempting to call the +collectionWithValues:forKeys: method from Swift code will result in a compiler error.
+collectionWithValues:forKeys:メソッドをスウィフトコードから呼び出す試みは、コンパイラエラーの結果になるでしょう。
To make an Objective-C declaration unavailable at compile time in both Swift and Objective-C, use the NS_UNAVAILABLE macro. The macro behaves just like the NS_SWIFT_UNAVAILABLE macro except that it omits the customizable error message and it restricts compile-time access to the declaration in Objective-C code.
Objective-C宣言をコンパイル時にSwiftとObjective-Cの両方で利用できなくするには、NS_UNAVAILABLEマクロを使ってください。このマクロはちょうどNS_SWIFT_UNAVAILABLEマクロのように振舞います、しかしそれがカスタマイズ可能なエラーメッセージを省略することと、それがコンパイル時アクセスをObjective-Cコードの中の宣言に制限することを除きます。
Adding Availability Information to Objective-C APIs
利用可能性情報をObjective-C APIに加える
In Swift, you use the @available attribute to control whether a declaration is available to use when building an app for a particular target platform. Similarly, you use the availability condition #available to execute code conditionally based on required platform and version conditions.
スウィフトでは、あなたは@available属性を使うことで、ある宣言が利用可能であるかどうかを制御して、特定の対象プラットホームのためにアプリをビルドするときに使うようにします。同様に、あなたは利用可能性条件#availableを使うことで、必要なプラットホームおよびバージョン条件に基づいて、条件付きでコードを実行します。
Both kinds of availability specifier are available in Objective-C using the corresponding syntax shown in the following examples.
両方の種類の利用可能性指定子は、以下の例で示される対応する構文を使ってObjective-Cで利用可能です。
This example shows availability information used on a declaration in Swift:
この例は、スウィフトでのある宣言で使われる利用可能性情報を示します:
@available(iOS 11, macOS 10.13, *)func newMethod() {// Use iOS 11 APIs.}
And here’s how you add the same availability information in Objective-C:
そしてここにあなたが同じ利用可能性情報をObjective-Cにおいて加える方法があります:
@interface MyViewController : UIViewController- (void) newMethod API_AVAILABLE(ios(11), macosx(10.13));@end
The example below shows availability information used in a conditional statement in Swift:
下の例は、スウィフトでの条件文で使われる利用可能性情報を示します:
if #available(iOS 11, *) {// Use iOS 11 APIs.} else {// Alternative code for earlier versions of iOS.}
And here’s how you use the same availability information in Objective-C:
そしてここにはあなたが同じ利用可能性情報をObjective-Cで使う方法があります:
if (@available(iOS 11, *)) {// Use iOS 11 APIs.} else {// Alternative code for earlier versions of iOS.}
For more information about specifiying platform availability, see Declaration Attributes in The Swift Programming Language (Swift 4.1).
プラットホーム利用可能性を指定することについての更なる情報として、宣言属性をスウィフトプログラミング言語 (Swift 4.1)で見てください。
Naming Your Product Module
あなたの製品モジュールに名前をつける
The name of the Xcode-generated header for Swift code, and the name of the Objective-C bridging header that Xcode creates for you, are generated from your product module name. By default, your product module name is the same as your product name. However, if your product name has any nonalphanumeric characters, such as a period (.), they are replaced with an underscore (_) in your product module name. If the name begins with a number, the first number is replaced with an underscore.
スウィフトコードのためのXcode生成のヘッダの名前、そしてXcodeがあなたの代わりにつくるObjective-C橋渡しヘッダのの名前は、あなたの製品モジュール名から生成されます。特に何もしなければ、あなたの製品モジュール名は、あなたの製品名と同じものです。しかし、あなたの製品名がアルファベットでない文字、例えばピリオド(.)を持つならば、それらはあなたの製品モジュール名においてアンダーライン(_)と取り替えられます。名前が数で始まるならば、最初の数はアンダーラインと取り替えられます。
You can also provide a custom name for the product module name and Xcode will use this when naming the bridging and generated headers. To do this, change the Product Module Name build setting.
あなたはまた、あつらえの名前を製品モジュール名のために用意することができます、そしてXcodeはこれを橋渡しおよび生成ヘッダに名前をつけるとき使います。これをするために、「Product Module Name」ビルド設定を変更してください。
Troubleshooting Tips and Reminders
問題解決の秘訣と注意
Treat your Swift and Objective-C files as the same collection of code, and watch out for naming collisions.
あなたのスウィフトとObjective-Cファイルを同じコードのコレクションとみなしてください、そして名前衝突に気をつけてください。If you’re working with frameworks, make sure the Defines Module (
DEFINES_MODULE) build setting under Packaging is set to “Yes”.
あなたがフレームワークを扱ってならば、「Packaging」の下の「Defines Module(DEFINES_MODULE)」ビルド設定が「Yes」に設定されることを確認してください。If you’re working with the Objective-C bridging header, make sure the Objective-C Bridging Header (
SWIFT_OBJC_BRIDGING_HEADER) build setting under Swift Compiler - Code Generation is set to a path to the bridging header file relative to your project (for example, “MyApp/MyApp-Bridging-Header.h”).
あなたがObjective-C橋渡しヘッダを扱っているならば、「Swift Compiler - Code Generation」下の「Objective-C Bridging Header(SWIFT_OBJC_BRIDGING_HEADER)」ビルド設定が、あなたのプロジェクトに関連する橋渡しヘッダファイルへのパスを持つことを確認してください(例えば、「MyApp/MyApp-Bridging-Header.h」)。Xcode uses your product module name (
PRODUCT_MODULE_NAME)—not your target name (TARGET_NAME)—when naming the Objective-C bridging header and the generated header for your Swift code. For information on product module naming, see Naming Your Product Module.
Xcodeは、あなたのスウィフトコードのためのObjective-C橋渡しヘッダと生成ヘッダに名前をつける時、あなたの製品モジュール名(PRODUCT_MODULE_NAME)を使います ― あなたのターゲット名(TARGET_NAME)でなく。製品モジュールに名前をつけることに関する情報のために、あなたの製品モジュールに名をつけるを見てください。To be accessible and usable in Objective-C, a Swift class must be a descendant of an Objective-C class or it must be marked
@objc.
Objective-Cでアクセス可能にされて利用可能にされるために、スウィフトクラスはObjective-Cクラスの子孫でなければなりません、あるいは、それは@objcで印されなければなりません。When you bring Swift code into Objective-C, remember that Objective-C won’t be able to translate certain features that are specific to Swift. For a list, see Using Swift from Objective-C.
あなたがObjective-Cにスウィフトコードを連れて来るとき、Objective-Cがスウィフトに特有である特定の特徴を翻訳することができないのを思い出してください。その一覧のために、スウィフトをObjective-Cから使うを見てください。If you use your own Objective-C types in your Swift code, make sure to import the Objective-C headers for those types before importing the Swift generated header into the Objective-C
.mfile you want to use your Swift code from.
あなたがあなたのスウィフトコードにおいてあなた独自のObjective-C型を使うならば、スウィフト生成のヘッダをあなたがそれからスウィフトコードにアクセスすることを望むObjective-C.mファイルにインポートする前に、必ずそれらの型のためのObjective-Cヘッダをインポートするようにするようにしてください。Swift declarations marked with the
privateorfileprivatemodifier do not appear in the generated header. Private declarations are not exposed to Objective-C unless they are explicitly marked with@IBAction,@IBOutlet, or@objc.
privateまたはfileprivate修飾子で印される宣言は、生成されたヘッダの中に現れません。プライベートな宣言はObjective-Cにさらされません、それらが明示的に@IBAction、@IBOutlet、または@objcで印されない限りは。For app targets, declarations marked with the
internalmodifier appear in the generated header if the app target has an Objective-C bridging header.
アプリターゲットでは、internal修飾子で印される宣言は、そのアプリターゲットがObjective-C橋渡しヘッダを持つならば、生成ヘッダの中に現れます。For framework targets, only declarations with the
publicoropenmodifier appear in the generated header. You can still use Swift methods and properties that are marked with theinternalmodifier from within the Objective-C part of your framework, as long they are declared within a class that inherits from an Objective-C class. For more information on access-level modifiers, see Access Control in The Swift Programming Language (Swift 4.1).
フレームワークターゲットでは、publicまたはopen修飾子を持つ宣言だけが生成ヘッダの中に現れます。あなたは依然としてinternal修飾子で印されるスウィフトのメソッドとプロパティをあなたのフレームワークのObjecctive-C部分の内部から使うことができます、それらがObjective-Cクラスから継承するクラスの内部で宣言される限りは。アクセス水準修飾子に関する更なる情報のために、アクセス制御をスウィフトプログラミング言語(Swift 4.1)で見てください。
Interacting with C APIs
C APIとの相互作用
Copyright © 2018 Apple Inc. All rights reserved. Terms of Use | Privacy Policy | Updated: 2018-03-29