

Writing Swift Classes and Protocols with Objective-C Behavior
スウィフトのクラスとプロトコルをObjective-C挙動で書く
Interoperability lets you write Swift code that incorporates Objective-C behavior. You can subclass Objective-C classes, declare and adopt Objective-C protocols, and take advantage of other Objective-C functionality when writing Swift code. This means that you can create classes and protocols based on familiar, established behavior in Objective-C and enhance them with Swift’s modern and powerful language features.
相互運用性は、あなたにObjective-C挙動を取り入れるスウィフトコードを書かせます。あなたは、スウィフトコードを記述する時に、Objective-Cクラスのサブクラス作成、Objective-Cプロトコルの宣言と採用、そして他のObjective-C機能性の利用が可能です。これは、あなたがObjective-Cでのお馴染みの、確立された挙動に基づいてクラスおよびプロトコルを作成して、それらをスウィフトの現代的で強力な言語機能で強化することができることを意味します。
Inheriting from Objective-C Classes
Objective-Cクラスから継承する
In Swift, you can define subclasses of Objective-C classes. To create a Swift class that inherits from an Objective-C class, add a colon (:) after the name of the Swift class, followed by the name of the Objective-C class.
スウィフトにおいて、あなたはObjective-Cクラスのサブクラスを定義することができます。Objective-Cクラスから継承するスウィフトクラスを作成するために、スウィフトクラスの名前の後にコロン(:)、それに続けてObjective-Cクラスの名前を加えてください。
import UIKitclass MySwiftViewController: UIViewController {// define the class (クラスを定義する)}
A Swift subclass gets all the functionality offered by the superclass in Objective-C.
スウィフトのサブクラスは、Objective-Cでのスーパークラスによって提供される全ての機能性を獲得します。
To provide your own implementations of the superclass’s methods, use the override modifier. The compiler automatically infers the name of the overridden Objective-C method that matches the Swift method name. You can use the @objc(name) attribute to explicitly specify the corresponding Objective-C symbol.
そのスーパークラスの持つメソッドのあなた独自の実装を提供するには、override修飾子を使ってください。コンパイラは、そのスウィフトメソッド名と適合するオーバーライドされたObjective-Cメソッドの名前を自動的に推論します。あなたは、@objc(name)属性を使うことで、対応するObjective-Cシンボルを明示的に指定することができます。
When a Swift class introduces many new methods or properties that require behavior from the Objective-C runtime, use the @objcMembers attribute in the declaration of that class. Applying the @objcMembers attribute to a class implicitly adds the @objc attribute to all of its Objective-C compatible members. Because applying the @objc attribute can increase the compiled size of an app and adversely affect performance, only apply the @objcMembers attribute on declarations when each member needs to have the @objc attribute applied.
あるスウィフトクラスがObjective-Cランタイムからの挙動を要求する多くの新しいメソッドまたはプロパティを導入するならば、@objcMembers属性をそのクラスの宣言において使ってください。@objcMembers属性をあるクラスに適用することは、それのObjective-C互換メンバの全てに暗黙的に@objc属性を加えます。@objc属性を適用することはアプリのコンパイル済みサイズを増大させて性能に不利な影響をもたらすことから、各メンバが@objc属性を適用される必要がある場合に、ただ@objcMembers属性を宣言上でだけ適用してください。
NSCoding
NSCodingプロトコル
The NSCoding protocol requires that conforming types implement the required initializer init(coder:) and the required method encode(with:). Classes that adopt NSCoding directly must implement this method. Subclasses of classes that adopt NSCoding that have one or more custom initializers or any properties without initial values must also implement this method.
NSCodingプロトコルは、準拠している型が必須イニシャライザinit(coder:)および必須メソッドencode(with:)を実装することを必要とします。直接にNSCodingを採用するクラスは、このメソッドを実装しなければなりません。NSCodingを採用するクラスのサブクラスで1つ以上のカスタムイニシャライザまたはなんらかの初期値なしのプロパティを持つものは、同様にこのメソッドを実装しなければなりません。
For objects that are loaded from Storyboards or archived to disk using the NSUserDefaults or NSKeyedArchiver classes, you must provide a full implementation of this initializer. However, you might not need to implement an initializer for types that are expected to or cannot be instantiated in this way.
ストーリーボードからロードされるかディスクにNSUserDefaultsやNSKeyedArchiverクラスを使ってアーカイブされるオブジェクトに対して、あなたはこのイニシャライザの完全な実装を提供しなければなりません。しかしながら、あなたはこの方法でインスタンス化されることが出来ないかそうするつもりでない型のためにイニシャライザを実装する必要はありません。
Adopting Protocols
プロトコルを採用する
Objective-C protocols are imported as Swift protocols, which can be adopted by a class in a comma-separated list following the name of a class’s superclass, if any.
Objective-Cプロトコルは、スウィフトプロトコルとしてインポートされます、そしてそれは、クラスによって採用されることが、もしあればクラスのもつスーパークラスの名前に続けて、コンマ区切りのリストに入れて、可能です。
class MySwiftViewController: UIViewController, UITableViewDelegate, UITableViewDataSource {// define the class (クラスを定義する)}
To declare a type that conforms to a single protocol in Swift code, use the protocol name directly as its type (as compared to id<SomeProtocol> in Objective-C). To declare a type that conforms to multiple protocols in Swift code, use a protocol composition, which takes the form SomeProtocol & AnotherProtocol (as compared to id<SomeProtocol, AnotherProtocol> in Objective-C).
ただ1つのプロトコルに準拠する型をスウィフトコードにおいて定義するには、そのプロトコル名を直接にそれの型として使ってください(Objective-Cでのid<SomeProtocol>になぞらえられる)。複数のプロトコルに準拠する型をスウィフトコードにおいて定義するには、プロトコル合成物を使ってください、それは形式SomeProtocol & AnotherProtocolをとります(Objective-Cでのid<SomeProtocol, AnotherProtocol>になぞらえられる)。
var textFieldDelegate: UITextFieldDelegatevar tableViewController: UITableViewDataSource & UITableViewDelegate
When a Swift initializer, property, subscript, or method is used to satisfy a requirement of an Objective-C protocol, the compiler automatically infers the name to match the requirement, similar to what is done for overridden methods. You can use the @objc(name) attribute to explicitly specify the corresponding Objective-C symbol.
スウィフトのイニシャライザ、プロパティ、添え字、またはメソッドがObjective-Cプロトコルのある要件を満たすために使われる場合、コンパイラは自動的にその要件と適合する名前を推論します、オーバーライドされたメソッドに対して行われることと同じように。あなたは、>@objc(name)属性を使うことで、対応するObjective-Cシンボルを明示的に指定することができます。
Writing Initializers and Deinitializers
イニシャライザとデイニシャライザを書く
The Swift compiler ensures that your initializers do not leave any properties in your class uninitialized to increase the safety and predictability of your code. Additionally, unlike Objective-C, in Swift there is no separate memory allocation method to invoke. You use native Swift initialization syntax even when you are working with Objective-C classes—Swift converts Objective-C initialization methods to Swift initializers. For more information about implementing your own initializers, see Initializers in The Swift Programming Language (Swift 4.1).
スウィフトコンパイラは、あなたのコードの安全性と予測可能性を高めるためにあなたのイニシャライザたちがアンイニシャライズされるあなたのクラスにおいて1つのプロパティもそのままにしておかないことを確実にします。その上に、Objective-Cと違って、スウィフトでは別々のメモリ割り当てメソッドが呼ばれることはありません。あなたがObjective-Cクラスを扱っているときでも、あなたは生粋のスウィフト初期化構文を使います ― スウィフトは、Objective-C初期化メソッドをスウィフトイニシャライザに変換します。あなた自身のイニシャライザを実装することについての更なる情報として、イニシャライザをスウィフトプログラミング言語(Swift 4.1)でみてください。
When you want to perform additional clean-up before your class is deallocated, you can implement a deninitializer instead of the dealloc method. Swift deinitializers are called automatically, just before instance deallocation happens. Swift automatically calls the superclass deinitializer after invoking your subclass’ deinitializer. When you are working with an Objective-C class or your Swift class inherits from an Objective-C class, Swift calls your class’s superclass dealloc method for you as well. For more information about implementing your own deinitializers, see Deinitializers in The Swift Programming Language (Swift 4.1).
あなたのクラスがメモリ割り当て解除される前に、あなたが追加の掃除をしたいときは、あなたはdeallocメソッドでなくてデイニシャライザを実行することができます。スウィフトデイニシャライザは、ちょうどインスタンスの割り当て解除が起こる前に、自動的に呼ばれます。スウィフトは、あなたのサブクラスのデイニシャライザを呼び出した後、自動的にスーパークラスのデイニシャライザを呼び出します。あなたがObjective-CクラスまたはObjective-Cクラスから継承するあなたのスウィフトクラスを扱ってとき、スウィフトはあなたのクラスのスーパークラスのdeallocメソッドもまたあなたの代わりに呼び出します。あなた自身のデイニシャライザを実装することについての更なる情報として、デイニシャライザをスウィフトプログラミング言語(Swift 4.1)でみてください。
Using Swift Class Names with Objective-C APIs
スウィフトクラス名をObjective-C APIで使う
Swift classes are namespaced based on the module they are compiled in, even when used from Objective-C code. Unlike Objective-C, where all classes are part of a global namespace–and must not have the same name–Swift classes can be disambiguated based on the module they reside in. For example, the fully qualified name of a Swift class named DataManager in a framework named MyFramework is MyFramework.DataManager. A Swift app target is a module itself, so the fully qualified name of a Swift class named Observer in an app called MyGreatApp is MyGreatApp.Observer.
スウィフトクラスは、それらがコンパイルされているモジュールに基づく名前空間に置かれます、Objective-Cコードから使用される時でさえもです。Objective-Cとは違い、全てのクラスがグローバルな名前空間の一部である ― それゆえ同じ名前を持ってはならない ― ところで、スウィフトクラスは、それらが属するモジュールに基づいて違いを明らかにされることができます。例えば、MyFrameworkと命名されるあるフレームワークのDataManagerと命名されるあるスウィフトクラスの完全修飾名は、MyFramework.DataManagerです。あるスウィフトアプリ・ターゲートは、あるモジュールそれ自体です、なのでMyGreatAppと呼ばれるあるアプリの中のObserverと命名されるあるスウィフトクラスの完全修飾名は、MyGreatApp.Observerです。
In order to preserve namespacing when a Swift class is used in Objective-C code, Swift classes are exposed to the Objective-C runtime with their fully qualified names. Therefore, when you work with APIs that operate on the string representation of a Swift class, you must include the fully qualified name of the class. For example, when you create a document–based Mac app, you provide the name of your NSDocument subclass in your app’s Info.plist file. In Swift, you must use the full name of your document subclass, including the module name derived from the name of your app or framework.
スウィフトクラスがObjective-Cコードの中で使用されるときに名前空間を保護する目的で、スウィフトクラスたちはそれらの完全修飾名を使ってObjective-Cランタイムに露出されます。それゆえに、あなたがあるスウィフトクラスの文字列表現で作動するAPIを扱うとき、あなたはそのクラスの完全修飾名を含めなければなりません。例えば、あなたがドキュメントベースのMacアプリを作成しているとき、あなたは、あなたのNSDocumentサブクラスの名前をあなたのアプリのInfo.plistファイルにおいて提供しなければなりません。スウィフトにおいて、あなたは、あなたのアプリまたはフレームワークの名前から引き出されるモジュール名を含めて、あなたのドキュメントサブクラスの完全な名前を使う必要があります。
In the example below, the NSClassFromString(_:) function is used to retrieve a reference to a class from its string representation. In order to retrieve a Swift class, the fully qualified name, including the name of the app, is used.
以下の例において、NSClassFromString(_:)関数は、あるクラスへの参照をそれの文字列表現から取り出すために使われます。あるスウィフトクラスを取り出すために、その完全修飾名が、そのアプリの名前を含めて、使用されます。
let myPersonClass: AnyClass? = NSClassFromString("MyGreatApp.Person")
Integrating with Interface Builder
インタフェースビルダーと統合する
The Swift compiler includes attributes that enable Interface Builder features for your Swift classes. As in Objective-C, you can use outlets, actions, and live rendering in Swift.
スウィフトコンパイラは、あなたのスウィフトクラスのためにインタフェースビルダー機能を可能にする属性を含みます。Objective-Cの場合のように、あなたはスウィフトにおいてアウトレット、アクション、そしてライブレンダリングを使うことができます。
Working with Outlets and Actions
アウトレットとアクションを扱う
Outlets and actions allow you to connect your source code to user interface objects in Interface Builder. To use outlets and actions in Swift, insert @IBOutlet or @IBAction just before the property or method declaration. You use the same @IBOutlet attribute to declare an outlet collection—just specify an array for the type.
アウトレットとアクションによって、あなたは、あなたのソース・コードをインタフェースビルダーのユーザー・インタフェースオブジェクトに接続することができます。スウィフトにおいてアウトレットとアクションを使うために、プロパティまたはメソッド宣言の直前に@IBOutletまたは@IBActionを書き込んでください。あなたは、同じ@IBOutlet属性をアウトレット・コレクションを宣言するために使います ― ちょうどある配列に型を指定するように。
When you declare an outlet in Swift, you should make the type of the outlet an implicitly unwrapped optional. This way, you can let the storyboard connect the outlets at runtime, after initialization. When your class is initialized from a storyboard or xib file, you can assume that the outlet has been connected.
あなたがスウィフトにおいてアウトレットを宣言するとき、あなたはそのアウトレットの型を暗黙的にアンラップされるオプショナルにしなければなりません。そうして、あなたは、初期化の後で、実行時にストーリーボードをアウトレットたちに接続させます。あなたのクラスがストーリーボードまたはxibファイルから初期化されるときは、あなたはアウトレットが接続されてしまっていることを確信できます。
For example, the following Swift code declares a class with an outlet, an outlet collection, and an action:
例えば、以下のスウィフトコードは、1つのアウトレット、1つのアウトレット接続、そして1つのアクションを持つクラスを宣言します:
class MyViewController: UIViewController {@IBOutlet weak var button: UIButton!@IBOutlet var textFields: [UITextField]!@IBAction func tappedButton(_ sender: UIButton?) {print("button was tapped!")}}
Live Rendering
ライブレンダリング
You can use two different attributes—@IBDesignable and @IBInspectable—to enable live, interactive custom view design in Interface Builder. When you create a custom view that inherits from the UIView class or the NSView class, you can add the @IBDesignable attribute just before the class declaration. After you add the custom view to Interface Builder (by setting the custom class of the view in the inspector pane), Interface Builder renders your view in the canvas.
あなたは、インタフェースビルダーにおいて、生の、双方向のあつらえのビュー設計をできるように、2つの異なる属性 ― @IBDesignableと@IBInspectable ― を使うことができます。あなたがUIViewクラスまたはNSViewクラスから継承するカスタムメイドのビューをつくるとき、あなたは@IBDesignable属性をクラス宣言の直前に加えることができます。あなたがカスタムメイドのビューをインタフェースビルダーに加えた(インスペクターペインにおいてそのビューのカスタム・クラスを設定することによって)後に、インタフェースビルダーはキャンバスにおいてあなたのビューを描画します。
You can also add the @IBInspectable attribute to properties with types compatible with user defined runtime attributes. After you add your custom view to Interface Builder, you can edit these properties in the inspector.
あなたは、また、ユーザー定義のランタイム属性と互換性を持つ型をもつプロパティへ@IBInspectable属性を加えることができます。あなたがあなたのカスタムメイドのビューをインタフェースビルダーに加えたあと、あなたはインスペクターにおいてこれらのプロパティを編集することができます。
@IBDesignableclass MyCustomView: UIView {@IBInspectable var textColor: UIColor@IBInspectable var iconHeight: CGFloat// ...}
Specifying Property Attributes
プロパティ属性を指定する
In Objective-C, properties have a range of potential attributes that specify additional information about a property’s behavior. In Swift, you specify these property attributes in a different way.
Objective-Cにおいて、プロパティたちは、あるプロパティの挙動に関する追加の情報を指定する多種多様な潜在的な属性を持ちます。スウィフトにおいて、あなたは異なる方法でこれらのプロパティ属性を指定します。
Strong and Weak
強い、弱い
Swift properties are strong by default. Use the weak keyword to indicate that a property has a weak reference to the object stored as its value. This keyword can be used only for properties that are optional class types. For more information, see Attributes.
スウィフトプロパティは、特に何もしなければ強いです。weakキーワードを使用して、あるプロパティがその値として格納しておくオブジェクトへの弱い参照を持つことを示してください。オプショナルのクラス型であるプロパティだけに対して、このキーワードは使われることができます。詳細は、属性を見てください。
Read/Write and Read-Only
「読み/書き」と「読み出し専用」
In Swift, there are no readwrite and readonly attributes. When declaring a stored property, use let to make it read-only, and use var to make it read/write. When declaring a computed property, provide a getter only to make it read-only and provide both a getter and setter to make it read/write. For more information, see Properties in The Swift Programming Language (Swift 4.1).
スウィフトでは、readwriteとreadonly属性はありません。ある格納プロパティを宣言するとき、それを読み出し専用にするためにletを、そしてそれを読み/書きにするためにvarを使ってください。ある計算プロパティを宣言するとき、それを読み出し専用にするためにゲッターのみを提供してください、そしてそれを読み/書きにするためにゲッターとセッターの両方を提供してください。詳細は、プロパティをスウィフトプログラミング言語(Swift 4.1)で見てください。
Copy Semantics
コピー意味論
In Swift, the Objective-C copy property attribute translates to @NSCopying. The type of the property must conform to the NSCopying protocol. For more information, see Attributes in The Swift Programming Language (Swift 4.1).
スウィフトでは、Objective-Cのcopyプロパティ属性は、@NSCopyingとして解釈します。プロパティの型は、NSCopyingプロトコルに準拠しなければなりません。詳細は、属性をスウィフトプログラミング言語(Swift 4.1)で見てください。
Implementing Core Data Managed Object Subclasses
コアデータ管理オブジェクトのサブクラスを実装する
Core Data provides the underlying storage and implementation of properties in subclasses of the NSManagedObject class. Core Data also provides the implementation of instance methods that you use to add and remove objects from to-many relationships. You use the @NSManaged attribute to inform the Swift compiler that Core Data provides the storage and implementation of a declaration at runtime.
コアデータは、プロパティたちの基盤となる外部記憶と実装をNSManagedObjectクラスのサブクラスにおいて提供します。コアデータはまた、あなたが対多リレーションシップからのオブジェクトの追加と削除をするために使うインスタンスメソッドの実装を提供します。あなたは、@NSManaged属性を使って、コアデータがある宣言のストレージと実装を実行時に提供することをスウィフトコンパイラに知らせます。
Add the @NSManaged attribute to each property or method declaration in your managed object subclass that corresponds to an attribute or relationship in your Core Data model. For example, consider a Core Data entity called “Person” with a String attribute “name” and a to-many relationship “friends”:
あなたのコアデータモデルの中の属性またはリレーションシップに対応する、あなたの管理オブジェクトのサブクラスにおけるプロパティまたはメソッド宣言それぞれに、@NSManaged属性を加えてください。例えば、あるコアデータ・エントリ、「Person」と呼ばれて、String属性「name」と対多リレーションシップ「friends」をもつものを考えてみてください:
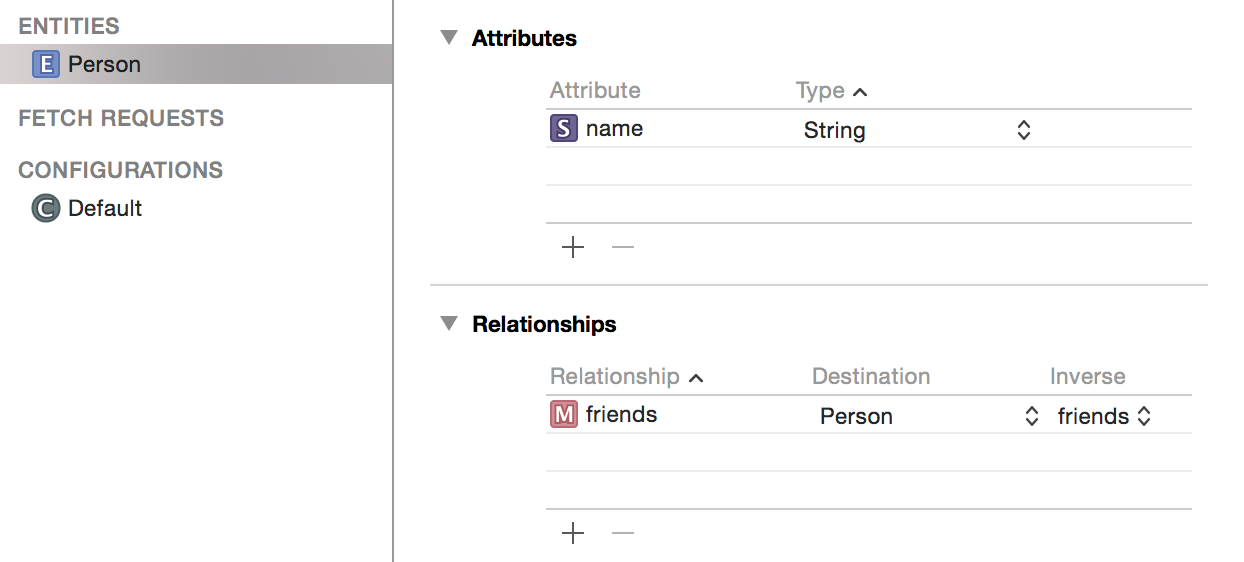
Choose “Create NSManagedObject Subclass…” from the “Editor” menu to generate corresponding Swift code for the NSManagedObject subclass, Person:
「Create NSManagedObject Subclass…」を「Editor」メニューから選択することで、NSManagedObjectのサブクラス、Personに対応するスウィフトコードを生成してください:
// Person+CoreDataClass.swiftimport CoreDataclass Person: NSManagedObject {// Insert code here to add functionality to your managed object subclass (コードをここに挿入して機能性をあなたの管理オブジェクトサブクラスに加えます)}// Person+CoreDataProperties.swiftextension Person {@NSManaged var name: String@NSManaged var friends: NSSet}
The name and friends properties are both declared with the @NSManaged attribute to indicate that Core Data provides their implementation and storage at runtime.
nameとfriendsプロパティは、両方とも@NSManaged属性を使って宣言され、コアデータがそれらの実装とストレージを実行時に提供することを指し示します。
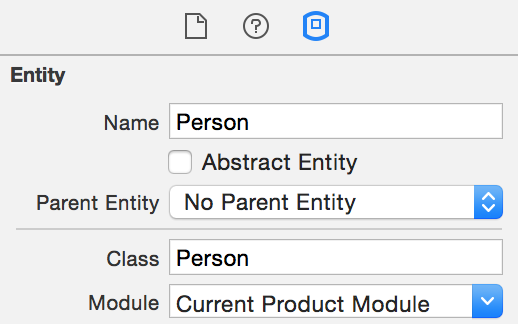
To configure a Swift subclass of NSManagedObject for use by a Core Data model entity, open the model entity inspector in Xcode, enter the class name into the Class field, and choose “Current Product Module” from the Module field drop-down list.
あるコアデータ・エントリによって使うためにNSManagedObjectのスウィフトサブクラスを構成するには、そのモデルのEntityインスペクタをXcodeにおいて開いて、クラス名をClass欄に入力して、「Current Product Module」をModule欄ポップダウンリストから選んでください。
Declaring Protocols
プロトコルを宣言する
In Swift, you can define protocols that Objective-C classes can conform to. To create a Swift protocol that can be adopted by an Objective-C class, mark the protocol declaration with the @objc attribute.
スウィフトにおいて、あなたはObjective-Cクラスが準拠できるプロトコルを定義できます。Objective-Cクラスによって採用されることができるスウィフトプロトコルを宣言するには、protocol宣言を@objc属性で印してください。
import UIKit@objc protocol MyCustomProtocol {var people: [Person] { get }func tableView(_ tableView: UITableView, configure cell: UITableViewCell, forPerson person: Person)@objc optional func tableView(_ tableView: UITableView, willDisplay cell: UITableViewCell, forPerson person: Person)}
A protocol declares all initializers, properties, subscripts, and methods that an Objective-C class must implement in order to conform to the protocol. Any optional protocol requirements must be marked with the @objc attribute and have the optional modifier.
プロトコルは、Objective-Cクラスがそのプロトコルに準拠するために実装しなければならない全てのイニシャライザ、プロパティ、添え字、そしてメソッドを宣言します。なんであれオプショナルのプロトコル要件は、@objc属性で印されてoptional修飾子を持たなければなりません。
An Objective-C class can conform a protocol declared in Swift in the same way that it would an Objective-C protocol, by implementing the required methods.
Objective-Cクラスは、スウィフトで宣言されるプロトコルにそれがObjective-Cプロトコルにするのと同じ方法で、必須メソッドを実装することによって、準拠できます。
@interface MyCustomController: UIViewController <MyCustomProtocol>@property (nonatomic, strong) NSArray<Person *> *people;@end@implementation MyCustomController@synthesize people;- (void)tableView:(UITableView *)tableViewconfigure:(UITableViewCell *)cellforPerson:(Person *)person{// Configure cell (セルを構成設定する)}@end
Interacting with Objective-C APIs
Objective-C APIとの相互作用
Copyright © 2018 Apple Inc. All rights reserved. Terms of Use | Privacy Policy | Updated: 2018-03-29