Basic Operators¶ 基本の演算子
An operator is a special symbol or phrase that you use to check, change, or combine values. For example, the addition operator (+) adds two numbers, as in let i = 1 + 2, and the logical AND operator (&&) combines two Boolean values, as in if enteredDoorCode && passedRetinaScan.
演算子は、あなたがいろいろな値を調べたり、変えたり、結合したりするために使う、特別な記号または語句です。例えば、加算演算子(+)は、let i = 1 + 2のように、2つの数を加えてひとつにします、そして論理積演算子(&&)は、if enteredDoorCode && passedRetinaScanのように、2つのブール値を組み合わせます。
Swift supports the operators you may already know from languages like C, and improves several capabilities to eliminate common coding errors. The assignment operator (=) doesn’t return a value, to prevent it from being mistakenly used when the equal to operator (==) is intended. Arithmetic operators (+, -, *, /, % and so forth) detect and disallow value overflow, to avoid unexpected results when working with numbers that become larger or smaller than the allowed value range of the type that stores them. You can opt in to value overflow behavior by using Swift’s overflow operators, as described in Overflow Operators.
スウィフトは、あなたがCのような言語から既に知っているかもしれない演算子をサポートします、そしていくつかの能力を向上させることで一般的なコード記述エラーを排除します。代入演算子(=)は値を返しません、同等演算子(==)が意図される時にそれが誤って使われるのを防ぐためです。算術演算子(+、-、*、/、%その他)は、値があふれること(オーバフロー)を検知して承認しません、数を扱うときにそれらを格納する型の許容される値の範囲より大きいか小さくなる予想外の結果を防ぐためです。オーバフロー演算子で記述されるように、あなたは、スウィフトのもつオーバフロー演算子を使うことによって、値オーバフロー挙動を選ぶことが可能です。
Swift also provides range operators that aren’t found in C, such as a..<b and a...b, as a shortcut for expressing a range of values.
スウィフトはまた、Cでは見られない範囲演算子、例えばa..<bとa...bを、値の範囲を表す近道として提供します。
This chapter describes the common operators in Swift. Advanced Operators covers Swift’s advanced operators, and describes how to define your own custom operators and implement the standard operators for your own custom types. この章は、スウィフトの通常の演算子を記載します。先進の演算子では、スウィフトの先進の演算子を取り扱い、加えてあなた独自のあつらえの演算子を定義する方法、そしてあなた独自のあつらえの型のために標準の演算子を実装する方法を解説します。
Terminology¶ 用語
Operators are unary, binary, or ternary: 演算子には、単項、二項、または三項があります:
- Unary operators operate on a single target (such as
-a). Unary prefix operators appear immediately before their target (such as!b), and unary postfix operators appear immediately after their target (such asc!). 単項演算子は、1つだけの目標に作用します(例えば-aなど)。単項接頭辞演算子はそれらの目標の直前に現れます(例えば!bのように)、そして単項接尾辞演算子はそれらの目標の直後に現れます(例えばc!のように)。 - Binary operators operate on two targets (such as
2 + 3) and are infix because they appear in between their two targets. 二項演算子は、2つの目標に作用します(例えば2 + 3のように)、そしてそれがそれら2つの目標の間に現れるので接中辞です。 - Ternary operators operate on three targets. Like C, Swift has only one ternary operator, the ternary conditional operator (
a ? b : c). 三項演算子は、3つの目標に作用します。Cのように、スウィフトはただ1つの三項演算子、三項条件演算子(a ? b : c)だけをもちます。
The values that operators affect are operands. In the expression 1 + 2, the + symbol is an infix operator and its two operands are the values 1 and 2.
演算子が影響を及ぼす値は、演算数です。式1 + 2において、記号+は接中辞演算子です、そしてその2つの演算数は値1と2です。
Assignment Operator¶ 代入演算子
The assignment operator (a = b) initializes or updates the value of a with the value of b:
代入演算子(a = b))は、aの値をbの値で初期化または更新します:
- let b = 10
- var a = 5
- a = b
- // a is now equal to 10(aは今は10と等しい)
If the right side of the assignment is a tuple with multiple values, its elements can be decomposed into multiple constants or variables at once: 代入の右側が、複数の値をもつタプルであるならば、その要素は同時に複数の定数または変数に分解されることができます:
- let (x, y) = (1, 2)
- // x is equal to 1, and y is equal to 2(xは1と等しい、そしてyは2と等しい)
Unlike the assignment operator in C and Objective-C, the assignment operator in Swift doesn’t itself return a value. The following statement isn’t valid: CとObjective-Cの代入演算子と違って、スウィフトの代入演算子は、それ自身で値を返しません。以下の文は、有効ではありません:
- if x = y {
- // This isn't valid, because x = y doesn't return a value.(これは有効ではありません、x = yが値を返さないので。)
- }
This feature prevents the assignment operator (=) from being used by accident when the equal to operator (==) is actually intended. By making if x = y invalid, Swift helps you to avoid these kinds of errors in your code.
この特徴は、実際には同等演算子(==)が意図されるときに、偶然に代入演算子(=)が使われるのを防止します。if x = yを無効にすることによって、スウィフトはあなたがこれらの種類のエラーをあなたのコードにおいて避けるのを手伝います。
Arithmetic Operators¶ 算術演算子
Swift supports the four standard arithmetic operators for all number types: スウィフトは、4つの標準の算術演算子を数の型すべてに対してサポートします:
- Addition (
+) 加算(+) - Subtraction (
-) 減算(-) - Multiplication (
*) 乗算(*) - Division (
/) 除算(/)
- 1 + 2 // equals 3(3に等しい)
- 5 - 3 // equals 2(2に等しい)
- 2 * 3 // equals 6(6に等しい)
- 10.0 / 2.5 // equals 4.0(4.0に等しい)
Unlike the arithmetic operators in C and Objective-C, the Swift arithmetic operators don’t allow values to overflow by default. You can opt in to value overflow behavior by using Swift’s overflow operators (such as a &+ b). See Overflow Operators.
CとObjective-Cの算術演算子と違って、スウィフトの算術演算子は、値がオーバフローするのを初期状態では許しません。あなたは、スウィフトのオーバフロー演算子を使用することによって、値オーバフロー挙動を選ぶことが可能です(例えばa &+ bのように)。オーバフロー演算子を見てください。
The addition operator is also supported for String concatenation:
加算演算子は、また、String連結に対してもサポートされます:
- "hello, " + "world" // equals "hello, world"(「こんにちは、世界よ」に等しい)
Remainder Operator¶ 剰余演算子
The remainder operator (a % b) works out how many multiples of b will fit inside a and returns the value that’s left over (known as the remainder).
剰余演算子(a % b)は、どのくらい多くのbの倍数がaの内部に収まるかを計算して、残された値(余りとして知られるもの)を返します。
Note 注意
The remainder operator (%) is also known as a modulo operator in other languages. However, its behavior in Swift for negative numbers means that, strictly speaking, it’s a remainder rather than a modulo operation.
剰余演算子(%)は、また、他の言語ではモジュロ演算子として知られています。しかし、スウィフトでの負数に対するそれの挙動は、それが、厳密に言って、剰余(remainder)であり、モジュロ(modulo)演算でないのを意味します。
Here’s how the remainder operator works. To calculate 9 % 4, you first work out how many 4s will fit inside 9:
ここに剰余演算子が機能する方法があります。9 % 4を計算するために、あなたは最初にどれくらい多くの4が9の中に収まるかを考え出します:
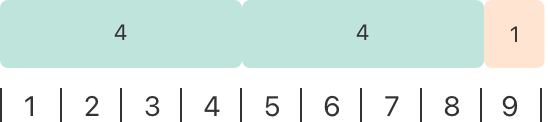
You can fit two 4s inside 9, and the remainder is 1 (shown in orange).
あなたは2つの4を9の内部に収めることができます、そして余りは1です(オレンジ色で示されます)。
In Swift, this would be written as: スウィフトでは、これはこのように書かれます:
- 9 % 4 // equals 1(1に等しい)
To determine the answer for a % b, the % operator calculates the following equation and returns remainder as its output:
a % bに対する答えを決定するために、%演算子は以下の等式を計算します、そしてその出力として余りを返します:
a = (b x some multiplier) + remainder
where some multiplier is the largest number of multiples of b that will fit inside a.
ここでsome multiplierはbの倍数でaの内部に収まる最も大きな数です。
Inserting 9 and 4 into this equation yields:
9と4をこの等式に入れることは、以下を生じます:
9 = (4 x 2) + 1
The same method is applied when calculating the remainder for a negative value of a:
同じメソッドが、負の値のaのための余りを計算するとき適用されます:
- -9 % 4 // equals -1(-1に等しい)
Inserting -9 and 4 into the equation yields:
-9と4を等式に入れることは、以下を生じます:
-9 = (4 x -2) + -1
giving a remainder value of -1.
そして-1の余り値を与えます。
The sign of b is ignored for negative values of b. This means that a % b and a % -b always give the same answer.
bの符号は、負の値のbのために無視されます。これは、a % bとa % -bが常に同じ答えを与えることを意味します。
Unary Minus Operator¶ 単項マイナス演算子
The sign of a numeric value can be toggled using a prefixed -, known as the unary minus operator:
数の値の符号は、単項マイナス演算子として知られる、接頭辞-を使うことによって切り換えられることができます:
- let three = 3
- let minusThree = -three // minusThree equals -3(minusThreeは、-3に等しい)
- let plusThree = -minusThree // plusThree equals 3, or "minus minus three"(plusThreeは、3に、または「マイナス マイナス three」に等しい)
The unary minus operator (-) is prepended directly before the value it operates on, without any white space.
単項マイナス演算子(-)は、それが作用する値の前に、全く空白なしで、直接に先頭に追加されます。
Unary Plus Operator¶ 単項プラス演算子
The unary plus operator (+) simply returns the value it operates on, without any change:
単項プラス演算子(+)は、それが作用する値を、どんな変更もせずに、ただ単純に返します:
- let minusSix = -6
- let alsoMinusSix = +minusSix // alsoMinusSix equals -6(alsoMinusSixは、-6に等しい)
Although the unary plus operator doesn’t actually do anything, you can use it to provide symmetry in your code for positive numbers when also using the unary minus operator for negative numbers. 単項プラス演算子は実際に何もしないけれども、あなたは、負の数に単項マイナス演算子を使うときに、正の数に対してもまたあなたのコードで釣り合いを取るためにそれを使うことができます。
Compound Assignment Operators¶ 複合代入演算子
Like C, Swift provides compound assignment operators that combine assignment (=) with another operation. One example is the addition assignment operator (+=):
Cのように、スウィフトは複合代入演算子を提供します、それは、代入(=)を別の演算と組み合わせます。1つの例は、加算代入演算子(+=)です:
- var a = 1
- a += 2
- // a is now equal to 3(aは現在、3と等しい)
The expression a += 2 is shorthand for a = a + 2. Effectively, the addition and the assignment are combined into one operator that performs both tasks at the same time.
式a += 2は、a = a + 2の簡略な表現です。実質的に、加算と代入は1つの演算子に結合され、同時に両方の作業を実行します。
Note 注意
The compound assignment operators don’t return a value. For example, you can’t write let b = a += 2.
複合代入演算子は、値を返しません。例えば、あなたはlet b = a += 2を書くことができません。
For information about the operators provided by the Swift standard library, see Operator Declarations. スウィフト標準ライブラリによって提供される演算子についての情報のために、さまざまな演算子宣言を見てください。
Comparison Operators¶ 比較演算子
Swift supports the following comparison operators: スウィフトは、以下の比較演算子をサポートします:
- Equal to (
a == b) 同等である (a == b) - Not equal to (
a != b) 同等でない (a != b) - Greater than (
a > b) より大きい (a > b) - Less than (
a < b) より小さい、未満 (a < b) - Greater than or equal to (
a >= b) より大きいか等しい、以上 (a >= b) - Less than or equal to (
a <= b) より小さいか等しい、以下 (a <= b)
Note 注意
Swift also provides two identity operators (=== and !==), which you use to test whether two object references both refer to the same object instance. For more information, see Identity Operators.
スウィフトはまた、2つの同一性演算子を提供します(===と!==)、それはあなたが2つのオブジェクト参照が両方とも同じオブジェクト・インスタンスに言及するかどうかについて調べるために使います。更なる情報として、同一性演算子を見てください。
Each of the comparison operators returns a Bool value to indicate whether or not the statement is true:
それぞれの比較演算子は、Bool値を返して、その文が真かどうかを指し示します:
- 1 == 1 // true because 1 is equal to 1(1が1と同等なので真)
- 2 != 1 // true because 2 isn't equal to 1
- 2 > 1 // true because 2 is greater than 1(2が1より大きいので真)
- 1 < 2 // true because 1 is less than 2(1が2より小さいので真)
- 1 >= 1 // true because 1 is greater than or equal to 1(1が1以上なので真)
- 2 <= 1 // false because 2 isn't less than or equal to 1
Comparison operators are often used in conditional statements, such as the if statement:
比較演算子は、条件文においてしばしば使われます、例えばif文など:
- let name = "world"
- if name == "world" {
- print("hello, world")
- } else {
- print("I'm sorry \(name), but I don't recognize you")
- }
- // Prints "hello, world", because name is indeed equal to "world".(「hello, world」を出力します、nameが確かに「world」と等しいので。)
For more about the if statement, see Control Flow.
if文に関する詳細は、制御の流れを見てください。
You can compare two tuples if they have the same type and the same number of values. Tuples are compared from left to right, one value at a time, until the comparison finds two values that aren’t equal. Those two values are compared, and the result of that comparison determines the overall result of the tuple comparison. If all the elements are equal, then the tuples themselves are equal. For example: あなたは、2つのタプルを比較することが、それらが同じ型と同じ数の値を持つならば可能です。タプルは、左から右へと、一度に1つの値を、比較が等しくない2つの値を見つけるまで、比較されます。そのような2つの値が比較されます、するとその比較の結果がタプル比較の結果全体を決定します。すべての要素が等しいならば、その時それらのタプル自体が等しいです。例えば:
- (1, "zebra") < (2, "apple") // true because 1 is less than 2; "zebra" and "apple" aren't compared// 1は2より少ないので真;「zebra」と「apple」は比較されません
- (3, "apple") < (3, "bird") // true because 3 is equal to 3, and "apple" is less than "bird"(3は3と等しく、「apple」は「bird」より少ないので真)
- (4, "dog") == (4, "dog") // true because 4 is equal to 4, and "dog" is equal to "dog"(4は4と等しく、「dog」は「dog」と等しいので真)
In the example above, you can see the left-to-right comparison behavior on the first line. Because 1 is less than 2, (1, "zebra") is considered less than (2, "apple"), regardless of any other values in the tuples. It doesn’t matter that "zebra" isn’t less than "apple", because the comparison is already determined by the tuples’ first elements. However, when the tuples’ first elements are the same, their second elements are compared—this is what happens on the second and third line.
上の例において、あなたは左から右への比較挙動を最初の行において見ることができます。1は2より少ないことから、(1, "zebra")は(2, "apple")より少ないとみなされます、タプルの中のあらゆる他の値に関係なく。"zebra"が"apple"より少ないことは問題ではありません、この比較はすでにタプルの最初の要素によって決定されているからです。しかしながら、タプルのもつ最初の要素が同じ場合、2番目の要素は比較されます — これが2番目と3番目の行で起こることです。
Tuples can be compared with a given operator only if the operator can be applied to each value in the respective tuples. For example, as demonstrated in the code below, you can compare two tuples of type (String, Int) because both String and Int values can be compared using the < operator. In contrast, two tuples of type (String, Bool) can’t be compared with the < operator because the < operator can’t be applied to Bool values.
タプルは、与えられた演算子で比較されることが、その演算子がそれぞれのタプルの中の値それぞれに適用可能である場合にのみ可能です。例えば、下のコードで実演されるように、あなたは型(String, Int)の2つのタプルを比較できます、なぜならStringとIntの値の両方とも<演算子を使って比較できるからです。対照的に、型(String, Bool)の2つのタプルは<演算子で比較できません、なぜなら<演算子はBool値に適用できるからです。
- ("blue", -1) < ("purple", 1) // OK, evaluates to true(OK、trueと評価します)
- ("blue", false) < ("purple", true) // Error because < can't compare Boolean values(エラー、なぜなら < がブール値を比較できないため)
Note 注意
The Swift standard library includes tuple comparison operators for tuples with fewer than seven elements. To compare tuples with seven or more elements, you must implement the comparison operators yourself. スウィフト標準ライブラリは、いくらかのタプル比較演算子を、7要素より少数でのタプルに対して含んでいます。7つまたはそれより多い要素のタプルを比較するには、あなたは比較演算子をあなた自身で実装しなければなりません。
Ternary Conditional Operator¶ 三項条件演算子
The ternary conditional operator is a special operator with three parts, which takes the form question ? answer1 : answer2. It’s a shortcut for evaluating one of two expressions based on whether question is true or false. If question is true, it evaluates answer1 and returns its value; otherwise, it evaluates answer2 and returns its value.
三項条件演算子は3つの部分をもつ特別な演算子です、それは形式question ? answer1 : answer2をとります。それは、questionが真実であるか間違っているかに基づいて、2つの式のうちの1つを評価することに対する近道です。questionが真実ならば、それはanswer1を評価して、その値を返します;そうでなければ、それはanswer2を評価して、その値を返します。
The ternary conditional operator is shorthand for the code below: 三項条件演算子は、下のコードの短縮形です:
- if question {
- answer1
- } else {
- answer2
- }
Here’s an example, which calculates the height for a table row. The row height should be 50 points taller than the content height if the row has a header, and 20 points taller if the row doesn’t have a header: ここにひとつの例があります、それはあるテーブルの列の高さを計算します。列の高さは、列にヘッダがあるならば内容の高さより50ポイント高く、列にヘッダがないならば20ポイント高くなければなりません:
- let contentHeight = 40
- let hasHeader = true
- let rowHeight = contentHeight + (hasHeader ? 50 : 20)
- // rowHeight is equal to 90(rowHeightは、90と等しい)
The example above is shorthand for the code below: 上の例は、下のコードの短縮形です:
- let contentHeight = 40
- let hasHeader = true
- let rowHeight: Int
- if hasHeader {
- rowHeight = contentHeight + 50
- } else {
- rowHeight = contentHeight + 20
- }
- // rowHeight is equal to 90(rowHeightは、90と等しい)
The first example’s use of the ternary conditional operator means that rowHeight can be set to the correct value on a single line of code, which is more concise than the code used in the second example.
最初の例の三項条件演算子の使用は、rowHeightがただ1行のコードで正しい値に設定されることができるのを意味します、それは2番目の例において使われるコードより簡潔です。
The ternary conditional operator provides an efficient shorthand for deciding which of two expressions to consider. Use the ternary conditional operator with care, however. Its conciseness can lead to hard-to-read code if overused. Avoid combining multiple instances of the ternary conditional operator into one compound statement. 三項条件演算子は、2つの式のどちらを考慮するべきか決定することについての効果的な短縮形を提供します。しかし、注意して三項条件演算子を使用してください。その簡潔さは、濫用されるならば、読み辛いコードに至る可能性があります。三項条件演算子を使用したもの複数を1つの複合文に結合することを避けてください。
Nil-Coalescing Operator¶ nil合体演算子
The nil-coalescing operator (a ?? b) unwraps an optional a if it contains a value, or returns a default value b if a is nil. The expression a is always of an optional type. The expression b must match the type that’s stored inside a.
nil合体演算子(a ?? b)は、それが値を持つならばオプショナルのaをアンラップします、またはaがnilならば省略時の値のbを返します。aの式は常にオプショナル型です。bの式はaの中に格納される型に合致しなければなりません。
The nil-coalescing operator is shorthand for the code below: nil合体演算子は、以下のコードに対する簡略形です:
- a != nil ? a! : b
The code above uses the ternary conditional operator and forced unwrapping (a!) to access the value wrapped inside a when a isn’t nil, and to return b otherwise. The nil-coalescing operator provides a more elegant way to encapsulate this conditional checking and unwrapping in a concise and readable form.
上のコードは、三項条件演算子と強制アンラップ(a!)を使って、aがnilでないならばa内部にラップされた値にアクセスします、それ以外ではbを返します。nil合体演算子は、この条件検査およびアンラップを簡潔で判読しやすい形式にカプセル化するより洗練された方法を提供します。
Note 注意
If the value of a is non-nil, the value of b isn’t evaluated. This is known as short-circuit evaluation.
aの値がnilでないならば、bの値は評価されません。これは短絡評価として知られています。
The example below uses the nil-coalescing operator to choose between a default color name and an optional user-defined color name: 以下の例は、nil合体演算子を、省略時の色の名前とオプショナルの利用者定義の色の名前とで選択するために使います:
- let defaultColorName = "red"
- var userDefinedColorName: String? // defaults to nil
- var colorNameToUse = userDefinedColorName ?? defaultColorName
- // userDefinedColorName is nil, so colorNameToUse is set to the default of "red"(userDefinedColorNameはnilです、なのでcolorNameToUseは省略時の「赤」に設定されます)
The userDefinedColorName variable is defined as an optional String, with a default value of nil. Because userDefinedColorName is of an optional type, you can use the nil-coalescing operator to consider its value. In the example above, the operator is used to determine an initial value for a String variable called colorNameToUse. Because userDefinedColorName is nil, the expression userDefinedColorName ?? defaultColorName returns the value of defaultColorName, or "red".
userDefinedColorName変数は、省略時の値のnilを持つ、あるオプショナルのStringとして定義されます。userDefinedColorNameがオプショナル型であるため、あなたはその値を考慮するためにnil合体演算子を使うことが出来ます。上の例で、この演算子はcolorNameToUseと呼ばれるあるString変数の初期値を確定するために使われます。userDefinedColorNameはnilなので、式userDefinedColorName ?? defaultColorNameは、defaultColorNameの値、すなわち"red"を返します。
If you assign a non-nil value to userDefinedColorName and perform the nil-coalescing operator check again, the value wrapped inside userDefinedColorName is used instead of the default:
あなたがnilでない値をuserDefinedColorNameに代入して、nil合体演算子による確認をふたたび実行するならば、userDefinedColorName内にラップされた値は省略時のものの代わりに使用されます。
- userDefinedColorName = "green"
- colorNameToUse = userDefinedColorName ?? defaultColorName
- // userDefinedColorName isn't nil, so colorNameToUse is set to "green"(userDefinedColorNameはnilではありません、それでcolorNameToUseは「緑」に設定されます)
Range Operators¶ 範囲演算子
Swift includes several range operators, which are shortcuts for expressing a range of values. スウィフトは、いくつかの範囲演算子を含みます、それらは値の範囲を表す近道です。
Closed Range Operator¶ 完結範囲演算子
The closed range operator (a...b) defines a range that runs from a to b, and includes the values a and b. The value of a must not be greater than b.
完結範囲演算子(a...b)は、aからbまで続く範囲を定義します、それはaとbの値を含んでいます。aの値はbより大きくてはいけません。
The closed range operator is useful when iterating over a range in which you want all of the values to be used, such as with a for-in loop:
完結範囲演算子は、あなたがその値の全てが使われることを望む、ある範囲全体に渡って繰り返すときに役に立ちます、例えばfor-inループで:
- for index in 1...5 {
- print("\(index) times 5 is \(index * 5)")
- }
- // 1 times 5 is 5(1かける5は、5です)
- // 2 times 5 is 10(2かける5は、10です)
- // 3 times 5 is 15(3かける5は、15です)
- // 4 times 5 is 20(4かける5は、20です)
- // 5 times 5 is 25(5かける5は、25です)
For more about for-in loops, see Control Flow.
for-inループに関する詳細は、制御の流れを見てください。
Half-Open Range Operator¶ 半開範囲演算子
The half-open range operator (a..<b) defines a range that runs from a to b, but doesn’t include b. It’s said to be half-open because it contains its first value, but not its final value. As with the closed range operator, the value of a must not be greater than b. If the value of a is equal to b, then the resulting range will be empty.
半開範囲演算子(a..<b)は、aからbまで続く範囲を定義します、しかしbの値を含みません。それが半開と言われるのは、それがその最初の値を含むけれども、その最後の値は含まないためです。完結範囲演算子と同じように、aの値はbより大きくてはいけません。aの値がbと等しいならば、そのとき結果として生じる範囲は空になります。
Half-open ranges are particularly useful when you work with zero-based lists such as arrays, where it’s useful to count up to (but not including) the length of the list: 半開範囲は、あなたが配列のようなゼロに基づくリストを扱うとき特に便利です、そこにおいて、そのリストの長さまで(しかしそれは含まずに)数え上げるのに役に立ちます:
- let names = ["Anna", "Alex", "Brian", "Jack"]
- let count = names.count
- for i in 0..<count {
- print("Person \(i + 1) is called \(names[i])")
- }
- // Person 1 is called Anna(人物は1、アンナと呼ばれる)
- // Person 2 is called Alex(人物2は、アレックスと呼ばれる)
- // Person 3 is called Brian(人物3は、ブライアンと呼ばれる)
- // Person 4 is called Jack(人物4は、ジャックと呼ばれる)
Note that the array contains four items, but 0..<count only counts as far as 3 (the index of the last item in the array), because it’s a half-open range. For more about arrays, see Arrays.
この配列が4つの項目を含む点に注意してください、しかし0..<countは3(この配列の最後の項目のインデックス)まで数えるだけです、なぜならそれが半開範囲であるためです。配列に関する詳細は、配列を見てください。
One-Sided Ranges¶ 片側範囲
The closed range operator has an alternative form for ranges that continue as far as possible in one direction—for example, a range that includes all the elements of an array from index 2 to the end of the array. In these cases, you can omit the value from one side of the range operator. This kind of range is called a one-sided range because the operator has a value on only one side. For example: 完結範囲演算子は、一方向に可能な限り続く範囲 — 例えば、インデックス2から配列の最後までの配列のすべての要素を含む範囲、などに対する代替の形式を持ちます。これらの場合、あなたは範囲演算子の1つの側から値を省くことができます。この種類の範囲は、片側範囲と呼ばれます、なぜならこの演算子は一方の側でのみ値を持つからです。例えば:
- for name in names[2...] {
- print(name)
- }
- // Brian
- // Jack
- for name in names[...2] {
- print(name)
- }
- // Anna
- // Alex
- // Brian
The half-open range operator also has a one-sided form that’s written with only its final value. Just like when you include a value on both sides, the final value isn’t part of the range. For example: 半開範囲演算子もまた、それの最後の値のみで記述される、片側形式を持ちます。ちょうどあなたが両方の側で1つの値を含める場合のように、最後の値はその範囲の一部分ではありません。例えば:
- for name in names[..<2] {
- print(name)
- }
- // Anna
- // Alex
One-sided ranges can be used in other contexts, not just in subscripts. You can’t iterate over a one-sided range that omits a first value, because it isn’t clear where iteration should begin. You can iterate over a one-sided range that omits its final value; however, because the range continues indefinitely, make sure you add an explicit end condition for the loop. You can also check whether a one-sided range contains a particular value, as shown in the code below. 片側範囲は、添え字とは違い、他の文脈で使用できます。あなたは、最初の値を省いた片側範囲に対して反復していくことができません、なぜならどこで反復が始まるべきかが明瞭でないからです。あなたは、それの最後の値を省いた片側範囲に対して反復処理できます;しかしながら、範囲があいまいに続いていることから、確実にあなたが明示的な終了条件をそのループに対して加えるようにしてください。あなたはまた、以下のコードで示すように、片側範囲が特定の値を含むかどうか調べることができます。
- let range = ...5
- range.contains(7) // false
- range.contains(4) // true
- range.contains(-1) // true
Logical Operators¶ 論理演算子
Logical operators modify or combine the Boolean logic values true and false. Swift supports the three standard logical operators found in C-based languages:
論理演算子は、ブールの論理値trueおよびfalseを修正または結合します。スウィフトは、Cに基づく言語で見られる3つの標準の論理演算子をサポートします:
- Logical NOT (
!a) 論理否定(!a) - Logical AND (
a && b) 論理積(a && b) - Logical OR (
a || b) 論理和(a || b)
Logical NOT Operator¶ 論理否定演算子
The logical NOT operator (!a) inverts a Boolean value so that true becomes false, and false becomes true.
論理否定演算子(!a)は1つのブール値を逆にします、それでtrueはfalseに、falseはtrueになります。
The logical NOT operator is a prefix operator, and appears immediately before the value it operates on, without any white space. It can be read as “not a”, as seen in the following example:
論理否定演算子は接頭辞演算子です、そして全く空白なしで、それが作用する値の直前に現れます。それは、「aでない」のように読まれることができます、下記の例では見られるように:
- let allowedEntry = false
- if !allowedEntry {
- print("ACCESS DENIED")
- }
- // Prints "ACCESS DENIED"(「アクセス拒否」を出力します)
The phrase if !allowedEntry can be read as “if not allowed entry.” The subsequent line is only executed if “not allowed entry” is true; that is, if allowedEntry is false.
語句if !allowedEntryは、「許されたエントリでないならば」と読まれることができます。続く行は「許されたエントリでない」が真である場合;すなわち、allowedEntryがfalseである場合に実行されます。
As in this example, careful choice of Boolean constant and variable names can help to keep code readable and concise, while avoiding double negatives or confusing logic statements. この例の場合のように、ブールの定数と変数の名前の慎重な選択はコードを読みやすく簡潔にしておくのを助けることができます、その一方で、二重の否定や、混乱させる論理文を避けてください。
Logical AND Operator¶ 論理積演算子
The logical AND operator (a && b) creates logical expressions where both values must be true for the overall expression to also be true.
論理積演算子(a && b)は、論理式をつくります、そこにおいて全体的な式もまたtrueになるためには、両方の値がtrueでなければなりません。
If either value is false, the overall expression will also be false. In fact, if the first value is false, the second value won’t even be evaluated, because it can’t possibly make the overall expression equate to true. This is known as short-circuit evaluation.
どちらかの値がfalseならば、全体的な式もまたfalseになります。実際には、最初の値がfalseならば、2番目の値は評価されさえしません、なぜならそれがどうやっても式全体をtrueと等しくすることが出来ないためです。これは短絡評価として知られています。
This example considers two Bool values and only allows access if both values are true:
この例は、2つのBool値を考慮して、両方の値がtrueの場合にのみアクセスを許します:
- let enteredDoorCode = true
- let passedRetinaScan = false
- if enteredDoorCode && passedRetinaScan {
- print("Welcome!")
- } else {
- print("ACCESS DENIED")
- }
- // Prints "ACCESS DENIED"(「アクセス拒否」を出力します)
Logical OR Operator¶ 論理和演算子
The logical OR operator (a || b) is an infix operator made from two adjacent pipe characters. You use it to create logical expressions in which only one of the two values has to be true for the overall expression to be true.
論理和演算子(a || b)は、2つの隣接したパイプ文字から作られる接中辞演算子です。あなたはそれを、全体的な式がtrueになるためには2つの値のうちの1つだけがtrueであればよい論理式をつくるために使います。
Like the Logical AND operator above, the Logical OR operator uses short-circuit evaluation to consider its expressions. If the left side of a Logical OR expression is true, the right side isn’t evaluated, because it can’t change the outcome of the overall expression.
上の論理積演算子のように、論理和演算子はその式を考慮するために短絡評価を使います。論理和式の左側がtrueならば、右側は評価されません、なぜならそれが式全体の結論を変えることができないからです。
In the example below, the first Bool value (hasDoorKey) is false, but the second value (knowsOverridePassword) is true. Because one value is true, the overall expression also evaluates to true, and access is allowed:
下記の例で、最初のBool値(hasDoorKey)はfalseです、しかし、第二の値(knowsOverridePassword)はtrueです。1つの値がtrueなので、式全体もまたtrueです、そしてアクセスは許可されます:
- let hasDoorKey = false
- let knowsOverridePassword = true
- if hasDoorKey || knowsOverridePassword {
- print("Welcome!")
- } else {
- print("ACCESS DENIED")
- }
- // Prints "Welcome!"(「歓迎します!」を出力します)
Combining Logical Operators¶ 論理演算子を結合する
You can combine multiple logical operators to create longer compound expressions: あなたは、より長く複雑な式をつくるために複数の論理演算子を結合することができます:
- if enteredDoorCode && passedRetinaScan || hasDoorKey || knowsOverridePassword {
- print("Welcome!")
- } else {
- print("ACCESS DENIED")
- }
- // Prints "Welcome!"(「歓迎します!」を出力します)
This example uses multiple && and || operators to create a longer compound expression. However, the && and || operators still operate on only two values, so this is actually three smaller expressions chained together. The example can be read as:
この例は、より長く複雑な式をつくるために複数の&&と||演算子を使用します。しかし、&&と||演算子は依然として2つの値だけに作用します、なのでこれは実際のところ1つに繋がれた3つのより小さい式です。この例は、次のように解釈されることができます:
If we’ve entered the correct door code and passed the retina scan, or if we have a valid door key, or if we know the emergency override password, then allow access. 私達が正しいドア・コードを入力して網膜走査をパスしたならば、または私達が有効なドア・キーを持つならば、または私達が非常用解除パスワードを知っているならば、その時アクセスを許可してください。
Based on the values of enteredDoorCode, passedRetinaScan, and hasDoorKey, the first two subexpressions are false. However, the emergency override password is known, so the overall compound expression still evaluates to true.
enteredDoorCode、passedRetinaScan、そしてhasDoorKeyの値に基づいて、最初の2つの下位の式はfalseです。しかし、非常用解除パスワードは知られているので、複合式全体はなおtrueと評価します。
Note 注意
The Swift logical operators && and || are left-associative, meaning that compound expressions with multiple logical operators evaluate the leftmost subexpression first.
スウィフトの論理演算子&&と||は、左結合です、複数の論理演算子を持つ複合式が最も左の下位の式を最初に評価することを意味しています。
Explicit Parentheses¶ 明確な括弧
It’s sometimes useful to include parentheses when they’re not strictly needed, to make the intention of a complex expression easier to read. In the door access example above, it’s useful to add parentheses around the first part of the compound expression to make its intent explicit: 複雑な式をより簡単に読めるようにするため、丸括弧をそれらが厳密には必要とされないとき含むことは、時々役に立ちます。上のドア・アクセスの例で、その意図を明確にするために複合式の最初の部分のまわりに丸括弧を加えることは、役に立ちます:
- if (enteredDoorCode && passedRetinaScan) || hasDoorKey || knowsOverridePassword {
- print("Welcome!")
- } else {
- print("ACCESS DENIED")
- }
- // Prints "Welcome!"(「歓迎します!」を出力します)
The parentheses make it clear that the first two values are considered as part of a separate possible state in the overall logic. The output of the compound expression doesn’t change, but the overall intention is clearer to the reader. Readability is always preferred over brevity; use parentheses where they help to make your intentions clear. 丸括弧は、最初の2つの値が全体的な論理の中で1つの隔てられたあり得る状態の部分として考慮されることを明白にします。複合式の出力は変わりません、しかし全体的な意図は読者にとってより明らかです。読みやすさは、常に簡潔さよりも好まれます;それらがあなたの意図を明確にする助けとなるところに丸括弧を使ってください。