

Build a Basic UI
基本的なUIを作る
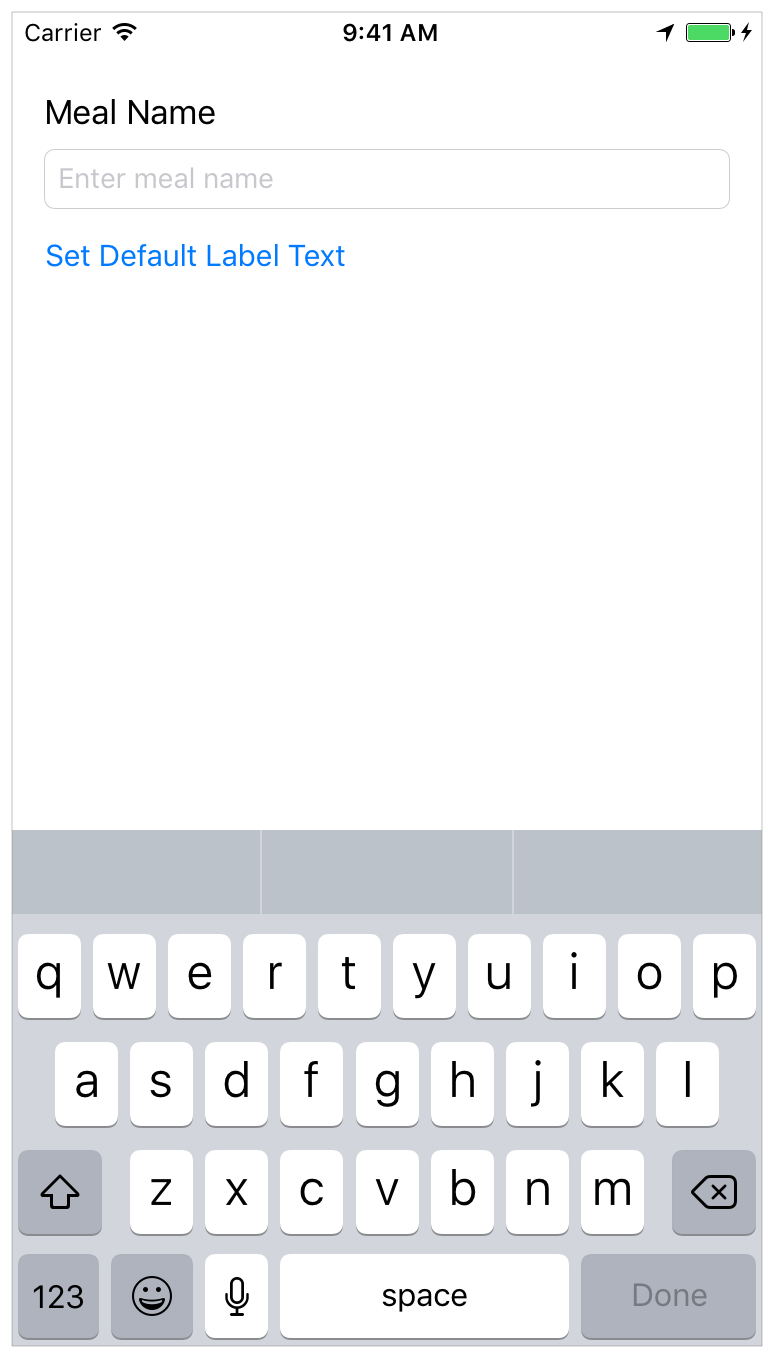
This lesson gets you familiar with Xcode, the tool you use to write apps. You’ll become familiar with the structure of a project in Xcode and learn how to navigate between and use basic project components. In the lesson, you’ll start making a simple user interface (UI) for the FoodTracker app and view it in the simulator. When you’re finished, your app will look something like this:
このレッスンは、あなたをXcodeに親しませます、それはあなたがアプリを書くために使うツールです。あなたは、Xcodeにおけるプロジェクトの構造に馴染んで、基本的なプロジェクトコンポーネントの間をなんとか進んでいき、それを使用する方法を学びます。このレッスンでは、あなたはFoodTrackerアプリのためのある単純なユーザインターフェイス(UI)の作成を始めます、そしてそれをシミュレータで観察します。あなたが作業し終わった時、あなたのアプリはこのようなものに見えるでしょう:
Learning Objectives
学習する目標
At the end of the lesson, you’ll be able to:
このレッスンの終わりに、あなたが出来るようになるのは:
Create a project in Xcode
プロジェクトをXcodeで作成するIdentify the purpose of key files that are created with an Xcode project template
Xcodeプロジェクトテンプレートを使って作成されるキーファイル(主要ファイル)の用途を確認するOpen and switch between files in a project
プロジェクト内のいくつかのファイルを開いてその間で切り替えるRun an app in iOS Simulator
アプリをiOSシミュレータ(模擬再現プログラム)で実行するAdd, move, and resize UI elements in a storyboard
ストーリーボードの中でUI要素の追加、削除、そしてリサイズ(大きさ変更)をするEdit the attributes of UI elements in a storyboard using the Attributes inspector
ストーリーボードの中でUI要素の属性をAttributesインスペクタ(「属性」管理機能)を使って編集するView and rearrange UI elements using the outline view
UI要素をアウトラインビューを使って表示して位置を直すPreview a storyboard UI using the Assistant editor’s Preview mode
ストーリーボードUIを「Assistant」エディタの「プレビュー」モードを使ってプレビュー(下見)するUse Auto Layout to lay out a UI that automatically adapts to the user’s device size
Auto Layout(自動レイアウト、自動配置)を使ってユーザーのデバイス(機器)の大きさに自動的に適応するUIを設置する
Create a New Project
新しいプロジェクトの作成
Xcode includes several built-in app templates for developing common types of iOS apps, such as games, apps with tab-based navigation, and table view-based apps. Most of these templates have preconfigured interface and source code files. For this lesson, you’ll start with the most basic template: Single View Application.
Xcodeは、いくつかの組み込みのアプリテンプレート(アプリひな形)を、一般的な種類のiOSアプリ、例えばゲーム、タブに基づくナビゲーションを持つアプリ、およびテーブルビューに基づくアプリなどの開発のために含んでいます。これらのひな形のほとんどは、あらかじめ構成されたインターフェイスとソースコード・ファイルを持ちます。このレッスンでは、あなたは最も基本的なひな形:Single View Application(ビューが1つだけのアプリケーション)で始めます。
To create a new project
新規プロジェクトを作成するには
Open Xcode from the
/Applicationsdirectory.
/ApplicationsディレクトリからXcodeを開きます。If this is the first time you’ve launched Xcode, it may ask you to agree to the user agreement and to download additional components. Follow the prompts through these screens until Xcode is completely set up and ready to launch.
これがあなたがXcodeを起動する最初の時ならば、それは利用者契約に同意するかあなたに尋ねてから追加コンポーネントをダウンロードするでしょう。Xcodeが完全に設定されて起動準備ができるまでこれらの画面を進んでプロンプトに従ってください。As soon as Xcode launches, the welcome window appears.
Xcodeが起動するとすぐ、ウェルカムウインドウが現れます。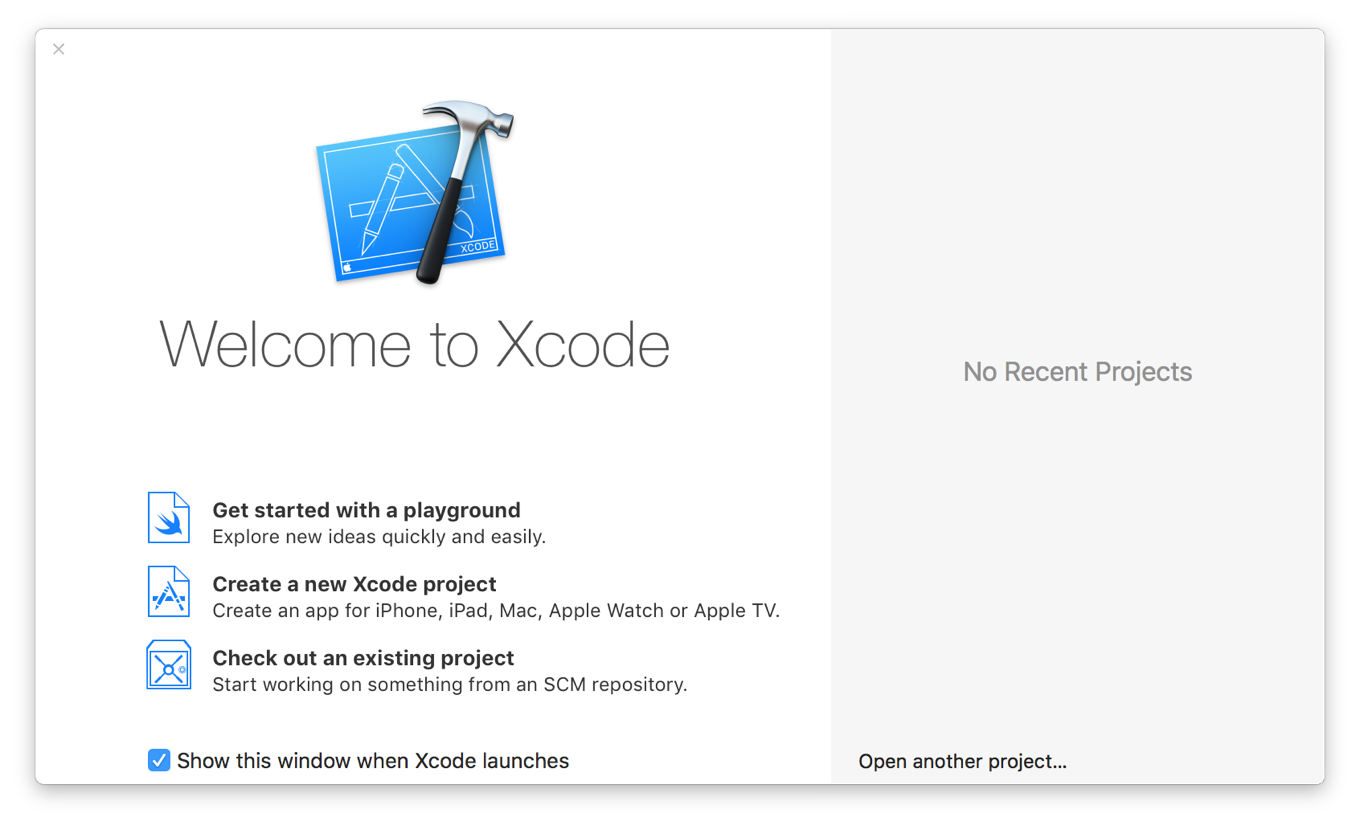
If a project window appears instead of the welcome window, don’t worry—you probably created or opened a project in Xcode previously. Just use the menu item in the next step to create the project.
もしWelcomeウインドウではなくプロジェクトウインドウが現れても、心配いりません—あなたはおそらくXcoceで以前にプロジェクトを作成または開いたのでしょう。単にそのメニュー項目を次のステップでプロジェクトを作成するのに使ってください。In the welcome window, click “Create a new Xcode project” (or choose File > New > Project).
Welcomeウインドウにおいて、「Create a new Xcode project」をクリックしてください(または「File > New > Project」を選んでください)。Xcode opens a new window and displays a dialog in which you choose a template.
Xcodeは新しいウインドウを開きダイアログを表示します、そこであなたはあるひな形を選びます。Select iOS at the top of the dialog.
ダイアログの一番上でiOSを選んでください。In the Application section, select Single View Application and then click Next.
「Application」セクションにおいて、Single View Applicationをクリックして、それからNextをクリックしてください。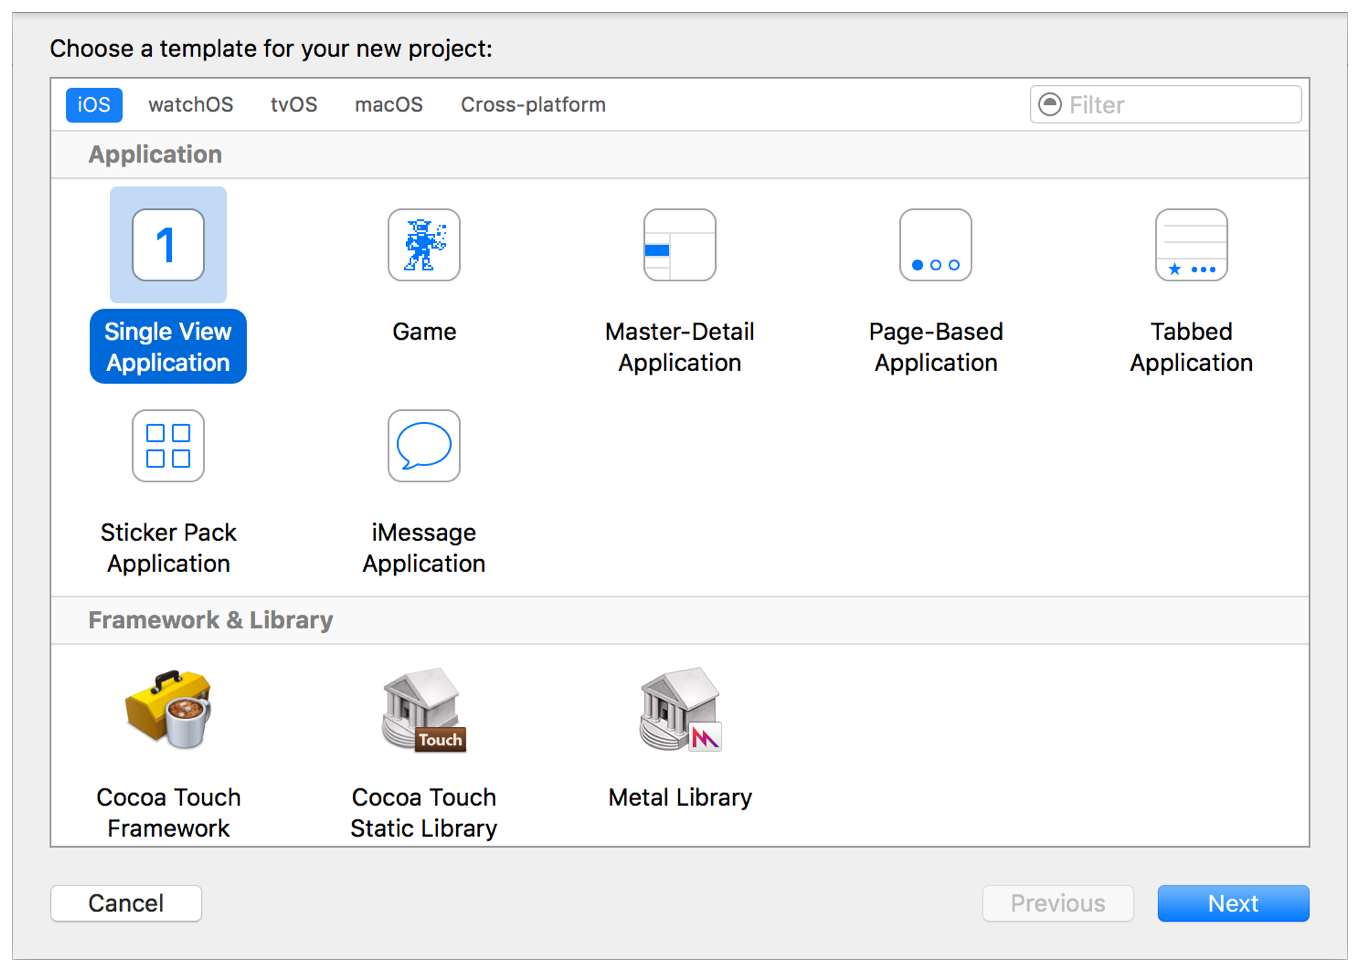
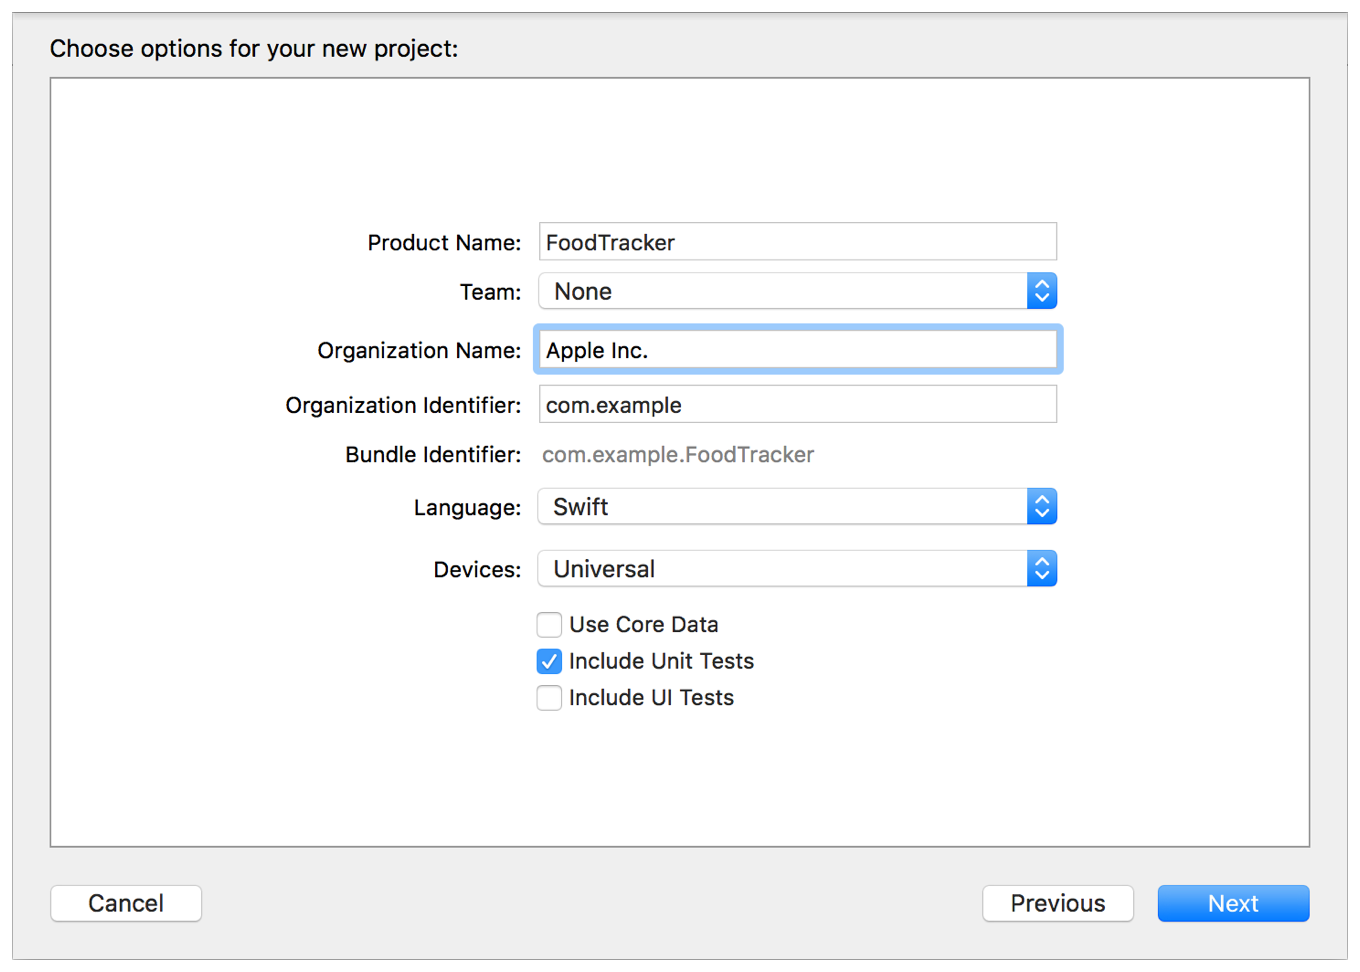
In the dialog that appears, use the following values to name your app and choose additional options for your project:
現れるダイアログにおいて、以下の値を使ってあなたのアプリに名前をつけて、あなたのプロジェクトのための追加オプションを選んでください。Product Name:
FoodTracker
製品名:FoodTrackerXcode uses the product name you entered to name your project and the app.
Xcodeはあなたが入力した製品名を使ってあなたのプロジェクトとアプリを命名します。Team: If this is not automatically filled in, set the team to None.
チーム:これが自動的に記入されないならば、チームはNoneに設定してください。Organization Name: The name of your organization or your own name. You can leave this blank.
組織名:あなたの組織の名前またはあなた自身の名前。あなたはこれを空白のままにできます。Organization Identifier: Your organization identifier, if you have one. If you don’t, use
com.example.
組織識別子。あなたの組織識別子、あなたがそれを持つならば。あなたが持たないならば、com.exampleを使ってください。Bundle Identifier: This value is automatically generated based on your product name and organization identifier.
バンドル識別子:この値は、自動的にあなたの製品名と組織識別子に基づいて生成されます。Language: Swift
言語:SwiftDevices: Universal
デバイス(機器):共通A Universal app is one that runs on both iPhone and iPad.
Universalアプリは、iPhoneとiPadの両方で動作するものです。Use Core Data: Unselected.
Core Dataの使用:非選択。Include Unit Tests: Selected.
ユニットテストを含む:選択。Include UI Tests: Unselected.
UIテストを含む:非選択。
Click Next.
Nextをクリックしてください。In the dialog that appears, select a location to save your project and click Create.
現れるダイアログで、あなたのプロジェクトを保存する場所を選びCreateをクリックしてください。Xcode opens your new project in the workspace window.
Xcodeは、あなたの新しいプロジェクトをワークスペースウインドウ(作業場)で開きます。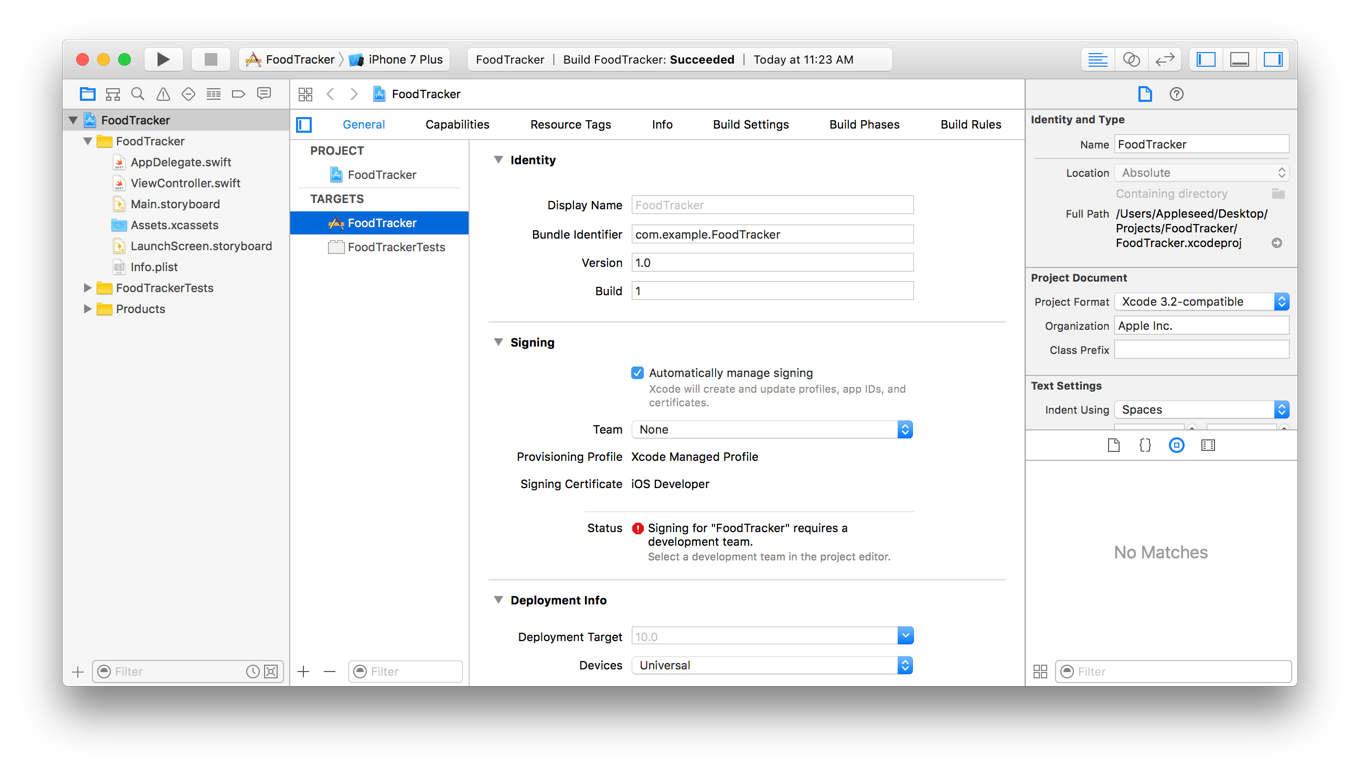
In the workspace window, you may or may not see an error icon with a message that says “Signing for FoodTracker requires a development team.” This warning means you haven’t set up Xcode for iOS development yet, but don’t worry, you can complete these lessons without doing that. You do not need a development team to run the app in the simulator.
ワークスペースウインドウでは、あなたはエラーアイコンと「FoodTrackerのための署名は開発チームを必要とします。」というメッセージを見るかもしれないし見ないかもしれません。この警告は、あなたがXcodeをiOSのためにまだ設定し終わっていないことを意味します、しかし心配いりません、あなたはこれらのレッスンをそうすることなく完了できます。あなたは、アプリをシミュレータで実行するのに開発チームを必要としません。
Get Familiar with Xcode
Xcodeに慣れる
Xcode includes everything you need to create an app. It organizes all the files and resources that go into creating an app. It provides editors for both your code and your user interfaces. Also, Xcode lets you build, run, and debug your app—providing simulators for iOS devices and a powerful integrated debugger.
Xcodeは、あなたがアプリを作成するのに必要なものすべてを含んでいます。それは、アプリの作成に従事するすべてのファイルとリソースを組織化します。それは、あなたのコードとあなたのユーザインターフェイス両方のためのエディタを提供します。また、Xcodeはあなたにあなたのアプリのビルド、実行、そしてデバッグを行わせます — iOSデバイスのためのシミュレータおよび強力なインタラクティブデバッガを提供します。
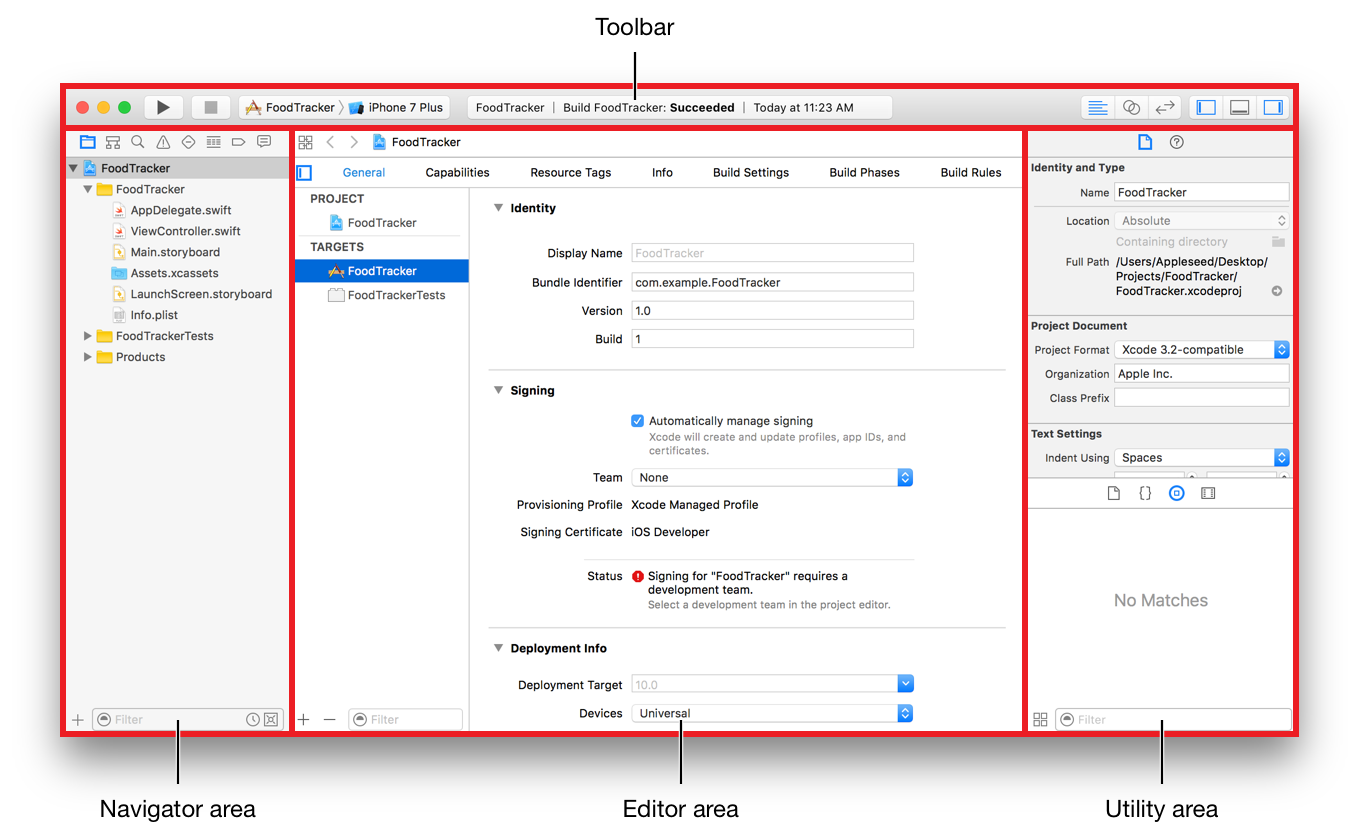
Take a few moments to familiarize yourself with the main sections of the Xcode workspace. You’ll use the areas identified in the window below throughout the lessons. Don’t be overwhelmed by all of the pieces; each area is described in more detail when you need to use it.
少しだけ時間をとってXcodeワークスペースのさまざまな主要部門に慣れておいてください。あなたはレッスンを通して下のウインドウにおいて確認される区画を使います。これらの部分部分の全てに圧倒されないで;各区画はあなたがそれを使う必要があるときにより詳細に説明されます。
Run iOS Simulator
iOSシミュレータの実行
Because you based your project on an Xcode template, the basic app environment is automatically set up for you. Even though you haven’t written any code, you can build and run the Single View Application template without any additional configuration.
あなたは、Xcodeひな形をもとにあなたのプロジェクトを構築したので、基本的なアプリ環境は自動的にあなたの代わりに準備されます。あなたが1つもコードを書かなかったとしても、あなたはSingle View Applicationひな形をビルドして実行することが、追加の何らかの構成なしにできます。
To build and run your app, use the iOS Simulator app that’s included in Xcode. The simulator gives you an idea of how your app would look and behave if it were running on a device.
あなたのアプリをビルドして実行するには、iOS Simulatorアプリを使ってください、それはXcodeに含まれます。シミュレータは、あなたのアプリがどう見えるだろうかそしてそれがデバイス上で動作していたならばどう振る舞うかの見解をあなたに与えます。
The simulator can model a number of different types of hardware—All the screen sizes and resolutions for both iPad and iPhone—so you can simulate your app on every device you’re developing for. In this lesson, use the iPhone 7 option.
シミュレータは、多くの異なる型のハードウェアをモデル化することができます — iPadとiPhone両方の画面サイズと解像度のすべて — それであなたはあなたのアプリをあなたが開発しているあらゆるデバイス上でシミュレートできます。このレッスンでは、iPhone 7オプションを使ってください。
To run your app in the simulator
あなたのアプリをシミュレータで実行するには
In the Scheme pop-up menu in the Xcode toolbar, choose iPhone 7.
XcodeツールバーのSchemeポップアップメニューにおいて、iPhone 7を選んでください。The Scheme pop-up menu lets you choose which simulator or device you’d like to run your app on. Make sure you select the iPhone 7 Simulator, not an iOS device.
Schemeポップアップメニューは、あなたがあなたのアプリを実行したいと思うのはどのデバイスまたはシミュレータかをあなたに選ばせます。あなたが、iOSデバイスではなく、iPhone 7シミュレータを選択するのを確かめてください。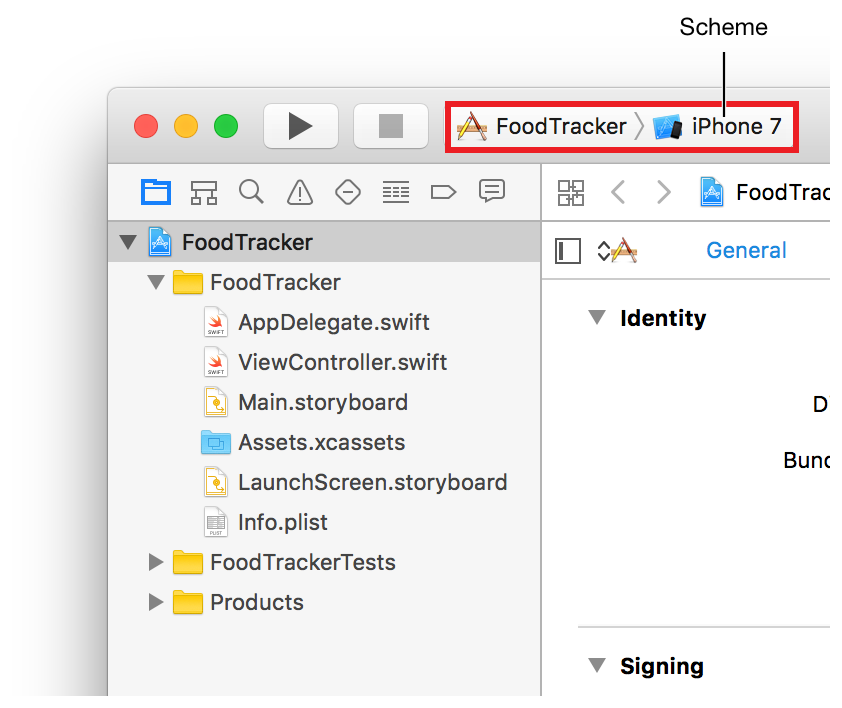
Click the Run button, located in the top-left corner of the Xcode toolbar.
Run(実行)ボタンをクリックしてください、Xcodeツールバーの一番上左の角にあります。
Alternatively, choose Product > Run (or press Command-R).
または代わりに、Product > Runを選んでください(またはCommandキー + R)。If you’re running an app for the first time, Xcode asks whether you’d like to enable developer mode on your Mac. Developer mode allows Xcode access to certain debugging features without requiring you to enter your password each time. Decide whether you’d like to enable developer mode and follow the prompts.
あなたがアプリを実行したのが初めてならば、Xcodeはあなたが開発者モードをあなたのMacで有効にしたいかどうかを尋ねます。開発者モードは、特定のデバッグ機能をXcodeが毎回あなたのパスワード入力をあなたに要求せずに利用できるようにします。あなたが開発者モードを有効にしたいかどうかを決めてプロンプトに従ってください。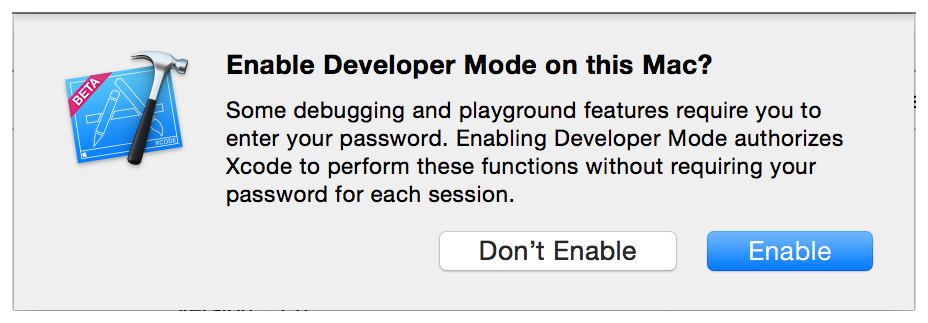
If you choose not to enable developer mode, you may be asked for your password later on. These lessons assume developer mode is enabled.
あなたが開発者モードを有効にしないのを選んだならば、あなたはあなたのパスワードを後で聞かれるでしょう。これらのレッスンは、開発者モードが有効にされると仮定します。Watch the Xcode toolbar as the build process completes.
Xcoceツールバーがビルドプロセスが完了するのを見守ります。Xcode displays messages about the build process in the activity viewer, which is in the middle of the toolbar.
Xcodeは、メッセージをビルドプロセスについてアクティビティビューア(状況表示窓)の中で表示します、それはツールバーの中央にあります。
After Xcode finishes building your project, the simulator starts automatically. It may take a few moments to start up the first time.
Xcodeがあなたのプロジェクトをビルドし終えた後、シミュレータは自動的に始まります。それは初めての始動では少し時間がかかるかもしれません。
The simulator opens in the iPhone mode you specified and then launches your app. Initially, the simulator displays your app’s launch screen, and then it transitions to your app’s main interface. In an unmodified Single View Application template, the launch screen and the main interface are identical.
シミュレータは、まさしくあなたが指定したようにiPhoneモードで開きます、それからあなたのアプリを起動します。初めに、シミュレータはあなたのアプリの起動画面を表示します、それからそれはあなたのアプリのメインインターフェイスへ移行します。変更なしのSingle View Applicationテンプレートでは、起動画面とメインインターフェイスは同一です。
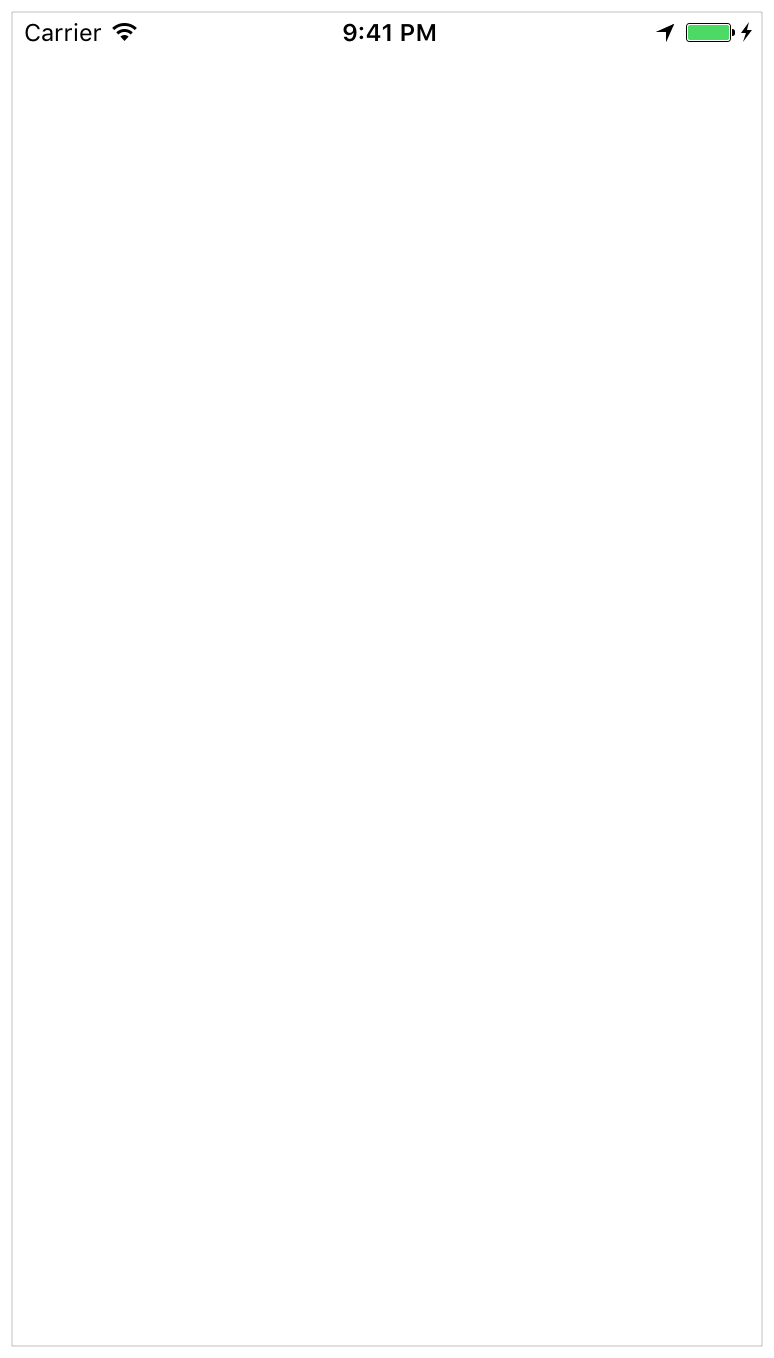
Right now, the Single View Application template doesn’t do much—it just displays a white screen. Other templates have more complex behavior. It’s important to understand a template’s uses before you extend it to make your own app. Running your app in the simulator with no modifications is a good way to start developing that understanding.
今のところ、Single View Applicationひな形(テンプレート)は、大したことはしません—それはただ白い画面を表示するだけです。他のひな形は、もっと複雑なふるまいをします。あるひな形の用途を、独自アプリ作成のためにあなたがそれを拡張する前に理解することは大切です。あなたのアプリをシミュレータで変更なしで実行してみるのは、よく理解して開発を始めるのによい方法です。
Quit the simulator by choosing Simulator > Quit Simulator (or pressing Command-Q).
シミュレータを、Simulator > Quit Simulatorを選ぶ(またはCommadキー + Qを押す)ことで終了してください。
Review the Source Code
ソースコードを調査する
The Single View Application template comes with a few source code files that set up the app environment. First, take a look at the AppDelegate.swift file.
Single View Applicationひな形は、いくつかのソースコードファイルを備えています、それはアプリ環境を準備します。最初に、AppDelegate.swiftファイルを見てみましょう。
To look at the AppDelegate.swift source file
AppDelegate.swiftソースファイルを見るには
Make sure the project navigator is open in the navigator area.
プロジェクトナビゲータ(案内機能)がナビゲータ区画で開いていることを確認してください。The project navigator displays all the files in your project. If the project navigator isn’t open, click the leftmost button in the navigator selector bar. (Alternatively, choose View > Navigators > Show Project Navigator.)
プロジェクトナビゲータは、あなたのプロジェクト内のすべてのファイルを表示します。プロジェクトナビゲータが開いていないならば、ナビゲータ選択バーの中の一番左のボタンをクリックしてください。(または代わりに、View > Navigators > Show Project Navigatorを選んでください。)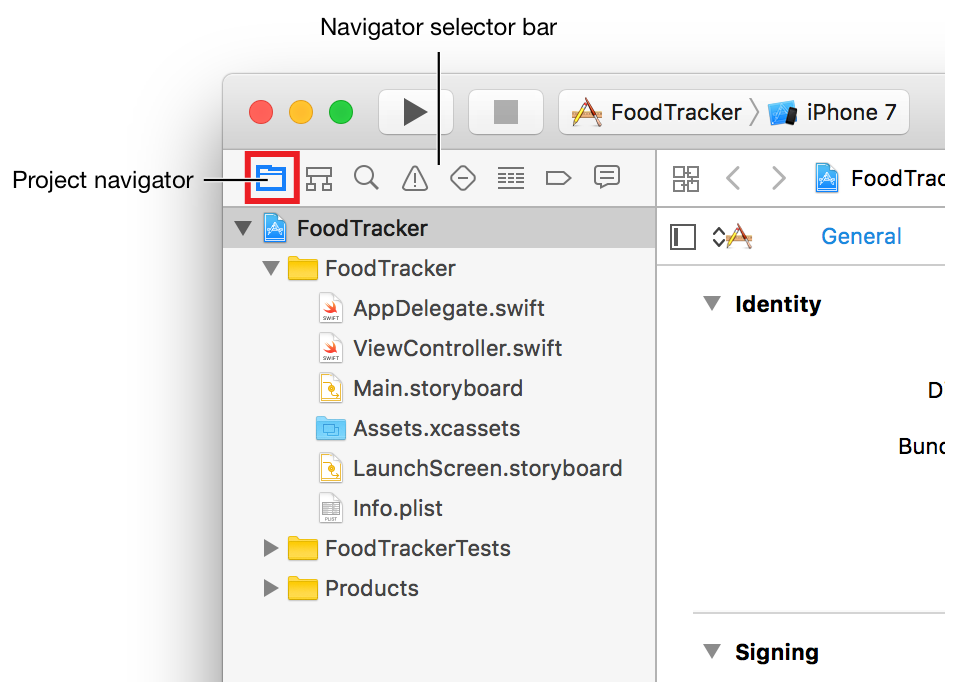
If necessary, open the FoodTracker folder in the project navigator by clicking the disclosure triangle next to it.
必要ならば、FoodTrackerフォルダをプロジェクトナビゲータにおいてその隣の開示三角形をクリックすることで開いてください。Select
AppDelegate.swift.
AppDelegate.swiftを選択します。Xcode opens the source file in the main editor area of the window.
Xcodeは、ソースファイルをウインドウ中央の大きなエディタ区画で開きます。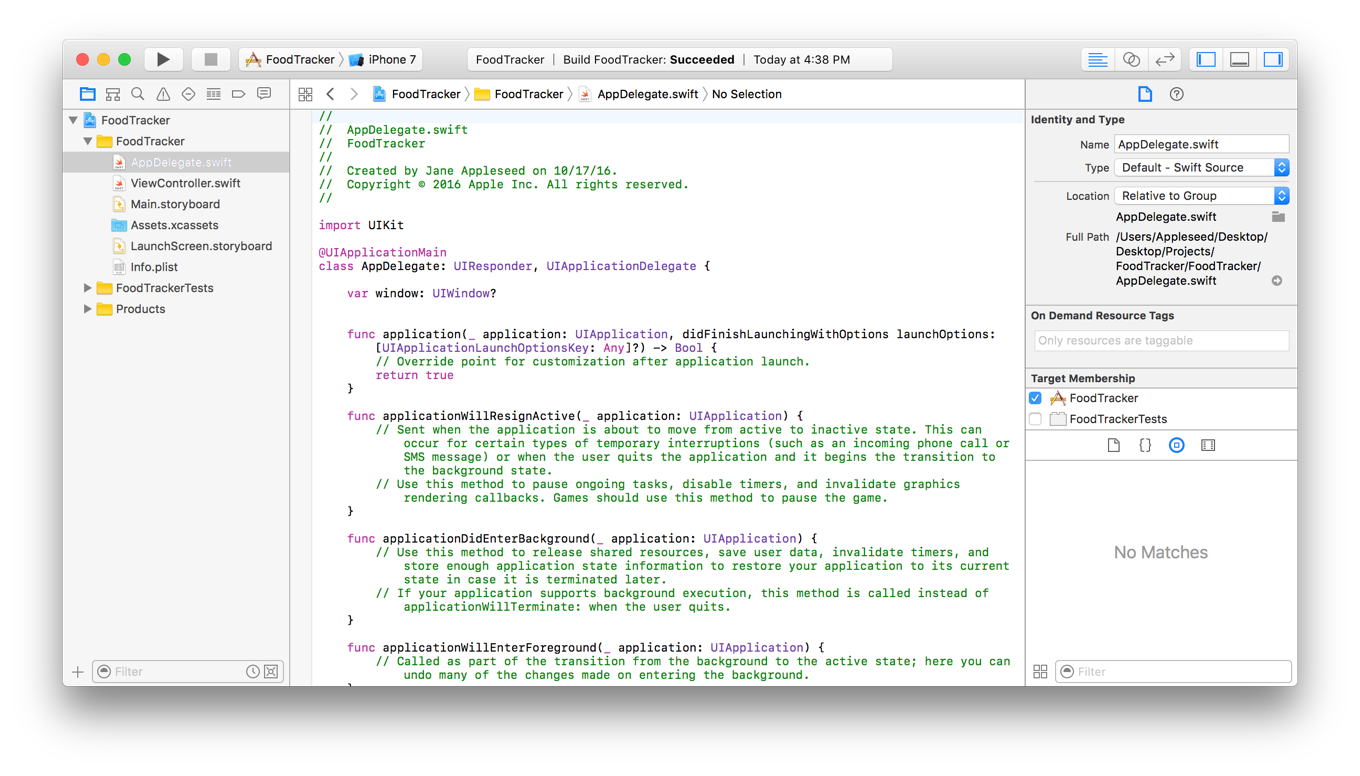
Alternatively, double-click the
AppDelegate.swiftfile to open it in a separate window.
あるいは、AppDelegate.swiftファイルをダブルクリックしてそれを独立したウインドウで開いてください。
The App Delegate Source File
アプリデリゲート・ソースファイル
The AppDelegate.swift source file has two primary functions:
AppDelegate.swiftソースファイルは、2つの主要な機能を持ちます:
It defines your
AppDelegateclass. The app delegate creates the window where your app’s content is drawn and provides a place to respond to state transitions within the app.
それはあなたのAppDelegateクラスを定義します。アプリデリゲートは、あなたのアプリのコンテンツが描出されるウインドウを作成して、アプリ内部の状態推移に反応する場所を提供します。It creates the entry point to your app and a run loop that delivers input events to your app. This work is done by the
UIApplicationMainattribute (@UIApplicationMain), which appears toward the top of the file.
それは、あなたのアプリに対するエントリポイントと、あなたのアプリに入力イベントを送り届ける実行ループを作成します。この仕事は、UIApplicationMain属性(@UIApplicationMain)によって行われます、それはファイルの一番上の方に現れます。Using the
UIApplicationMainattribute is equivalent to calling theUIApplicationMainfunction and passing yourAppDelegateclass’s name as the name of the delegate class. In response, the system creates an application object. The application object is responsible for managing the life cycle of the app. The system also creates an instance of yourAppDelegateclass, and assigns it to the application object. Finally, the system launches your app.
UIApplicationMain属性を使用することは、UIApplicationMain関数を呼び出してあなたのAppDelegateクラスの名前をデリゲートクラスの名前として渡すことに同等です。応答して、システムはアプリケーションオブジェクトを作成します。アプリケーションオブジェクトは、アプリのライフサイクルを管理する責任を負います。システムはまた、あなたのAppDelegateクラスのインスタンスを作成します、そしてそれをアプリケーションオブジェクトへ割り当てます。最終的に、システムはあなたのアプリを起動します。
The AppDelegate class is automatically created whenever you create a new project. Unless you are doing something highly unusual, you should use this class provided by Xcode to initialize your app and respond to app-level events. The AppDelegate class adopts the UIApplicationDelegate protocol. This protocol defines a number of methods you use to set up your app, to respond to the app’s state changes, and to handle other app-level events.
AppDelegateクラスは、あなたが新しいプロジェクトを作成するたびごとに自動的に作成されます。あなたが非常に変わった何事かをしない限り、あなたはXcodeによって提供されるこのクラスを使うことで、あなたのアプリを初期化してアプリ水準のイベントに応答すべきです。AppDelegateクラスは、UIApplicationDelegateプロトコルを採用します。このプロトコルは、あなたがあなたのアプリを設定するために、アプリの状態変化に応答するために、そして他のアプリ水準のイベントを取り扱うために使うための多くのメソッドを定義します。
The AppDelegate class contains a single property: window.
AppDelegateクラスは、ただ1つのプロパティ(特性):windowだけを含みます。
var window: UIWindow?
This property stores a reference to the app’s window. This window represents the root of your app’s view hierarchy. It is where all of your app content is drawn. Note that the window property is an optional, which means it may have no value (be nil) at some point.
このプロパティは、アプリのウインドウへの参照を格納します。このウインドウは、あなたのアプリのビュー階層のルートを表します。それはあなたのアプリのコンテンツの全てが描画されるところです。windowプロパティがオプショナルであることに注意してください、そのことは、それがある時点で値を持たない(nil)かもしれないことを意味します。
The AppDelegate class also contains stub implementations of the following delegate methods:
AppDelegateクラスはまた、以下のデリゲートメソッドのスタブ実装を含みます:
func application(_ application: UIApplication, didFinishLaunchingWithOptions launchOptions: [UIApplicationLaunchOptionsKey: Any]?) -> Boolfunc applicationWillResignActive(_ application: UIApplication)func applicationDidEnterBackground(_ application: UIApplication)func applicationWillEnterForeground(_ application: UIApplication)func applicationDidBecomeActive(_ application: UIApplication)func applicationWillTerminate(_ application: UIApplication)
These methods let the application object communicate with the app delegate. During an app state transition—for example, app launch, transitioning to the background, and app termination—the application object calls the corresponding delegate method, giving your app an opportunity to respond. You don’t need to do anything special to make sure these methods get called at the correct time—the application object handles that job for you.
これらのメソッドは、アプリケーションオブジェクトにアプリデリゲートと通信させます。アプリの状態推移—例えば、アプリの起動、バックグラウンドへの移行、そしてアプリの終了など—の間に、アプリケーションオブジェクトは、該当するデリゲートメソッドを呼び出して、応答するのにふさわしい機会をあなたのアプリに与えます。これらのメソッドが正しい時に呼ばれるのを確実にするのに、あなたが何か特別なことをする必要はありません—アプリケーションオブジェクトはその仕事をあなたの代わりに取り扱います。
Each of the delegate methods has a default behavior. If you leave the template implementation empty or delete it from your AppDelegate class, you get the default behavior whenever that method is called. Alternatively, you can add your own code to the stub methods, defining custom behaviors that are executed when the methods are called.
デリゲートメソッドの各々は、省略時の挙動を持ちます。あなたがひな形実装を空のままにしておいたり、それをあなたのAppDelegateクラスから削除したならば、あなたはそのメソッドが呼ばれるたびに省略時の挙動を受け取ります。あるいは、あなたはあなた独自のコードをスタブメソッドに加えて、そのメソッドが呼び出される時に実行されるあつらえの挙動を定義することができます。
The template also provides comments for each of the stub methods. These comments describe how these methods can be used by your app. You can use the stub methods and comments as a blueprint for designing many common app-level behaviors.
このテンプレートはまた、スタブメソッドそれぞれに対するコメントを提供します。これらのコメントは、どのようにそれらのメソッドがあなたのアプリによって使用されることができるかを記述します。あなたは、スタブメソッドとコメントを多くのよくあるアプリ水準挙動の設計のための青写真として使うことができます。
In this lesson, you won’t be using any custom app delegate code, so you don’t have to make any changes to the AppDelegate.swift file.
このレッスンでは、あなたは何らあつらえのアプリデリゲートコードを使用しません、それであなたはいかなる変更もAppDelegate.swiftファイルにする必要はありません。
The View Controller Source File
ビューコントローラ・ソースファイル
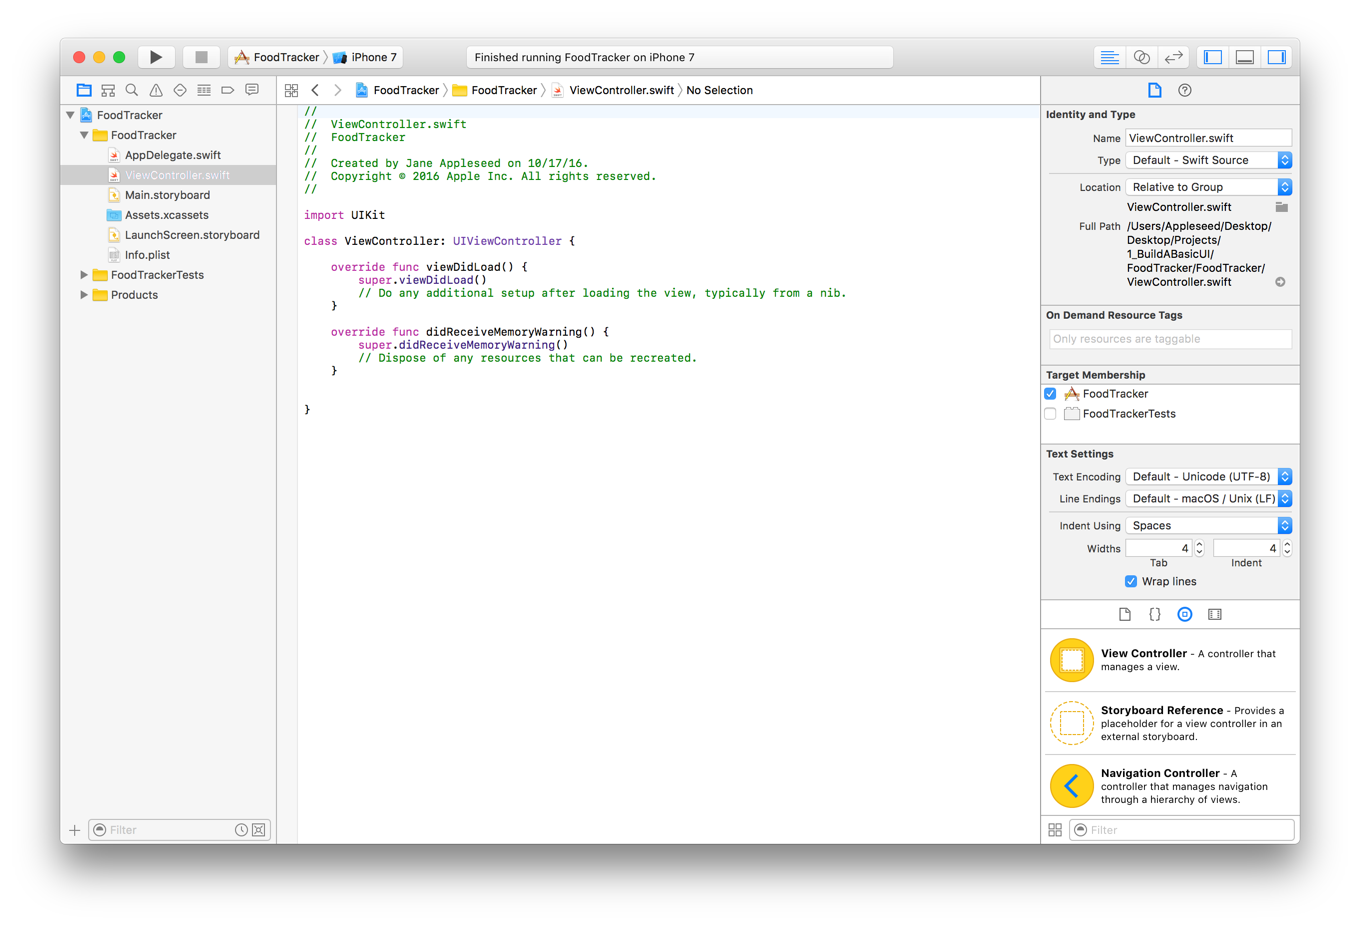
The Single View Application template has another source code file: ViewController.swift. Select ViewController.swift in the project navigator to view it.
Single View Applicationひな形は、もう一つソースコードファイル:ViewController.swiftを持ちます。ViewController.swiftをプロジェクトナビゲータにおいて選択してそれを眺めてください。
This file defines a custom subclass of UIViewController named ViewController. Right now, this class simply inherits all the behavior defined by UIViewController. To override or extend that behavior, you override the methods defined on UIViewController.
このファイルはViewControllerという名前のあつらえのUIViewControllerのサブクラス(下位クラス)を定義します。今のところ、このクラスはUIViewControllerで定義される挙動のすべてを単に継承します。その挙動をオーバーライドしたり拡張したりするために、あなたはUIViewControllerで定義されるメソッドをオーバーライドします。
As you can see in the ViewController.swift file, the template’s implementation overrides both the viewDidLoad() and didReceiveMemoryWarning() methods; however, the template’s stub implementation doesn’t do anything yet, except call the UIViewController version of these methods. You can add your own code to customize the view controller’s response to these events.
ViewController.swiftファイルの中であなたが見ることができるように、この雛形の持つ実装はviewDidLoad()とdidReceiveMemoryWarning()メソッドの両方をオーバーライドします;しかしながら、雛形の持つスダブ実装はまだ何もしません、これらのメソッドのUIViewController版を呼び出す以外は。あなたは、あなた独自のコードを加えることで、これらのイベントへのビューコントローラの応答をカスタマイズできます。
Although the template comes with the didReceiveMemoryWarning() method, you won’t need to implement it in these lessons, so go ahead and delete it.
このひな形がdidReceiveMemoryWarning()メソッドを備えると言っても、あなたはこれらのレッスンにおいてそれを実装する必要はありません、それで前へ進みそれは削除してください。
At this point, your ViewController.swift code should look something like this:
この時点で、あなたのViewController.swiftコードはこのようなものに見えるはずです:
import UIKitclass ViewController: UIViewController {override func viewDidLoad() {super.viewDidLoad()// Do any additional setup after loading the view, typically from a nib. (何らかの追加の準備をビューを、大抵はnibからロードした後で行います)}}
You’ll start writing code in this source code file later in this lesson.
あなたは、後ほどこのレッスンでこのソースコードファイルにコードを書き始めます。
Open Your Storyboard
あなたのストーリーボードを開く
You’re ready to start working on a storyboard for your app. A storyboard is a visual representation of the app’s user interface, showing screens of content and the transitions between them. You use storyboards to lay out the flow—or story—that drives your app. You see exactly what you're building while you’re building it, get immediate feedback about what’s working and what’s not, and make instantly visible changes to your user interface.
あなたは、あなたのアプリのストーリーボードで作業を始める準備ができています。ストーリーボードは、アプリのユーザインターフェイスの視覚による表現です、それはいくつかの画面表示コンテンツとそれらの間の転換を表示します。あなたはストーリーボードを使って、あなたのアプリを操作する流れ(フロー)—または物語(ストーリー)—を整えます。あなたは、あなたが作っているものをあなたがそれを作っている時に正確に見て、何が機能して何がしないかについて直に反応を得ます、そして即座に視覚的変更をあなたのユーザインターフェイスに行います。
To open your storyboard
あなたのストーリーボードを開くには
In the project navigator, select
Main.storyboard.
プロジェクトナビゲータにおいて、Main.storyboardを選びます。Xcode opens the storyboard in Interface Builder—its visual interface editor—in the editor area. The background of the storyboard is the canvas. You use the canvas to add and arrange user interface elements.
Xcodeは、ストーリーボードをエディタ区画のインターフェイスビルダーで—それの視覚インターフェイスエディタで—開きます。ストーリーボードの背景は、キャンバスです。あなたは、このキャンバスを使ってユーザインターフェイス要素を加えたり整えたりします。
Your storyboard should look similar to this:
あなたのストーリーボードはこのように見えるはずです:
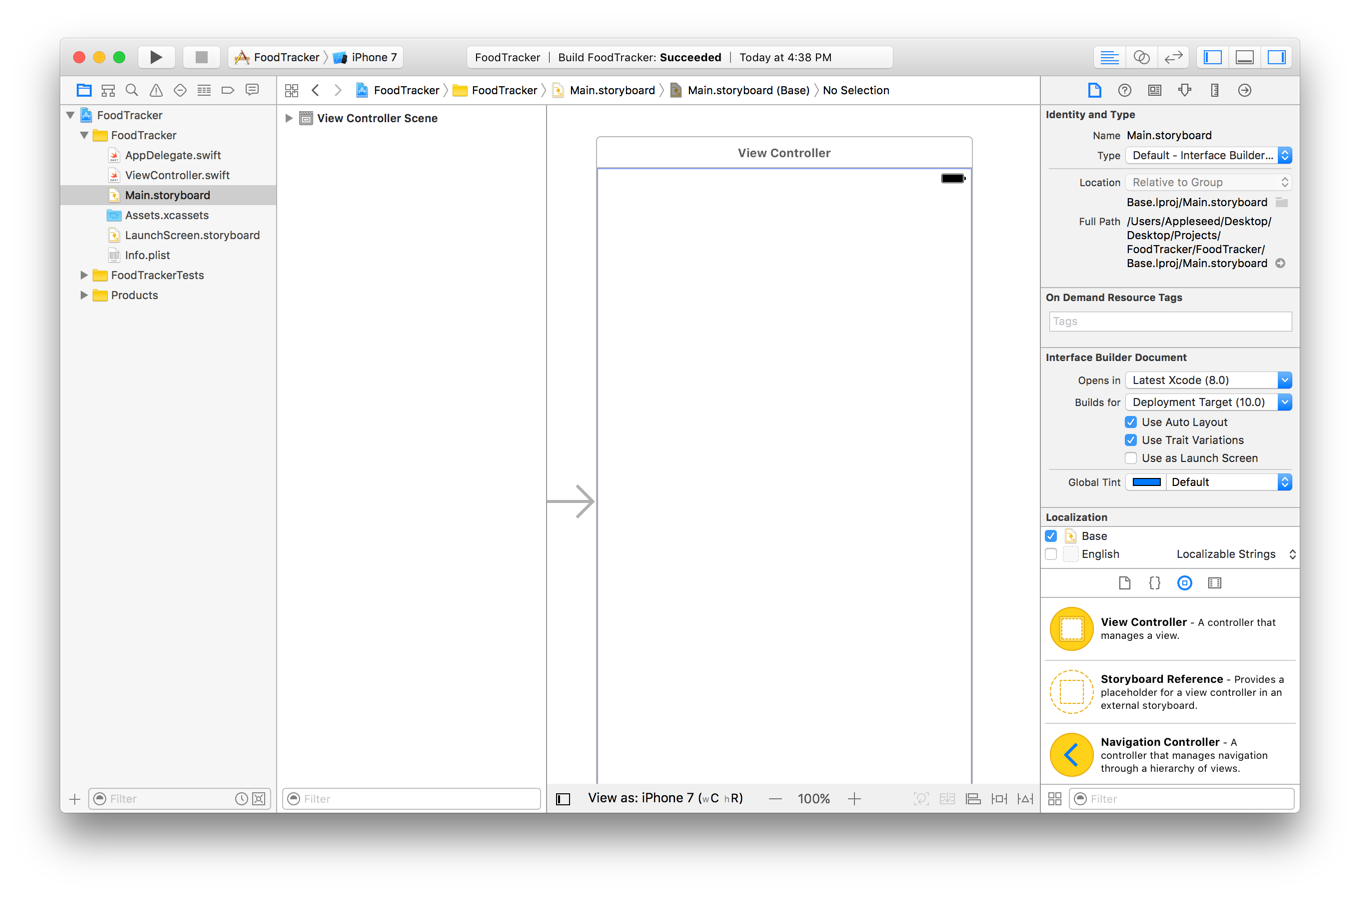
At this point, the storyboard in your app contains one scene, which represents a screen of content in your app. The arrow that points to the left side of the scene on the canvas is the storyboard entry point, which means that this scene is loaded first when the app starts. Right now, the scene that you see on the canvas contains a single view that’s managed by a view controller. You’ll learn more about the roles of views and view controllers soon.
この時点で、あなたのアプリのストーリーボードは1つのシーン(場面)を含んでいます、それはあなたのアプリのコンテンツの画面のひとつを表します。キャンバス上でシーンの左側面を指し示す矢印はストーリーボードエントリポイントです、それは、アプリがスタートする時にこのシーンが最初にロードされることを意味します。今のところ、あなたがキャンバス上で見るこのシーンはただ1つのビューを含みます、それはビューコントローラによって管理されます。あなたはすぐに、もっとビューおよびビューコントローラについて学びます。
When you ran your app in the iPhone 7 Simulator app, the view in this scene is what you saw on the device screen. However, the scene on the canvas may not have the same dimensions as the simulator’s screen. You can select the screen size and orientation at the bottom of the canvas. In this case, it’s set to iPhone 7 in a portrait orientation, so the canvas and the simulator are the same.
あなたがあなたのアプリをiPhone 7 シミュレータアプリで実行した場合、このシーンの中のビューはあなたがデバイス画面上で見たとおりです。しかしながら、キャンバス上のシーンはシミュレータの画面と同じ寸法を持たないでしょう。あなたは、画面のサイズと方向をキャンバスの一番下で選択できます。この場合には、それは縦向き方向のiPhone 7 に設定されます、それでキャンバスとシミュレータは同じになります。
Even though the canvas shows a specific device and orientation, it is important to create an adaptive interface—an interface that automatically adjusts so that it looks good on any device and in any orientation. As you develop your interface, you can change the canvas’s view, letting you see how your interface adapts to different size screens.
キャンバスが特定のデバイスと方向を示すとしても、重要なのは適応インターフェイス — 自動的に適応することでそれがあらゆるデバイスであらゆる方向においてふさわしく見えるインターフェイス — を作成することです。あなたがあなたのインターフェイスを開発するにつれて、あなたはキャンバスのビューを変更することができ、あなたのインターフェイスが異なるサイズの画面にどう適応するかをあなたが見れるようにします。
Build the Basic UI
基本となるUIを造る
It’s time to build a basic interface. You’ll start by working on a user interface for the scene that lets you add a new meal to your meal tracking app, FoodTracker.
基本インターフェイスを作る時です。あなたは、新しい食事をあなたの食事追跡アプリ、FoodTrackerに加えるシーンのユーザインターフェイス上で作業することで始めます。
Xcode provides a library of objects that you can add to a storyboard file. Some of these are elements that appear in the user interface, such as buttons and text fields. Others, such as view controllers and gesture recognizers, define the behavior of your app but don’t appear onscreen.
Xcodeは、あなたがストーリーボードファイルに加えることができるオブジェクトのライブラリ(オブジェクトの図書館)を提供します。それらのいくつかは、ユーザインターフェイスの中に現れる要素です、例えばボタンやテキスト欄など。他のもの、例えばビューコントローラやジェスチャリコグナイザ(ジェスチャー認識、身ぶり認識)は、あなたのアプリの挙動を定義しますが画面上には現れません。
The elements that appear in the user interface are known as views. Views display content to the user. They are the building blocks for constructing your user interface and presenting your content in a clear, elegant, and useful way. Views have a variety of useful built-in behaviors, including displaying themselves onscreen and reacting to user input.
ユーザインターフェイスの中に現れる要素は、ビューとして知られます。おのおののビューは、中身(コンテンツ)を利用者(ユーザ)に表示します。それらは、あなたのユーザインターフェイスを組み立てるための、そしてあなたのコンテンツ(表示したいこと)をわかりやすく、優雅に、役に立つ形で提示するための建築ブロックです。ビューは、それら自身を画面上で表示したりユーザ入力に反応したりを含む、いろいろの有用な組み込みの挙動を持ちます。
All view objects in iOS are of type UIView or one of its subclasses. Many UIView subclasses are highly specialized in appearance and behavior. Start by adding a text field (UITextField), one such subclass of UIView, to your scene. A text field lets a user type in a single line of text, which you’ll use as the name of a meal.
iOSでの全てのビューオブジェクトは、型UIViewまたはそれのサブクラスです。多くのUIViewサブクラスは、外観と挙動において高度に特殊化されます。そのようなUIViewのサブクラスの1つ、テキスト欄(UITextField)をあなたのシーンに加えることで始めましょう。テキスト欄は、ユーザにただ1行だけのテキスト、あなたが食事の名前として使うもの、を入力させます。
To add a text field to your scene
テキスト欄をあなたのシーンに加えるには
Choose Editor > Canvas, and make sure Show Bounds Rectangles is selected.
Editor > Canvasを選んでください、そしてShow Bounds Rectanglesが選択されることを確かめてください。This setting causes Interface Builder to draw a blue bounding box around all the views in the canvas. Many views and controls have transparent backgrounds, making it difficult to see their actual size. Layout bugs occur when the system resizes a view so that it’s either larger or smaller than you anticipate. Enabling this setting helps you understand exactly what’s going on in your view hierarchy.
この設定は、Interface Builderにキャンバスの中のすべてのビューの周りに青い境界ボックスを描画させます。多くのビューとコントロールは、透明な背景を持ち、それがそれらの実際の大きさを知るのを難しくしています。レイアウトの欠陥は、システムがあるビューの大きさを変更するときに現れます、それゆえそれはあなたが予想するより大きいか小さいかのどちらかになります。この設定を有効にすることは、あなたのビュー階層がどうなっているかあなたが正確に理解する助けとなります。Open the Object library.
オブジェクトライブラリを開きます。The Object library appears at the bottom of the utility area on the right side of Xcode. If you don’t see the Object library, click its button, which is the third button from the left in the library selector bar. (Alternatively, choose View > Utilities > Show Object Library.)
オブジェクトライブラリは、Xcodeの右側ユーティリティ区画の1番下に見えます。オブジェクトライブラリが見えないならば、それのボタンをクリックしてください、それはライブラリ選択バーの左から3番目のボタンです。(または代わりに、View > Utilities > Show Object Libraryを選びます)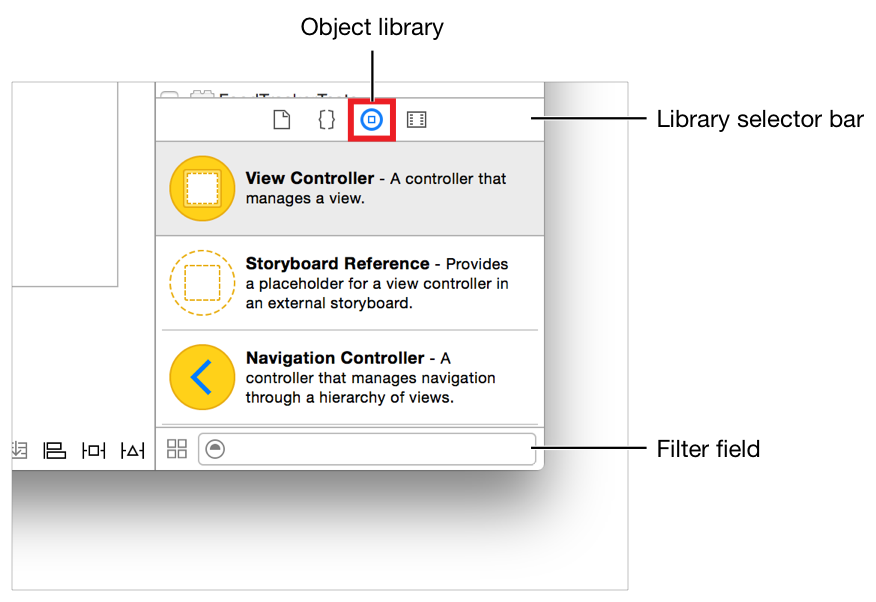
A list appears showing each object’s name, description, and visual representation.
各オブジェクトの名前、説明、そして視覚的表現を示しているリストが現れます。In the Object library, type
text fieldin the filter field to find the Text Field object quickly.
オブジェクトライブラリにおいて、フィルタ欄(選り分け用単語の入力欄)にtext fieldをタイプしてText Field(テキスト欄)オブジェクトを素早く見つけましょう。Drag a Text Field object from the Object library to your scene.
Text Fieldオブジェクトをオブジェクトライブラリからあなたのシーンへとドラッグしてください。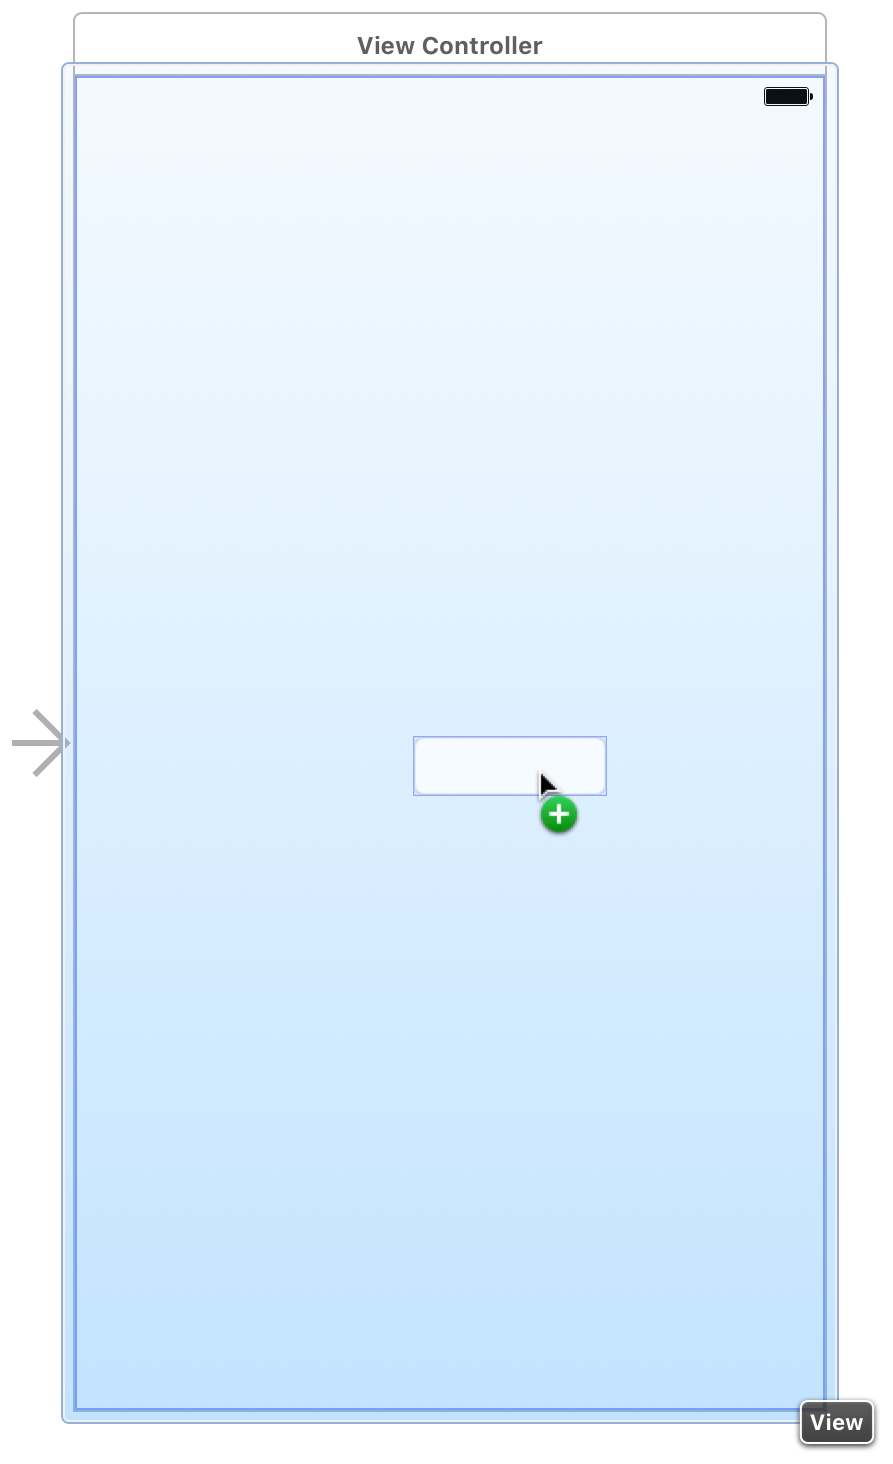
If necessary, zoom in by choosing Editor > Canvas > Zoom.
必要ならば、Editor > Canvas > Zoomを選んで拡大します。Drag the text field so that it’s positioned in the top half of the scene and aligned with the left margin in the scene.
テキスト欄をドラッグして、それがシーンの上半分のところに位置するように、そしてシーンの左端にそろうようにします。Stop dragging the text field when you see something like this:
テキスト欄のドラッグをやめた時あなたが見るものはこのようなものです: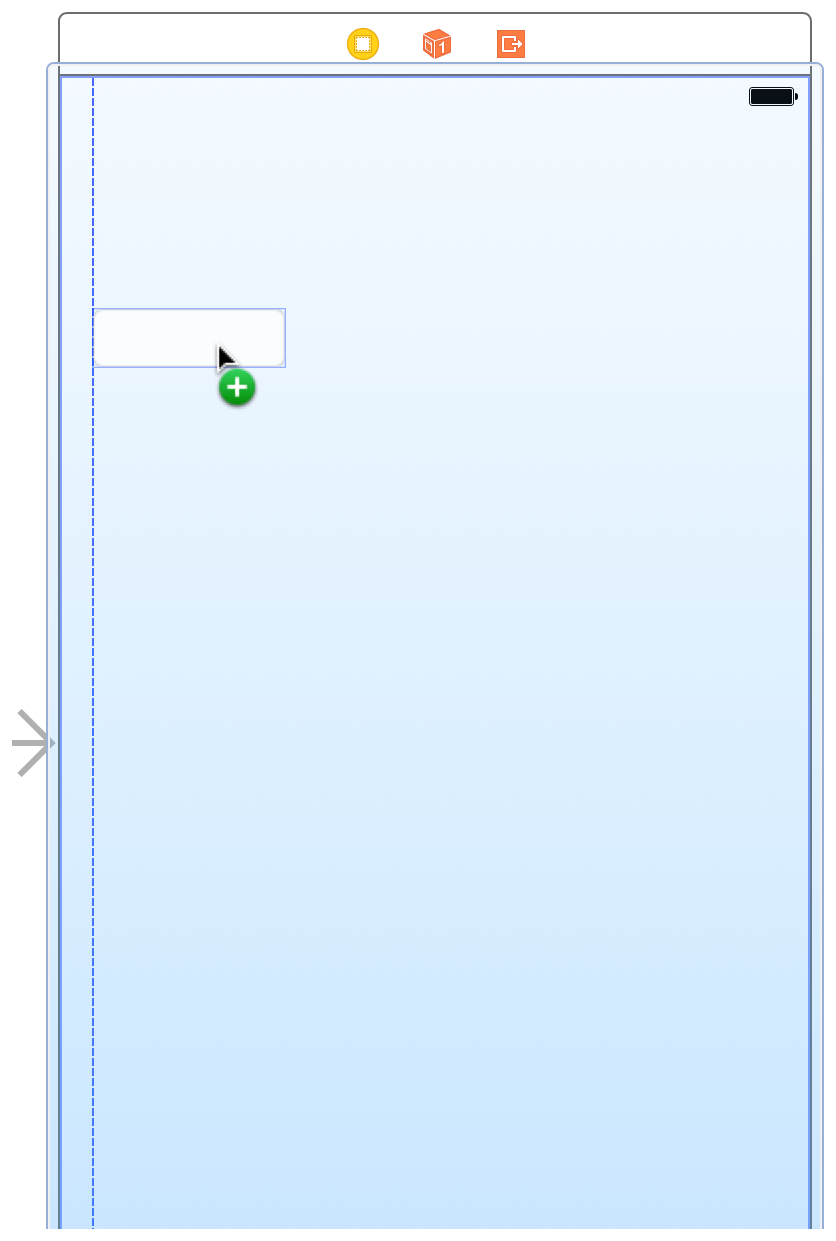
The blue layout guides help you place the text field. Layout guides are visible only when you drag or resize objects next to them; they disappear when you let go of the text field.
青のレイアウトガイド(割り付け・配置目じるし)は、あなたがテキスト欄を設置するのを助けます。レイアウトガイドは、あなたがオブジェクトをドラッグやリサイズするときにのみ見えます。If necessary, click the text field to reveal the resize handles.
必要ならば、テキスト欄をクリックしてリサイズハンドル(寸法調節つまみ)が見えるようにしてください。You resize a user interface element by dragging its resize handles, which are small white squares that appear on the element’s borders. You reveal an element’s resize handles by selecting it. In this case, the text field should already be selected because you just stopped dragging it. If your text field looks like the one below, you’re ready to resize it; if it doesn’t, select it on the canvas.
あなたは、ユーザインターフェイス要素をそれのリサイズハンドル、それは小さな四角形でその要素のへりに現れます、をドラッグすることによって大きさ調整します。あなたは、ある要素のリサイズハンドルをそれを選択することによって見えるようにします。この場合、テキスト欄はすでに選択されているはずです、なぜならあなたがそれのドラッグをちょうど止めたところだからです。あなたのテキスト欄が下のもののように見えるならば、あなたはそれをリサイズする準備ができています;それがそう見えないならば、それをキャンバス上で選択してください。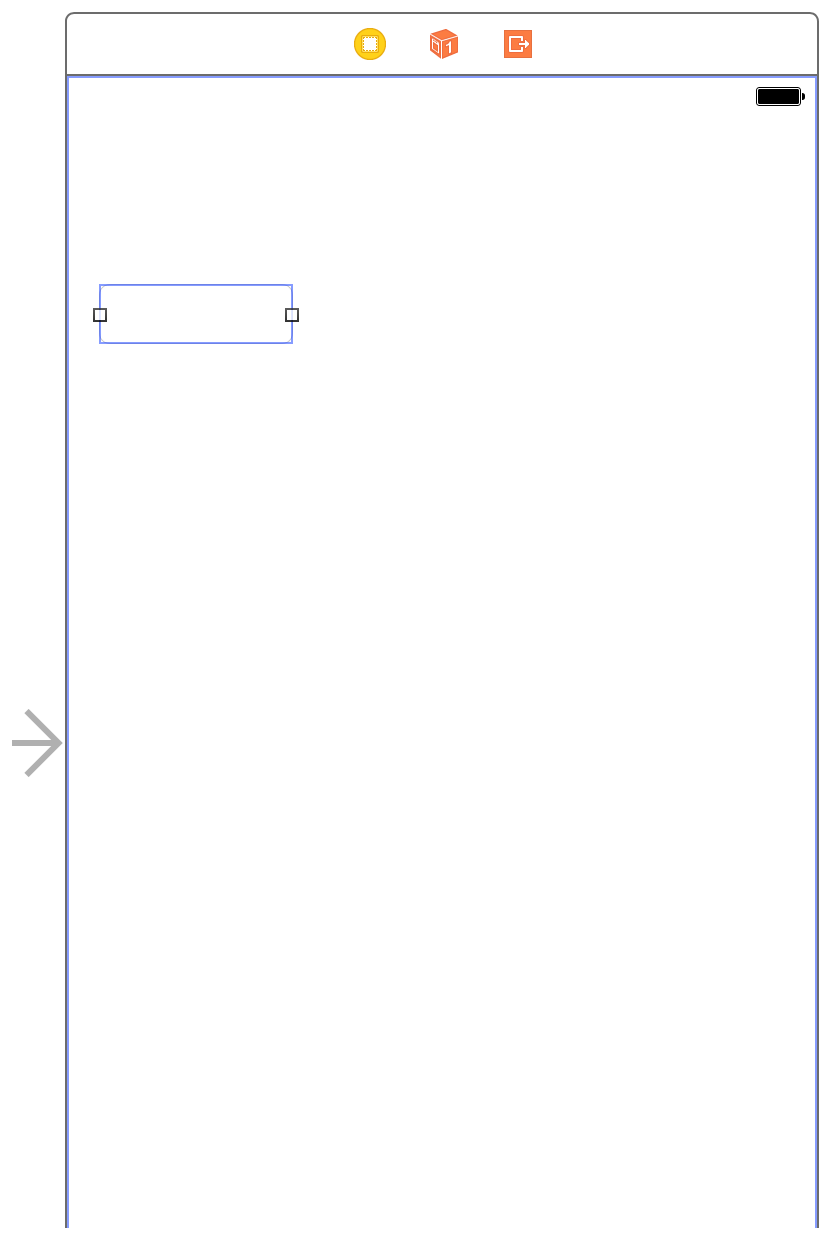
Resize the left and right edges of the text field until you see three vertical layout guides: the left margin alignment, the horizontal center alignment, and the right margin alignment.
テキスト欄の左および右端を、あなたが3つの垂直レイアウトガイド:左余白調節、横中心調節、右余白調節を見るまでリサイズ(大きさ調節)してください。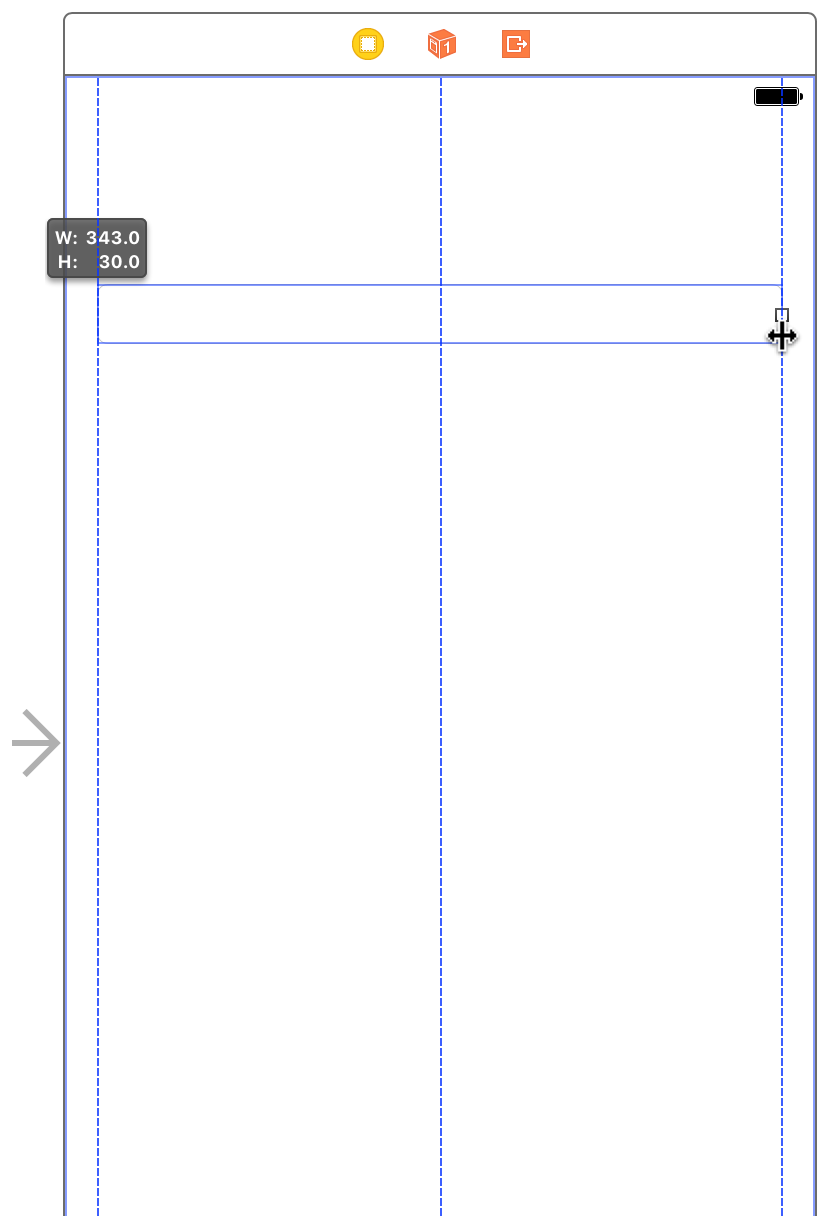
Although you have the text field in your scene, there’s no instruction to the user about what to enter in the field. Use the text field’s placeholder text to prompt the user to enter the name of a new meal.
あなたはテキスト欄をあなたのシーンに持つにもかかわらず、ユーザに対してその欄に何を入力するかの指示がありません。このテキスト欄のプレースホルダテキスト(仮に入れておくテキスト)を使って、新しい食事の名前を入力するようユーザに促してください。
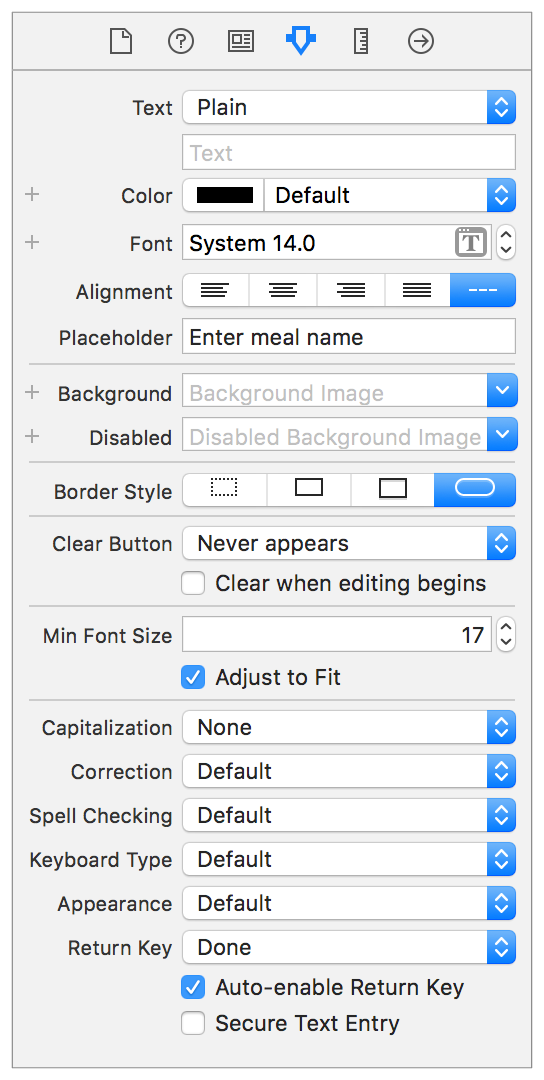
To configure the text field’s placeholder text
テキスト欄のプレースホルダテキストを設定するには
With the text field selected, open the Attributes inspector
 in the utility area.
テキスト欄が選択された状態で、Attributesインスペクタをユーティリティ区画で開いてください。
The Attributes inspector appears when you click the fourth button from the left in the inspector selector bar. It lets you edit the properties of an object in your storyboard.
Attributesインスペクタは、あなたがインスペクタバーの左から4番目のボタンをクリックすると現れます。それはあなたにあなたのストーリーボードのオブジェクトのプロパティを編集させます。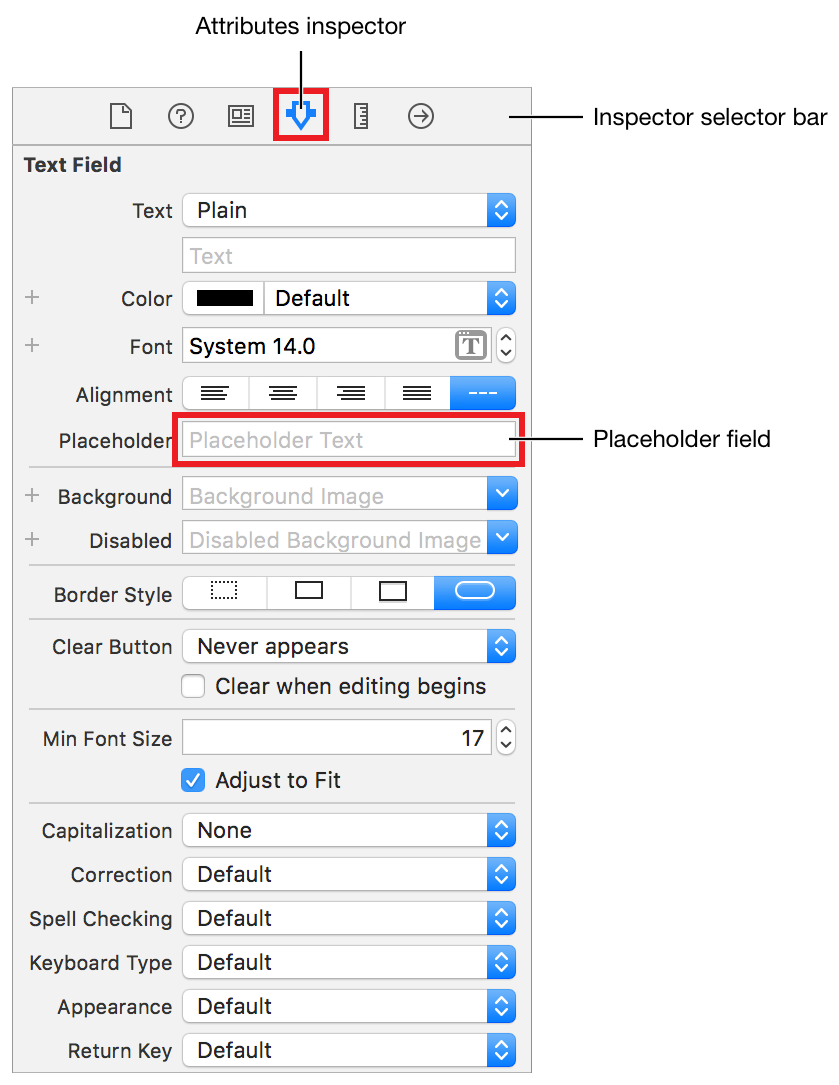
In the Attributes inspector, find the field labeled Placeholder and type
Enter meal name.
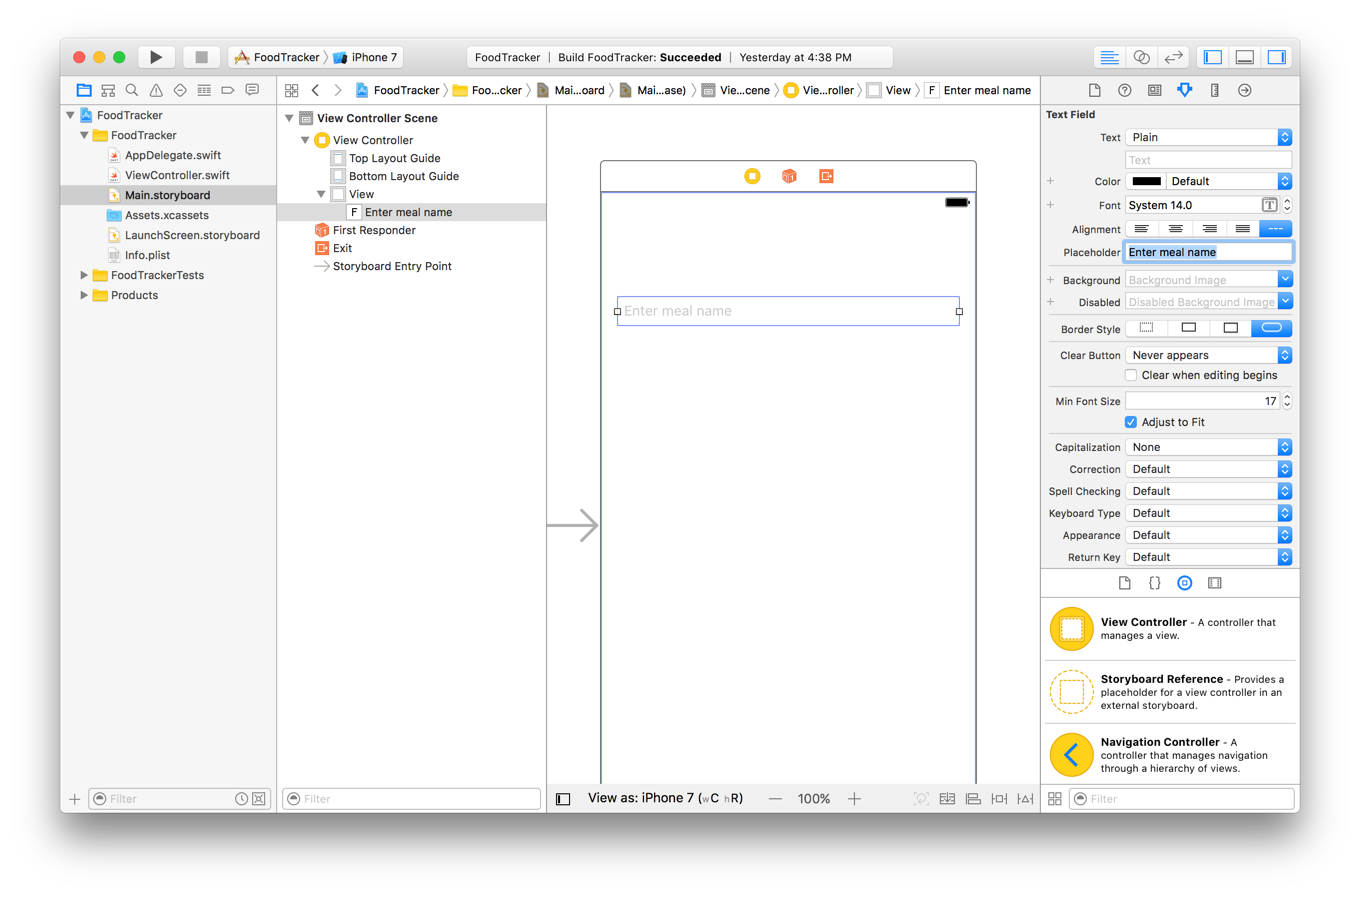
Attributesインスペクタにおいて、Placeholderと表示される欄を見つけてEnter meal nameとタイプしてください。Press Return to display the new placeholder text in the text field.
リターンキーを押して新しいプレースホルダテキストをテキスト欄において表示してください。
Your scene should look similar to this:
あなたのシーンはこれと似たものに見えるはずです:
While you’re editing the text field’s attributes, you can also edit the attributes of the system keyboard that’s displayed when a user selects the text field.
あなたがテキスト欄の属性を編集しているときに、あなたはまた、ユーザがそのテキスト欄を選択すると表示されるシステムキーボードの属性を編集することができます。
To configure the text field’s keyboard
このテキスト欄のキーボードを設定するには
Make sure the text field is still selected.
テキスト欄がまだ選択されていることを確かめてください。In the Attributes inspector , find the field labeled Return Key and select Done (scroll down if necessary).
Attributesインスペクタにおいて、「Return Key」と表示のある欄を捜して「Done」を選択してください(必要なら下にスクロールしてください)。This change will make the default Return key on the keyboard more pronounced to the user by changing it into a Done key.
この変更は、もともとはReturnキーであるものをそのキーボード上でユーザにより目立つようにそれをDoneキーに変えます。In the Attributes inspector, select the Auto-enable Return Key checkbox (again, scroll down if necessary).
Attributesインスペクタにおいて、「Auto-enable Return Key」チェックボックスを選択してください(再び、必要なら下にスクロールしてください)。This change makes it impossible for the user to tap the Done key before typing text into the text field, ensuring that users can never enter an empty string as a meal name.
この変更は、ユーザにDoneキーのタップをテキスト欄にテキストをタイプするまでは不可能にして、ユーザが絶対に空の文字列を食事名として入力することがないようにします。
The Attributes inspector should now show the following keyboard settings:
Attributesインスペクタは、今では次のようなキーボード設定を示すはずです:
Next, add a label (UILabel) at the top of the scene. A label isn’t interactive; it just displays static text in the user interface. To help you understand how to define interaction between elements in the user interface, you’ll configure this label to display the text the user enters into the text field. It’ll be a good way to test that the text field is taking the user input and processing it appropriately.
次に、ラベル(UILabel)をこのシーンの一番上に加えます。ラベルは相互作用するもの(インタラクティブ)ではありません;それはただ静的なテキストをユーザインターフェイスにおいて表示するだけです。どうやってユーザインターフェイスにおける要素間の相互作用を定義するかをあなたが理解する助けとして、あなたはこのラベルをユーザがテキストフィールドに入力するテキストを表示するように構成設定します。テキスト欄がユーザの入力を受け取っていることと適切にそれを処理していることをテストするためにこれは良い方法となります。
To add a label to your scene
あなたのシーンにラベルを加えるには
In the Object library, type
labelin the filter field to find the Label object quickly.
オブジェクトライブラリにおいて、フィルタ欄にlabelとタイプしてラベルオブジェクトを素早く探してください。Drag a Label object from the Object library to your scene.
ラベルオブジェクトをオブジェクトライブラリからあなたのシーンにドラッグしてください。Drag the label so that it’s right above the text field and aligned with the left margin in the scene.
そのラベルをドラッグして、それがテキスト欄のすぐ上、シーンの左端にそろうようにします。Stop dragging the label when you see something like this:
ラベルのドラッグをやめた時あなたが見るのはこのようなものです: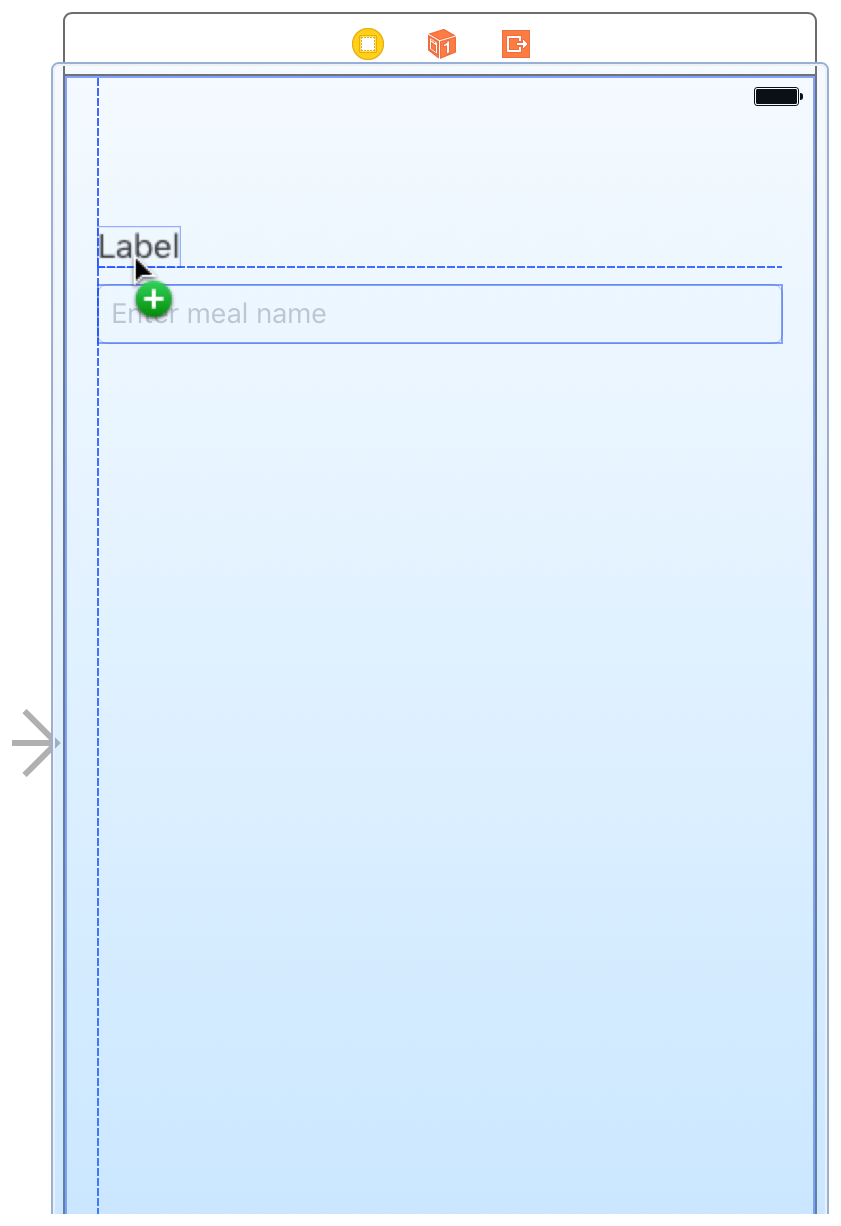
Double-click the label and type
Meal Name.
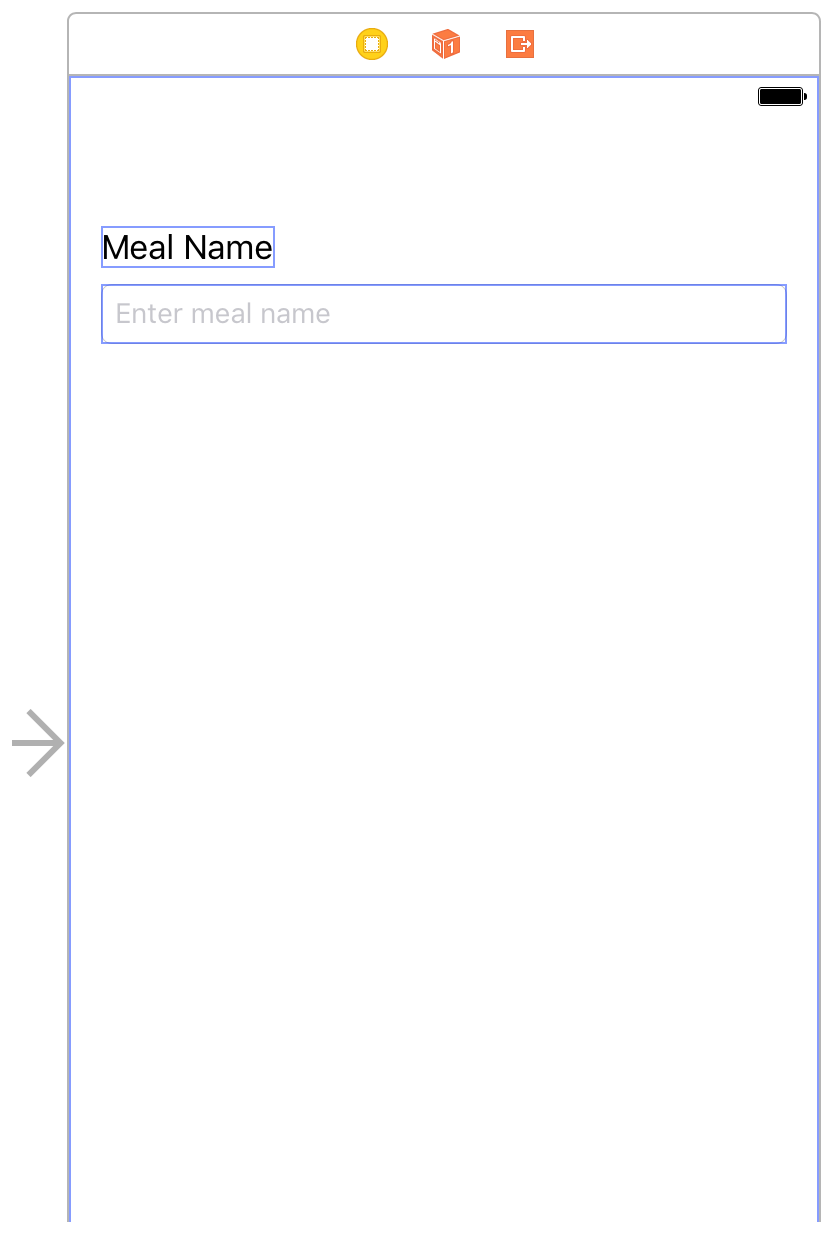
ラベルをダブルクリックしてMeal Nameと入力してください。Press Return to display the new text in the label.
リターンを押して新しいテキストをラベルにおいて表示します。
Your scene should look something like this:
あなたのシーンはこのようなものに見えるはずです:
Now, add a button (UIButton) to the scene. A button is interactive, so users can tap it to trigger an action that you define. Later, you’ll create an action to reset the label text to a default value.
今度は、ボタン(UIButton)をシーンに追加します。ボタンはインタラクティブ(ユーザと相互作用するもの)です、なのでユーザはそれをタップしてある動作を引き起こすことができます、その動作はあなたが定義します。後で、あなたは、ラベルテキストを省略時の値に設定し直す、あるアクションを作成します。
To add a button to your scene
ボタンをあなたのシーンに加えるには
In the Object library, type
buttonin the filter field to find the Button object quickly.
オブジェクトライブラリにおいて、buttonとフィルタ欄にタイプしてButtonオブジェクトを素早く見つけます。Drag a Button object from the Object library to your scene.
Buttonオブジェクトをオブジェクトライブラリからあなたのシーンへドラッグします。Drag the button so that it’s right below the text field and aligned with the left margin in the scene.
そのボタンをドラッグして、それがテキスト欄のすぐ下、シーンの左端にそろうようにします。Stop dragging the button when you see something like this:
ボタンのドラッグをやめた時あなたが見るのはこのようなものです: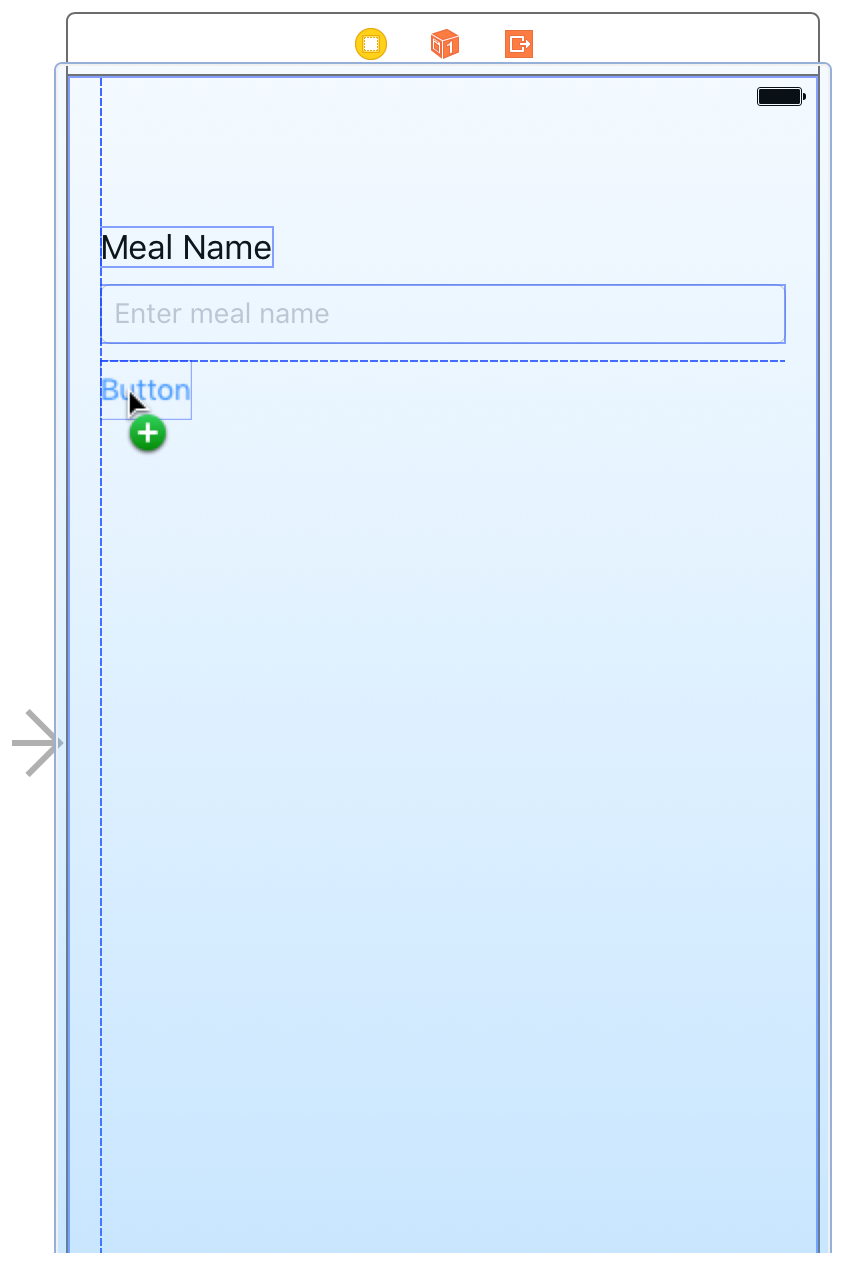
Double-click the button and type
Set Default Label Text.
このボタンをダブルクリックしてSet Default Label Textとタイプしてください。Press Return to display the new text in the button.
リターンキーを押してボタンの新しいテキストを表示します。Reposition the button, if necessary.
必要ならば、ボタンの位置を直します。
At this point, your scene should look something like this:
この時点で、あなたのシーンはこのようなものに見えるはずです:
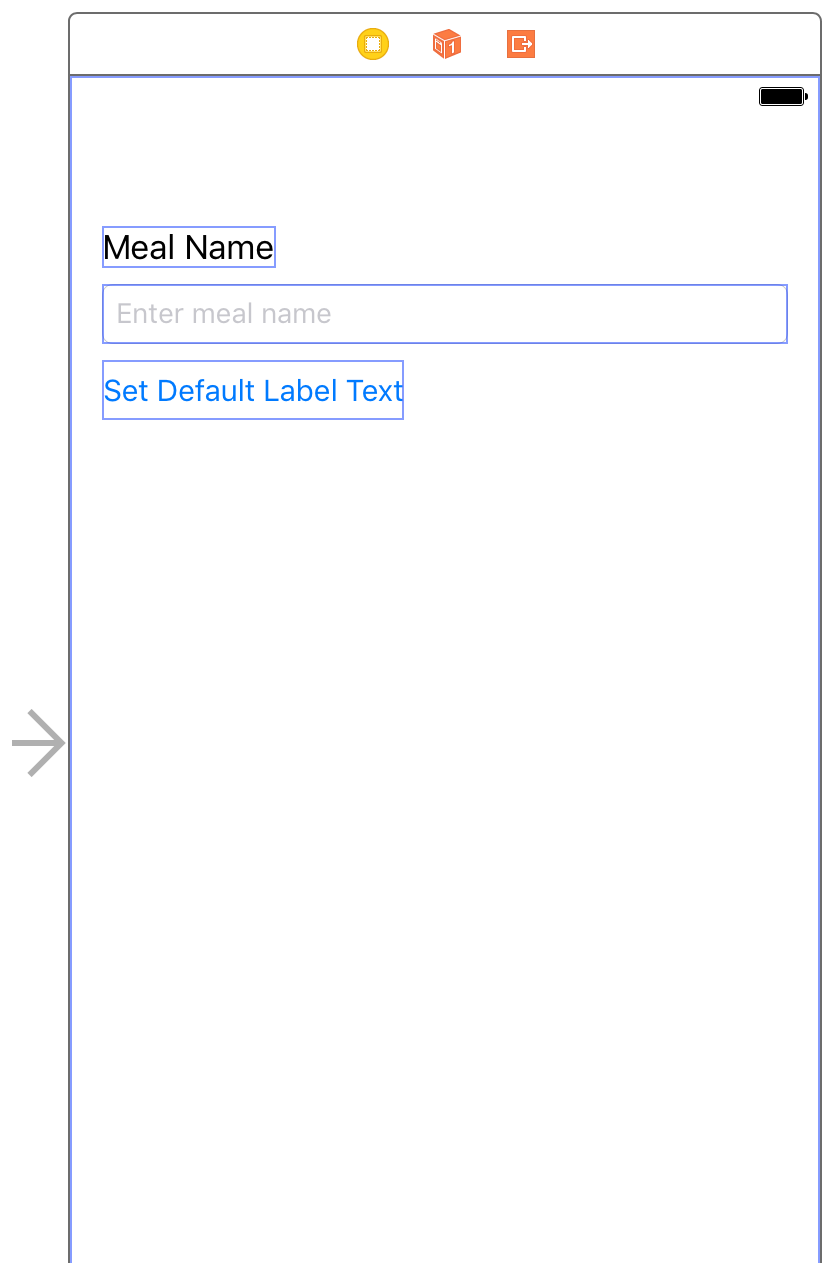
It’s good to understand how the elements you’ve added are actually arranged in the scene. Look at the outline view to see which user interface elements have been added to your scene.
あなたが加えた要素がどのように実際にシーンに配置されたかを理解するのは良いことです。アウトラインビュー(外観図)で見て、どんなユーザインターフェイス要素があなたのシーンに加えられたか確かめてください。
To view the outline view
アウトラインビューで眺めるには
In your storyboard, find the outline view toggle.
あなたのストーリーボードにおいて、アウトラインビュー切替ボタンを見つけてください。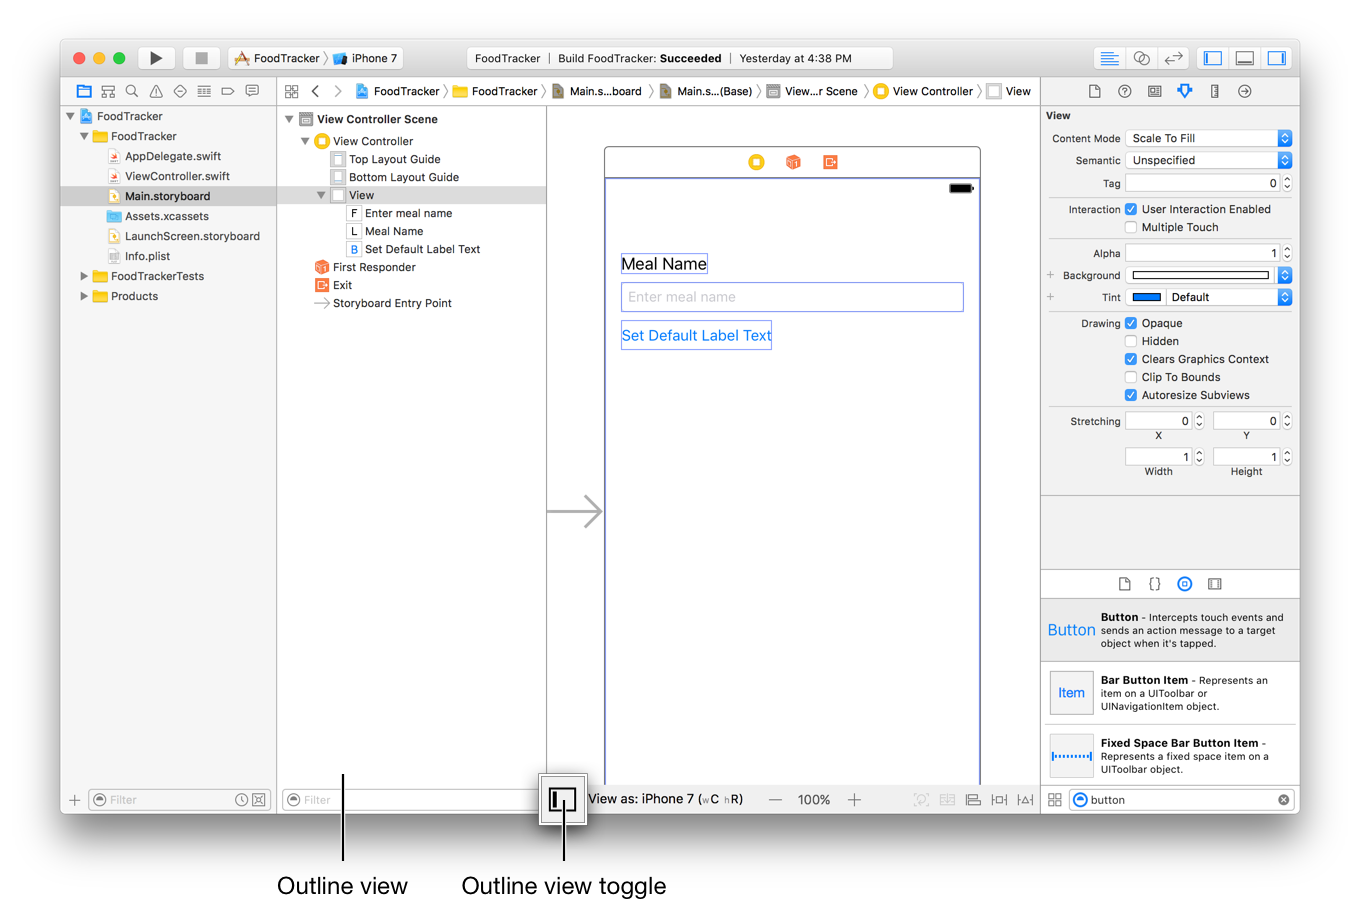
If the outline view is collapsed, click the toggle to expand the outline view.
アウトラインビューが折りたたまれているならば、切替ボタンをクリックしてアウトラインビューを展開してください。You can use the outline view toggle to collapse and expand the outline view as needed.
あなたはアウトラインビュー切替スイッチを使って、アウトラインビューを必要に応じて畳んだり広げたりできます。
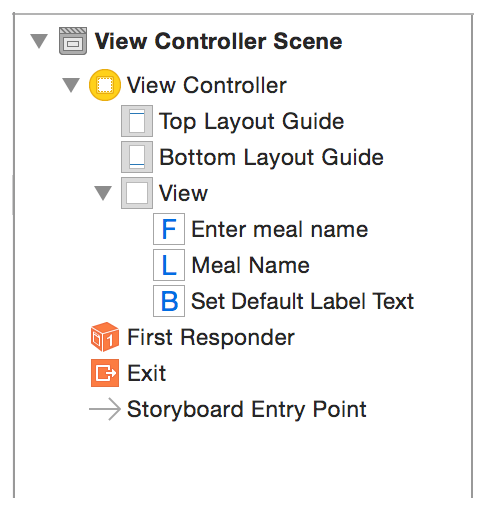
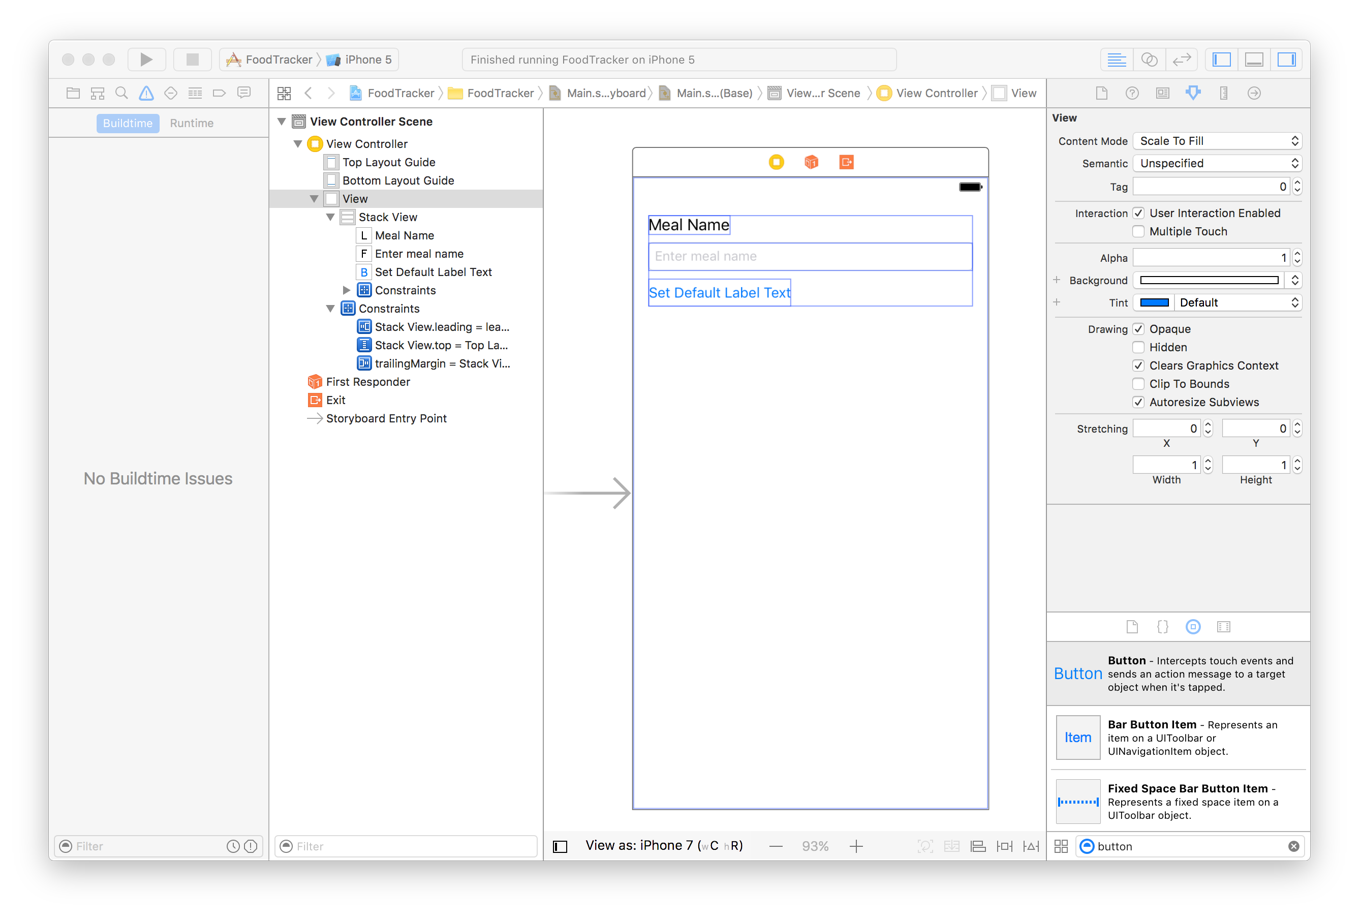
The outline view, which appears on the left side of the canvas, lets you see a hierarchical representation of the objects in your storyboard. You should be able to see the text field, label, and button you just added listed in the hierarchy. But why are the user interface elements you added nested under View?
キャンバスの左側に現れるアウトラインビューは、あなたのストーリーボードの中のオブジェクトの階層表現をあなたに見させます。あなたは、あなたが加えたばかりのテキスト欄、ラベル、そしてボタンが階層中に記載されるのを見ることができるはずです。しかしなぜあなたが加えたユーザインターフェイス要素が「View」の下に入れ子にされるのでしょう?
Views not only display themselves onscreen and react to user input, they can serve as containers for other views. Views are arranged in a hierarchical structure called the view hierarchy. The view hierarchy defines the layout of views relative to other views. Within that hierarchy, views enclosed within a view are called subviews, and the parent view that encloses a view is called its superview. A view can have multiple subviews and only one superview.
ビューは、それ自身を画面上で表示してユーザの入力に反応するだけではありません、それは他のビューの容れ物としての役割をすることができます。ビューは、ビュー階層と呼ばれる、ある階層構造の中に並べられます。ビュー階層は、ビューの配置を他のビューとの関係で定義します。この階層内で、あるビューの内部に納められるビューはサブビューと呼ばれます、そしてビューを納めている親ビューはスーパービューと呼ばれます。あるビューは、複数のサブビューと1つだけのスーパービューを持つことができます。
In general, each scene has its own view hierarchy. At the top of each view hierarchy is a content view. In the current scene, the content view is named View, the top level view inside the View Controller. The text field, label, and button are subviews of the content view. All other views that you place in this scene will be subviews of this content view (although they themselves can have nested subviews).
一般に、各シーンはそれ自身のビュー階層を持ちます。各ビュー階層の最上部にはコンテンツビューがあります。現在のシーンにおいて、コンテンツビューは「View」、View Controller内のトップレベルビュー、と呼ばれます。テキスト欄、ラベル、そしてボタンは、コンテンツビューのサブビューです。あなたがこのシーンの中に置いた他の全てのビューは、このコンテンツビューのサブビューになります(けれどもそれら自身が入れ子にされたサブビューを持つことができます)。
Preview Your Interface
あなたのインターフェイスのプレビュー(下見)
Preview your app periodically to check that everything is looking the way you expect. You can preview your app interface using the assistant editor, which displays a secondary editor side-by-side with your main one.
あなたのアプリを定期的にプレビューして、その全てがあなたが求める状態に見えることを確認してください。あなたは、あなたのアプリのインターフェイスを、副次的なエディタをあなたの主要なものに並べて表示するアシスタントエディタを使ってプレビューすることができます。
To preview your interface
あなたのインターフェイスをプレビューするには
Click the Assistant button in the Xcode toolbar near the top right corner of Xcode to open the assistant editor.
XcodeツールバーのAssistantボタンをXcodeの1番上右隅近くでクリックして、アシスタントエディタを開いてください。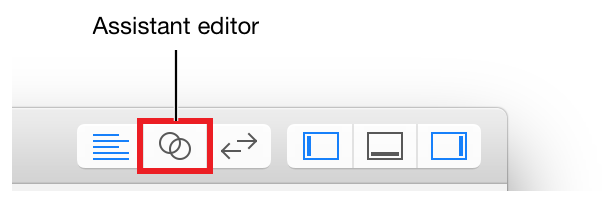
If you want more space to work, collapse the project navigator and utility area by clicking the Navigator and Utilities buttons in the Xcode toolbar.
あなたがもっと作業空間を必要とするならば、プロジェクトナビゲータとユーティリティ区画をXcodeツールパーのNavigatorとUtilitiesボタンをクリックすることで折り畳んでください。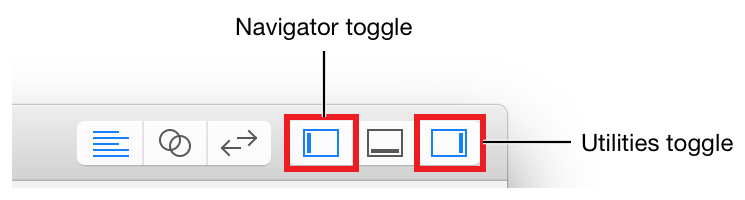
You can also collapse the outline view.
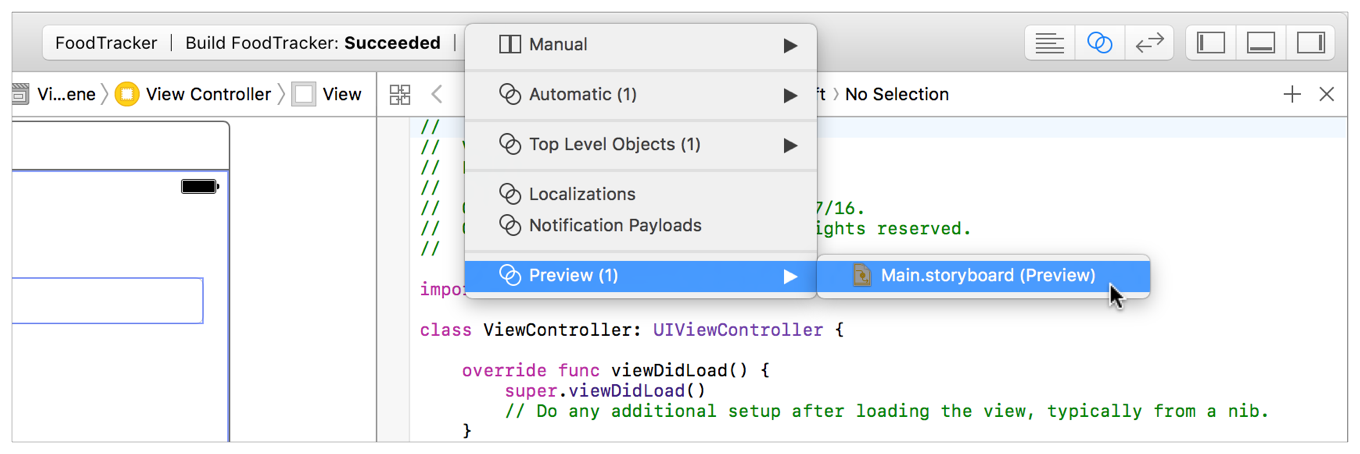
あなたはまたアウトラインビューも折り畳むことができます。In the editor selector bar, which appears at the top of the assistant editor, switch the assistant editor from Automatic to Preview > Main.storyboard (Preview).
アシスタントエディタの最上部にある、エディタ選択バーにおいて、アシスタントエディタをAutomaticからPreview > Main.storyboard(プレビュー)へ切り替えてください。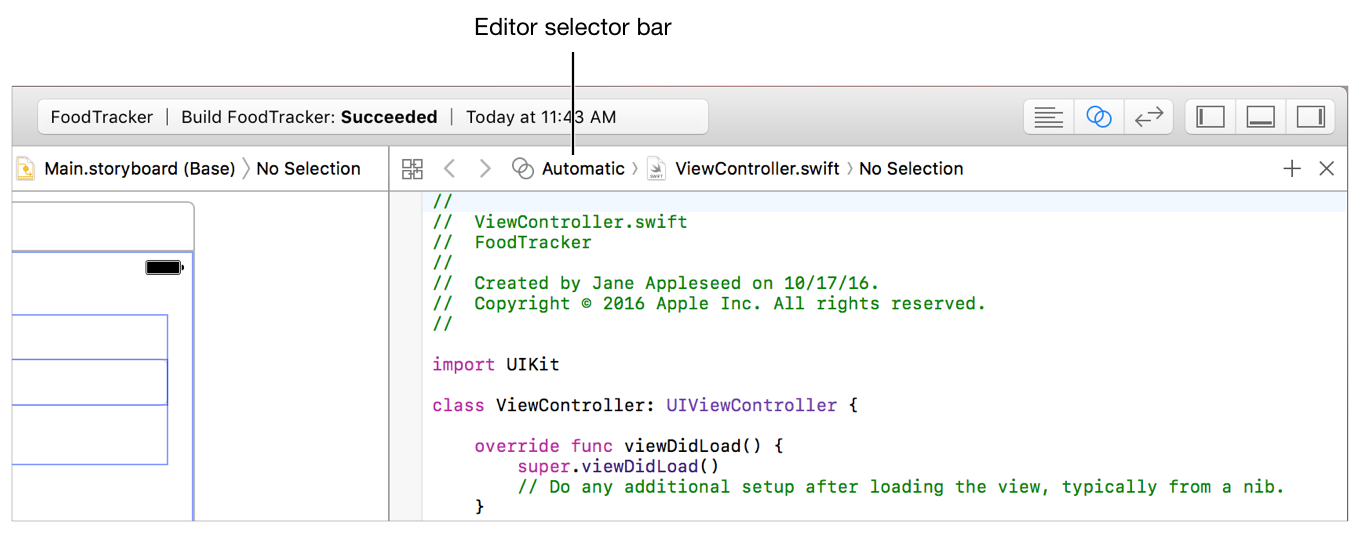
As you see in the assistant editor, the preview looks almost identical to the canvas. However, this does not really tell you anything new. Both the canvas and the preview are showing the same size screen (iPhone 7) and the same orientation (portrait). If you want to check and see if your interface is adaptive, you need to preview different size screens and different orientations.
あなたがアシスタントエディタで見ると、プレビューはキャンバスとほとんど同一に見えます。いずれにしても、これは実際あなたに何か変わったことを教えません。キャンバスとプレビューの両方とも、同じ大きさの画面(iPhone 7)と同じ方向(縦向き)を表示しています。あなたのインターフェイスが適応性を持つかどうかを見て確かめたいならば、あなたは異なる大きさの画面と異なる方向でプレビューする必要があります。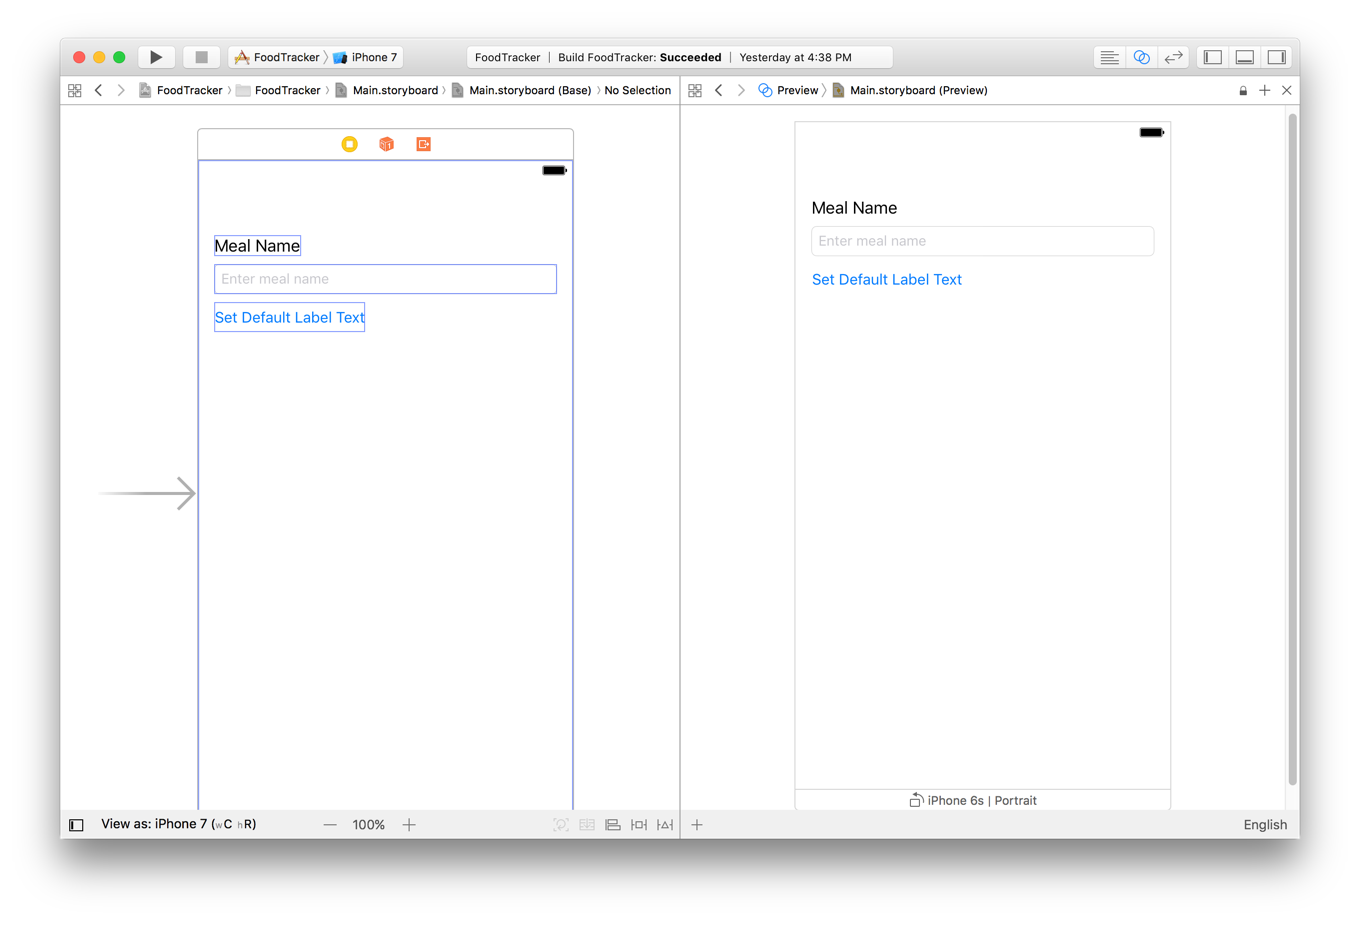
To preview the landscape orientation, click the Rotate button at the bottom of the preview.
水平方向でプレビューするには、Rotateボタンをプレビューの一番下でクリックしてください。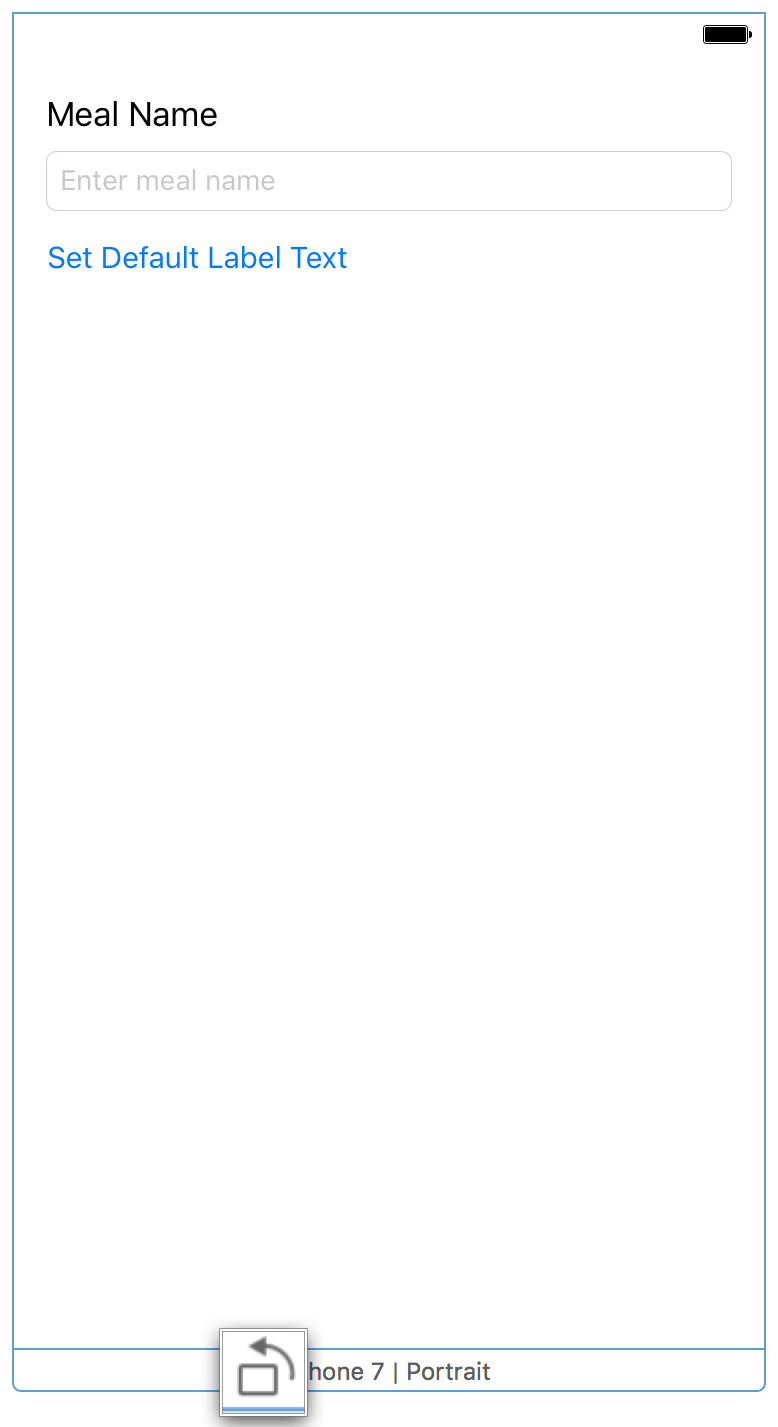
Unfortunately, things no longer look quite right. The text field, label, and button keep the same size and position relative to the screen’s upper left corner. This means that the text field no longer fills the screen from margin to margin.
あいにく、物事はもはや全く正しく見えません。テキスト欄、ラベル、そしてボタンは、同じ大きさと位置を画面の上左隅に関して保ちます。これが意味するのは、テキスト欄はもはや余白から余白まで画面いっぱいではないということです。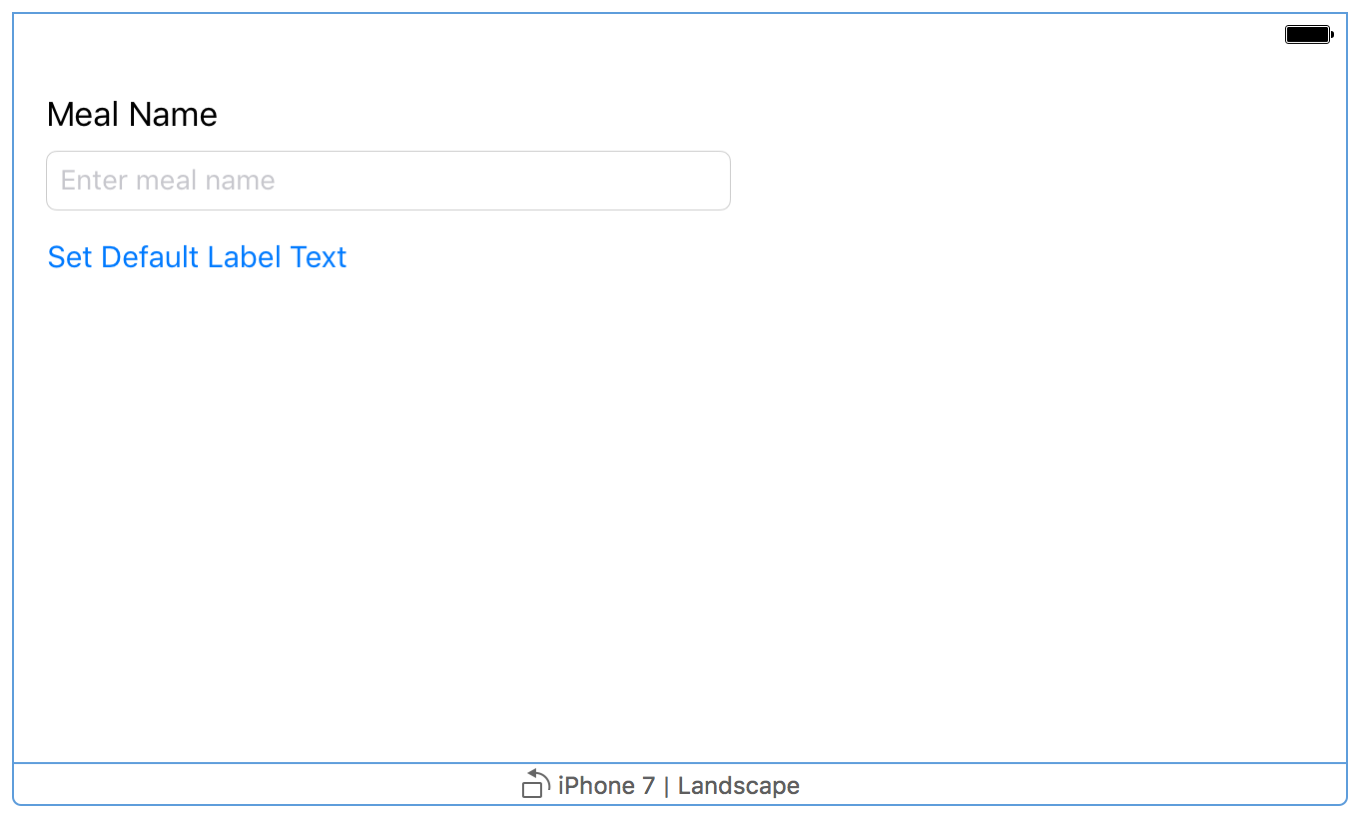
To preview a different screen size, click the Add button at the bottom of the assistant editor, and select iPhone SE.
異なる画面サイズをプレビューするには、Addボタンをアシスタントエディタの一番下でクリックして、iPhone SEを選んでください。
Again, the text field, label, and button keep the same size and position relative to the screen’s upper left corner. This time, however, the text field extends past the screen’s right edge.
再び、テキスト欄、ラベル、そしてボタンは、同じ大きさと位置を画面の上左隅に関して保ちます。今度は、しかしながら、テキスト欄は画面の右端を越えて伸びています。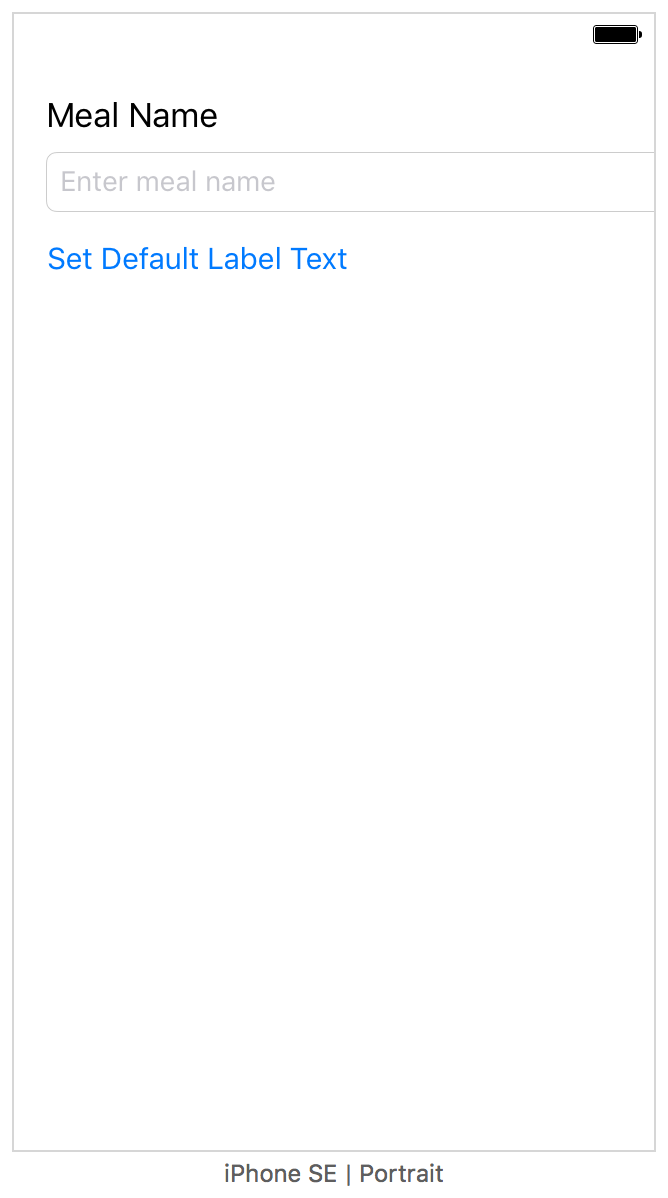
To create an adaptive interface, you’ll need to specify how the interface should adjust to different screen sizes. For example, when the interface is rotated into a landscape orientation, the text field should grow. When the interface is displayed on an iPhone SE, the text field should shrink. You can specify these kinds of interface rules easily using Auto Layout.
適応インターフェイスを作成するには、あなたはどのようにインターフェイスが異なる画面サイズに適応すべきかを指定する必要があるでしょう。例えば、インターフェイスが横方向へと回転される場合、テキスト欄は伸びるべきです。インターフェイスがiPhone SE上で表示される場合、テキスト欄は縮まなければなりません。あなたはこれらの種類のインターフェイス規則を「自動レイアウト」(自動配置)を使って簡単に指定できます。
Adopt Auto Layout
自動レイアウトを採用する
Auto Layout is a powerful layout engine that helps you design adaptive layouts that dynamically respond to any changes to the scene’s size. You describe your layout using constraints—rules that explain where one element should be located relative to another, or what size the element should be. Auto Layout dynamically calculates the size and position of each element based on these constraints.
自動レイアウトは強力なレイアウト機構です、それは、画面の大きさに対する何らかの変更に動的に応答する適応性のあるレイアウトをあなたが設計する手助けをします。あなたは、あなたのレイアウトをいくらかの制約 — ある要素が別のものとの関係から位置すべきところを、または要素がどんな大きさであるべきかを、説明する規則を使って記述します。自動レイアウトは、各要素の大きさと位置をそれらの制約に基づいて動的に計算します。
One of the easiest ways to define your layout is using a stack view (UIStackView). A stack view provides a streamlined interface for laying out a collection of views in either a column or a row. The stack view uses Auto Layout under the hood to calculate the size and position of all the views that it manages. This lets you easily access the full power of Auto Layout, while greatly reducing the complexity of your layout.
あなたのレイアウトを定義する最も簡単な方法の1つは、スタックビュー(UIStackView)を使うことです。スタックビューは、いくらかのビューからなる1集団を縦列か横列のどちらかでレイアウトするための簡素化したインターフェイスを提供します。スタックビューは、「自動レイアウト」をその覆いの下で使用して、それが管理するすべてのビューの大きさと位置を計算します。これは、あなたを「自動レイアウト」の完全な能力に簡単にアクセスさせて、同時にあなたのレイアウトの複雑さを大いに減らします。
To adopt Auto Layout, wrap your existing interface elements in a stack view, and then add the constraints needed to position the stack view in the scene.
「自動レイアウト」を採用するには、あなたの既存のインターフェイス要素を1つのスタックビューの中に包んでから、シーンの中でそのスタックビューが位置するのに必要とされる制約を加えてください。
To add Auto Layout constraints to the meal scene
「自動レイアウト」制約を食事シーンに加えるには
Return to the standard editor by clicking the Standard button.
標準エディタにStandardボタンをクリックすることで戻ってください。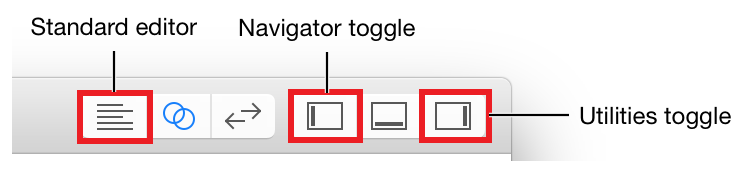
Expand the project navigator and utility area by clicking the Navigator and Utilities buttons in the Xcode toolbar.
プロジェクトナビゲータとユーティリティ区画をNavigatorとUtilitiesボタンをXcodeツールバーでクリックすることで広げてください。While pressing the Shift key on your keyboard, select the text field, label, and button.
あなたのキーボードのシフトキーを押したままで、テキスト欄、ラベル、およびボタンを選択してください。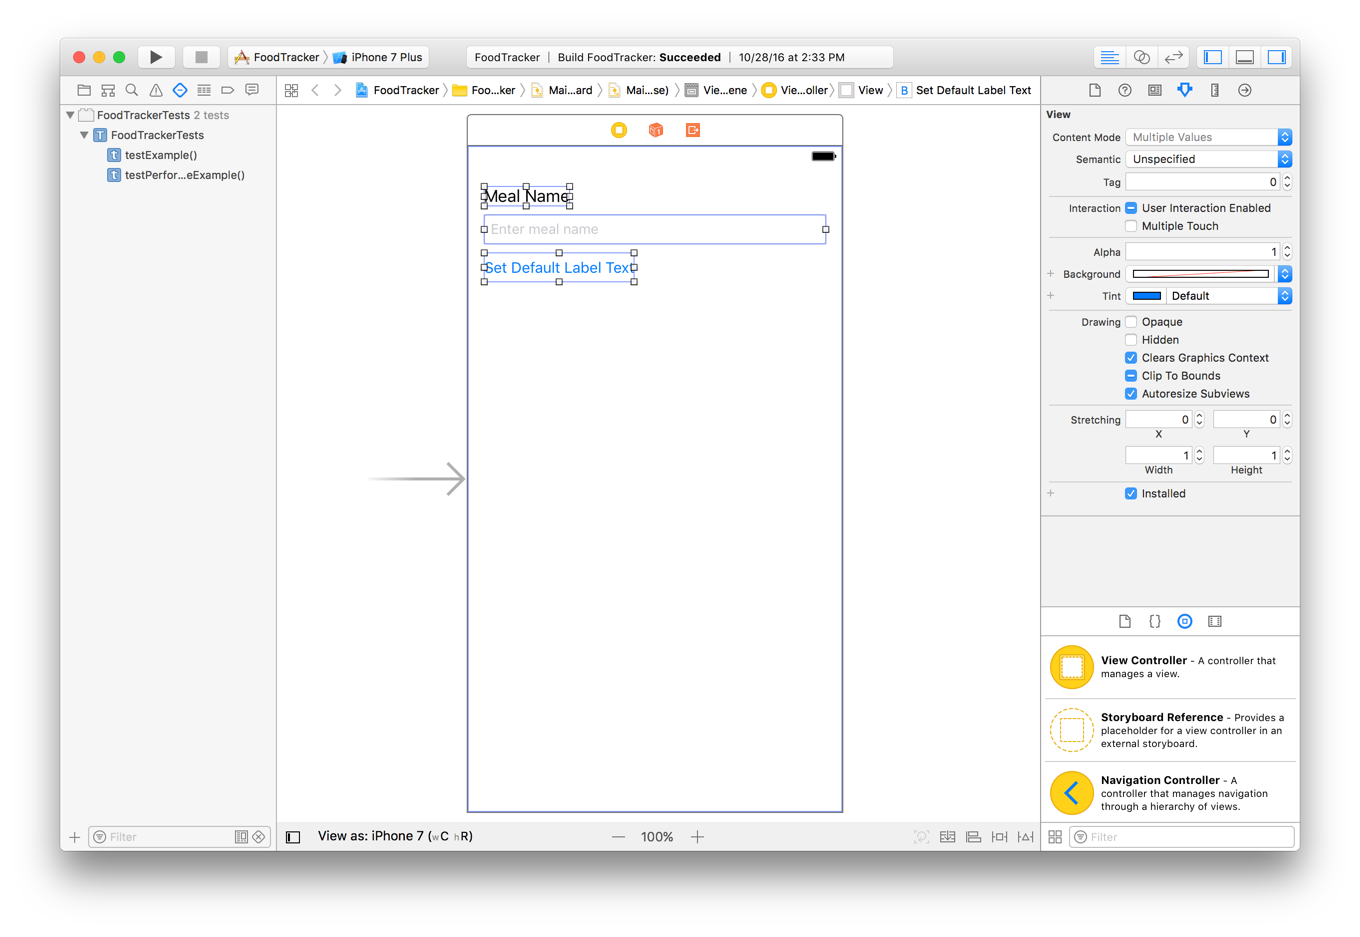
On the bottom right of the canvas, click the Embed In Stack button. (Alternatively, choose Editor > Embed In > Stack View.)
キャンバスの右下で、Embed In Stackボタンをクリックしてください。(または代わりに、Editor > Embed In > Stack Viewを選んでください。)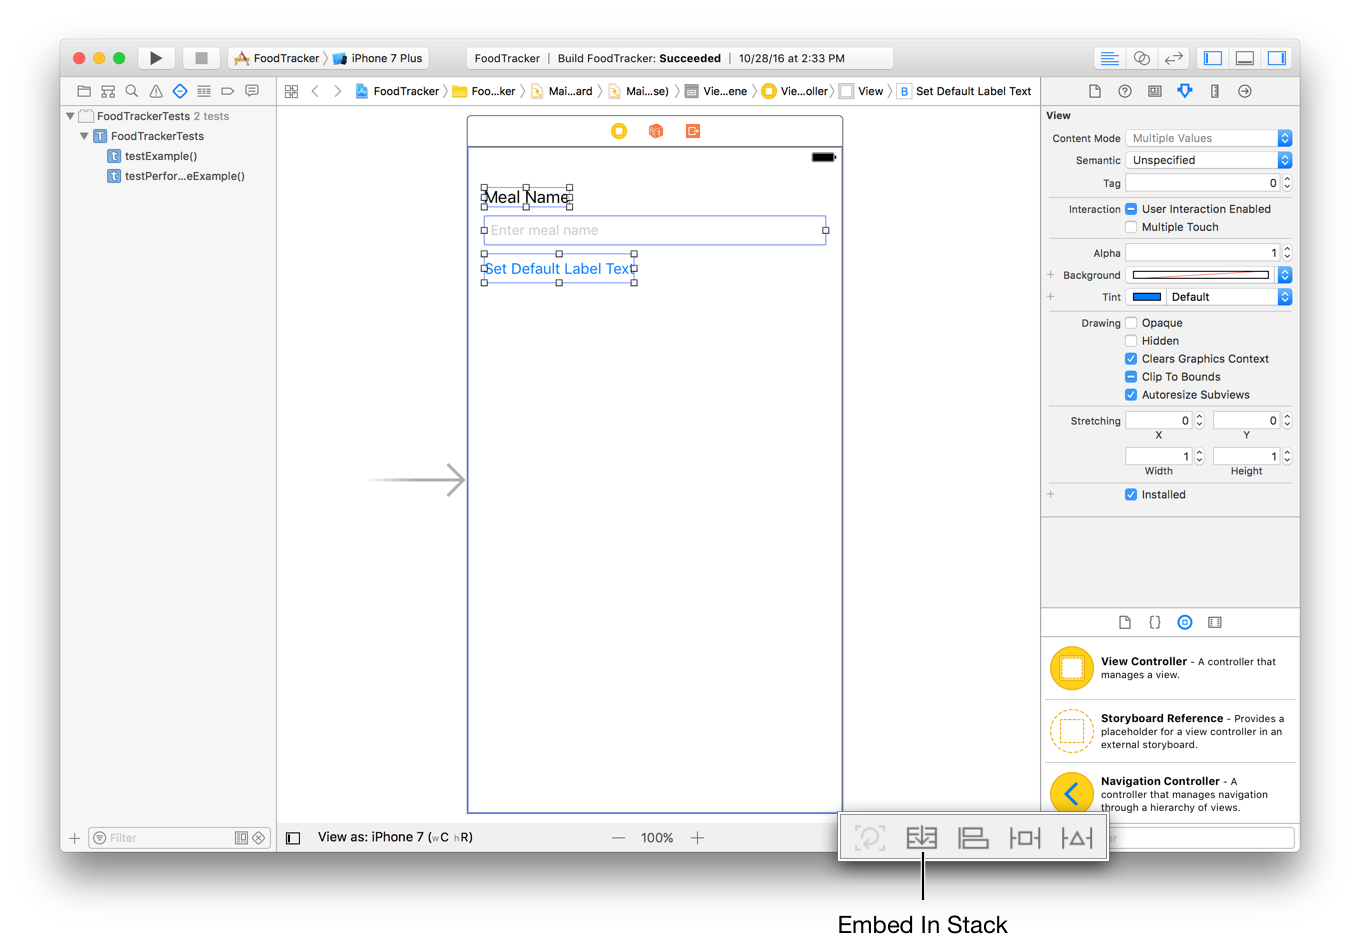
Xcode wraps the user interface elements in a stack view, stacking them together. Xcode analyzes your existing layout to figure out that the items should stack vertically, not horizontally.
Xcodeは、それらのユーザインターフェイス要素をひとつのスタックに包んで(ラップして)、それらを積み重ねて一緒にします。Xcodeは、あなたの既存のレイアウトを解析して、それらの項目が、水平にではなしに、垂直に積み重ねられるべき状態を解決します。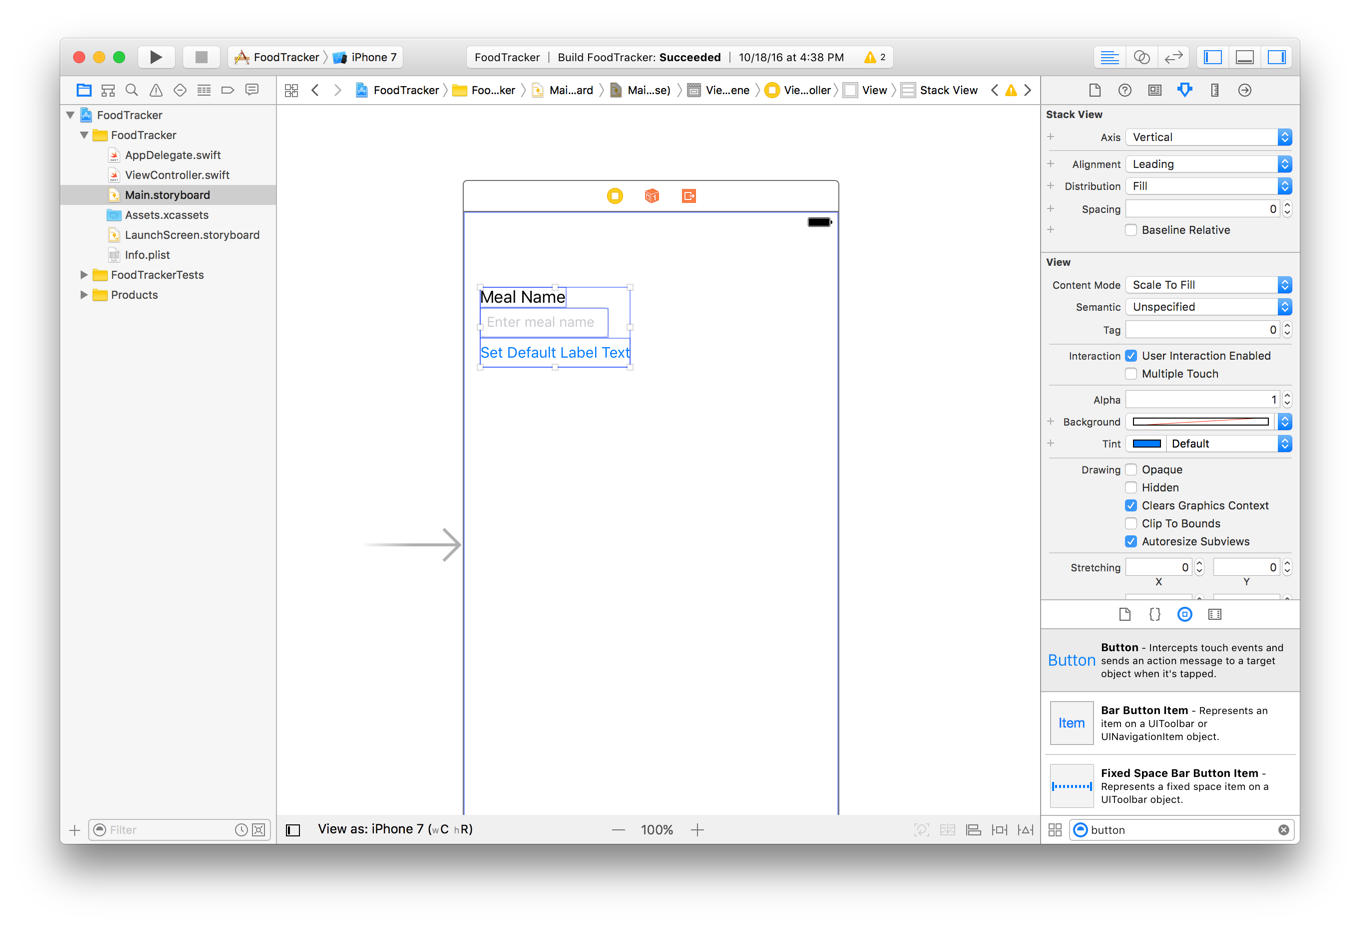
If necessary, open the outline view. Select the Stack View object.
必要なら、アウトラインビューを開いてください。Stack Viewオブジェクトを選択してください。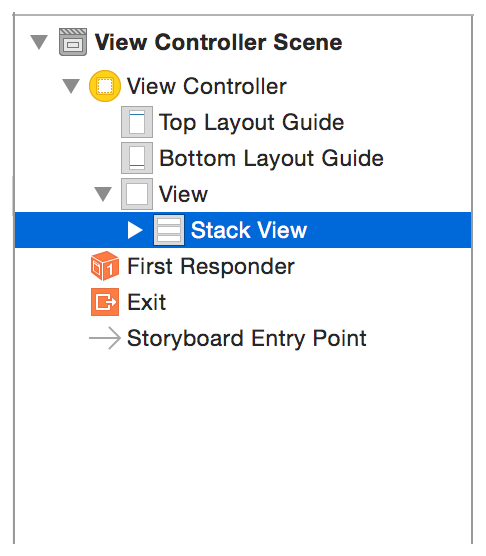
In the Attributes inspector, type
8in the Spacing field. Press Return.
Attributesインスペクタにおいて、8をSpacing欄でタイプしてください。リターンキーを押します。You’ll notice the user interface elements space out vertically, and the stack view grows with them.
あなたは、ユーザインターフェイス要素が垂直方向に間隔をあけ、そしてスタックビューがそれらとともに大きくなるのに気づくでしょう。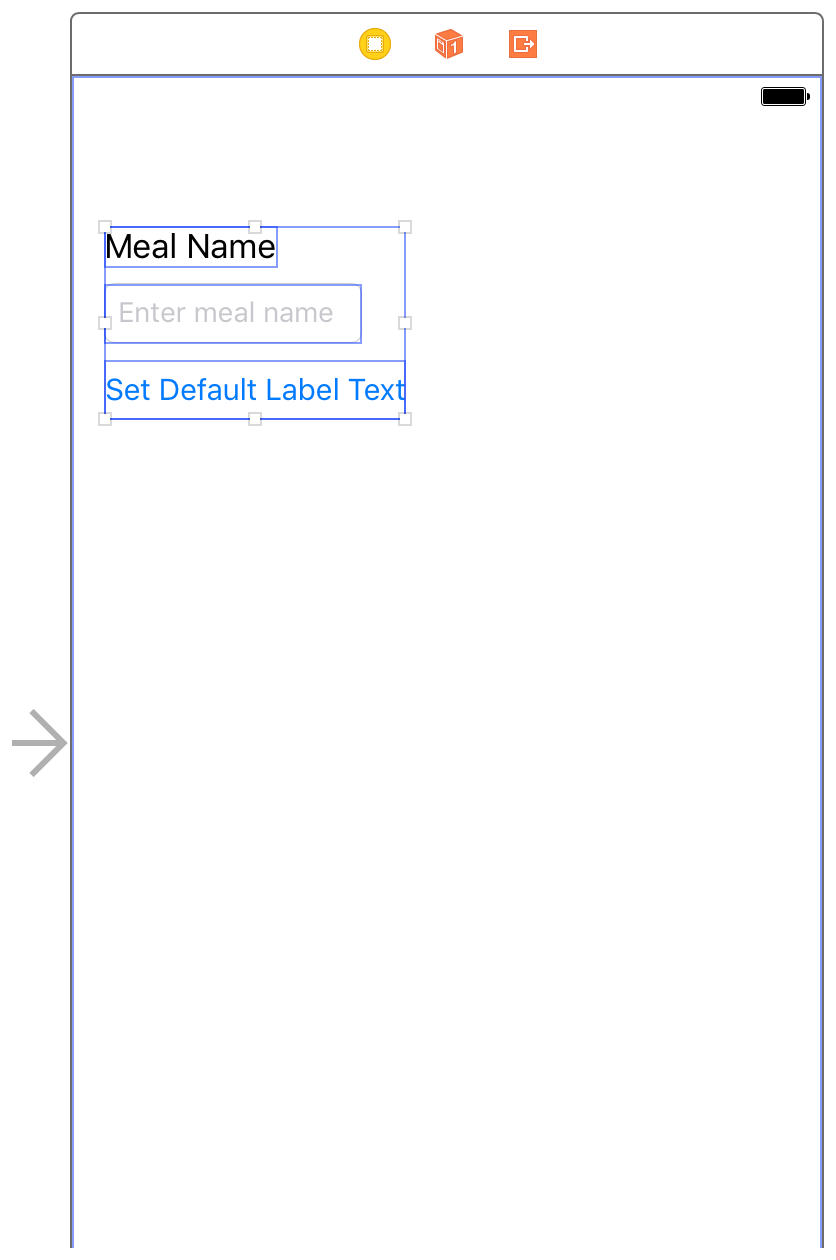
On the bottom right of the canvas, open the Add New Constraints menu.
キャンバスの1番下右で、Add New Constraintsメニューを開いてください。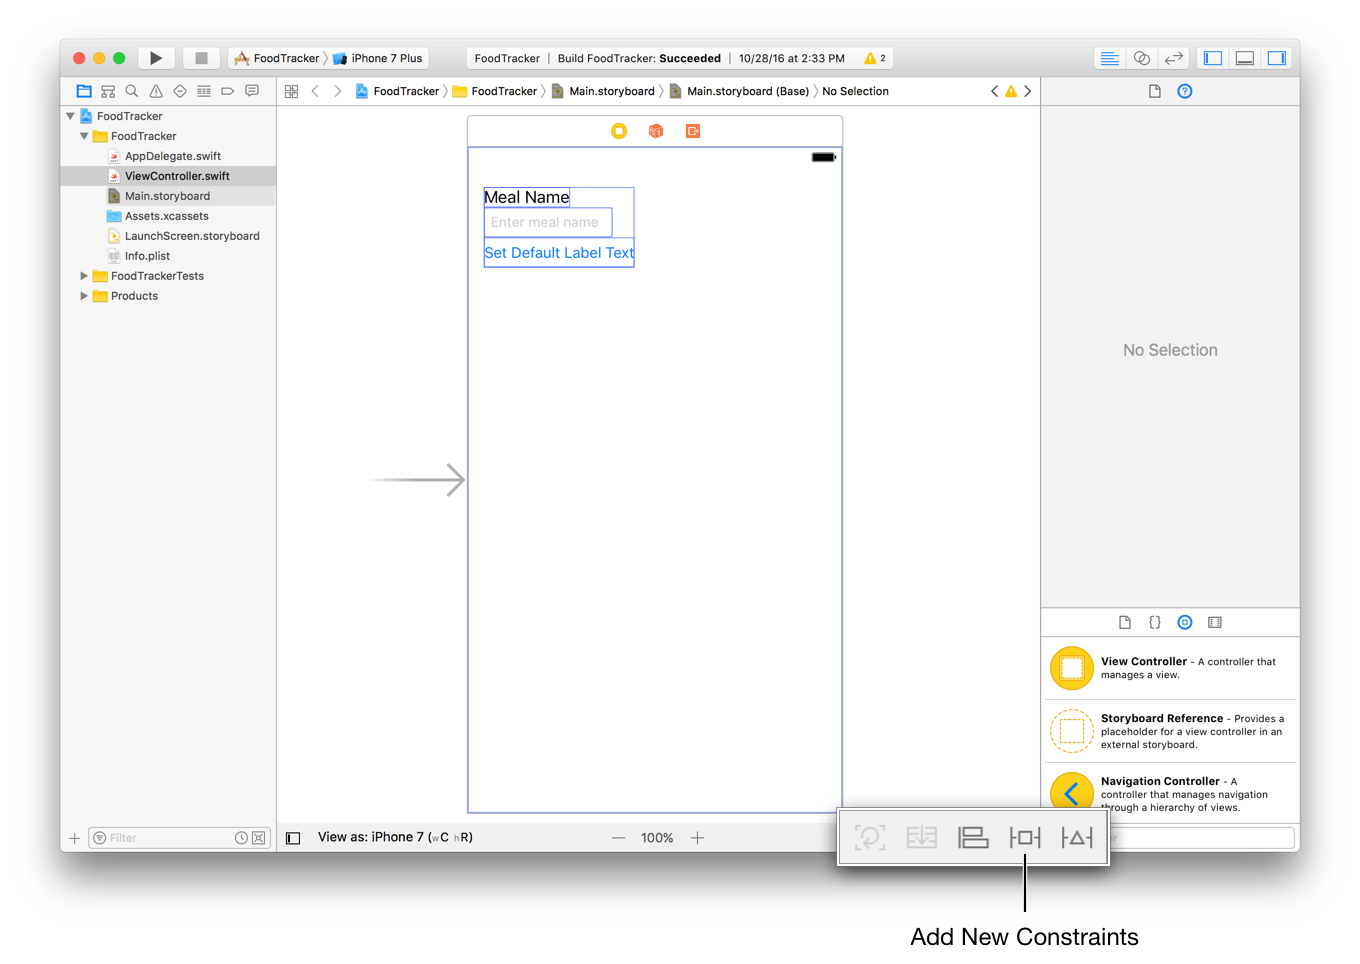
Above “Spacing to nearest neighbor,” click the two horizontal constraints and the top vertical constraint to select them. They become red when they are selected.
上の方の「Spacing to nearest neighbor(すぐ隣との間隔)」で、2つの水平制約と上部の垂直制約をクリックして、それらを選択してください。それらが赤くなったらそれらが選択されたということです。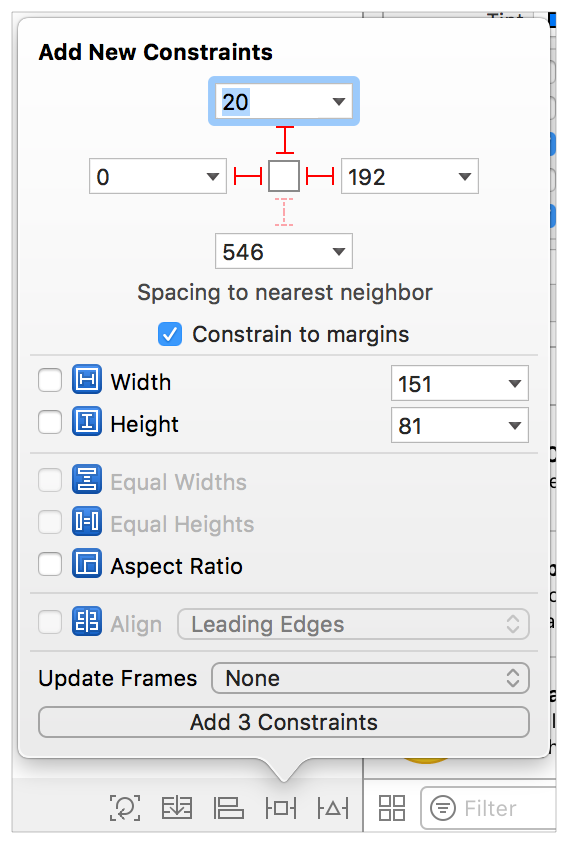
These constraints indicate spacing to the nearest leading, trailing, and top neighbors. In this context, the term nearest neighbor means the boundary of the closest user interface element, which can be the superview, another user interface element, or a margin. Because the “Constrain to margins” checkbox is selected, the stack view in this case will be constrained to the superview’s left and right margins. This provides space between the stack view and the edge of the scene.
これらの制約は、最も近い前方、後方、そして上方の隣りとの間隔を示します。この文脈では、最も近い隣りという語は、隣接したユーザインターフェイス要素、それはスーパービュー、別のユーザインターフェイス要素、または余白であるかもしれません、の境界線を意味します。「Constrain to margins」チェックボックスが選択されているため、この場合のスタックビューは、それのスーパービューの左および右余白に対して制約されています。これは、スタックビューとこのシーンの端の間の空白を提供します。On the other hand, the top of the stack is constrained relative to the scene’s top layout guide. The top layout guide is positioned at the bottom of the status bar, if the status bar is visible. If not, it is positioned at the top of the scene. Therefore, you need to add a little space between the stack view and the layout guide.
別の見方をすれば、スタックの上部はシーンのもつ上部レイアウトガイドに関係して制約されます。上部レイアウトガイドは、ステータスバーの一番下に置かれます、ステータスバーが見えているならば。そうでないならば、それはシーンの一番上に置かれます。したがって、あなたは小さな空白をスタックビューとレイアウトガイドの間に加える必要があります。Type
0in the left and right boxes, and type20spacing in the top box.
0を左と右のボックスでタイプしてください、そして20の間隔を上部ボックスでタイプしてください。In the pop-up menu next to Update Frames, choose Items of New Constraints. This causes Interface Builder to automatically update the frames of the affected views when you create the constraints.
Update Framesに接するポップアップメニューで、項目New Constraintsを選んでください。これは、あなたが制約を作成する時に影響を受けるビューのフレームをInterface Builderに自動的に更新させます。The Add New Constraints menu should look something like this:
Add New Constraintsメニューは、このように見えるはずです: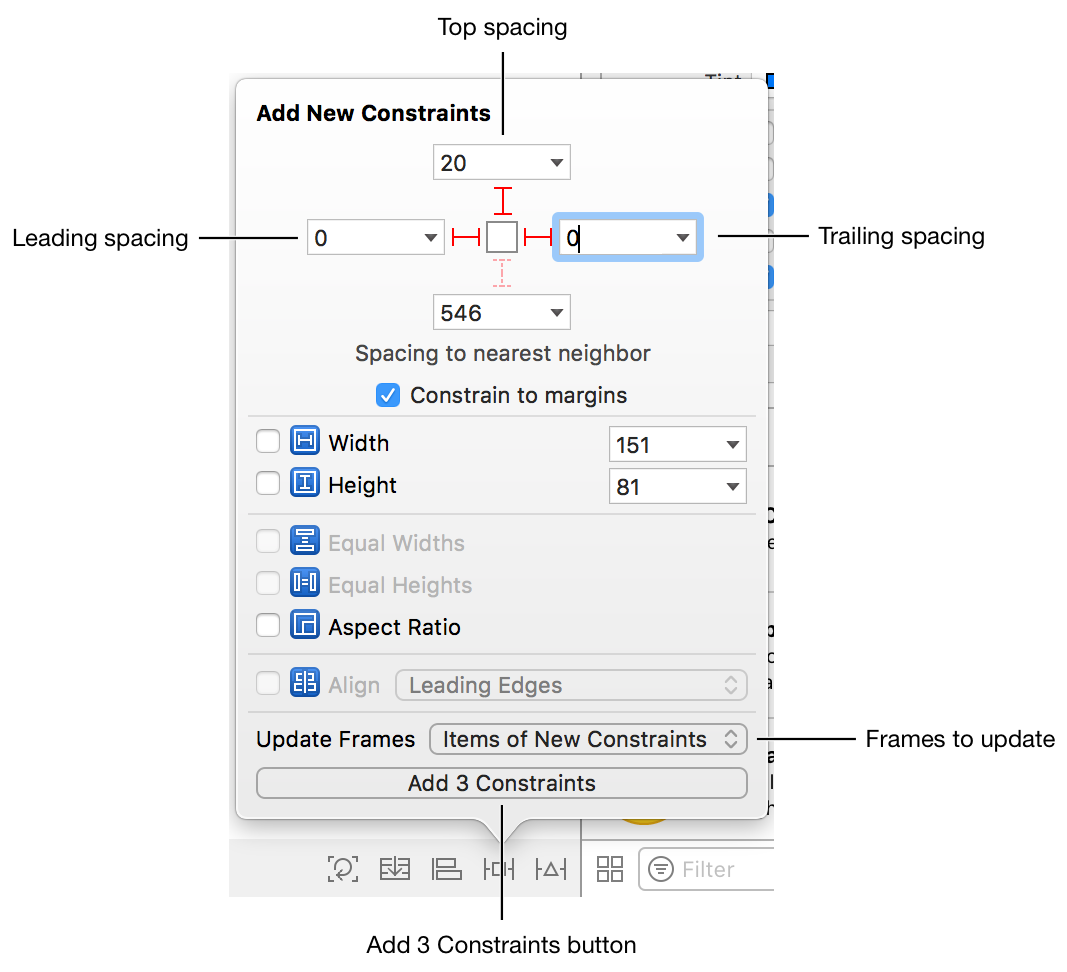
In the Add New Constraints menu, click the Add 3 Constraints button.
Add New Constraintsメニューにおいて、Add 3 Constraintsボタンをクリックしてください。
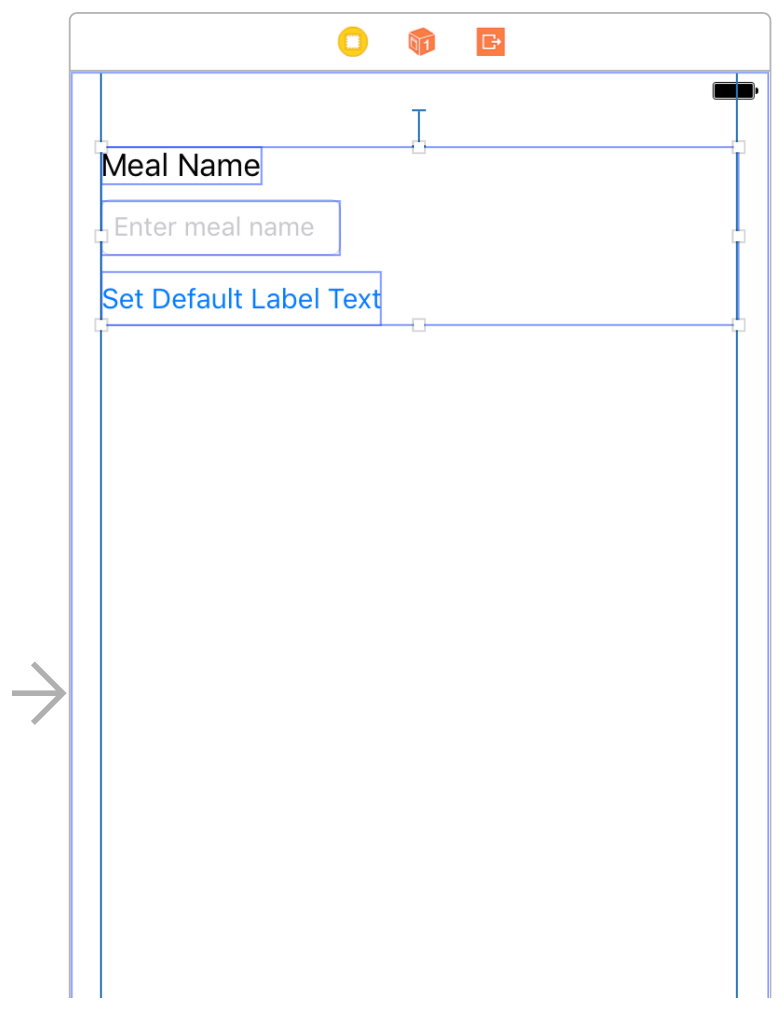
The meal scene user interface should look something like this:
食事シーンユーザインターフェイスは、このようなものに見えるはずです:
You’ll notice that the text field still isn’t stretching to the far edge of the scene. Add a constraint to fix that.
あなたはテキスト欄がまだ伸びておらず、シーンの端まで遠いのに気づくでしょう。ある制約を加えてそれを修正してください。
To adjust the text field width within the stack
テキスト欄の幅をスタック内部で調整するには
In your storyboard, select the text field in the meal scene.
あなたのストーリーボードにおいて、テキスト欄を食事シーンにおいて選択します。On the bottom right of the canvas, open the Add New Constraints menu again.
キャンバスの1番下右で、Add New Constraintsメニューをふたたび開いてください。
Above “Spacing to nearest neighbor,” click the right horizontal constraint to select it. It becomes red when it is selected.
上の「Spacing to nearest neighbor」で、右横制約をクリックしてそれを選択します。それが赤くなったらそれが選択されたということです。Type
0in the right box.
左のボックスで0をタイプします。In the pop-up menu next to Update Frames, choose Items of New Constraints.
Update Framesに接するポップアップメニューで、項目New Constraintsを選んでください。The Add New Constraints menu should look something like this:
Add New Constraintsメニューは、このように見えるはずです: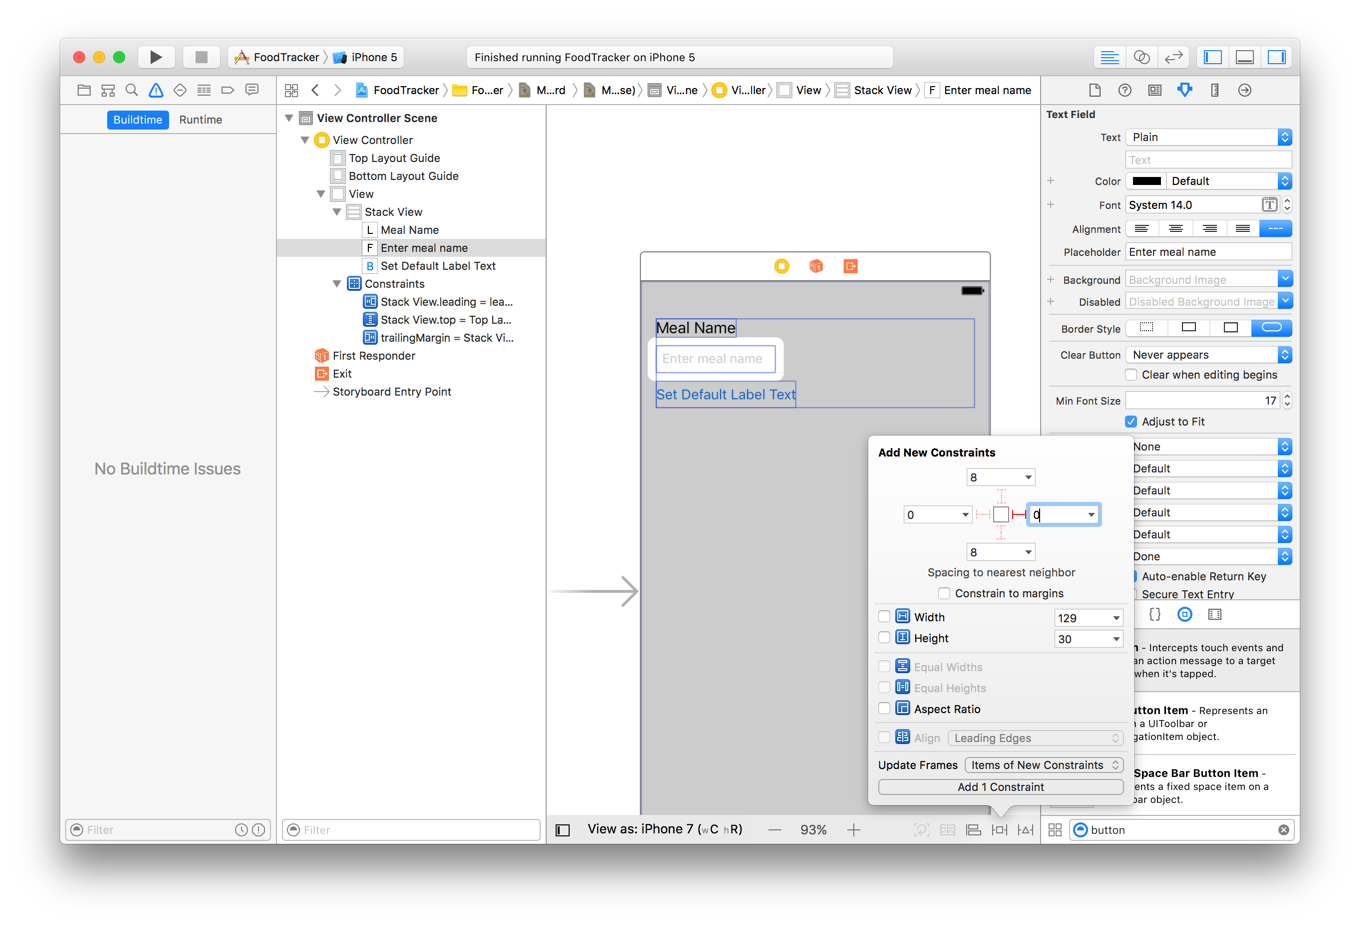
In the Add New Constraints menu, click the Add 1 Constraint button.
Add New Constraintsメニューにおいて、Add 1 Constraintボタンをクリックしてください。
The meal scene user interface should look something like this:
食事シーンユーザインターフェイスは、このようなものに見えるはずです:
Checkpoint: Run your app in iOS Simulator. Rotate the simulator by choosing Hardware > Rotate Left and Hardware > Rotate Right (or Command-Left Arrow and Command-Right Arrow). Notice how the text field grows and shrinks to the appropriate size depending on the device’s orientation and screen size. Also notice that the status bar disappears in landscape orientation.
確認点:あなたのアプリをiOSシミュレータで実行してください。シミュレータをHardware > Rotate Left and Hardware > Rotate Rightを選ぶこと(またはCommand-Left ArrowおよびCommand-Right Arrow)によって回転させてください。どのようにテキスト欄が伸びたり縮んだりしてデバイスの方向や画面サイズ次第で適切な大きさになるかに注意してください。また横方向ではステータスバーが見えなくなることに注意してください。
Click inside the text field and enter text using the onscreen keyboard (if you’d like, you can use your computer’s keyboard by choosing Hardware > Keyboard > Connect Hardware Keyboard).
テキスト欄の内側をクリックしてテキストを画面上のキーボードを使って入力してください(あなたがそうしたいなら、あなたはあなたのコンビュータのキーボードをHardware > Keyboard > Connect Hardware Keyboardを選ぶことによって使うことができます)。
Debugging Auto layout
自動レイアウトをデバッグする
If you don’t get the behavior you expect, use the Auto Layout debugging features to help you. These features can be accessed using the Update Frames button and Resolve Auto Layout Issues menu.
あなたが期待する挙動を得ないならば、あなたの助けとなる自動レイアウトデバッグ機能を使ってください。これらの機能は、Update FramesボタンとResolve Auto Layout Issuesメニューを使ってアクセスされることができます。
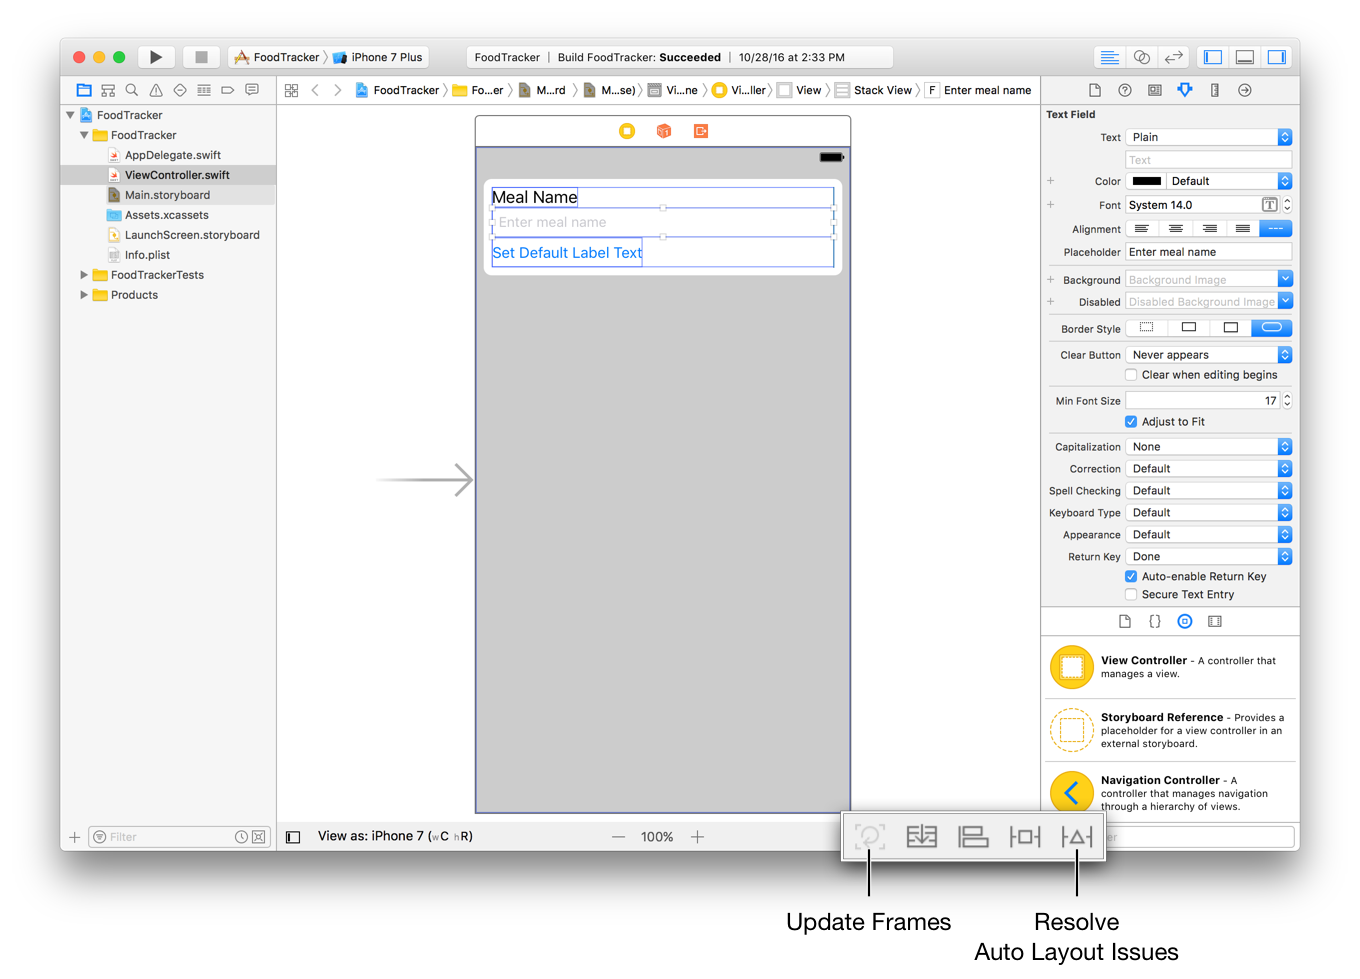
If you are getting warnings about misplaced views, use the Update Frames button. This button updates the frames of the selected view and all of its subviews. Select the scene’s view controller to update all the views in the scene. You can also Option-click the Update Frames button to update only the selected view.
あなたが間違って設置されたビューについての警告を受けているならば、Update Framesボタンを使ってください。このボタンは、選択されたビューおよびそれの全てのサブビューのフレームを更新します。シーンのビューコントローラを選択することで、シーンの中の全てのビューを更新してください。あなたはまたUpdate Framesボタンをオプション-クリックすることで、選択されたビューのみを更新できます。
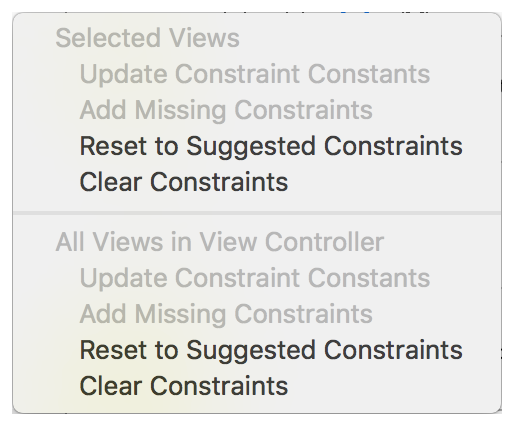
If the layout does not behave as you expect, click the Resolve Auto Layout Issues button to bring up a menu of debug commands. All the commands in this menu have two forms. One affects the currently selected view. The other affects all views in the current view controller. If all of the commands are grayed out, select the scene’s view controller or one of the views and open the menu again.
レイアウトがあなたが期待するように振舞わないならば、Resolve Auto Layout Issuesボタンをクリックすることでデバックコマンドのメニューを画面に出してください。このメニューのコマンド全ては、2つの形式を持ちます。1つは、現在選択されたビューに効果を及ぼします。もう1つは、現在のビューコントローラの中の全てのビューに影響します。コマンドの全てがグレイアウトされるならば、シーンの持つビューコントローラまたはビューのうちの1つを選択して、メニューを再び開いてください。
Choose Reset to Suggested Constraints to have Xcode update your interface with a valid set of constraints. Choose Clear Constraints to remove all constraints on the user interface elements, and then try following the previous instructions to set up the constraints again.
Reset to Suggested Constraintsを選択することで、Xcodeにあなたのインターフェイスを有効な制約ひとそろいで更新させてください。Clear Constraintsを選択することで、ユーザインターフェイス要素上の全ての制約を取り除いてください、そしてそれから前の指示に従って制約を再び設定してみてください。
Wrapping Up
まとめ
In this lesson, you’ve familiarized yourself with the contents of an Xcode project, and with many of the tools used to design and run an iOS app. You’ve also built a simple user interface.
このレッスンにおいて、あなたはあなた自身をXcodeプロジェクトのコンテンツに、そしてiOSアプリを設計して実行するのに使われる多くのツールに親しませました。あなたはまた、簡単なユーザインターフェイスを組み立てました。
Although the project’s scene doesn’t do much yet, the basic user interface is there and functional. Making sure your layout is robust and extensible from the start ensures that you have a solid foundation to build upon.
このプロジェクトのシーンはまだ多くのことをしていないとは言え、基本的なユーザインターフェイスはここにあって機能します。あなたのレイアウトががっしりして拡張可能であるのをその始まりから確かにすることは、あなたがその上に構築するための強固な基盤を持つことを保証します。
Copyright © 2016 Apple Inc. All rights reserved. Terms of Use | Privacy Policy | Updated: 2016-12-08