

Create a Table View
テーブルビューを作る
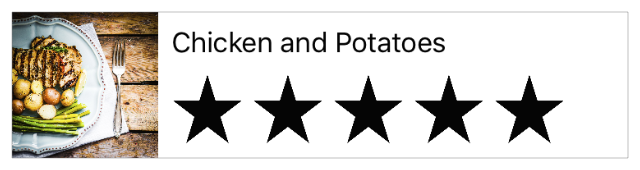
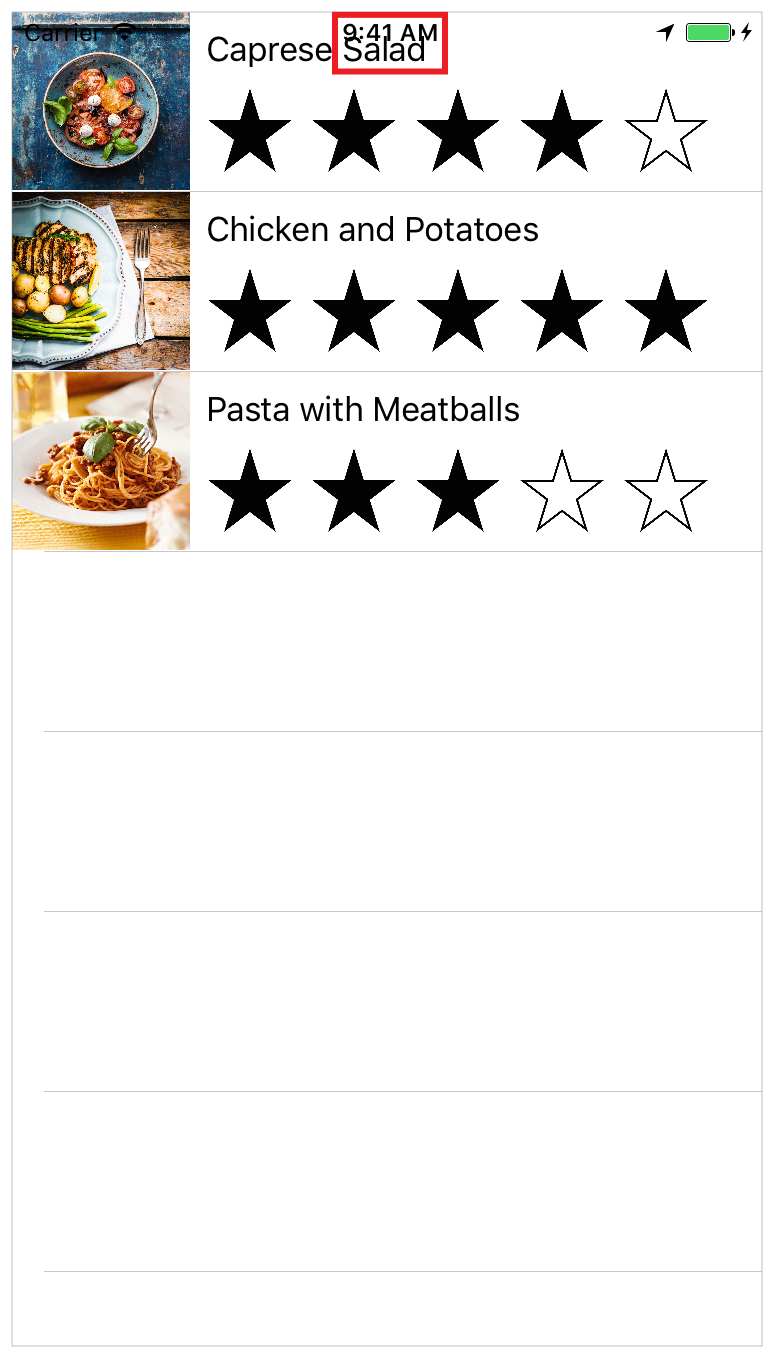
In this lesson, you create a second, table view-based scene, that lists the user’s meals. This meal list becomes the initial scene for your app. You also design custom table cells to display each meal, which look like this:
このレッスンでは、あなたは2番目の、テーブルビューに基づくシーン、ユーザの食事を一覧にするものを作成します。この食事リストは、あなたのアプリの最初のシーンとなります。あなたはまた、カスタムテーブルセルを設計して各食事を表示します、それはこのように見えます:
Learning Objectives
学習する目標
At the end of the lesson, you’ll be able to:
このレッスンの終わりに、あなたが出来るようになるのは:
Create a second storyboard scene
2つ目のストーリーボードを作成するUnderstand the key components of a table view
テーブルビューの鍵となる部分を理解するCreate and design a custom table view cell
カスタム(あつらえの)ビューセルの作成と設計Understand the roles of table view delegates and data sources
テーブルビュー委任先とデータソースの役割を理解するUse an array to store and work with data
配列を使ったデータの保存と活用Display dynamic data in a table view
動的なデータをテーブルビューで表示する
Create the Meal List
食事リストを作成する
So far, the FoodTracker app has a single scene, that is, a single screen of content. In a storyboard, each scene contains views managed by that a view controller, and any items added to the controller or its views (for example, Auto Layout constraints). A view is a rectangular region that can draw its own content and respond to user events. Views are instances of the UIView class or one of its subclasses. In this case, the scene contains the view controller’s content view, and all of the subviews you added in Interface Builder (the stack view, label, text field, image view, and rating control).
これまでは、FoodTrackerはただ1つだけのシーン、すなわち、単一画面のコンテンツ(内容)を持ちます。ストーリーボードにおいて、各シーンはそのビューコントローラによって管理されるいくらかのビュー、そしてそのコントローラまたはそれのビューに加えられるあらゆる項目(例えば、様々なAuto Layout制約など)を含みます。ビューは、ある長方形の領域です、それはそれ独自のコンテンツを描画してユーザイベントに応答することができます。ビューはUIViewクラスまたはそれのサブクラスの1つのインスタンスです。この場合は、シーンはビューコントローラの持つコンテンツビュー、そしてあなたがInterface Builderの中に加えたサブビューの全て(スタックビュー、ラベル、テキスト欄、イメージビュー、そして格付けコントロール)を含みます。
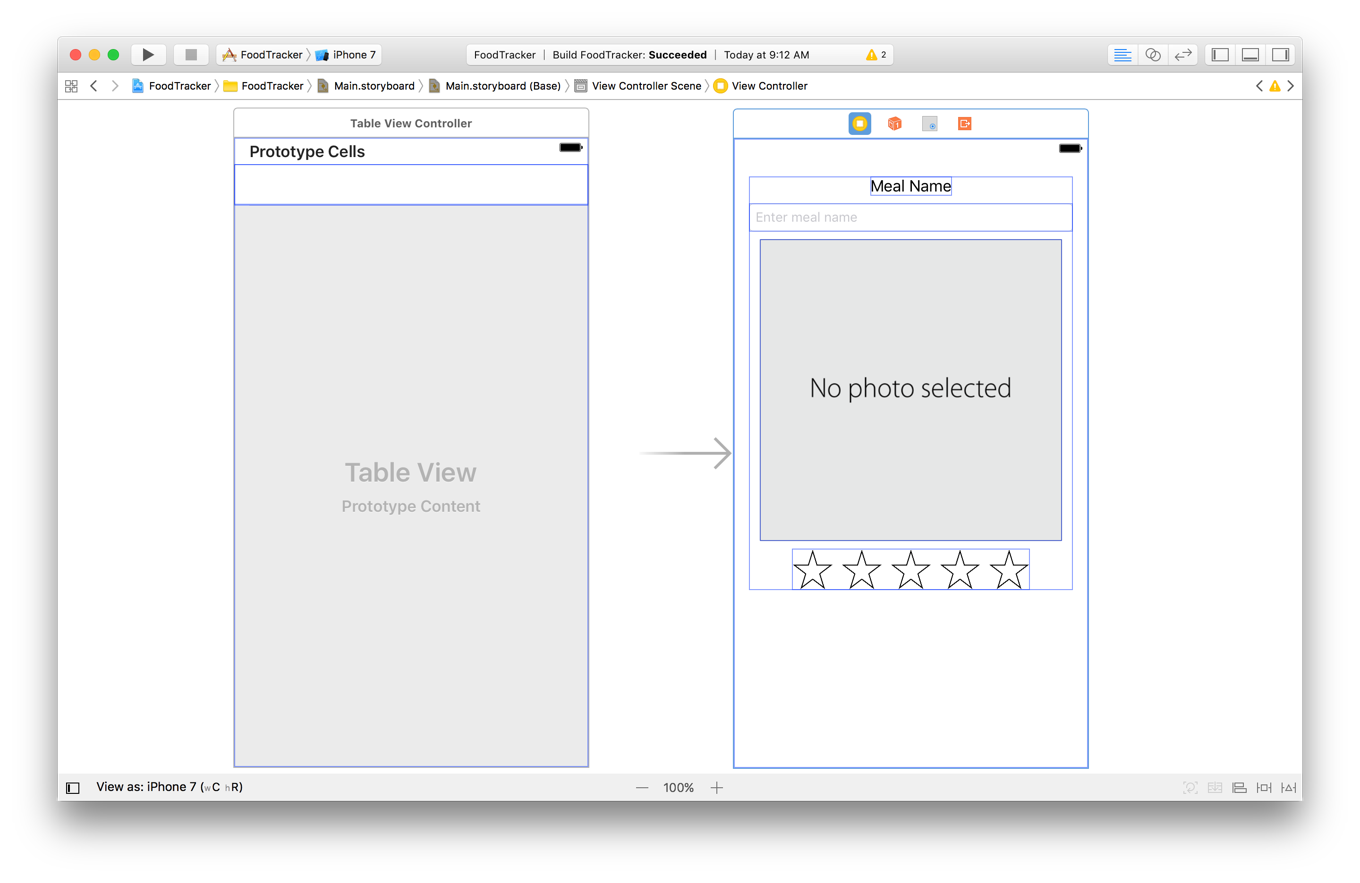
Now it’s time to create another scene that shows the entire list of meals. Fortunately, iOS comes with a built-in class, UITableView, designed specifically to display a scrolling list of items. A table view is managed by a table view controller (UITableViewController). UITableViewController is a subclass of UIViewController, which is designed to handle table view-related logic. You’ll create the new scene using a table view controller. The controller displays and manages a table view. In fact, the table view is the controller’s content view, and fills the entire space available to the scene.
今やもう一つのシーンを作成する時です、それは食事のリスト全体を表示します。幸いにも、iOSは組み込みのクラス、スクロールできる項目のリストを表示するために特別に設計される、UITableViewを備えています。テーブルビューは、テーブルビューコントローラ(UITableViewController)によって管理されます。UITableViewControllerは、テーブルビュ関連ロジックを取り扱うために設計されるUIViewControllerのサブクラスです。あなたは、新しいシーンを作成するのにテーブルビューコントローラを使います。コントローラは、テーブルビューを表示および管理します。実際には、テーブルビューは、そのコントローラの持つコンテンツビューです、そしてそのシーンで利用可能な空間全体を満たします。
To add a scene with a table view to your storyboard
テーブルビューを持つシーンをあなたのストーリーボードに追加するには
Open your storyboard,
Main.storyboard.
あなたのストーリーボード、Main.storyboardを開いてください。Open the Object library in the utility area. (Alternatively, choose View > Utilities > Show Object Library.)
オブジェクトライブラリをユーティリティ区画で開いてください。(または代わりに、View > Utilities > Show Object Libraryを選びます)In the Object library, find a Table View Controller object.
オブジェクトライブラリにおいて、Table View Controllerオブジェクトを見つけてください。Drag a Table View Controller object from the list, and drop it on the canvas to the left of the existing scene.
Table View Controllerオブジェクトをドラッグして、それをキャンバス上で既存のシーンの左にドロップしてください。If you try to drag the table view to the canvas and nothing happens, you’re probably dragging a table view object rather than a table view controller object. The table view object is just a view representing the table itself. Like other view objects, it must be added as a subview to an existing scene. On the other hand, the table view controller is a full scene. It includes both a table view and the controller that manages the table view.
あなたがテープルビューをキャンバスにドラッグすることを試みて何も起きないならば、あなたはおそらくテーブルビューコントローラオブジェクトではなくて、テーブルビューオブジェクトをドラッグしています。テーブルビューオブジェクトは、単にテーブルそれ自体を表しているビューです。他のビューオブジェクトのように、それはサブビューとして既存のシーンに加えられなければなりません。別の見方をすれば、テーブルビューコントローラは1つの完全なシーンです。それは、テーブルビューと、テーブルビューを管理するコントローラの両方を含みます。
You now have two scenes, one for displaying the meal list and one for displaying the details of a single meal.
あなたは今では2つのシーンを持ちます、食事リストを表示するためのものと1つの食事の詳細を表示するためのもの。
It makes sense to have the meal list be the first thing users see when they launch your app, so tell Xcode that’s your intent by setting the table view controller as the first scene.
食事リストがあなたのアプリを起動した時にユーザが見る最初のものであるのは道理にかなっています、それでXcodeにそれがあなたの意向であることを、テーブルビューコントローラを最初のシーンとして設定することによって伝えます。
To set the meal list as the initial scene
食事リストを最初のシーンとして設定するには
If you want more space to work, collapse the project navigator and utility area by clicking the Navigator and Utilities buttons in the Xcode toolbar.
あなたがもっと作業空間を必要とするならば、プロジェクトナビゲータとユーティリティ区画をXcodeツールパーのNavigatorとUtilitiesボタンをクリックすることで折り畳んでください。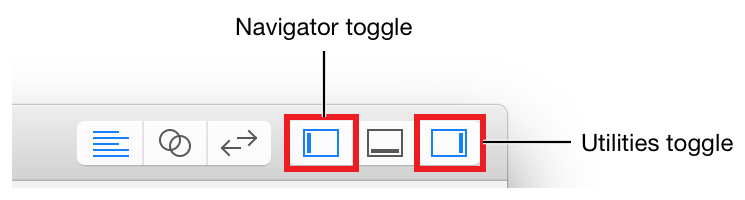
You can also collapse the outline view.
あなたはまたアウトラインビューも折り畳むことができます。Drag the storyboard entry point from the meal detail scene to the meal list scene.
ストーリーボードエントリポイントを食事詳細シーンから食事リストシーンへとドラッグしてください。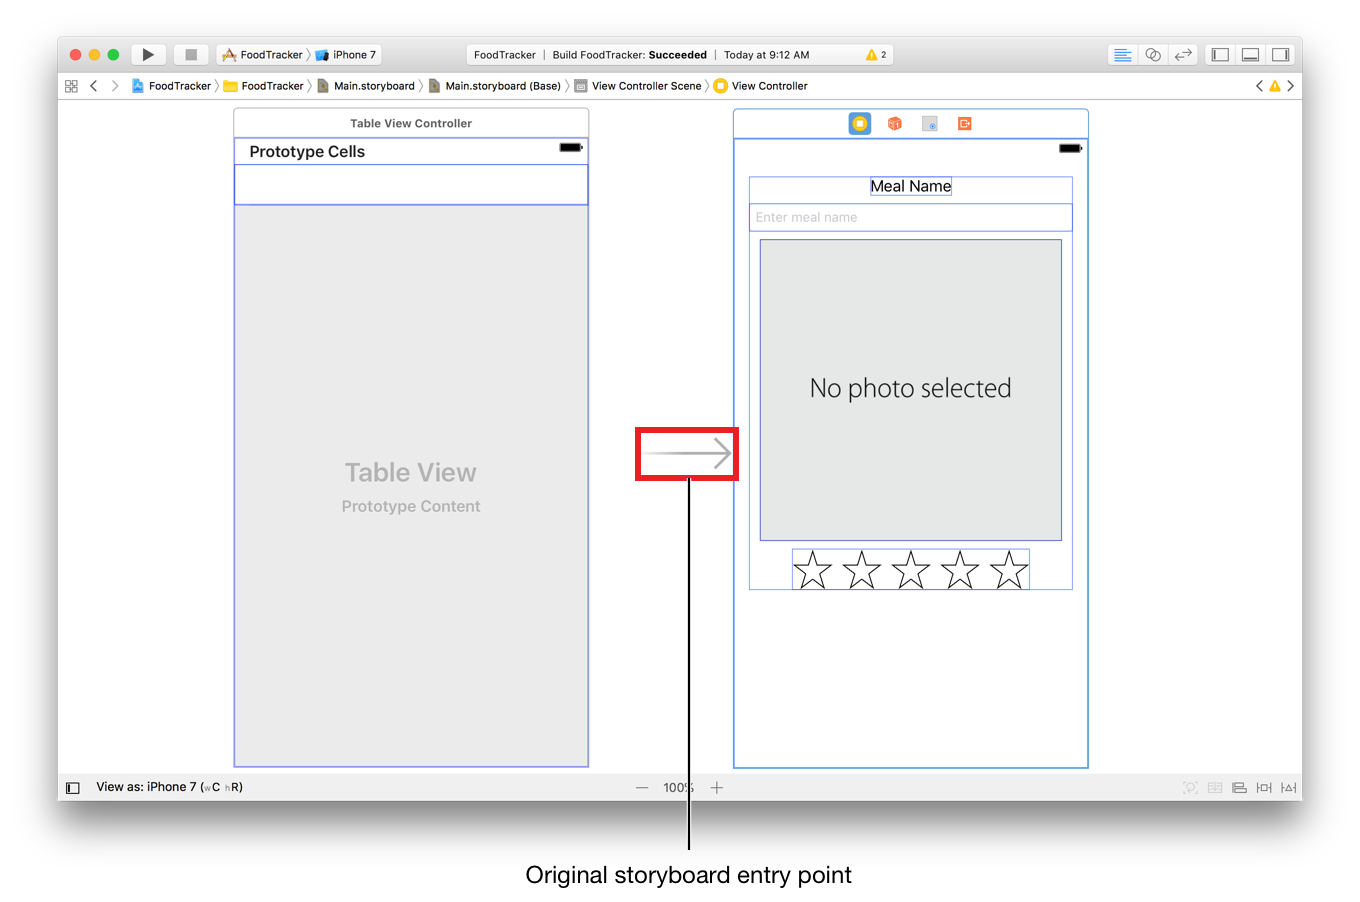
The table view controller is set as the initial view controller in your storyboard, making the meal list the first scene that loads on app launch.
テーブルビューコントローラは、あなたのストーリーボードの最初のビューコントローラとして設定されて、食事リストはアプリ起動でロードされる最初のシーンにされます。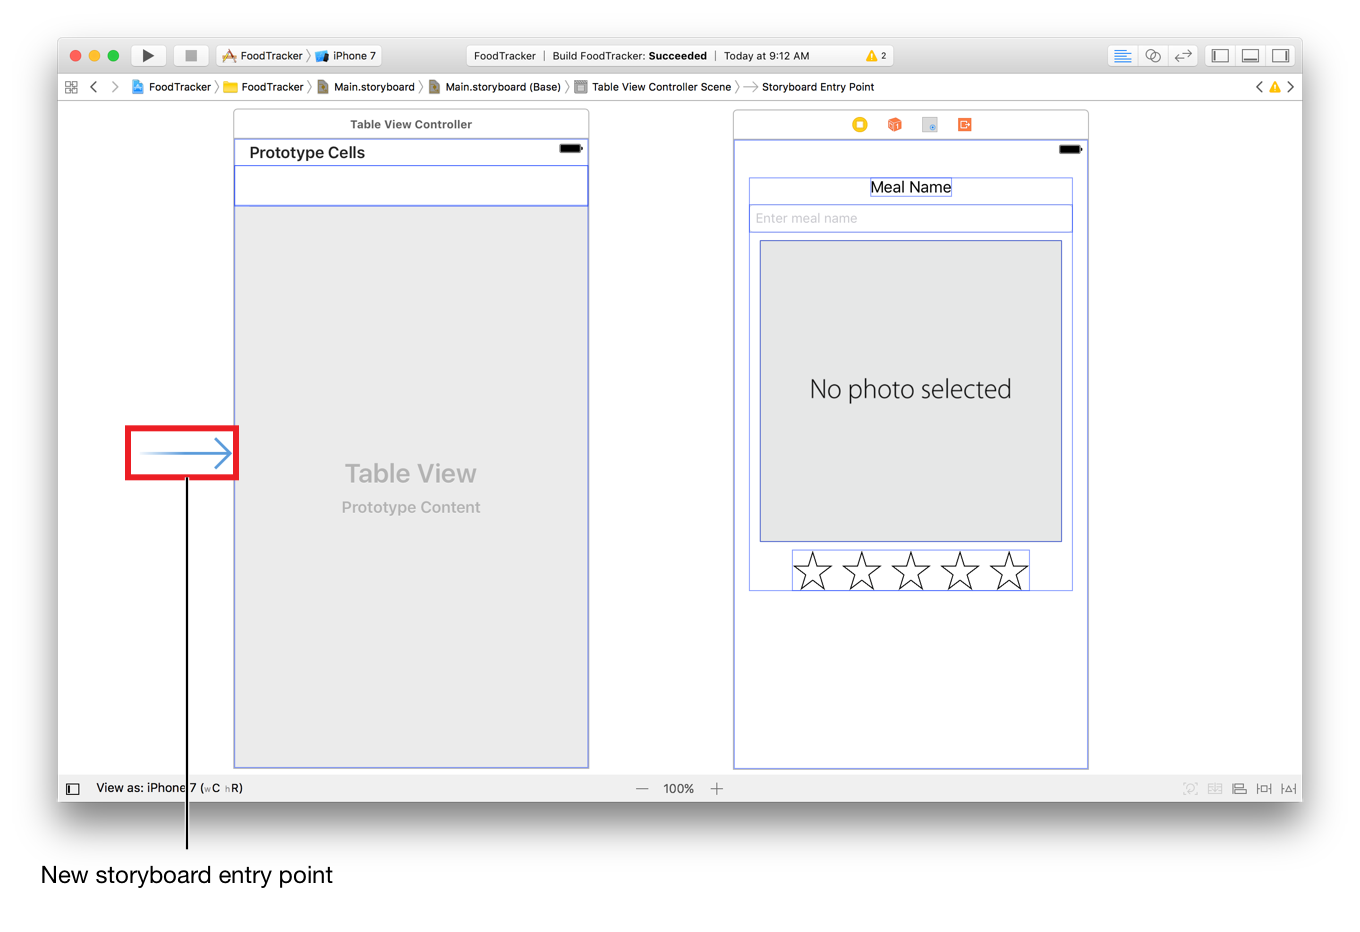
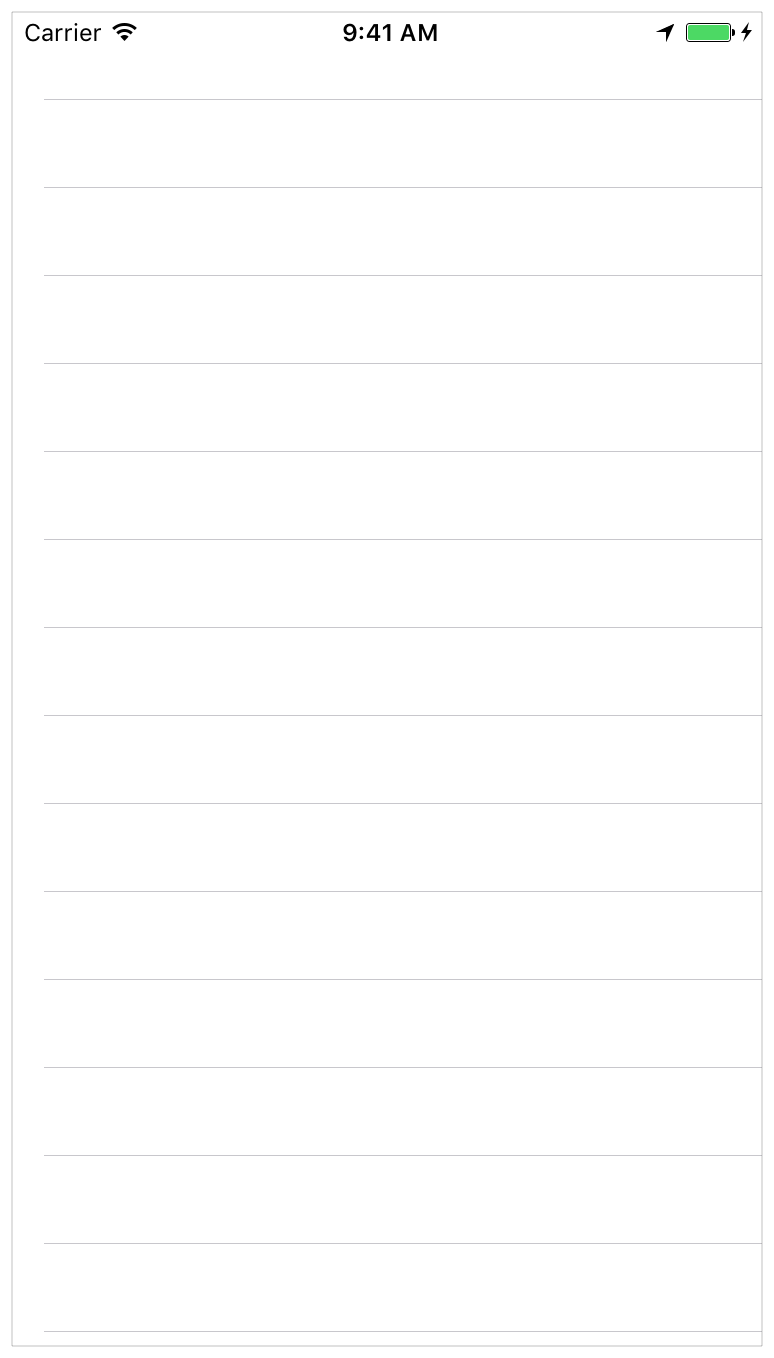
Checkpoint: Run your app. Instead of the meal detail scene with its text field, image view, and rating control, you should now see an empty table view—a screen with a number of horizontal dividers to separate it into rows, but with no content in each row.
確認点:あなたのアプリを実行してください。食事詳細シーンとそれが持つそれのテキスト欄、イメージビュー、そして格付けコントロールではなく、あなたは今では空のテーブルビューを見るはずです—それは、画面をいくつかの水平仕切りで行へとそれを分けています、しかし各行は空です。
You need to change a few settings on this table view so you can use it in your app.
あなたが必要とするのは、テーブルビュー上でいくつかの設定を変更して、それをあなたのアプリにおいて利用可能なものにすることです。
To configure the table view
テーブルビューを設定し構成するには
In your storyboard, open the outline view and expand the utility area.
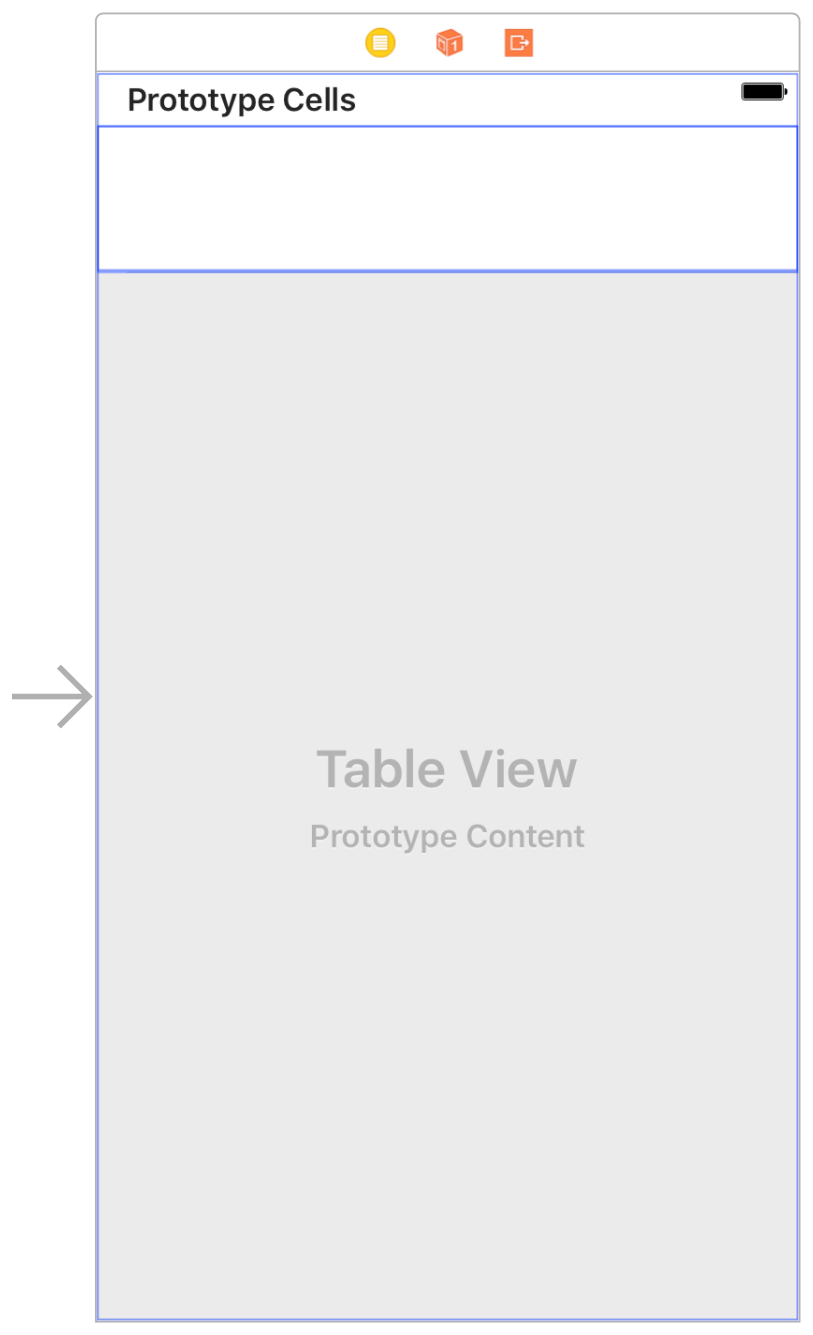
あなたのストーリーボードにおいて、アウトラインビューを開いてユーティリティ区画を展開してください。In the outline view, select Table View.
アウトラインビューにおいて、Table Viewを選択してください。The table view is nested under Table View Controller Scene > Table View Controller. You may have to click the disclosure triangles next to those objects to see the nested table view.
テーブルビューは、Table View Controller Scene > Table View Controllerの下に入れ子にされます。あなたは、それらのオブジェクトの隣で開示三角形をクリックして入れ子にされたテーブルビューを見る必要があるでしょう。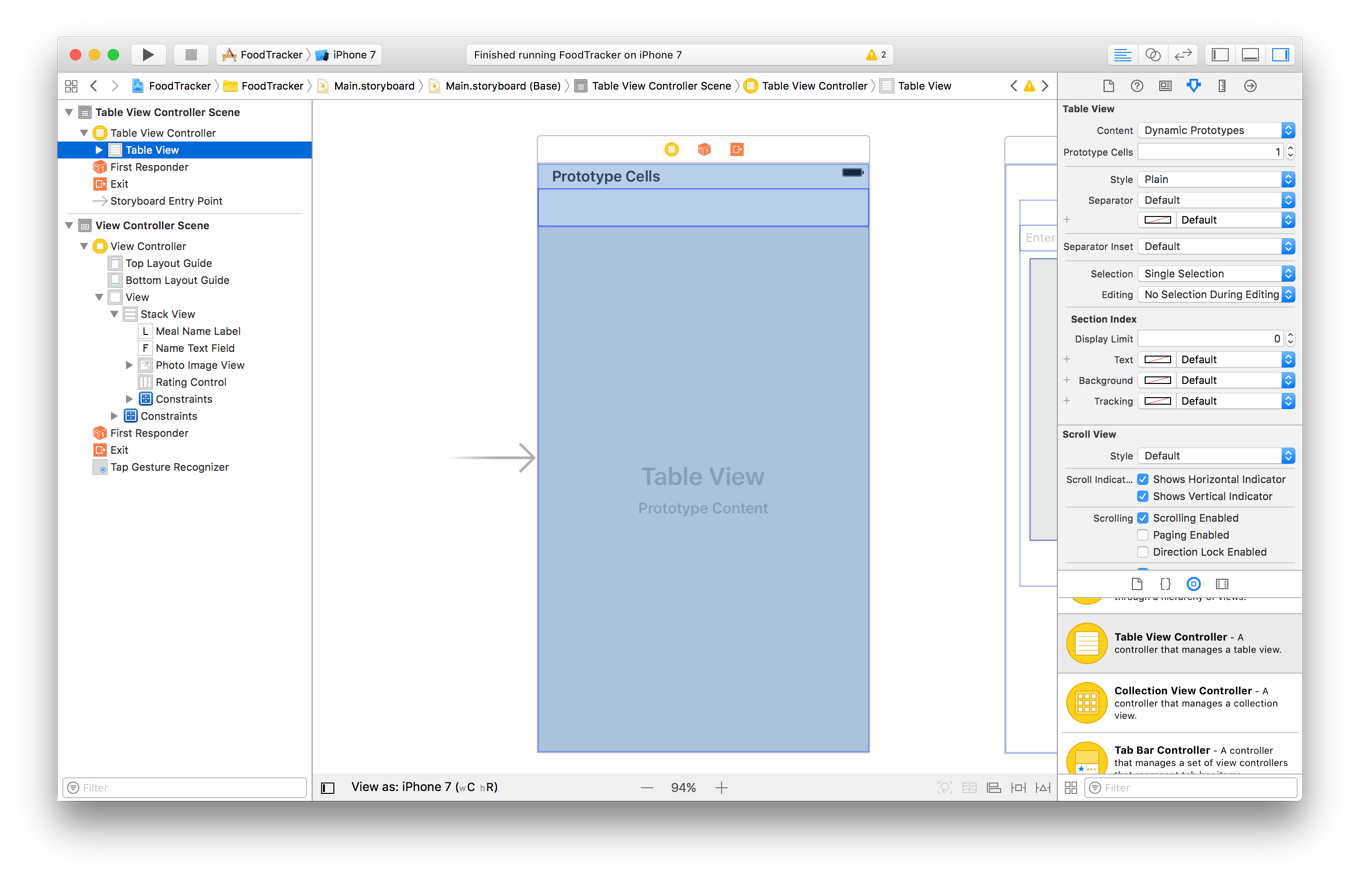
With the table view selected, open the Size inspector
 in the utility area.
テーブルビューが選択された状態で、Sizeインスペクタをユーティリティ区画で開いてください。
In the Size inspector, find the field labeled Row Height and type
90. Press Return.
サイズインスペクタにおいて、Row Heightとラベルをつけられる欄を探して90をタイプしてください。リターンキーを押します。
You’ll come back to working on the table view itself in a little while, after you design an interface for what the table view displays: its table view cells.
あなたは、テーブルビューそれ自体での作業に少ししたら戻ってきます、あなたがインターフェイス設計を、テーブルビューが表示するのは何か、についてした後にです:それはテーブルビューセル(表のます目)です。
Design Custom Table Cells
カスタムテーブルセル設計
The individual rows in a table view are managed by table view cells (UITableViewCell), which are responsible for drawing their contents. Table view cells come with a variety of predefined behavior and default cell styles; however, because you have more content to display in each cell than the default styles allow, you’ll need to define a custom cell style.
テーブルビュー内の個々の行は、テーブルビューセル(UITableViewCell)によって管理されます、それはその内容を描画する責任を持ちます。テーブルビューセルは、さまざまな前もって定義された挙動と省略時のセルスタイルを備えます;しかしながら、あなたは省略時のスタイルよりももっと多くのコンテンツを各セルに表示しなければならないことから、あなたはカスタムセルスタイルを定義する必要があります。
To create a subclass of UITableViewCell
UITableViewCellのサブクラスを作成するには
Expand the Navigator area and open the Project navigator.
Navigator区画を展開して、Projectナビゲータを開いてください。Choose File > New > File (or press Command-N).
File > New > Fileを選んでください(またはコマンド-Nを押します)。At the top of the dialog that appears, select iOS.
現れたダイアログの一番上で、iOSを選択してください。Select Cocoa Touch Class, and click Next.
Cocoa Touch Classを選んで、Nextをクリックしてください。In the Class field, type
Meal.
Class欄において、Mealをタイプしてください。In the “Subclass of” field, select
UITableViewCell.
「Subclass of」欄において、UITableViewCellを選んでください。The class title changes to
MealTableViewCell. Xcode makes it clear from the naming that you’re creating a custom table view cell, so leave the new name as is.
クラスのタイトルをMealTableViewCellに変更してください。Xcodeにはその名前の付け方からあなたがカスタムテーブルセルを作成しているのが明らかです、それで新しい名前はそのままにされます。Make sure the Language option is set to Swift.
LanguageオプションがSwiftに設定されていることを確かめてください。Click Next.
Nextをクリックしてください。The save location defaults to your project directory.
保存場所は、初期状態であなたのプロジェクトディレクトリです。The Group option defaults to your app name, FoodTracker.
Groupオプションは、初期状態であなたのアプリ名、FoodTrackerです。In the Targets section, make sure your app is selected and the tests for your app are unselected.
Targets区画において、あなたのアプリが選択されて、あなたのアプリのためのテストは選択されないことを確かめてください。Click Create.
Createをクリックします。Xcode creates a file that defines the
MealTableViewCellclass:MealTableViewCell.swift.
Xcodeは、MealTableViewCellクラスを定義するファイル:MealTableViewCell.swiftを作成します。In the Project navigator, reposition the
MealTableViewCell.swiftfile under the other Swift files, if necessary.
Projectナビゲータにおいて、MealTableViewCell.swiftファイルを他のSwiftファイルの下に位置変更してください、もし必要ならば。
Now, open your storyboard again.
次に、再びあなたのストーリーボードを開いてください。
If you look at the meal list scene in your storyboard, you’ll notice that it shows a single table view cell.
あなたが食事リストシーンをあなたのストーリーボードで観察するならば、あなたはそれがただ1つのテーブルビューセルを表示するのに気づくでしょう。
This cell is a prototype cell for the table. You can define the design and behavior of this cell. The table can then create instances of this cell. But first, you need to connect the table view cell in your scene to the custom cell subclass you just created.
このセルは、テーブルのための原型セルです。あなたは、このセルの設計と挙動を定義できます。テーブルは、それからこのセルのインスタンスを作成できます。しかしまず、あなたはあなたのシーン中のテーブルビューセルをあなたがちょうど作成したカスタムセルサブクラスと接続する必要があります。
To configure a custom cell for your table view
カスタムセルをあなたのテーブルビューに対して構成するには
In the outline view, select Table View Cell.
アウトラインビューにおいて、Table View Cellを選択してください。The cell is nested under Table View Controller Scene > Table View Controller > Table View. You may have to disclose those objects to see the table view cell.
セルは、Table View Controller Scene > Table View Controller > Table Viewの下に入れ子にされます。あなたは、それらのオブジェクトを開いていって、テーブルビューセルを見なければならないでしょう。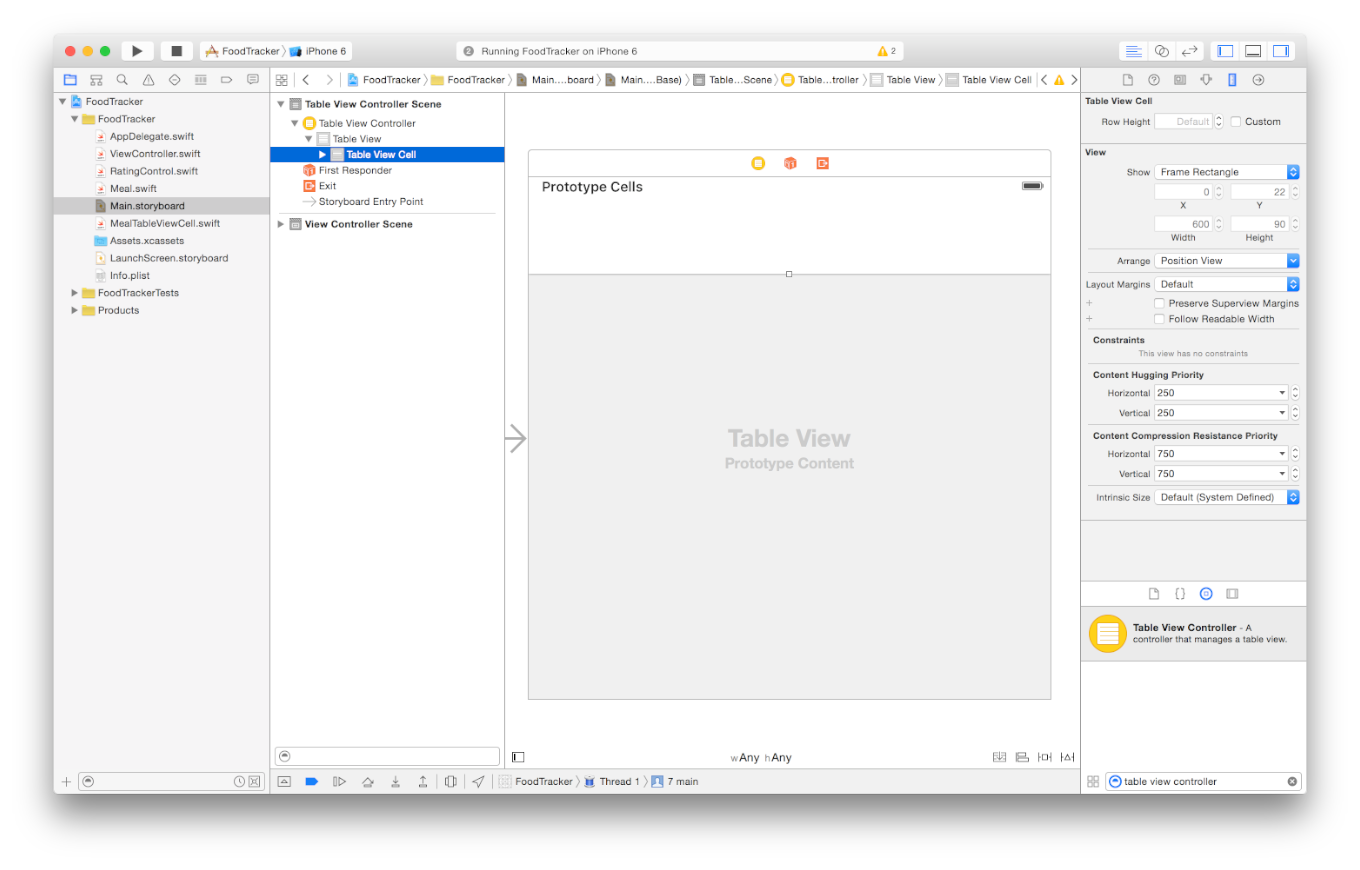
With the table view cell selected, open the Attributes inspector
 in the utility area.
テーブルビューセルが選択された状態で、Attributesインスペクタをユーティリティ区画で開いてください。
In the Attributes inspector, find the field labeled Identifier and type
MealTableViewCell. Press Return.
Attributesイスンペクタにおいて、Identifierとラベルをつけられる欄を見つけてMealTableViewCellとタイプしてください。リターンキーを押します。You will use this identifier to create instances of this prototype cell.
あなたは、この識別子を使ってこの原型セルのインスタンスを作成します。Open the Size inspector
.
Sizeインスペクタを開いてください。
In the Size inspector, find the field labeled Row Height and type
90.
サイズインスペクタにおいて、Row Heightとラベルをつけられる欄を探して90をタイプしてください。Make sure the Custom checkbox next to this field is selected:
この欄の隣のCustomチェックボックスが選択されることを確かめてください: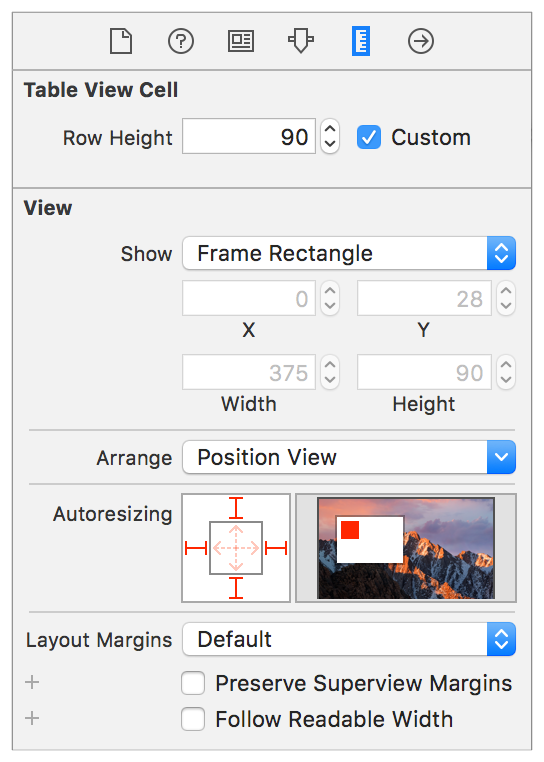
Press Return to display the new cell height in your storyboard.
リターンキーを押して新しいセルの高さをあなたのストーリーボードにおいて表示してください。Open the Identity inspector
 .
.
Identityインスペクタを開いてください。
Recall that the Identity inspector lets you edit properties of an object in your storyboard related to that object’s identity, such as what class the object belongs to.
思い出してください、同一性インスペクタは、あなたにあなたのストーリーボードのあるオブジェクトのプロパティをそのオブジェクトの同一性に関して、例えばどのクラスにそのオブジェクトが所属するかなどを、編集させます。In the Identity inspector, find the Class field and select
MealTableViewCell.
Identityインスペクタにおいて、Class欄を捜してMealTableViewCellを選択してください。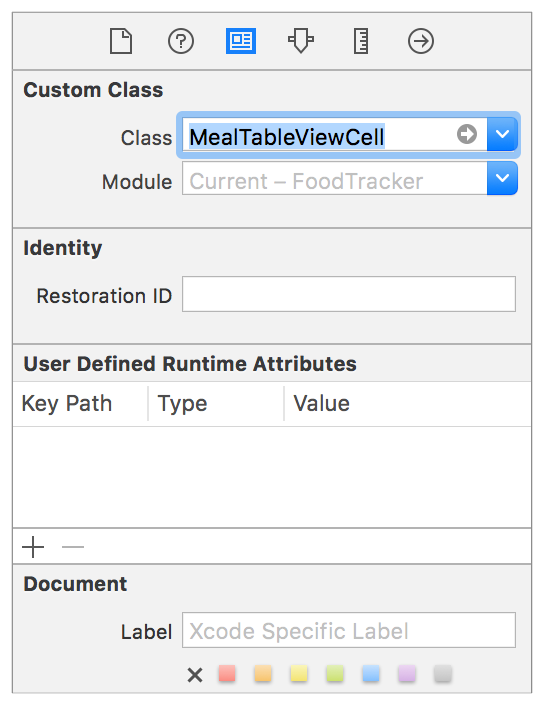
With the cell configured, you can design its custom user interface directly in the storyboard. You’ll need a label, an image view, and a rating control. You can reuse the rating control class that you created in an earlier lesson. Your custom interface will then contain the meal name, photo, rating, and look something like this:
セルが構成されたので、あなたはそれのカスタムユーザインターフェイスを直接にあなたのストーリーボード上で設計できます。あなたはラベル、イメージビュー、そして格付けコントロールを必要とします。あなたは、あなたが前のレッスンで作成した格付けコントロールクラスを再利用できます。あなたのカスタムインターフェイスは、そのとき食事名、写真、格付けを含み、そしてこのようなものに見えるでしょう:
To design the interface of the custom table cell
カスタムテーブルセルのインターフェイスを設計するには
Use the Object library to find an Image View object and drag it onto the table cell.
オブジェクトライブラリを使ってImage Viewオブジェクトを探してそれをテーブルセル上へドラッグしてください。Drag and resize the image view so that it’s square, flush against the left, top, and bottom of the cell.
イメージビューをドラッグおよびサイズ調節して、それが正方形で、セルの左、上、そして下に対してくっつくようにしてください。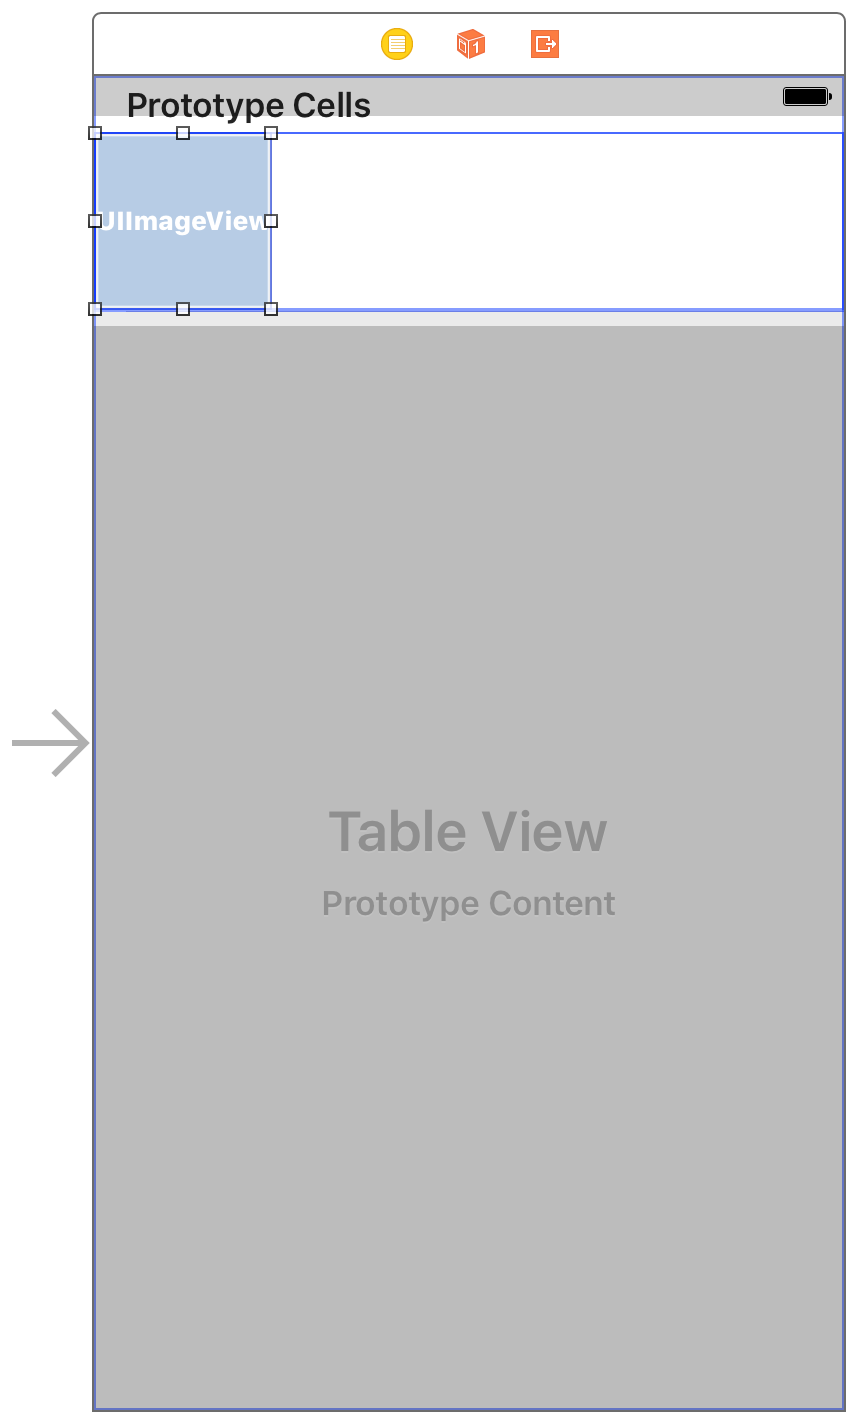
With the image view selected, open the Attributes inspector
in the Utility area.
イメージビューが選択された状態で、AttributesインスペクタをUtility区画で開いてください。
In the Attributes inspector, find the Image field and select
defaultPhoto. If you didn’t add a default photo to your project in a previous lesson, add it now.
Attributesインスペクタにおいて、Imageフィールドを見つけてdefaultPhotoを選択してください。あなたが省略時の写真をあなたのプロジェクトに以前のレッスンで加えなかったならば、今それを加えてください。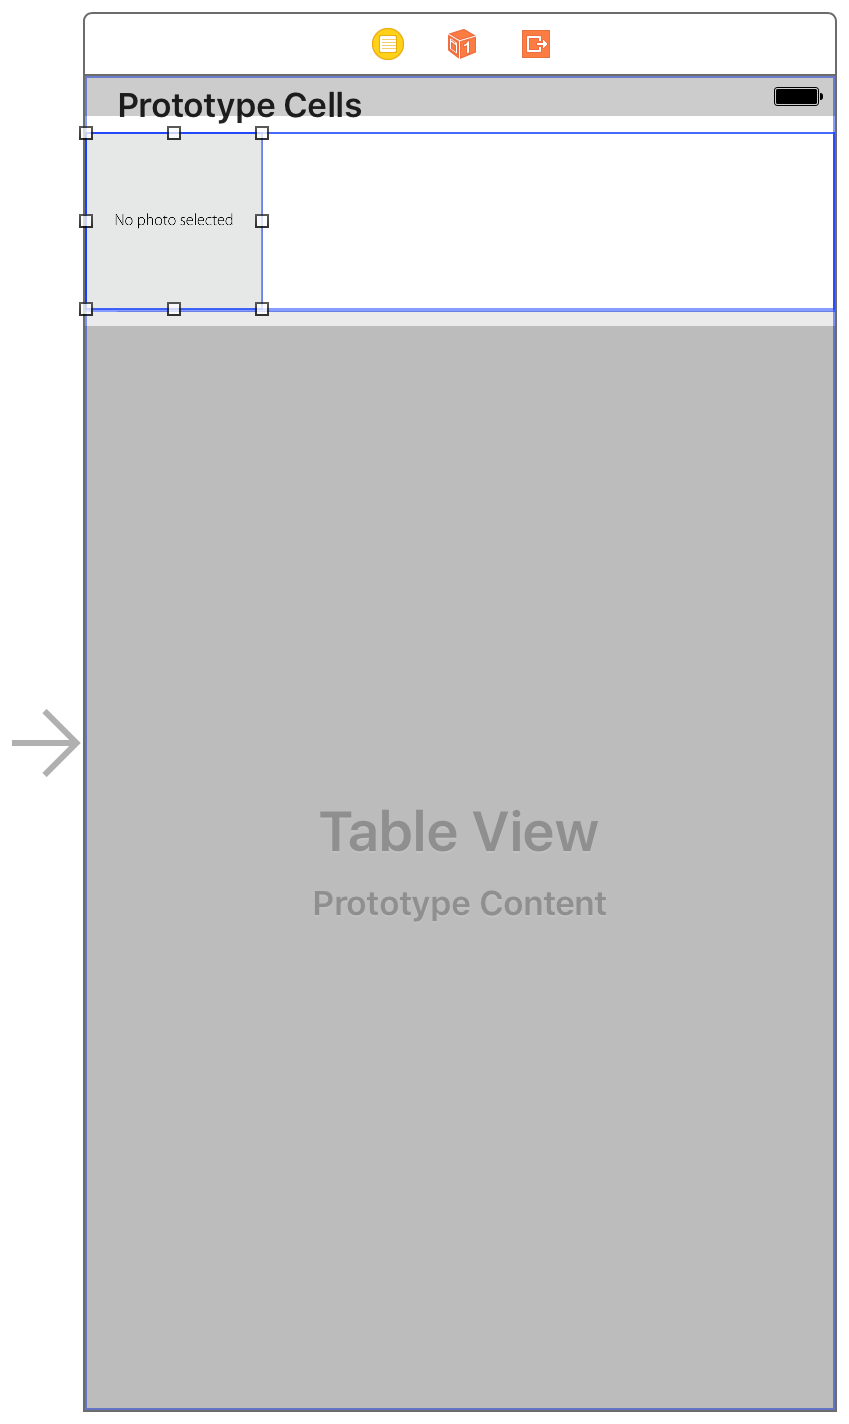
Use the Object library to find a Label object and drag it onto the table cell. You will use the label to show the meal’s name.
オブジェクトライブラリを使ってLabelオブジェクトを探してそれをテーブルセル上にドラッグしてください。あなたは、このラベルを使って食事の名前を表示します。Drag the label so that its lined up with the guidelines to the right side of the image view and to the top margin of the table view cell.
ラベルをドラッグして、それがイメージビューの右側とテーブルビューセルの上余白のガイドラインと整列するようにしてください。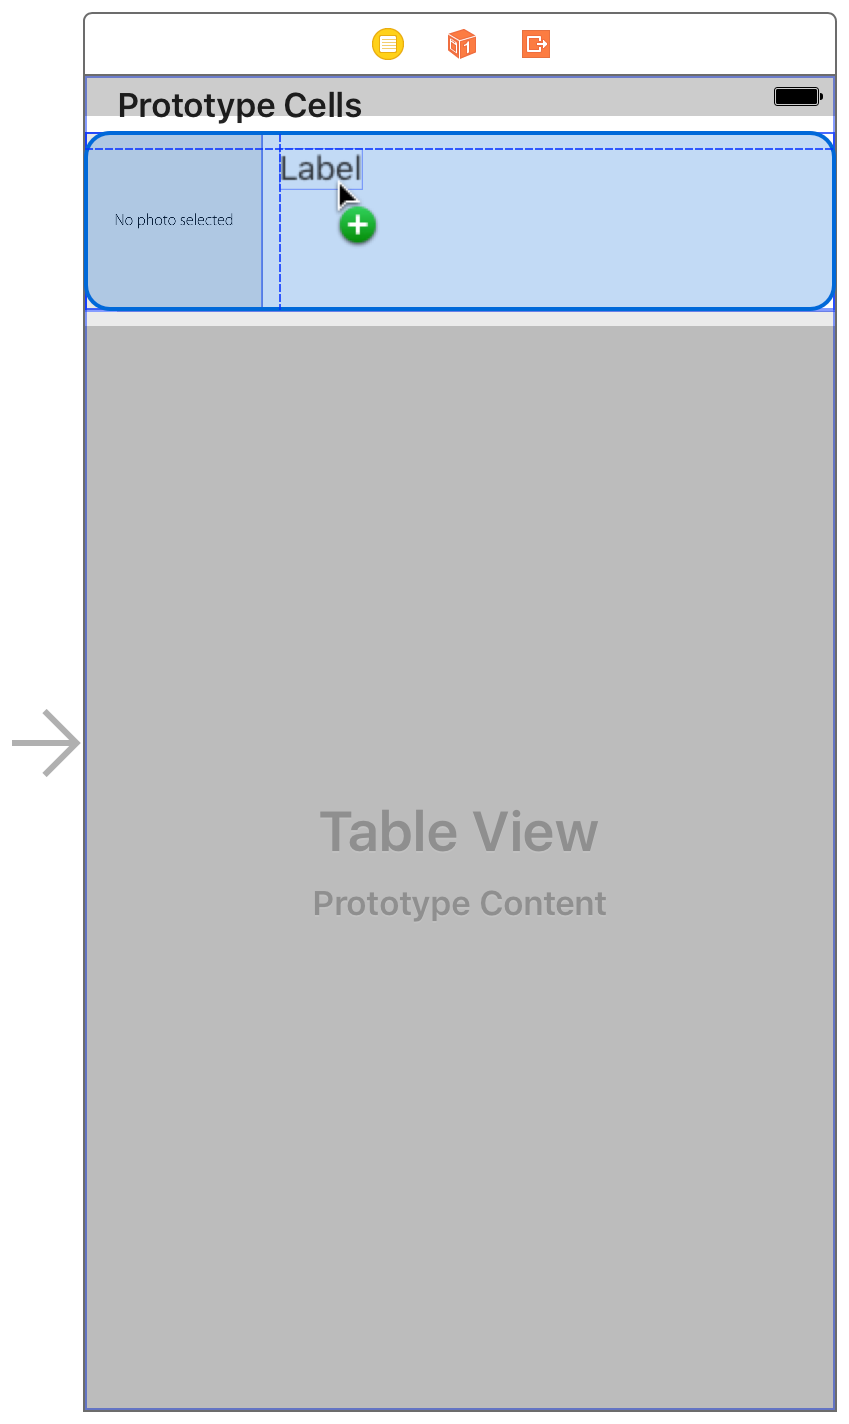
Resize the label so that its right edge stretches to the cell’s right margin.
ラベルを大きさ変更して、それの右端をセルの右余白まで引き延ばしてください。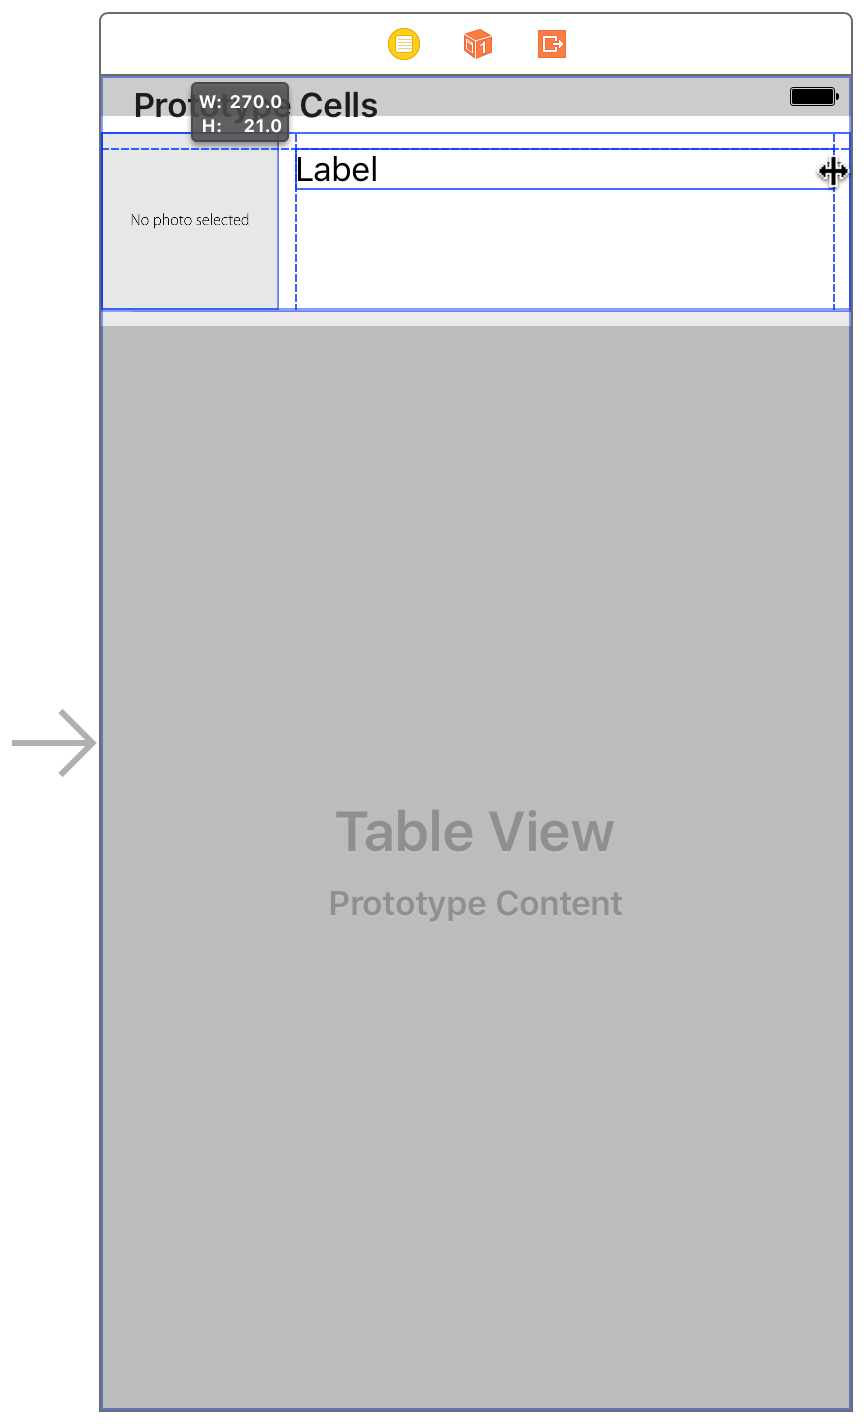
Use the Object library to find a Horizontal Stack View object and drag it onto the table cell.
Objectライブラリを使ってHorizontal Stack Viewオブジェクトを見つけて、それをテーブルセル上にドラッグしてください。With the stack view selected, open the Size inspector
in the utility area.
スタックビューが選択された状態で、Sizeインスペクタをユーティリティ区画で開いてください。
In the Size inspector, type
44in the Height field and252in the Width field. Press Return.
Sizeインスペクタにおいて、Height(高さ)欄に44をWidth(幅)欄に252をタイプしてください。リターンキーを押します。Drag the stack view so that it’s below the label and aligned with the label’s left margin.
このスタックビューをドラッグして、それがラベルの下で、ラベルのもつ左余白と整列するようにしてください。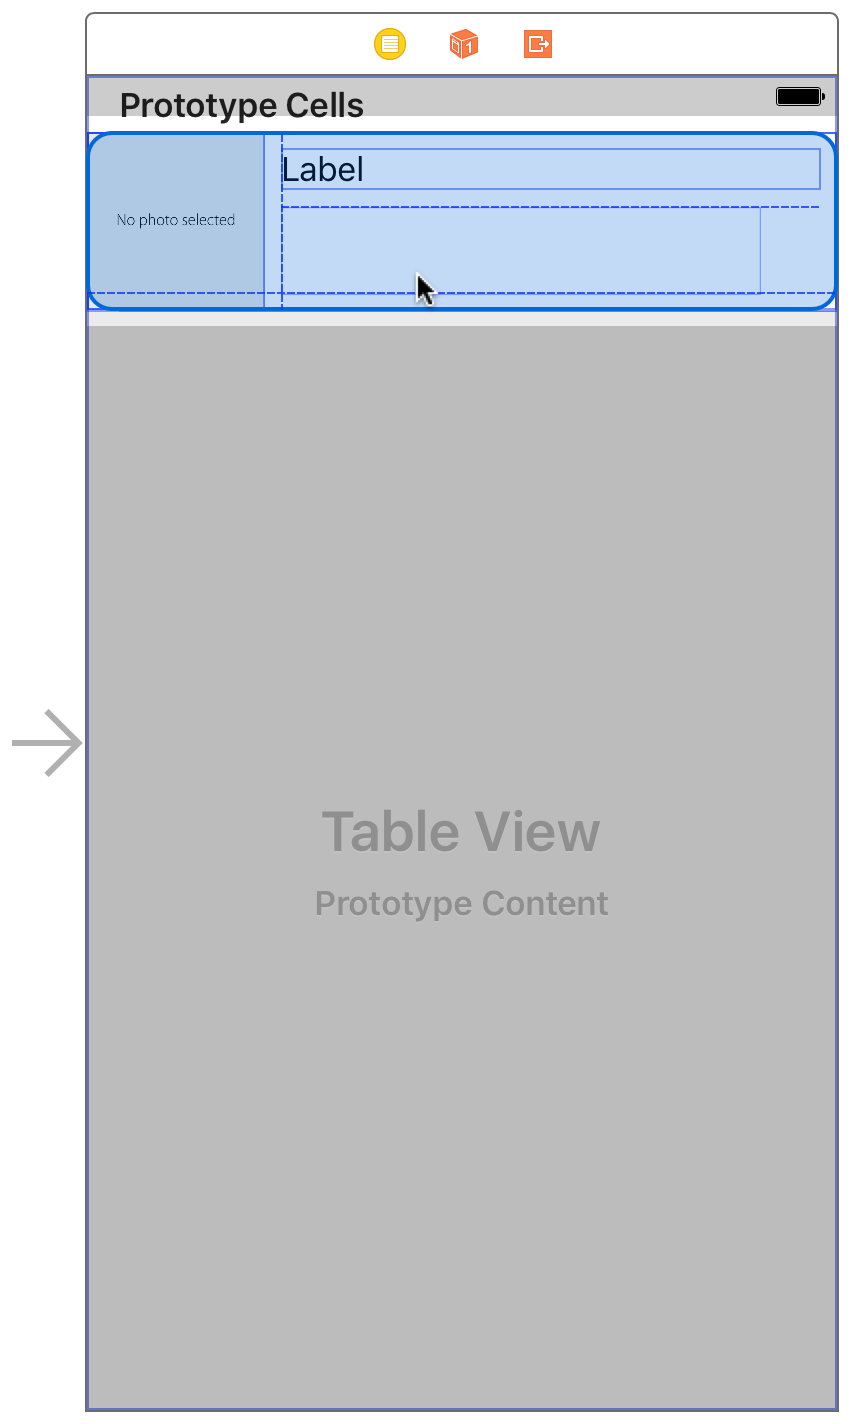
With the view selected, open the Identity inspector
.
ビューが選択された状態で、同一性インスペクタを開いてください。
In the Identity inspector, find the field labeled Class and select
RatingControl.
同一性インスペクタにおいて、Classとラベルをつけられる欄を探してRatingControlを選択してください。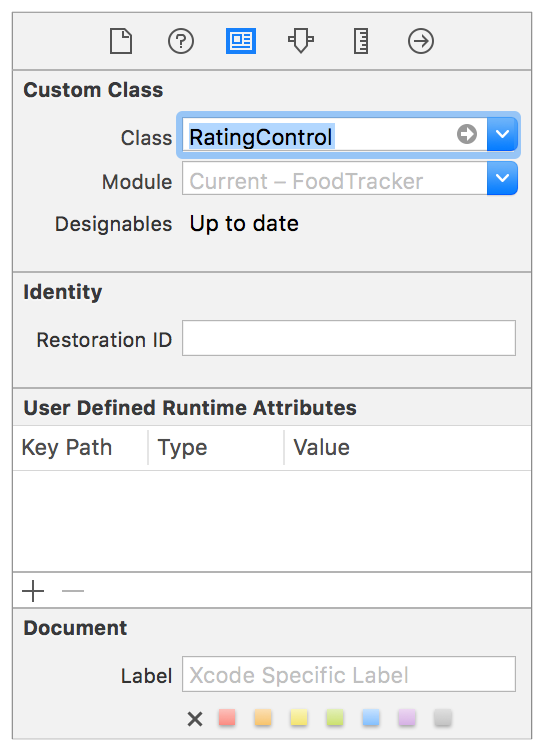
If you don’t see
RatingControlas an option in the pop-up menu, make sure you have the stack view selected on the canvas.
あなたがRatingControlをオプションとしてポップアップメニューに見ないならば、あなたがキャンパス上でスタックビューを選択していることを確かめてください。With the view selected, open the Attributes inspector
.
このビューが選択された状態で、Attributesインスペクタを開いてください。
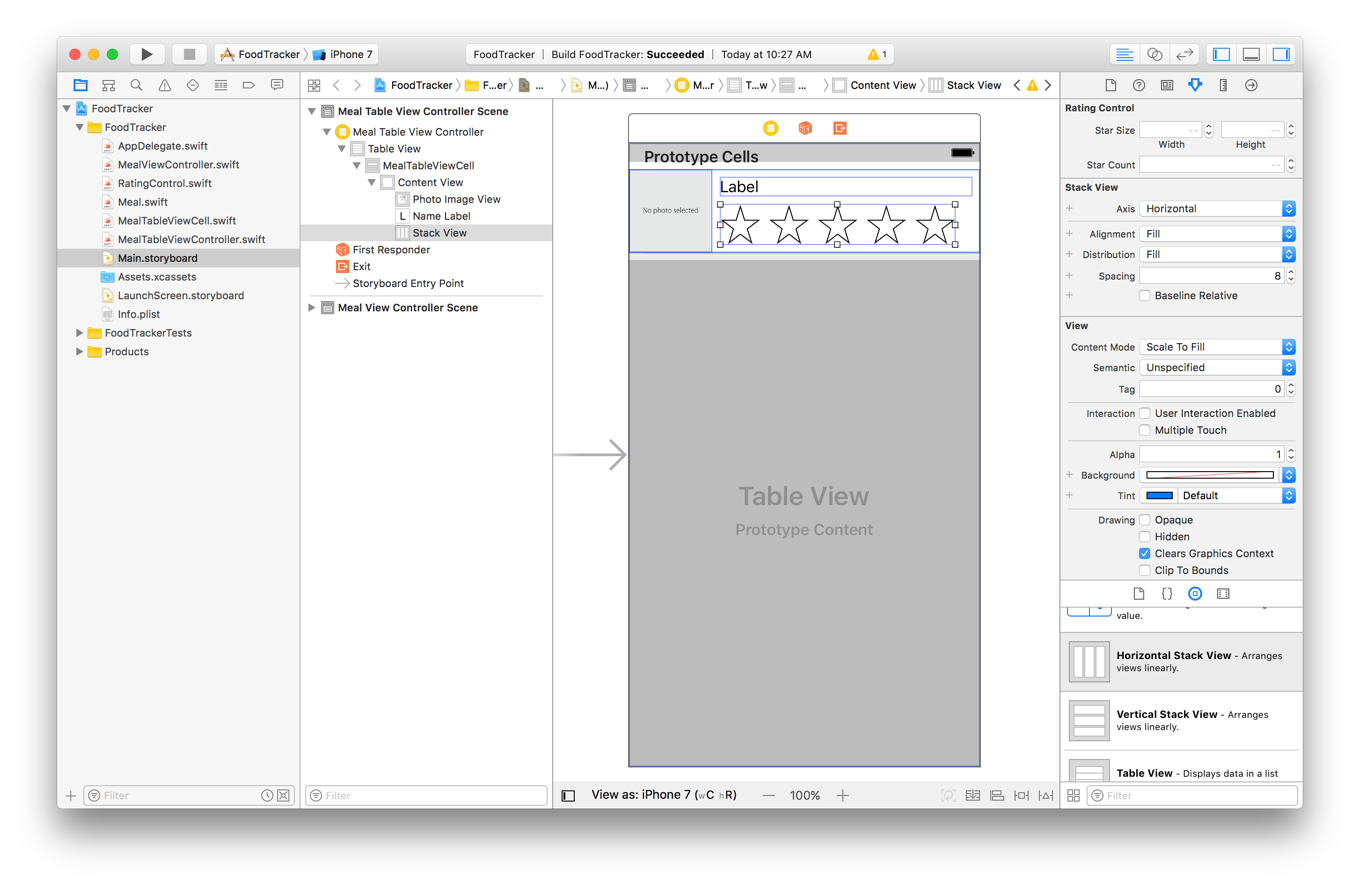
In the Attributes inspector, set the Spacing to 8. Next, find the field labeled Interaction and deselect the User Interaction Enabled checkbox.
Attributesインスペクタにおいて、Spacingを8に設定してください。次に、Interactionと名前を付けられるフィールドを探して、User Interaction Enabledチェックボックスを選択解除してください。You designed your custom rating control class to be interactive, but you don’t want users to be able to change the rating from the cell view. Instead, tapping anywhere in the cell should select the cell. So it’s important to disable that interaction when it’s in this context.
あなたは、あなたのカスタム格付けコントロールクラスを相互作用するように設計しました、しかしあなたはユーザに、格付けをセルビューから変更できることを望みません。代わりに、セルのどこか他をタップしてそのセルを選択すべきです。それでそれがこの状況にある時はこの相互作用を作動しないようにすることが重要です。
Your user interface should look something like this:
あなたのユーザインターフェイスはこのようなものに見えるはずです:
Checkpoint: Run your app. The table view cells now look taller. But even though you added all the necessary user interface elements to your table view cells, they’re showing up empty, just like before. Why’s that?
確認点:あなたのアプリを実行してください。テーブルビューセルは今ではより長く見えます。しかしあなたがすべての必要なユーザインターフェイス要素をあなたのテーブルビューセルに加えたとしても、それらは空で現れています、ちょうど前のように。これはなぜ?
In a storyboard, you can configure a table view to display static data (supplied in the storyboard) or dynamic data (programmatically supplied by the table view controller). By default, the table view controller uses dynamic data. This means the interface you created in the storyboard is simply a prototype for your cell. You still need to create instances of this cell in code and fill them with your app’s data.
ストーリーボードにおいて、あなたはテーブルビューを構成設定することで静的データ(ストーリーボードの中で提供される)または動的データ(プログラケ的にテーブルビューコントローラによって提供される)を表示できます。初期状態では、テーブルビューコントローラは動的データを使います。これが意味するのは、あなたがストーリーボードにおいて作成したインターフェイスが単純にあなたのセルに対する原型であるということです。あなたは依然としてこのセルのインスタンスいくらかをコードにおいて作成してそれらをあなたのアプリの持つデータで満たす必要があります。
For now, you can preview your cell using the assistant editor.
さしあたり、あなたはあなたのセルをアシスタントエディタを使ってプレビューします。
To preview your interface
あなたのインターフェイスをプレビューするには
Click the Assistant button in the Xcode toolbar to open the assistant editor.
AssistantボタンをXcodeツールバーにおいてクリックしてアシスタントエディタを開いてください。
If you want more space to work, collapse the project navigator and utility area by clicking the Navigator and Utilities buttons in the Xcode toolbar.
あなたがもっと場所を必要とするならば、プロジェクトナビゲータとユーティリティ区画をNavigatorとUtilitiesボタンをXcodeツールバーにおいてクリックすることで折り畳んでください。
You can also collapse the outline view.
あなたはまたアウトラインビューも折り畳むことができます。In the editor selector bar, which appears at the top of the assistant editor, switch the assistant editor from Automatic to Preview > Main.storyboard (Preview).
アシスタントエディタの最上部にある、エディタ選択バーにおいて、アシスタントエディタをAutomaticからPreview > Main.storyboard(プレビュー)へ切り替えてください。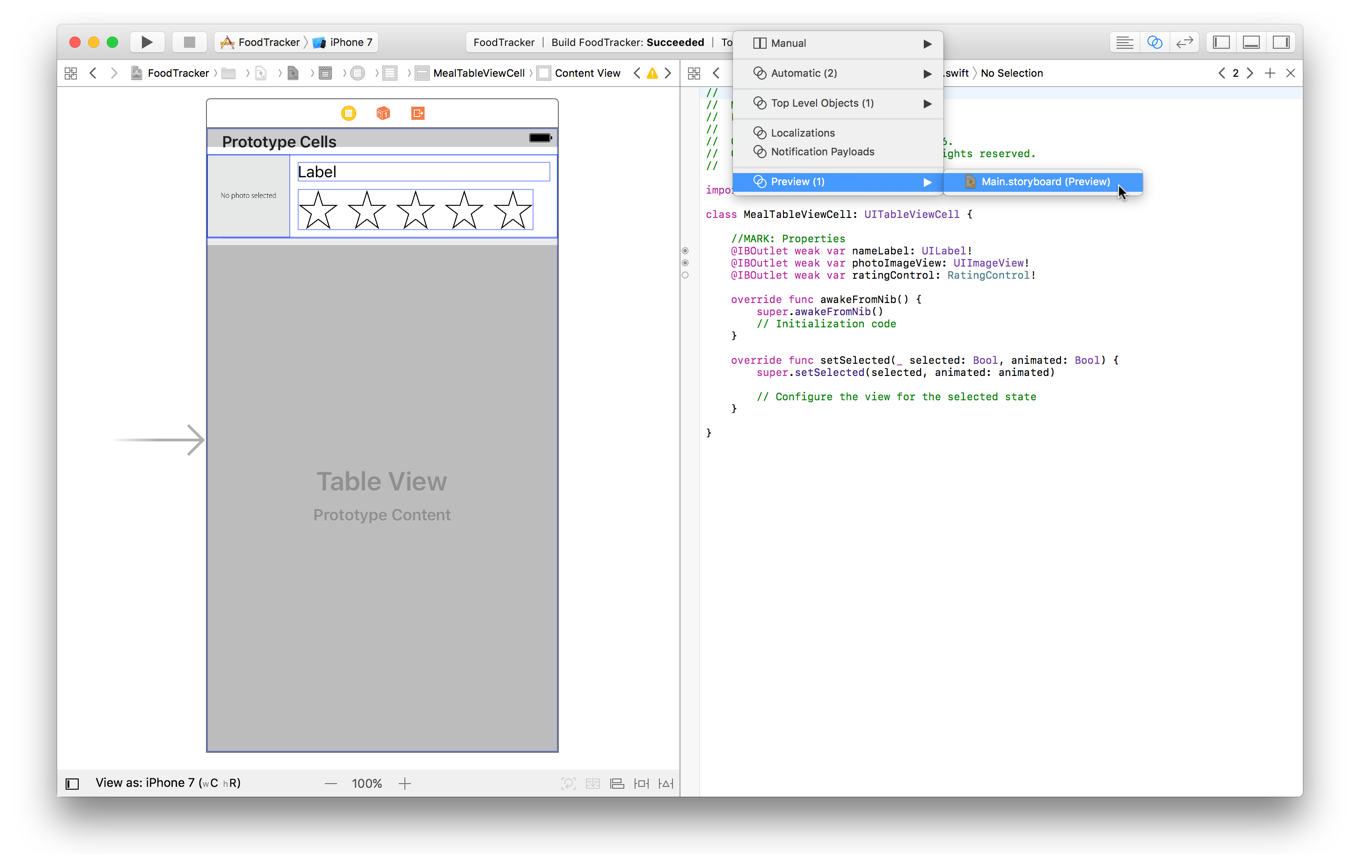
Your Xcode window should look something like this:
あなたのXcodeはこのようなものに見えるはずです: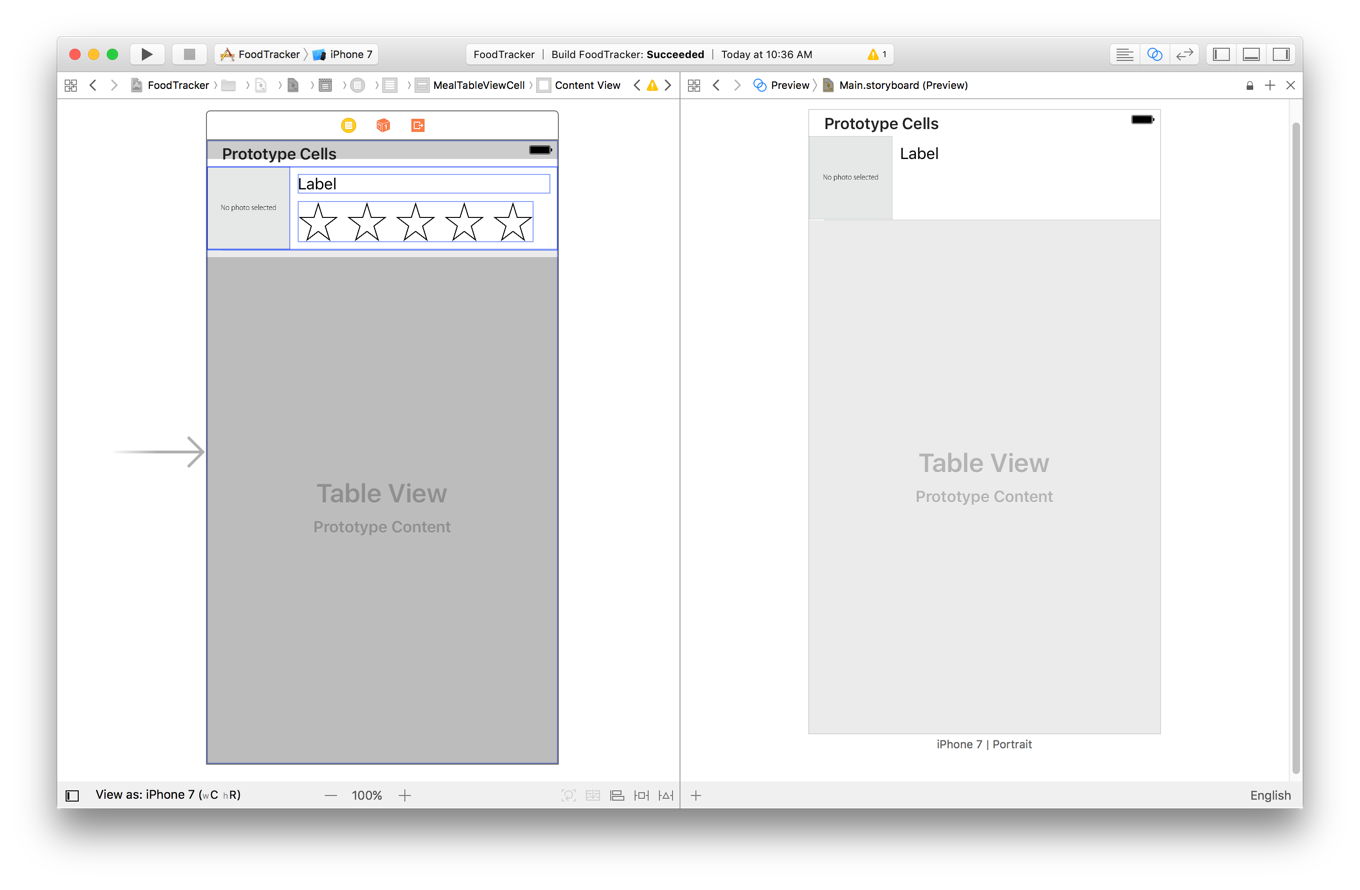
The preview shows the image view and the label. The rating control isn’t rendered in the preview, but otherwise the table view cell looks as expected.
プレビューは、イメージビューとラベルを示します。格付けコントロールはプレビューにおいて描出されません、しかし他の点ではテーブルビューセルは予想された通りに見えます。
Add Images to Your Project
あなたのプロジェクトに画像を加える
Next, you need to add a few sample images to your project. You’ll use these images when you load initial meal data into your app.
次に、あなたが必要とするのは、いくつかの見本画像をあなたのプロジェクトに加えることです。あなたがこれらの画像を使うのは、あなたが最初の食事画像データをあなたのアプリにロードする時です。
You can find sample images within the Images/ folder of the downloadable file at the end of this lesson, or use your own images. (Just make sure the names of the images you use match the image names in the code later.)
あなたは見本画像をこのレッスンの終わりでダウンロード可能なファイルのImages/フォルダ内で見つけることができます、またはあなた独自の画像を使うことができます。(ただあなたが使う画像の名前が後のコードの中の画像名と一致するようにしてください。)
To add images to your project
いくらかの画像をあなたのプロジェクトに加えるには
If the assistant editor is open, return to the standard editor by clicking the Standard button.
アシスタントエディタが開かれているならば、Standardボタンをチェックすることで標準エディタに戻ってください。Open the project navigator and utility area by clicking the Navigator and Utilities buttons in the Xcode toolbar.
プロジェクトナビゲータとユーティリティ区画をXcodeツールパーのNavigatorとUtilitiesボタンをクリックすることで開いてください。
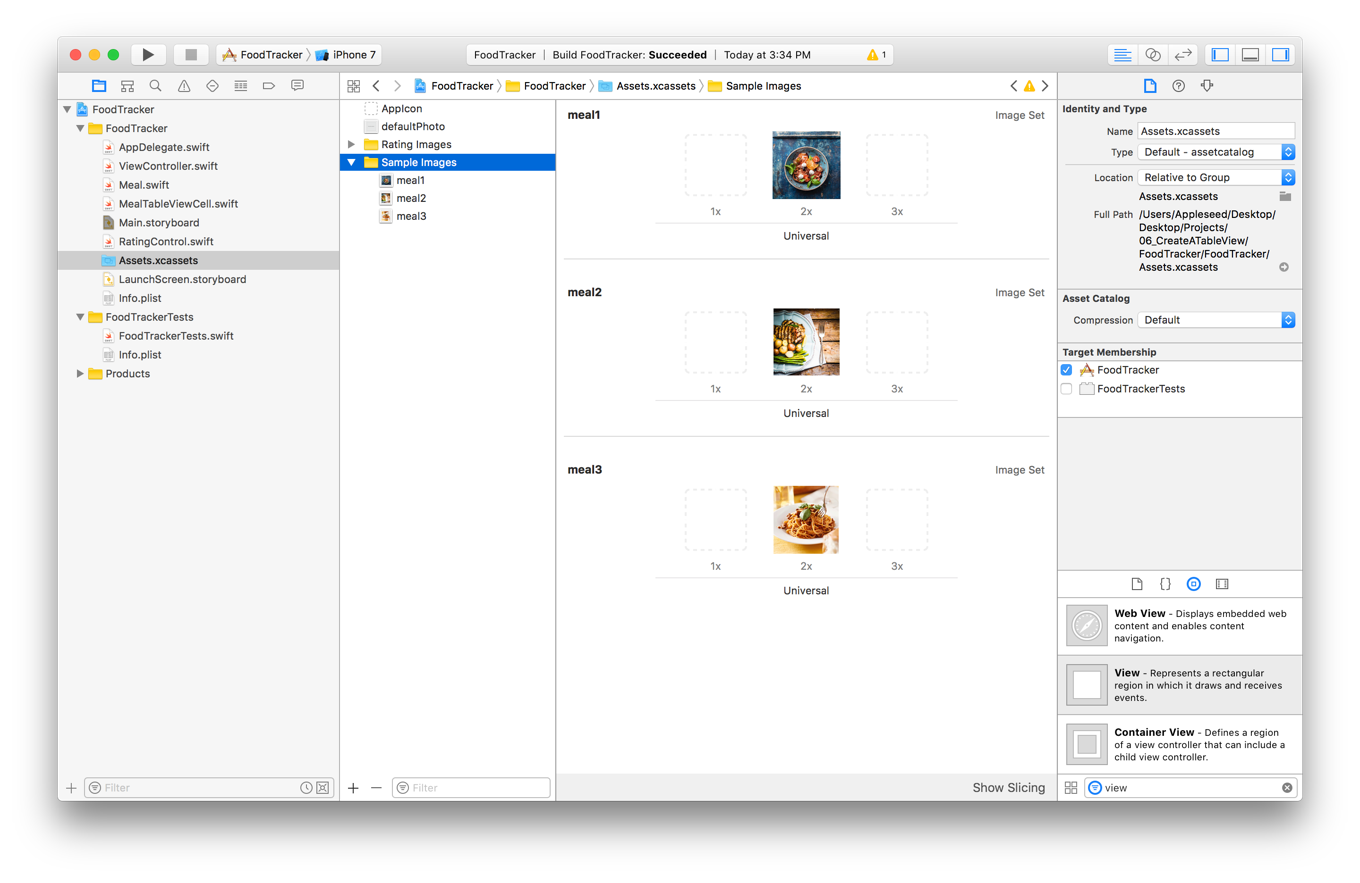
In the project navigator, select
Assets.xcassetsto view the asset catalog.
プロジェクトナビゲータにおいて、Assets.xcassetsを選択してアセットカタログを眺めてください。Recall that the asset catalog is a place to store and organize your image assets for an app.
思い出してください、アセットカタログはあなたのアプリのためのあなたの画像資産を格納し整理するところです。In the bottom left corner, click the plus (
+) button and select New Folder from the pop-up menu.
1番下左隅で、プラスボタン(+)をクリックしてNew Folderをポップアップメニューから選択してください。Double-click the folder name and rename it
Sample Images.
フォルダ名をダブルクリックしてそれをSample Imagesに改名してください。With the folder selected, in the bottom left corner, click the plus (
+) button and choose New Image Set from the pop-up menu.
そのフォルダが選択された状態で、1番下左隅で、プラス(+)ボタンをクリックしてNew Image Set(新規画像セット)をポップアップメニューから選んでください。Double-click the image set name and rename it to a name you’ll remember when you’re writing it in code.
その画像セット名をダブルクリックしてそれをある名前、あなたがコードに書く時思い出せるもの、に改名してください。On your computer, select the image you want to add.
あなたのコンピュータ上で、あなたが加えたい画像を選択してください。Drag and drop the image into the
2xslot in the image set.
その画像を画像セットの2xの挿入位置にドラック&ドロップしてください。
Repeat steps 5–8 for as many images as you like. In this lesson it is assumed that you have three different images named meal1, meal2, and meal3.
5–8の処置をあなたが望む画像の数だけ繰り返してください。このレッスンではあなたがmeal1、meal2、そしてmeal3と名前を付けられる3つの異なる画像を持つと仮定します。
Connect the Table Cell UI to Code
テーブルセルUIをコードに接続する
Before you can display dynamic data in your table view cells, you need to create outlet connections between the prototype in your storyboard and the code that represents the table view cell in MealTableViewCell.swift.
動的データをあなたのテーブルビューセルの中に表示する前に、あなたが必要とするのは、アウトレット接続をあなたのストーリーボードの中の原型とテーブルビューセルをMealTableViewCell.swiftにおいて表しているコードとの間に作成することです。
To connect the views to the MealTableViewCell.swift code
ビューをMealTableViewCell.swiftコードに接続するには
In your storyboard, select the label in the table view cell.
あなたのストーリーボードにおいて、ラベルをテーブルビューセルにおいて選択してください。Click the Assistant button in the Xcode toolbar to open the assistant editor.
AssistantボタンをXcodeツールバーにおいてクリックしてアシスタントエディタを開いてください。
If you want more space to work, collapse the project navigator and utility area by clicking the Navigator and Utilities buttons in the Xcode toolbar.
あなたがもっと作業空間を必要とするならば、プロジェクトナビゲータとユーティリティ区画をXcodeツールパーのNavigatorとUtilitiesボタンをクリックすることで折り畳んでください。
In the editor selector bar, which appears at the top of the assistant editor, switch the assistant editor from Preview to Automatic >
MealTableViewCell.swift.
アシスタントエディタの最上部にある、エディタ選択バーにおいて、アシスタントエディタをPreviewからAutomatic >MealTableViewCell.swiftへ切り替えてください。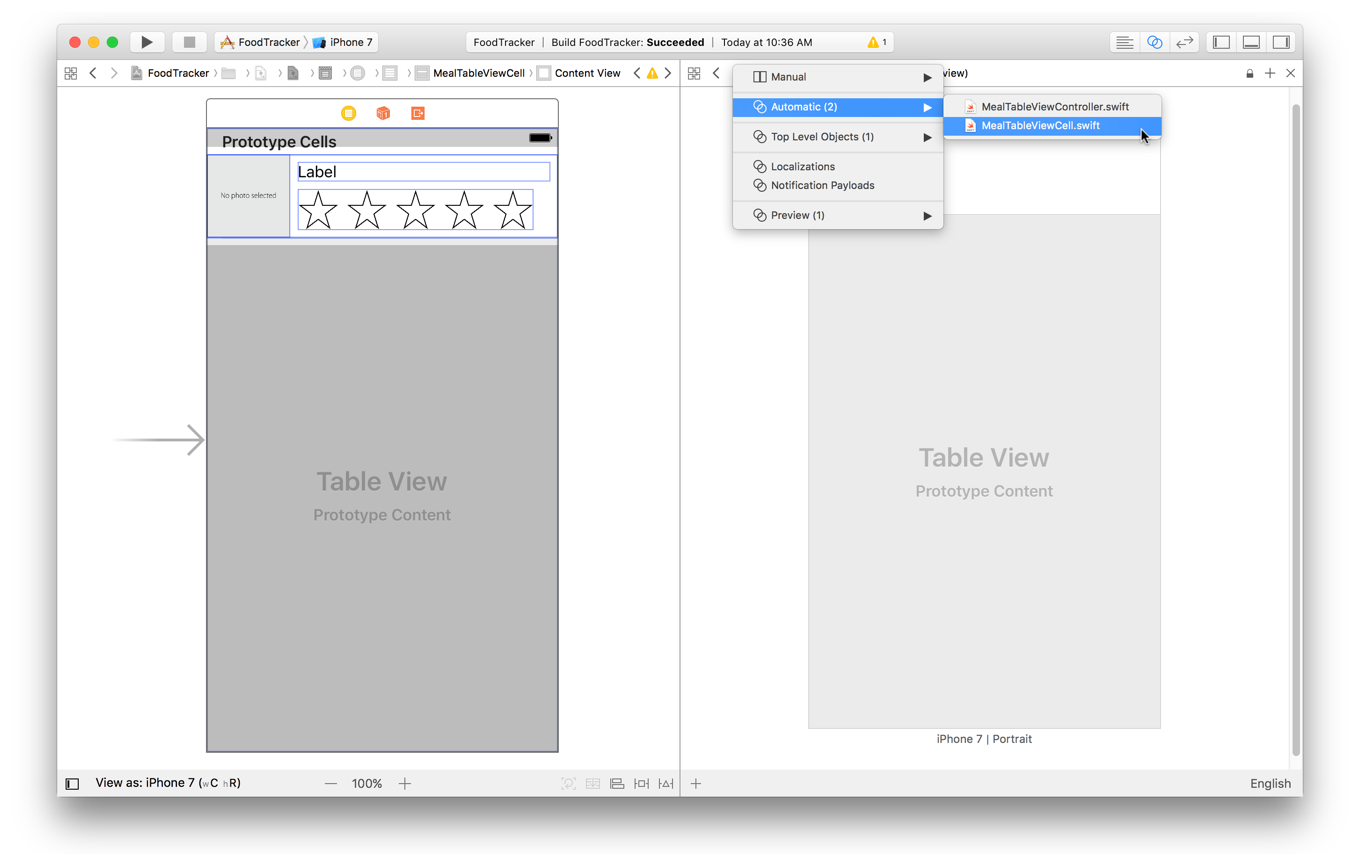
MealTableViewCell.swiftis displayed in the editor on the right.In
MealTableViewCell.swift, find theclassline, which should look like this:
MealTableViewCell.swiftにおいて、class行を見つけてください、それはこのように見えるはずです:class MealTableViewCell: UITableViewCell {
Below the
classline, add the following:
class行の下に、以下を加えてください://MARK: Properties
Control-drag from the label on your canvas to the code display in the editor on the right, stopping the drag at the line below the comment you just added in
MealTableViewCell.swift.
あなたのキャンバス上のラベルから右のエディタのコード表示までコントロール-ドラッグして、あなたが今ViewController.swiftに加えたコメントの下の行でドラッグをやめます。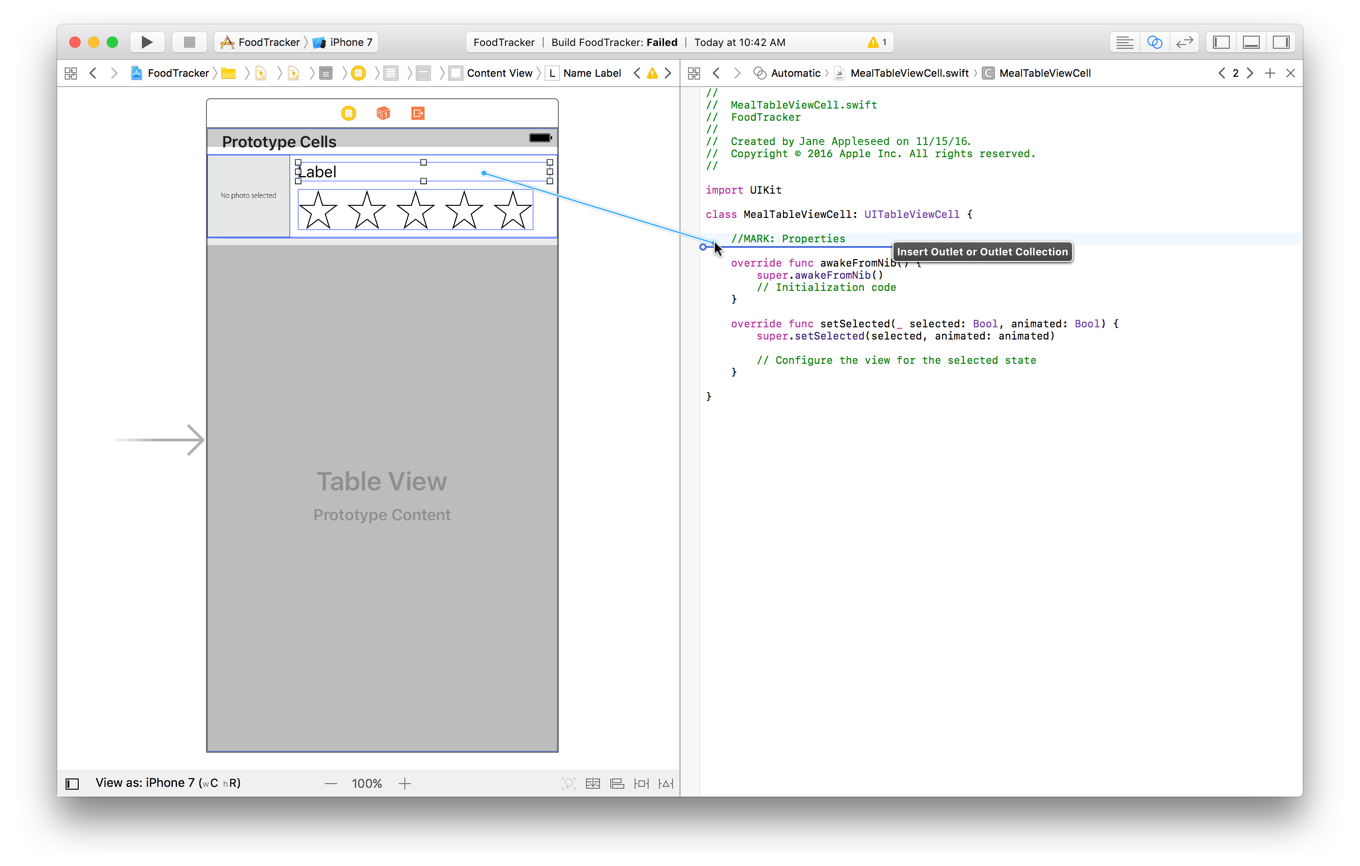
In the dialog that appears, for Name, type
nameLabel.
現れたダイアログにおいて、Nameに、nameLabelをタイプしてください。Leave the rest of the options as they are. Your dialog should look like this:
残りのオプションはそれらのままにしておきます。あなたのダイアログはこのように見えるはずです: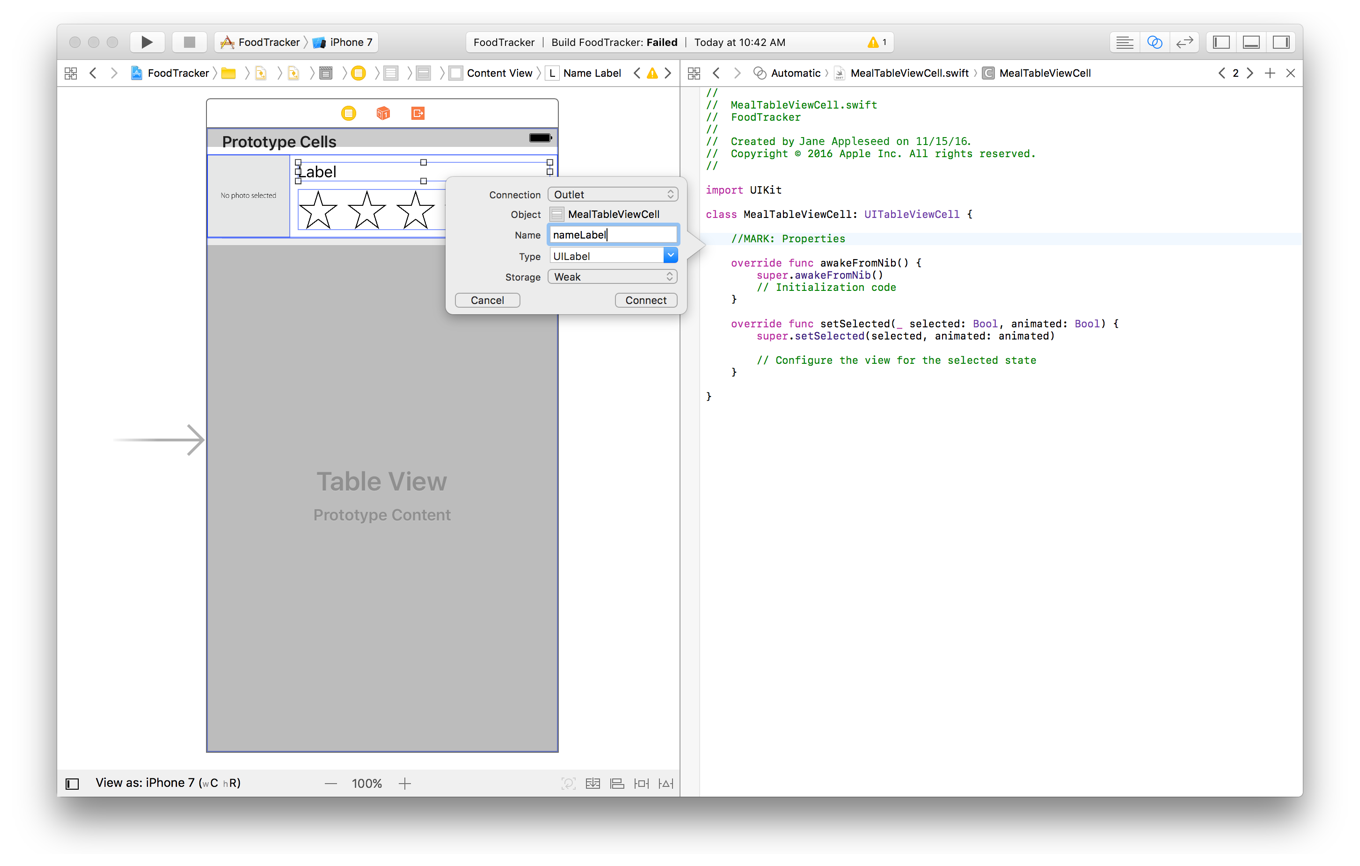
Click Connect.
Connectをクリックしてください。In your storyboard, select the image view in the table view cell.
あなたのストーリーボードにおいて、イメージビューをテーブルビューセルにおいて選択してください。Control-drag from the image view on your canvas to the code display in the editor on the right, stopping the drag at the line just below the
nameLabelproperty inMealTableViewCell.swift.
あなたのキャンバス上のイメージビューから右のエディタの中のコード表示へコントロール-ドラッグして、MealTableViewCell.swiftの中のnameLabelプロパティのすぐ下の行でドラッグをやめてください。
In the dialog that appears, for Name, type
photoImageView.
現れたダイアログにおいて、名前に、photoImageViewをタイプしてください。Leave the rest of the options as they are, and click Connect.
残りのオプションはそれらのままにしておき、Connectをクリックします。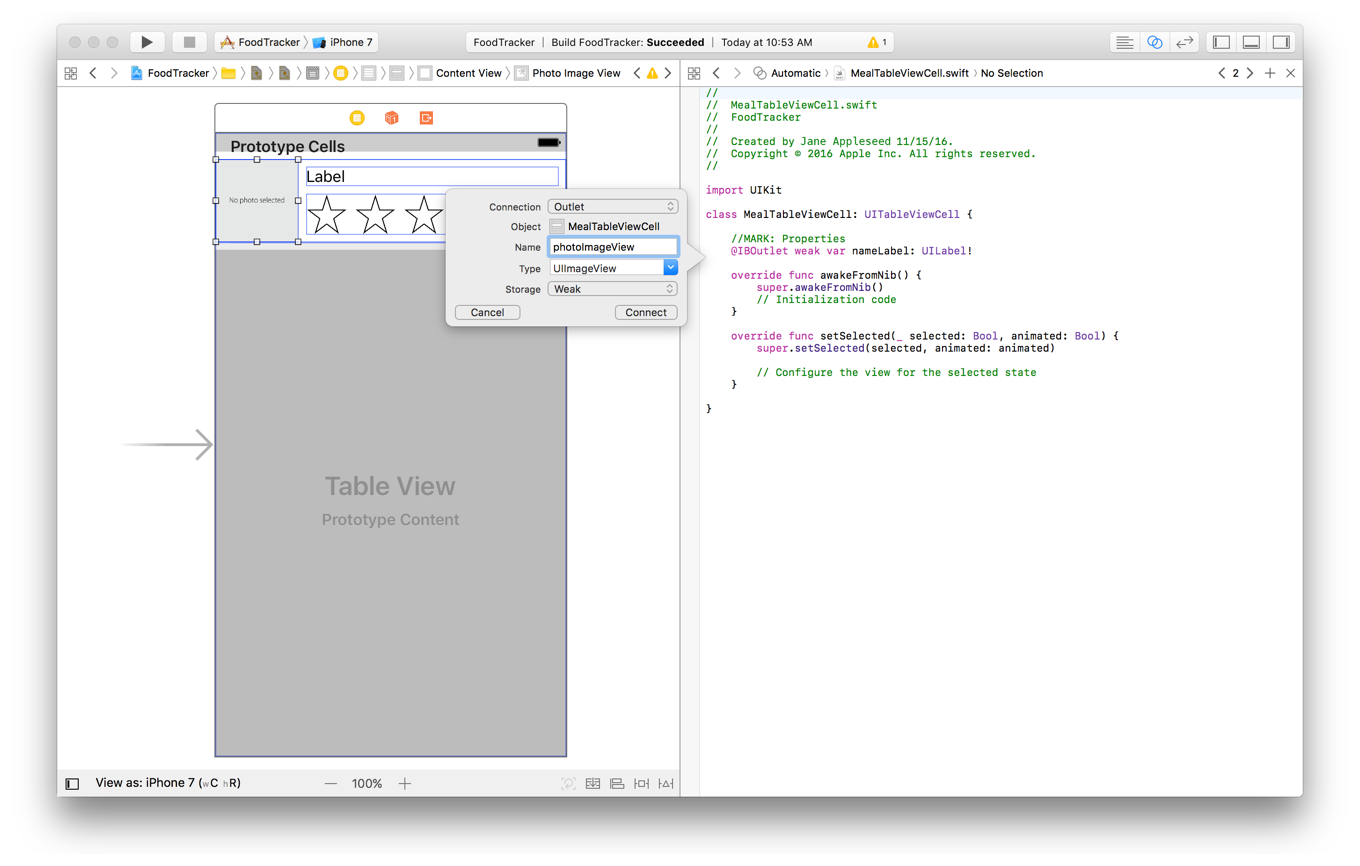
In your storyboard, select the rating control in the table view cell.
あなたのストーリーボードにおいて、格付けコントロールをテーブルビューセルにおいて選択してください。Control-drag from the rating control on your canvas to the code display in the editor on the right, stopping the drag at the line just below the
photoImageViewproperty inMealTableViewCell.swift.
あなたのキャンバス上の格付けコントロールから右のエディタの中のコード表示へコントロール-ドラッグして、MealTableViewCell.swiftの中のphotoImageViewプロパティのすぐ下の行でドラッグをやめてください。
In the dialog that appears, for Name, type
ratingControl.
現れたダイアログにおいて、名前に、ratingControlをタイプしてください。Leave the rest of the options as they are, and click Connect.
残りのオプションはそれらのままにしておき、Connectをクリックします。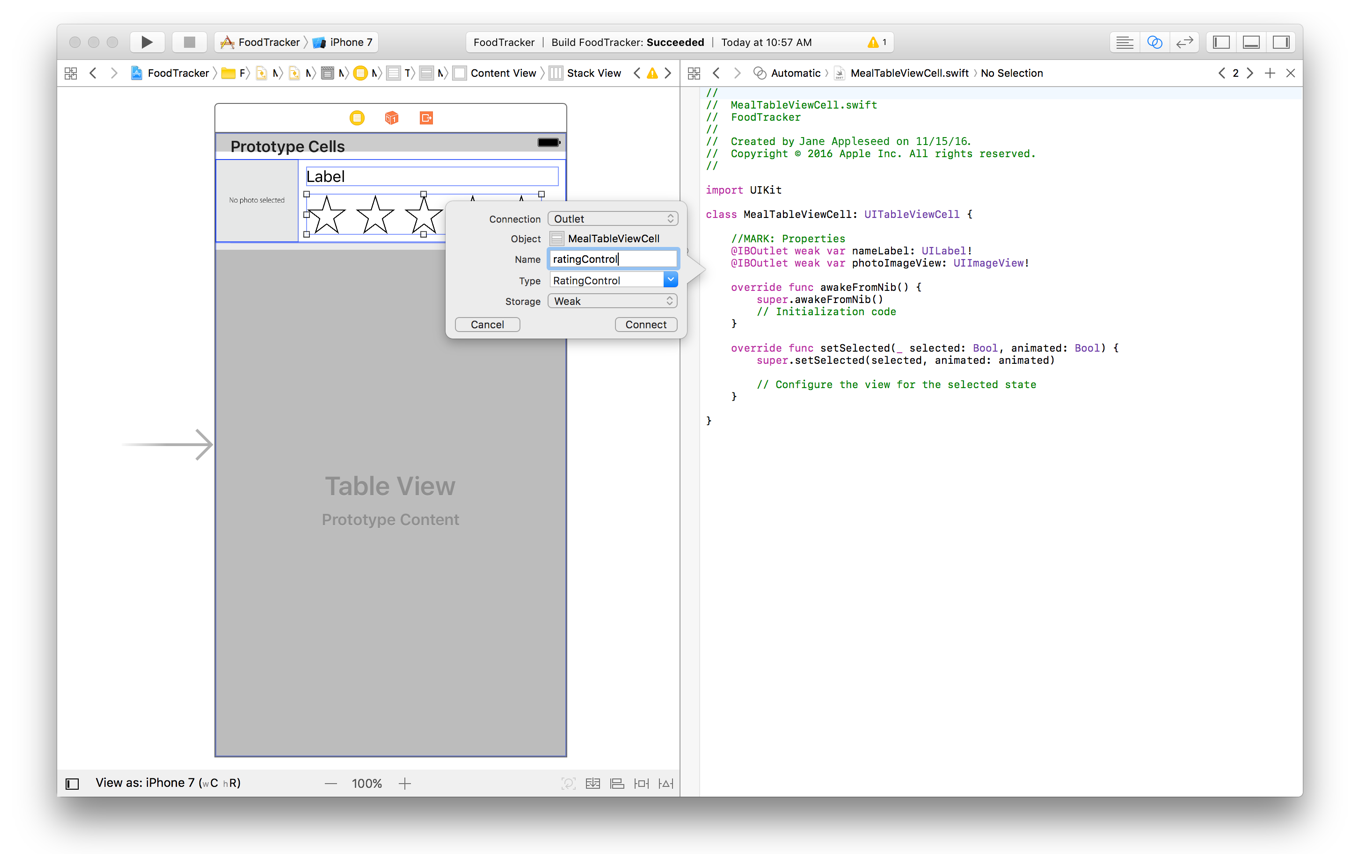
Your outlets in MealTableViewCell.swift should look like this:
あなたのアウトレットはMealTableViewCell.swiftにおいてこのように見えるはずです:
@IBOutlet weak var nameLabel: UILabel!@IBOutlet weak var photoImageView: UIImageView!@IBOutlet weak var ratingControl: RatingControl!
Load Initial Data
初期データのロード
To display any real data in your table cells, you need to write code to load that data. At this point, you have a data model for a meal: the Meal class. You also need to keep a list of those meals. The natural place to track this is in a custom view controller subclass that’s connected to the meal list scene. This view controller will manage the view that displays the list of meals, and have a reference to the data model behind what’s shown in the user interface.
何らかの実際のデータをあなたのテーブルセルに表示するために、あなたが必要とするのはコードを書いてそのデータをロードすることです。この時点で、あなたはある食事に対するデータモデル:Mealクラスを持ちます。あなたはまたそれら食事のリストを保持する必要があります。この足跡を残しておく自然な場所は、カスタムビューコントローラのサブクラスの中です、それは食事リストシーンに接続されます。このビューコントローラは、食事リストを表示するビューを管理します、そしてユーザインターフェイスにおいて見せられるものの背後にあるデータモデルへの参照を持ちます。
First, create a custom table view controller subclass to manage the meal list scene.
最初に、食事リストシーンを管理するためのカスタムビューコントローラのサブクラスを作成します。
To create a subclass of UITableViewController
UITableViewControllerのサブクラスを作成するには
Choose File > New > File (or press Command-N).
File > New > Fileを選んでください(またはコマンド-Nを押します)。At the top of the dialog that appears, select iOS, and then select Cocoa Touch Class.
現れたダイアログの一番上で、iOSを選択して、それからCocoa Touch Classを選択してください。Click Next.
Nextをクリックしてください。In the Class field, type
Meal.
Class欄において、Mealをタイプしてください。In the “Subclass of” field, select
UITableViewController.
「Subclass」欄において、UITableViewControllerを選択してください。The class title changes to
MealTableViewController. Leave that as is.
クラスタイトルがMealTableViewControllerに変わります。それはそのままにします。Make sure the “Also create XIB file” option is unselected.
「Also create XIB file」オプションが選択されないことを確かめてください。XIB files are an older way of designing the views managed by a view controller. They predate storyboards and basically represent a single scene from a storyboard. You won’t need an XIB file for this view controller, because you have already defined its content in the app’s storyboard.
これらXIBファイルは、ひとつのビューコントローラによって管理される複数ビューを設計する古い方法です。複数ストーリーボードの前のもので、基本的にひとつのストーリボードからただ1つだけのシーンを表します。あなたは、XIBファイルをこのビューコントローラのために必要としないでしょう、なぜならあなたは既にそれの内容をアプリのストーリーボードにおいて定義し終えたからです。Make sure the Language option is set to Swift.
LanguageオプションがSwiftに設定されていることを確かめてください。Click Next.
Nextをクリックしてください。The save location defaults to your project directory.
保存場所は、初期状態であなたのプロジェクトディレクトリです。The Group option defaults to your app name, FoodTracker.
Groupオプションは、初期状態であなたのアプリ名、FoodTrackerです。In the Targets section, your app is selected and the tests for your app are unselected.
Targets区画において、あなたのアプリが選択されて、あなたのアプリのためのテストは選択されません。Leave these defaults as they are, and click Create.
これらの初期値はそれらのままにしておきます、そしてCreateをクリックします。Xcode creates
MealTableViewController.swift, a source code file that defines your custom table view controller subclass.
XcodeはMealTableViewController.swift、あなたのカスタムテーブルビューコントローラサブクラスを定義するファイル、を作成します、If necessary, in the Project navigator, drag the
MealTableViewController.swiftfile so that it’s positioned with the other Swift files.
必要ならば、Projectナビゲータにおいて、MealTableViewController.swiftファイルをドラッグして、それでそれが他のSwiftファイルの下に置かれるようにします。
In this custom subclass, you can now define a property to store a list of Meal objects. The Swift standard library includes a structure called Array that works well for tracking lists of items.
このカスタムサブクラスにおいて、あなたは現在ひとつのプロパティを定義してMealオブジェクトのリストを格納します。Swift標準ライブラリは、ある構造体を含みます、それはArrayと呼ばれるものでいくつかの項目からなるリストの追跡に対して申し分なく働きます。
To load the initial data
初期データをロードするには
If the assistant editor is open, return to the standard editor by clicking the Standard button.
アシスタントエディタが開かれているならば、Standardボタンをチェックすることで標準エディタに戻ってください。Expand the project navigator and utility area by clicking the Navigator and Utilities buttons in the Xcode toolbar.
プロジェクトナビゲータとユーティリティ区画をNavigatorとUtilitiesボタンをXcodeツールバーでクリックすることで広げてください。
Open
MealTableViewController.swift.
MealTableViewController.swiftを開いてください。Below the
classline inMealTableViewController.swift, add the following code:
MealTableViewController.swiftの中のclass行の下に、以下のコードを加えてください://MARK: Propertiesvar meals = [Meal]()
This code declares a property on
MealTableViewControllerand initializes it with a default value (an empty array ofMealobjects). By makingmealsa variable (var) instead of a constant, you make the array mutable, which means you can add items to it after you initialize it.
この行は1つのプロパティをMealTableViewController上で宣言して、それを省略時の値で初期化します(Mealオブジェクトの空の配列)。mealsを定数ではなく変数(var)にすることで、あなたはこの配列を可変にします、それはあなたがそれを初期化した後にそれに項目を加えることができることを意味します。The table view controller template includes a number of method stubs and commented out methods. These are placeholder implementations that you can uncomment and expand to define the table’s appearance and behavior. You will look at these methods after you have the model data set up. For now, scroll past all the template methods, and add the following code before the final closing brace (
}):
テーブルビューコントローラ雛形は、多くのメソッドスタブとコメントアウトされたメソッドを含みます。いくらかのプレースホルダ実装があって、あなたがコメントから外して拡張することでテーブルの外観と挙動を定義できます。あなたは、これらのメソッドをあなたがモデルデータを準備し終えた後で見ることになります。さしあたり、すべてのテンプレートメソッドを過ぎるまでスクロールして、以下のコードを最後の閉じ波括弧(})の前に加えてください://MARK: Private Methodsprivate func loadSampleMeals() {}
This is a helper method to load sample data into the app.
これはヘルパーメソッドで、見本データをアプリにロードします。In the
loadSampleMeals()method, start by loading the three meal images:
loadSampleMeals()メソッドにおいて、3つの食事画像をロードすることで始めてください:let photo1 = UIImage(named: "meal1")let photo2 = UIImage(named: "meal2")let photo3 = UIImage(named: "meal3")
Make sure the names of the images in your project match the names you write in this code.
あなたのプロジェクトにおける画像の名前があなたがこのコードに書いた名前と合致することを確かめてください。After loading the images, create three meal objects.
画像をロード後、3つの食事オブジェクトを作成してください。guard let meal1 = Meal(name: "Caprese Salad", photo: photo1, rating: 4) else {fatalError("Unable to instantiate meal1")}guard let meal2 = Meal(name: "Chicken and Potatoes", photo: photo2, rating: 5) else {fatalError("Unable to instantiate meal2")}guard let meal3 = Meal(name: "Pasta with Meatballs", photo: photo3, rating: 3) else {fatalError("Unable to instantiate meal2")}
Because the
Mealclass’sinit!(name:, photo:, rating:)initializer is failable, you need to check the result returned by the initializer. In this case, you are passing valid parameters, so the initializer should never fail. If the initializer does fail, you have a bug in your code. To help you identify and fix any bugs, if the initializer does fail, thefatalError()function prints the error message to the console and the app terminates.
Mealクラスのinit!(name:, photo:, rating:)イニシャライザが失敗できることから、あなたはイニシャライザによって返される結果を検査する必要があります。この場合には、あなたは有効なパラメータを渡しています、それでイニシャライザは決して失敗しないはずです。イニシャライザが失敗するならば、あなたのコードにはバグがあります。あなたがバグを同定して修正するのを助けるため、イニシャライザが失敗するならば、fatalError()関数がエラーメッセージをコンソールに出力してアプリを終了します。After creating the
Mealobjects, add them to themealsarray using this code:
いくらのMealオブジェクトの作成の後で、それらをmeals配列にこのコードを使って加えてください:meals += [meal1, meal2, meal3]
Find the
viewDidLoad()method. The template implementation looks like this:
viewDidLoad()メソッドを見つけてください:ひな形実装はこのように見えます:override func viewDidLoad() {super.viewDidLoad()// Uncomment the following line to preserve selection between presentations (以下の行のコメントを外すと、表示間で選択を保護します)// self.clearsSelectionOnViewWillAppear = false// Uncomment the following line to display an Edit button in the navigation bar for this view controller. (以下の行のコメントを外すと、このビューコントローラのナビゲーションバーで「編集」ボタンを表示します)// self.navigationItem.rightBarButtonItem = self.editButtonItem()}
The template implementation of this method includes comments that were inserted by Xcode when it created
MealTableViewController.swift. Code comments like this provide helpful hints and contextual information in source code files, but you don’t need them for this lesson.
このメソッドの見本実装は、コメントを含みます、それは、XcodeによってそれがMealTableViewController.swiftを作成した時に挿入されたものです。このようなコードコメントは、ソースコードファイルにおいて役に立つヒントと前後関係的な情報を提供します。In the
viewDidLoad()method, delete the comments and add this code after the call tosuper.viewDidLoad()to load the sample meal data:
viewDidLoad()メソッドにおいて、コメントを削除してこのコードをsuper.viewDidLoad()への呼び出しの後に加えることで見本の食事データをロードしてください:// Load the sample data. // (見本データをロードする)loadSampleMeals()
When the view loads, this code calls the helper method you just wrote to load the sample data. You separated this into its own method to make your code more modular and readable.
ビューがロードされる時、このコードはあなたがちょうど書いたヘルパーメソッドを呼び出して見本のデータをロードします。あなたは、あなたのコードをよりモジュール化し読みやすくするために、これを独自のメソッドに分割しました。
Your viewDidLoad() method should look like this:
あなたのviewDidLoad()メソッドはこのように見えるはずです:
override func viewDidLoad() {super.viewDidLoad()// Load the sample data. // (見本データをロードする)loadSampleMeals()}
And your loadSampleMeals() method should look something like this:
あなたのloadSampleMeals()メソッドはこのようなものに見えるはずです:
private func loadSampleMeals() {let photo1 = UIImage(named: "meal1")let photo2 = UIImage(named: "meal2")let photo3 = UIImage(named: "meal3")guard let meal1 = Meal(name: "Caprese Salad", photo: photo1, rating: 4) else {fatalError("Unable to instantiate meal1")}guard let meal2 = Meal(name: "Chicken and Potatoes", photo: photo2, rating: 5) else {fatalError("Unable to instantiate meal2")}guard let meal3 = Meal(name: "Pasta with Meatballs", photo: photo3, rating: 3) else {fatalError("Unable to instantiate meal2")}meals += [meal1, meal2, meal3]}
Checkpoint: Build your project by choosing Product > Build. It should build without errors. Note: At this point, you may see an Xcode warning related to the fact that there’s no way to reach the View Controller scene in the app. You will fix that in the next lesson. For the rest of this lesson, just ignore it.
確認点:あなたのプロジェクトをProduct > Buildを選んでビルドします。それはエラーなしてビルドするはずです。注意:この時点で、あなたはView Controllerシーンに到達する方法がアプリには無いという事実に関連してXcodeが警告するのを見るでしょう。あなたは、それを次のレッスンで修正します。このレッスンの残りでは、単にそれを無視します。
Display the Data
データを表示する
At this point, your custom table view controller subclass, MealTableViewController, has a mutable array that’s prepopulated with some sample meals. Now you need to display this data in the user interface.
この時点で、あなたのカスタムテーブルビューコントローラサブクラス、MealTableViewControllerは、可変の配列を1つ持ちます、それはいくつかの見本の食事が入れられています。次にあなたが必要とするのは、このデータをユーザインターフェイスに表示することです。
To display dynamic data, a table view needs two important helpers: a data source and a delegate. A table view data source, as implied by its name, supplies the table view with the data it needs to display. A table view delegate helps the table view manage cell selection, row heights, and other aspects related to displaying the data. By default, UITableViewController and its subclasses adopt the necessary protocols to make the table view controller both a data source (UITableViewDataSource protocol) and a delegate (UITableViewDelegate protocol) for its associated table view. Your job is to implement the appropriate protocol methods in your table view controller subclass so that your table view has the correct behavior.
動的データを表示するために、テーブルビューは2つの重要な手助け:データソースと委任先を必要します。あるテーブルビューデータソースは、それの名前によってほのめかされるように、そのテーブルビューをそれが表示する必要があるデータとともに提供します。あるテーブルビュー委任先は、テーブルビューがセル選択、行の高さ、そして他のデータ表示に関する面を管理するのを助けます。初期時様態で、UITableViewControllerとそれのサブクラスは必要なプロトコルに準拠することで、テーブルビューコントローラをそれの関連データビューに対するデータソース(UITableViewDataSourceプロトコル)と委任先(UITableViewDelegateプロトコル)の両方にします。あなたの仕事は、適切なプロトコルメソッドをあなたのビューコントローラサブクラスに実装して、あなたのテーブルビュが正しく振舞うようにすることです。
A functioning table view requires three table view data source methods.
機能するテーブルビューは、3つのテーブルビューデータソースメソッドを必要とします。
func numberOfSections(in tableView: UITableView) -> Intfunc tableView(_ tableView: UITableView, numberOfRowsInSection section: Int) -> Intfunc tableView(_ tableView: UITableView, cellForRowAt indexPath: IndexPath) -> UITableViewCell
The first of these is numberOfSections(In:), which tells the table view how many sections to display. Sections are visual groupings of cells within table views, which is especially useful in table views with a lot of data. For a simple table view like the one in the FoodTracker app, you just need the table view to display a single section, so the implementation of the numberOfSections(In:) data source method is straightforward.
これらの最初のものは、numberOfSections(In:)です、それはテーブルビューにどれだけ多くのセクションを表示するか伝えます。セクションは、テーブルビュー内でのセルの視覚的なグループ分けです、それはテーブルビューにおいて多くのデータがあるとき特に便利です。FoodTrackerアプリでのもののような単純なテーブルビューに対して、あなたは単に1つだけセクションを表示するテーブルビューを必要とします、それでnumberOfSections(In:)データソースメソッドの実装は単刀直入なものです。
To display a section in your table view
セクションをあなたのテーブルビューにおいて表示するには
In
MealTableViewController.swift, find thenumberOfSections(In:)data source method. The template implementation looks like this:
MealTableViewController.swiftにおいて、numberOfSections(In:)データソースメソッドを見つけてください。ひな形実装はこのように見えます:override func numberOfSections(in tableView: UITableView) -> Int {// #warning Incomplete implementation, return the number of sections (#警告、実装は不完全です、セクションの数を返してください)return 0}
Change the return value from
0to1, and remove the warning comment.
戻り値を0から1に変えてください、そして警告コメントを削除してください。override func numberOfSections(in tableView: UITableView) -> Int {return 1}
This code makes the table view show 1 section instead of 0. You removed the comment that says
#warning Incomplete implementationbecause you’ve completed the implementation.
このコードは、テーブルビューが0ではなく1つのセクションを表示するようにします。あなたは#warning Incomplete implementationというコメントを削除しました、なぜならあなたが実装を完了したからです。
The next data source method, tableView(_:numberOfRowsInSection:), tells the table view how many rows to display in a given section. Your table view has only a single section, and each Meal object should have its own row. That means that the number of rows should be the number of Meal objects in your meals array.
次のデータソースメソッド、tableView(_:numberOfRowsInSection:)は、テーブルビューがどのくらい多くの行を指定されたセクションに表示するかを教えます。あなたのテーブルビューは、単に1つだけのセクションを持ちます、そして各Mealオブジェクトはそれ独自の列を持つべきです。それが意味するのは、列の数はあなたのmeals配列の中のMealオブジェクトの数であるはずだということです。
To return the number of rows in your table view
あなたのテーブルビューの中の行の数を返すには
In
MealTableViewController.swift, find thetableView(_:numberOfRowsInSection:)data source method. The template implementation looks like this:
MealTableViewController.swiftにおいて、tableView(_:numberOfRowsInSection:)データソースメソッドを見つけてください。ひな形実装はこのように見えます:override func tableView(_ tableView: UITableView, numberOfRowsInSection section: Int) -> Int {// #warning Incomplete implementation, return the number of rows (#警告、実装は不完全です、行の数を返してください)return 0}
You want to return the number of meals you have.
Arrayhas a property calledcountthat returns the number of items in the array, so the number of rows ismeals.count.
あなたが望むのはあなたが持つ食事の数を返すことです。Arrayは、countと呼ばれるあるプロパティを持ちます、それは、その配列の中の項目の数を返します、そういうわけで行の数はmeals.countです。Change the
tableView(_:numberOfRowsInSection:)data source method to return the appropriate number of rows, and remove the warning comment.
tableView(_:numberOfRowsInSection:)データソースメソッドを適切な行の数を返すように変更して、警告コメントを削除してください。override func tableView(_ tableView: UITableView, numberOfRowsInSection section: Int) -> Int {return meals.count}
The last data source method, tableView(_:cellForRowAt:), configures and provides a cell to display for a given row. Each row in a table view has one cell, and that cell determines the content that appears in that row and how that content is laid out.
最後のデータソースメソッド、tableView(_:cellForRowAt:)は、指定された列に対して表示するためにセルを構成して提供します。テーブルビューの各行は1つのセルを持ちます、そしてそのセルは、その行に現れる内容とその内容がどのように配置(レイアウト)されるかを決定します。
For table views with a small number of rows, all rows may be onscreen at once, so this method gets called for each row in your table. But table views with a large number of rows display only a small fraction of their total items at a given time. It’s most efficient for table views to ask for only the cells for rows that are being displayed, and that’s what tableView(_:cellForRowAt:) allows the table view to do.
少ない数の行を持つテーブルビューに対しては、すべての行が一度に画面上にあることができます、それでこのメソッドはあなたのテーブルの中の各行に対して呼ばれることになります。しかし多数の行を持つテーブルビューは、それらの項目全体のほんの一部しか一度に表示しません。テーブルビューにとって最も効率が良いのは、表示されている行のためのセルだけを要求することです、そしてそれはtableView(_:cellForRowAt:)がテーブルビューに可能にすることです。
For any given row in the table view, you configure the cell by fetching the corresponding Meal in the meals array, and then setting the cell’s properties to corresponding values from the Meal class.
テーブルビュー中の任意の指定された行のために、あなたはセルを構成します、それはmeals配列の中の対応するMealを取ってきて、それからセルのプロパティをMealクラスからの対応する値に設定することで行います。
To configure and display cells in your table view
セルを構成してあなたのテーブルビューで表示するには
In
MealTableViewController.swift, find and uncomment thetableView(_:cellForRowAt:)data source method. (To uncomment the method, remove the/*and*/characters surrounding it.)
MealTableViewController.swiftにおいて、tableView(_:cellForRowAt:)データソースメソッドを見つけてコメントを外してください。(メソッドのコメントを外すには、それを囲んでいる/*と*/文字を削除します。)After you do that, the template implementation looks like this:
あなたがこれをした後、ひな形実装はこのように見えます:override func tableView(_ tableView: UITableView, cellForRowAt indexPath: IndexPath) -> UITableViewCell {let cell = tableView.dequeueReusableCell(withIdentifier: "reuseIdentifier", for: indexPath)// Configure the cell... (セルを構成する…)return cell}
The
dequeueReusableCell(withIdentifier:for:)method requests a cell from the table view. Instead of creating new cells and deleting old cells as the user scrolls, the table tries to reuse the cells when possible. If no cells are available,dequeueReusableCell(withIdentifier:for:)instantiates a new one; however, as cells scroll off the scene, they are reused. The identifier tellsdequeueReusableCell(withIdentifier:for:)which type of cell it should create or reuse.
dequeueReusableCell(withIdentifier:for:)メソッドは、テーブルビューから1つのセルを要求します。ユーザがスクロールするにつれて新しいセルを作成して古いセルを削除する代わりに、テーブルは可能な場合にはセルを再利用しようとします。セルが利用可能でないならば、dequeueReusableCell(withIdentifier:for:)は新しいものをインスタンス化します;しかしながら、セルがシーンの最後までスクロールされるとき、それらは再利用されます。識別子は、dequeueReusableCell(withIdentifier:for:)に、それが作成または再利用するセルはどの型かを伝えます。To make this code work for your app, you’ll need to change the identifier to the prototype cell identifier you set in the storyboard (
MealTableViewCell), and then add code to configure the cell.
このコードがあなたのアプリのために働くようにするには、あなたはこの識別子をあなたがストーリーボード(MealTableViewCell)で設定した原型セル識別子に変えて、それからセルを構成設定するコードを加える必要があるでしょう。Add code at the beginning of the method, before the rest of the template implementation:
このメソッドの冒頭、残りのひな形実装の前にコードを加えてください:// Table view cells are reused and should be dequeued using a cell identifier. (テーブルビューセルは再利用されます、そしてセル識別子を使ってデキューされるべきです。)let cellIdentifier = "MealTableViewCell"
This creates a constant with the identifier you set in the storyboard.
これは、あなたがストーリーボードにおいて設定した識別子を使って定数を作成します。Update the template’s identifier to the
cellIdentifiervariable. The second line of code in the method should now look like this:
雛形の識別子をcellIdentifier変数へ更新してください。このメソッドのコードの2行目は今ではこのように見えるはずです:let cell = tableView.dequeueReusableCell(withIdentifier: cellIdentifier, for: indexPath)
Because you created a custom cell class that you want to use, downcast the type of the cell to your custom cell subclass,
MealTableViewCell.
あなたは使いたいと望むカスタムセルクラスを作成したので、セルの型をあなたのカスタムセルサブクラス、MealTableViewCellにダウンキャストしてください。guard let cell = tableView.dequeueReusableCell(withIdentifier: cellIdentifier, for: indexPath) as? MealTableViewCell else {fatalError("The dequeued cell is not an instance of MealTableViewCell.")}
There’s a lot going on in this code:
このコードにおいて多くのことが起こります:The
as? MealTableViewCellexpression attempts to downcast the returned object from theUITableViewCellclass to yourMealTableViewCellclass. This returns an optional.
as? MealTableViewCell式は、UITableViewCellクラスから返されたオブジェクトをあなたのMealTableViewCellクラスへとダウキャストを試みます。これはオプショナルを返します。The
guard letexpression safely unwraps the optional.
guard let式は、安全にそのオプショナルをアンラップします。If your storyboard is set up correctly, and the
cellIdentifiermatches the identifier from your storyboard, then the downcast should never fail. If the downcast does fail, thefatalError()function prints an error message to the console and terminates the app.
あなたのストーリボードが正しく準備される、そしてcellIdentifierがあなたのストーリーボードからの識別子と一致するならば、その時ダウンキャストは決して失敗しないはずです。ダウンキャストが失敗するならば、fatalError()関数はエラーメッセージをコンソールに出力してアプリを終了します。
After the
guardstatement, add the following code:
guard文の後に、以下のコードを加えてください:// Fetches the appropriate meal for the data source layout. (データソースレイアウトにきちんと合った食事を取ってくる)let meal = meals[indexPath.row]
This code fetches the appropriate meal from the
mealsarray.
このコードは、適切な食事をmeals配列から取ってきます。Now, use the meal object to configure your cell. Replace the
// Configure the cellcomment with the following code:
今度は、食事オブジェクトを使ってあなたのセルを構成設定してください。// Configure the cellコメントを以下のコードと置き換えてください:cell.nameLabel.text = meal.namecell.photoImageView.image = meal.photocell.ratingControl.rating = meal.rating
This code sets each of the views in the table view cell to display the corresponding data from
mealobject.
このコードは、テーブルビューセルの中のビューそれぞれに、mealオブジェクトから対応するデータを表示させます。
Your tableView(_:cellForRowAt:) method should look like this:
あなたのtableView(_:cellForRowAt:)メソッドはこのように見えるはずです:
override func tableView(_ tableView: UITableView, cellForRowAt indexPath: IndexPath) -> UITableViewCell {// Table view cells are reused and should be dequeued using a cell identifier. (テーブルビューセルは再利用されます、そしてセル識別子を使ってデキューされるべきです。)let cellIdentifier = "MealTableViewCell"guard let cell = tableView.dequeueReusableCell(withIdentifier: cellIdentifier, for: indexPath) as? MealTableViewCell else {fatalError("The dequeued cell is not an instance of MealTableViewCell.")}// Fetches the appropriate meal for the data source layout. (データソースレイアウトにきちんと合った食事を取ってくる)let meal = meals[indexPath.row]cell.nameLabel.text = meal.namecell.photoImageView.image = meal.photocell.ratingControl.rating = meal.ratingreturn cell}
The final step to displaying data in the user interface is to connect the code defined in MealTableViewController.swift to the meal list scene.
ユーザインターフェイスにおいてデータを表示するための最後の段階は、MealTableViewController.swiftにおいて定義されたコードを食事リストシーンに接続することになります。
To point the Table View Controller to MealTableViewController.swift
テーブルビューコントローラをMealTableViewController.swiftの方に向けるには
Open your storyboard.
あなたのストーリーボードを開いてください。Select the table view controller by clicking on its scene dock until the entire scene has a blue outline around it.
テーブルビューコントローラを、それのシーンドック上でクリックすることで選択してください、シーン全体がその周りに青いアウトラインを持つまで続けます。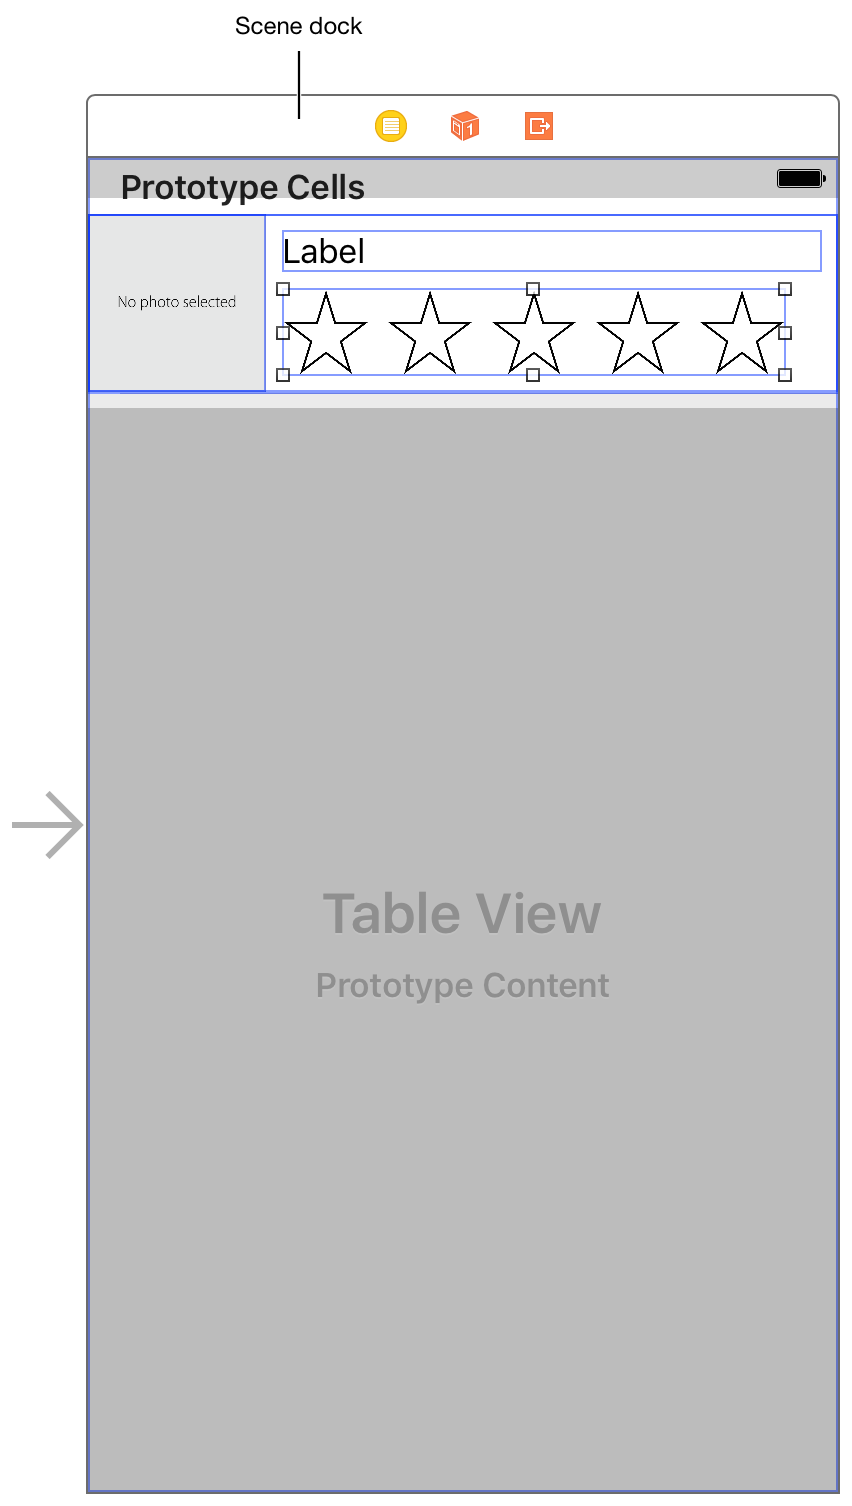
Open the Identity inspector
.
Identityインスペクタを開いてください。
In the Identity inspector, find the field labeled Class, and select
MealTableViewController.
同一性インスペクタにおいて、Classとラベルをつけられる欄を探してMealTableViewControllerを選択してください。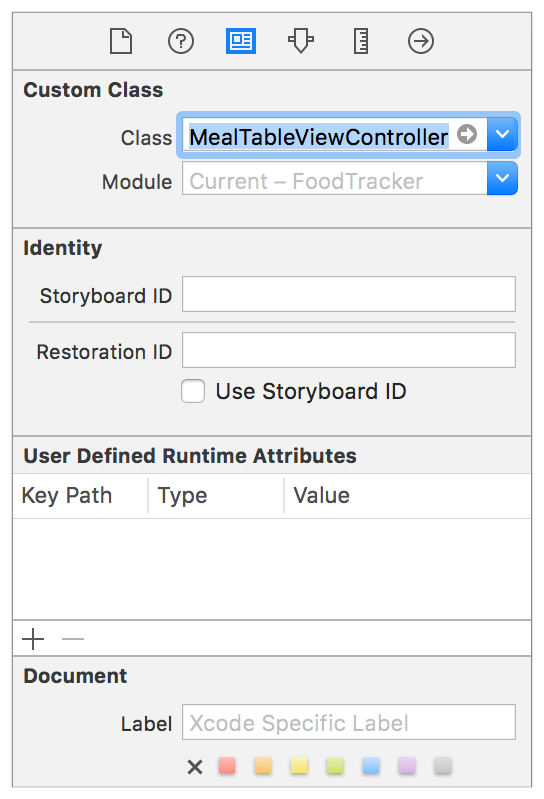
Checkpoint: Run your app. The list of items you added in the viewDidLoad() method should show up as cells in your table view. You’ll notice there’s a little bit of overlap between the table view cells and the status bar—you’ll fix that in the next lesson.
確認点:あなたのアプリを実行してください。あなたがviewDidLoad()メソッドに加えた項目のリストが、セルとしてあなたのテーブルビューの中に姿を見せるはずです。あなたは、テーブルビューセルとステータスパーが少しばかり重なっているのに気がつくでしょう—あなたは次のレッスンでそれを修正します。
Prepare the Meal Detail Scene for Navigation
食事詳細シーンをナビゲーションのために整える
As you prepare to implement navigation in the FoodTracker app, you need to delete and replace a few pieces of code and parts of the user interface that you won’t need anymore.
あなたがFoodTrackerアプリにおいてナビゲーションを実装する準備をする際に、あなたが必要とするのはいくつかのコード部分とユーザインターフェイスの一部を削除し置き換えることです、それはあなたがもう必要としないものです。
To clean up unused pieces of the project
プロジェクトの使用されない部分を掃除するには
Open your storyboard and look at the meal detail scene.
あなたのストーリーボードを開いて食事詳細シーンを見つけます。Your meal detail scene user interface should look something like this:
あなたの食事詳細シーンのユーザインターフェイスはこのようにものに見えるはずです:
In the meal detail scene, select the
Meal Namelabel, and press the Delete key to delete it.
この食事詳細シーンにおいて、Meal Nameラベルを選択してください、そしてデリートキーを押してそれを削除してください。The rest of the elements in the stack view reposition themselves appropriately.
スタックビューの中の残りの要素は、それら自身で適切に再び位置決めをします。
Open
ViewController.swift.
ViewController.swiftを開いてください。In
ViewController.swift, find thetextFieldDidEndEditing(_:)method.
ViewController.swiftにおいて、textFieldDidEndEditing(_:)メソッドを見つけてください。func textFieldDidEndEditing(_ textField: UITextField) {mealNameLabel.text = textField.text}
Delete the line that sets the text property of the label.
ラベルのテキストプロパティを設定する行を削除してください。mealNameLabel.text = textField.text
You’ll replace this with a new implementation soon.
あなたはこれを新しい実装でまもなく置き換えます。In
ViewController.swift, find themealNameLabeloutlet and delete it.
ViewController.swiftにおいて、mealNameLabelアウトレットを見つけてそれを削除してください。@IBOutlet weak var mealNameLabel: UILabel!
Because you now have two view controllers in your project, it makes sense to give ViewController.swift a more meaningful name.
あなたは現在2つのビューコントローラをあなたのプロジェクトの中に持つため、ViewController.swiftにより理解しやすい名前を与えるほうが賢明です。
To rename the ViewController.swift file
ViewController.swiftファイルを改名するには
In the project navigator, click the
ViewController.swiftfile once and press the Return key.
プロジェクトナビゲータにおいて、ViewController.swiftファイルを一度クリックして、リターンキーを押してください。Xcode lets you type in a new name for the file.
Xcodeは、あなたにこのファイルのための新しい名前を入力させます。Rename the file
MealViewController.swift. Press Return.
ファイルをMealViewController.swiftに改名してください。リターンキーを押します。In
MealViewController.swift, find the class declaration line:
MealViewController.swiftにおいて、次のクラス宣言行を探してください:class ViewController: UIViewController, UITextFieldDelegate, UIImagePickerControllerDelegate, UINavigationControllerDelegate {
Change the class name to
MealViewController.
クラス名をMealViewControllerに変更してください。class MealViewController: UIViewController, UITextFieldDelegate, UIImagePickerControllerDelegate, UINavigationControllerDelegate {
In the comment at the top of the file, also change the name from
ViewController.swifttoMealViewController.swift.
このファイルの最上部のコメントにおいてもまた、名前をViewController.swiftからMealViewController.swiftに変更してください。Open your storyboard.
あなたのストーリーボードを開いてください。Select the view controller by clicking on its scene dock.
ビューコントローラをそれのシーンドックをクリックすることで選択してください。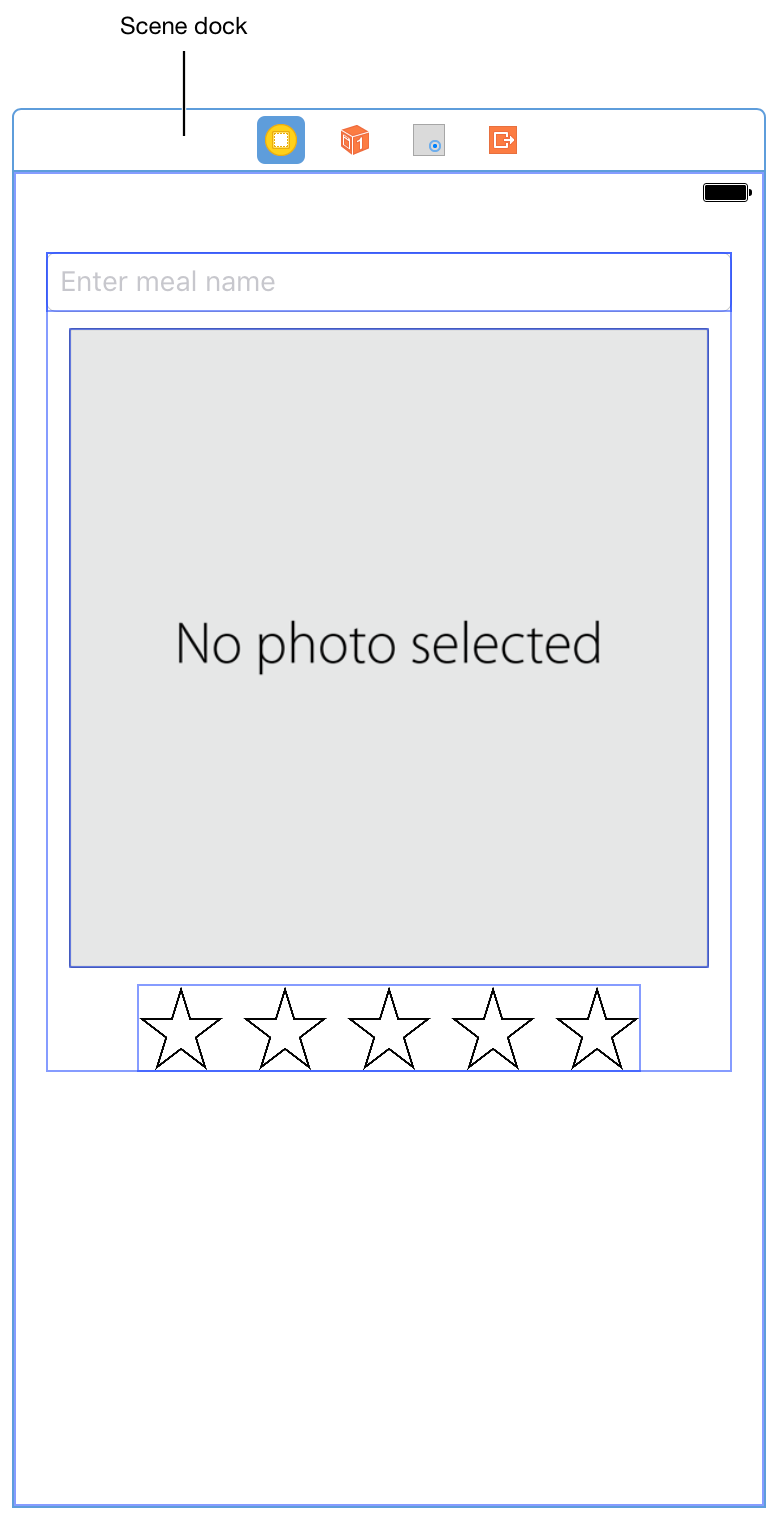
With the view controller selected, open the Identity inspector
.
ビューコントローラが選択された状態で、同一性インスペクタを開いてください。
In the Identity inspector, change the Class field from
ViewControllertoMealViewController.
同一性インスペクタにおいて、Class欄をViewControllerからMealViewControllerに変更してください。
Checkpoint: Build or run your app. Everything should work as before.
確認点:あなたのアプリをビルドまたは実行します。すべてのものが前と同じに機能するはずです。
Wrapping Up
まとめ
In this lesson, you built a custom table view cell. You attached your model object to your table view controller. You added sample data to the model, and you implemented the table view controller code needed to dynamically fill the table with the model data.
このレッスンでは、あなたはカスタムのテーブルビューセルを構築しました。あなたは、あなたのモデルオブジェクトをあなたのテーブルビューコントローに取り付けました。あなたは、見本データをモデルに追加しました、そしてあなたは動的にテーブルをモデルデータで満たすために必要とされるテーブルビューコントローラコードを実装しました。
Next lesson, you’ll add the ability to navigate between the table and the meal view.
次のレッスンでは、あなたはテーブルと食事ビューの間を進んでいく能力を加えることになります。
Define Your Data Model
あなたのデータモデルの定義
Copyright © 2016 Apple Inc. All rights reserved. Terms of Use | Privacy Policy | Updated: 2016-12-08