

Work with View Controllers
ビューコントローラを扱う
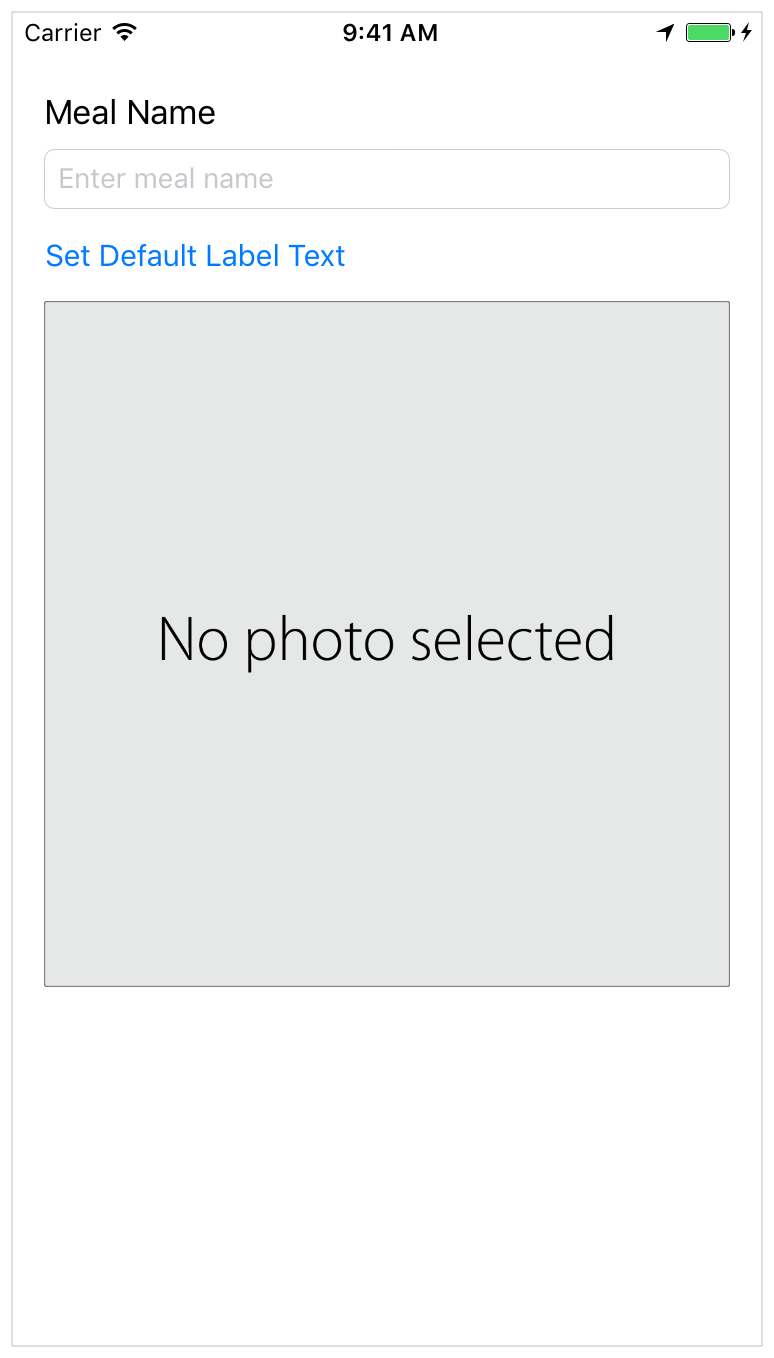
In this lesson, you’ll continue to work on the user interface (UI) for the meal scene in the FoodTracker app. You’ll rearrange the existing user interface elements and work with an image picker to add a photo to the scene. When you’re finished, your app will look something like this:
このレッスンでは、あなたはユーザインターフェイス (UI)に関する作業をFoodTrackerアプリの食事シーンのために続けます。あなたは、既存のユーザインターフェイス要素を並べ直して、イメージピッカーを取り扱うことで写真をシーンへ加えます。あなたが作業し終わった時、あなたのアプリはこのようなものに見えるでしょう:
Learning Objectives
学習する目標
At the end of the lesson, you’ll be able to:
このレッスンの終わりに、あなたが出来るようになるのは:
Understand the view controller life cycle and its callbacks (for example,
viewDidLoad,viewWillAppearandviewDidAppear)
ビューコントローラのライフサイクルとそれのコールバックを理解する(例えば、viewDidLoad、viewWillAppearおよびviewDidAppear)Pass data between view controllers
データをビューコントローラ間で渡すDismiss a view controller
ビューコントローラをかたづけるUse gesture recognizers to generate events
ジェスチャリコグナイザ(身振り認識)を使ってイベントを生成するAnticipate object behavior based on the
UIView/UIControlclass hierarchy
オブジェクト挙動をUIView/UIControlクラス階層に基づいて先取りするUse the asset catalog to add image assets to a project
アセットカタログ(資産目録)を使用して画像資産をプロジェクトに加える
Understand the View Controller Lifecycle
ビューコントローラのライフサイクルを理解する
So far, the FoodTracker app has a single scene, whose user interface is managed by a single view controller. As you build more complex apps, you’ll create more scenes, and will need to manage loading and unloading views as they’re moved on and off the screen.
これまで、FoodTrackerアプリはただ1つのシーンしか持たず、それはユーザインターフェイスがただ1つのビューコントローラによって管理されます。あなたがより複雑なアプリを作るとき、あなたはもっとシーンを作成するでしょう、そしてビューのロードとアンロードをそれらが画面に現れたり隠れたりするときに管理する必要があるでしょう。
An object of the UIViewController class (and its subclasses) comes with a set of methods that manage its view hierarchy. iOS automatically calls these methods at appropriate times when a view controller transitions between states. When you create a view controller subclass (like the ViewController class you’ve been working with), it inherits the methods defined in UIViewController and lets you add your own custom behavior for each method. It’s important to understand when the system calls these methods, so you can set up or tear down the views you’re displaying at the appropriate step in the process—something you’ll need to do later in the lessons.
UIViewControllerクラス(およびそれのサブクラス)のあるオブジェクトは、ひと揃いのメソッドを備えていて、それらはそれのビュー階層を管理します。iOSは、自動的にそれらのメソッドを適切な時に呼びます、その時とはあるビューコントローラが2つの状態間を推移するときです。あなたがあるビューコントローラのサブクラス(あなたが扱ったことのあるViewControllerクラスのようなもの)を作成する時には、それは、UIViewControllerで定義されるメソッドを継承し、そしてあなたにあなた独自のあつらえの挙動をそれぞれのメソッドに加えさせます。重要なことは、システムがそれらのメソッドをいつ呼び出すか理解することです、そうすればあなたはあなたが表示しているビューの準備や解体がこの一連の過程の適切な段階でできます—それはあなたが後にこのレッスンでする必要があることです。
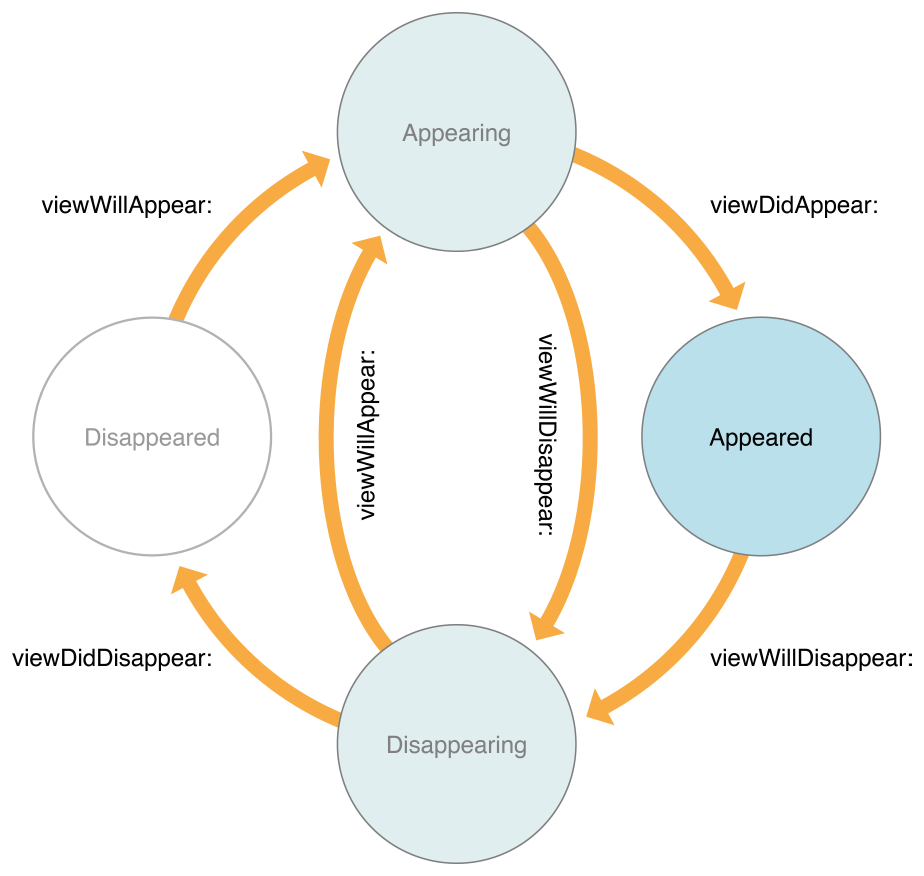
iOS calls the UIViewController methods as follows:
iOSはUIViewControllerメソッドを以下のように呼び出します:
viewDidLoad()—Called when the view controller’s content view (the top of its view hierarchy) is created and loaded from a storyboard. The view controller’s outlets are guaranteed to have valid values by the time this method is called. Use this method to perform any additional setup required by your view controller.
viewDidLoad()—ビューコントローラのコンテンツビューが作成されてロードされるときにストーリーボードから呼ばれます。ビューコントローラの持つアウトレットは、有効な値を持つことをこのメソッドが呼び出される時までに保障されます。このメソッドを使って、あなたのビューコントローラによって必要とされる追加的な準備を何であれ実行してください。Typically, iOS calls
viewDidLoad()only once, when its content view is first created; however, the content view is not necessarily created when the controller is first instantiated. Instead, it is lazily created the first time the system or any code accesses the controller’sviewproperty.
通常は、iOSはviewDidLoad()をただ一度だけ、、それが最初に作成される時に呼び出します;しかしながら、コンテンツビューは必ずしもコントローラが最初にインスタンス化される時に作成されるわけではありません。そうではなくて、それは遅延に、システムまたは何らかのコードがコントローラの持つviewプロパティにアクセスする最初の時に、作成されます。viewWillAppear()—Called just before the view controller’s content view is added to the app’s view hierarchy. Use this method to trigger any operations that need to occur before the content view is presented onscreen. Despite the name, just because the system calls this method, it does not guarantee that the content view will become visible. The view may be obscured by other views or hidden. This method simply indicates that the content view is about to be added to the app’s view hierarchy.
viewWillAppear()— ビューコントローラの持つコンテンツビューがアプリの持つビュー階層へ加えられる直前に呼び出されます。このメソッドを使って、コンテンツビューが画面上に提示される前に起こる必要がある何らかの演算を引き起こしてください。その名前にもかかわらず、システムがこのメソッドを呼び出すからといって、それはコンテンツビューが可視化されるようになることを保証しません。ビューは、他のビューまたは隠されることによって見えなくさせられるかもしれません。このメソッドは、単にコンテンツビューが間もなくアプリの持つビュー階層へ加えられるところであるのを指し示します。viewDidAppear()—Called just after the view controller’s content view has been added to the app’s view hierarchy. Use this method to trigger any operations that need to occur as soon as the view is presented onscreen, such as fetching data or showing an animation. Despite the name, just because the system calls this method, it does not guarantee that the content view is visible. The view may be obscured by other views or hidden. This method simply indicates that the content view has been added to the app’s view hierarchy.
viewDidAppear()— ビューコントローラの持つコンテンツビューがアプリの持つビュー階層へ加えられる直後に呼び出されます。このメソッドを使って、コンテンツビューが画面上に提示されるやいなや起こる必要がある何らかの演算を引き起こしてください、例えばデータを取ってきたりアニメーションを表示するなど。その名前にもかかわらず、システムがこのメソッドを呼び出すからといって、それはコンテンツビューが可視化されることを保証しません。ビューは、他のビューまたは隠されることによって見えなくさせられるかもしれません。このメソッドは、単にコンテンツビューが間もなくアプリの持つビュー階層へ加えられたところであるのを指し示します。
A complementary set of teardown methods exists, as shown in the state transition diagram above.
補完的なひと揃いの解体メソッドが、上の状態推移図で見せたように存在します。
You’ll be using some of these methods in the FoodTracker app to load and display your data. In fact, if you recall, you’ve already written some code in the viewDidLoad() method of ViewController:
あなたは、これらのメソッドの幾つかをFoodTrackerアプリで使ってあなたのデータをロードして表示することになるでしょう。実際、あなたが思い出すならば、あなたはすでにいくつかのコードをViewControllerのviewDidLoad()メソッドにおいて書いています:
override func viewDidLoad() {super.viewDidLoad()// Handle the text field’s user input through delegate callbacks. (テキスト欄のユーザ入力を委任先コールバックを経由して取り扱います。)nameTextField.delegate = self}
This style of app design where view controllers serve as the communication pipeline between your views and your data model is known as MVC (Model-View-Controller). In this pattern, models keep track of your app’s data, views display your user interface and make up the content of an app, and controllers manage your views. By responding to user actions and populating views with content from the data model, controllers serve as a gateway for communication between the model and views. MVC is central to a good design for any iOS app, and so far, the FoodTracker app has been built along MVC principles.
ビューコントローラがあなたのビューとあなたのデータモデルの間で通信の輸送菅としての役目をするこの形式のアプリ設計は、MVC(モデル-ビュー-コントローラ)として知られます。このパターン(類型)において、モデルはあなたのアプリのデータの最新状態を把握し、ビューはあなたのユーザインターフェイスを表示してアプリのコンテンツを作り上げ、そしてコントローラはあなたのビューを管理します。ユーザアクションへ応答することとビューをデータモデルからのコンテンツで満たすことによって、コントローラはモデルとビューの間の通信の関門の役目をします。MVCは、iOSアプリのための良い設計として中心的なものです。
As you keep the MVC pattern in mind for rest of the app’s design, it’s time to take your basic user interface to the next level, and add an image to the meal scene.
あなたがこのアプリの設計の残りに向けてMVCパターンを覚えたところで、あなたの基本ユーザインターフェイスを次のレベルに持っていき、食事シーンに画像を加えるときです。
Add a Meal Photo
食事の写真を加える
The next step in finishing the meal scene is adding a way to display a photo of a particular meal. For this, you’ll use an image view (UIImageView), a user interface element that displays a picture.
食事シーンを仕上げる次の段階は、ある食事の写真を表示する方法を加えることです。このために、あなたはイメージビュー(UIImageView)、画像を表示するユーザインターフェイス要素を使うことになります。
To add an image view to your scene
イメージビューをあなたのシーンに加えるには
Open your storyboard,
Main.storyboard.
あなたのストーリーボード、Main.storyboardを開いてください。Open the Object library in the utility area. (Alternatively, choose View > Utilities > Show Object Library.)
オブジェクトライブラリをユーティリティ区画で開きます。(または代わりに、View > Utilities > Show Object Libraryを選びます)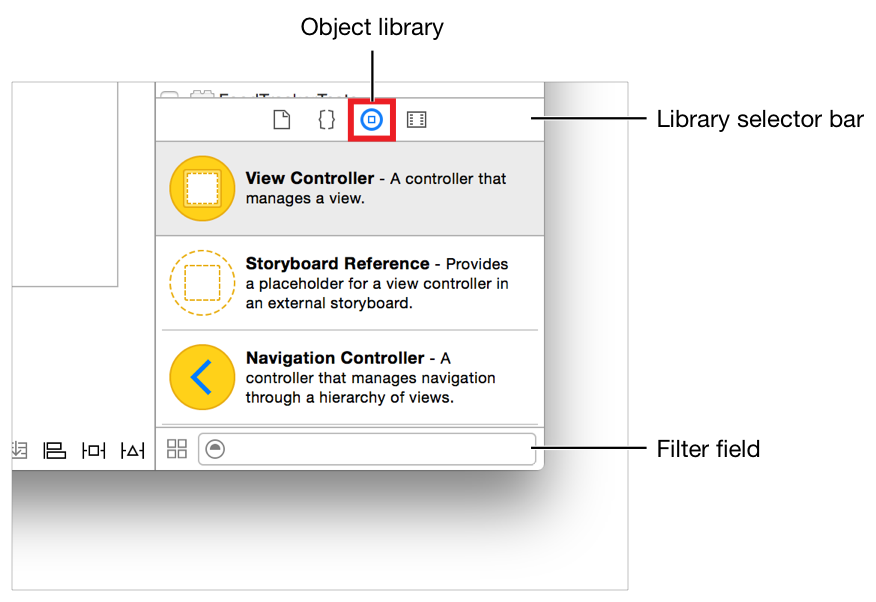
In the Object library, type
image viewin the filter field to find the Image View object quickly.
オブジェクトライブラリにおいて、image viewをフィルタ欄にタイプしてImage View(イメージビュー)オブジェクトを素早く見つけます。Drag an Image View object from the Object library to your scene so that it’s in the stack view below the button.
Image Viewオブジェクトをオブジェクトライブラリからあなたのシーンへドラッグして、それがスタックビューの中のボタンの下になるようにします。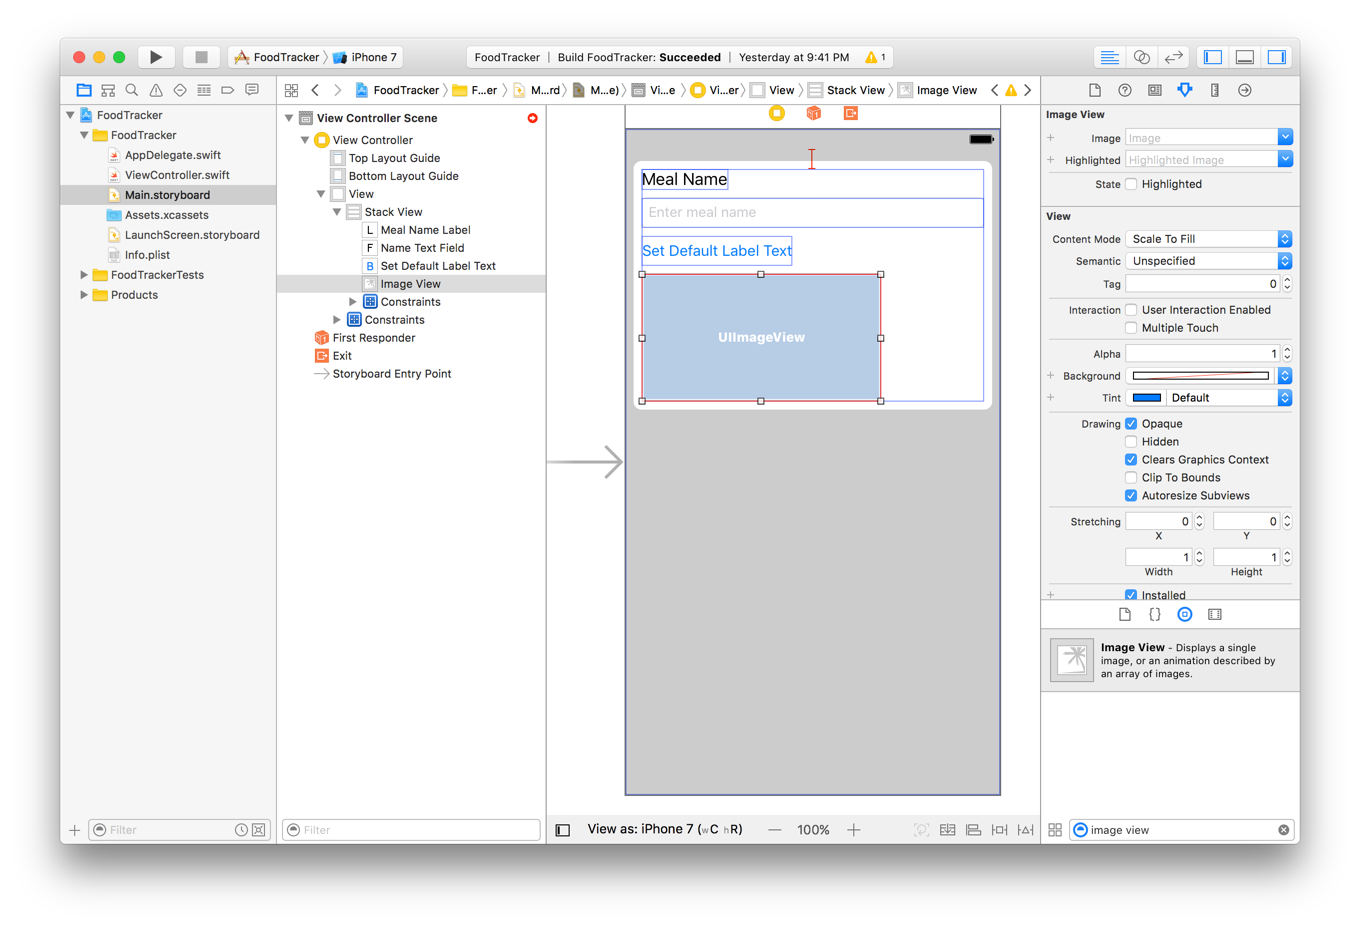
With the image view selected, open the Size inspector
 in the utility area.
イメージビューが選択された状態で、Sizeインスペクタをユーティリティ区画で開きます。
Recall that the Size inspector appears when you select the fifth button from the left in the inspector selector bar. It lets you edit the size and position of an object in your storyboard.
思い出してください、このサイズインスペクタが現れるのはあなたが左から5番目のボタンをインスペクタ選択バーで選んだ時です。それは、あなたにあなたのストーリーボードの中のオブジェクトの大きさと位置を編集させます。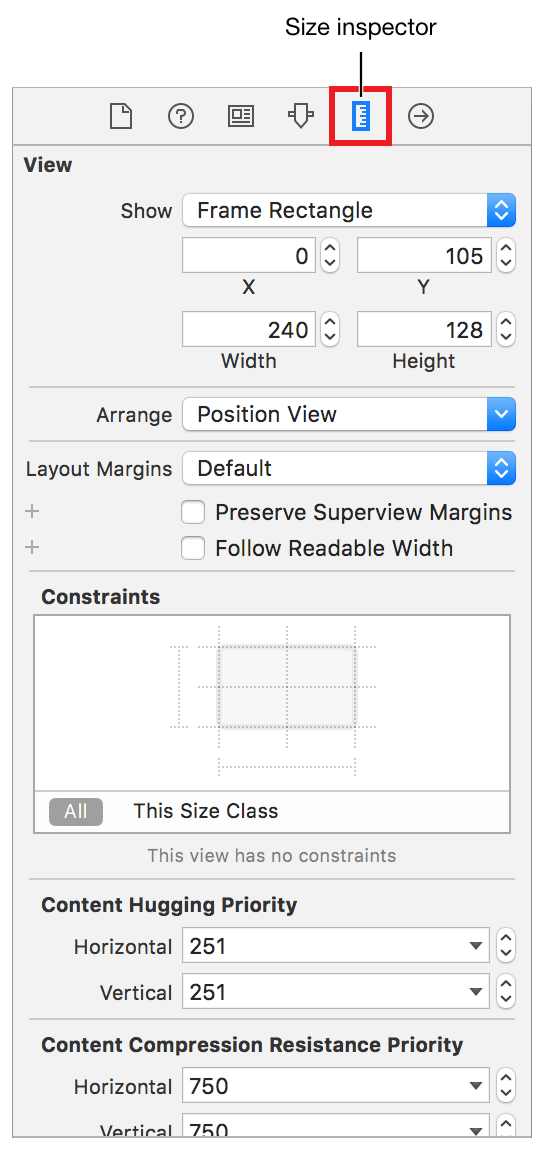
In the Intrinsic Size field, select Placeholder. (This field is at the bottom of the Size inspector, so you’ll need to scroll down to it.)
Intrinsic Size(固有サイズ)欄において、Placeholder(プレースホルダ)を選びます。(この欄は、Sizeインスペクタの下の方にあります、それであなたはそれまで下にスクロールする必要があるでしょう)Type
320in both the Width and Height fields. Press Return.
320をWidth(幅)とHeight(高さ)欄にタイプします。リターンキーを押します。A view’s intrinsic content size is the preferred size for the view based on its content. An empty image view doesn’t have an intrinsic content size. As soon as you add an image to a view, its intrinsic content size is set to the image’s size. Providing a placeholder size gives the image a temporary intrinsic content size that you can use while designing your user interface. This value is only used while designing your interface in Interface Builder; at runtime, the layout engine uses the view’s actual intrinsic content size instead.
あるビューの持つ固有コンテンツサイズは、ビューのためのそれのコンテンツに基づいた好ましい大きさです。空のイメージビューは固有コンテンツサイズを持ちません。あなたが画像をビューに加えるやいなや、それの固有コンテンツサイズはその画像の大きさへ設定されます。あるプレースホルダサイズを提供することは、その画像に一時的な固有コンテンツサイズを与えます、それはあなたがあなたのユーザインターフェイスを設計している間に使うことができます。この値は、あなたのインターフェイスをInterface Builderにおいて設計している間に使われることができるだけです;実行時には、レイアウトエンジンはそのビューの持つ実際の固有コンテンツサイズを代わりに使います。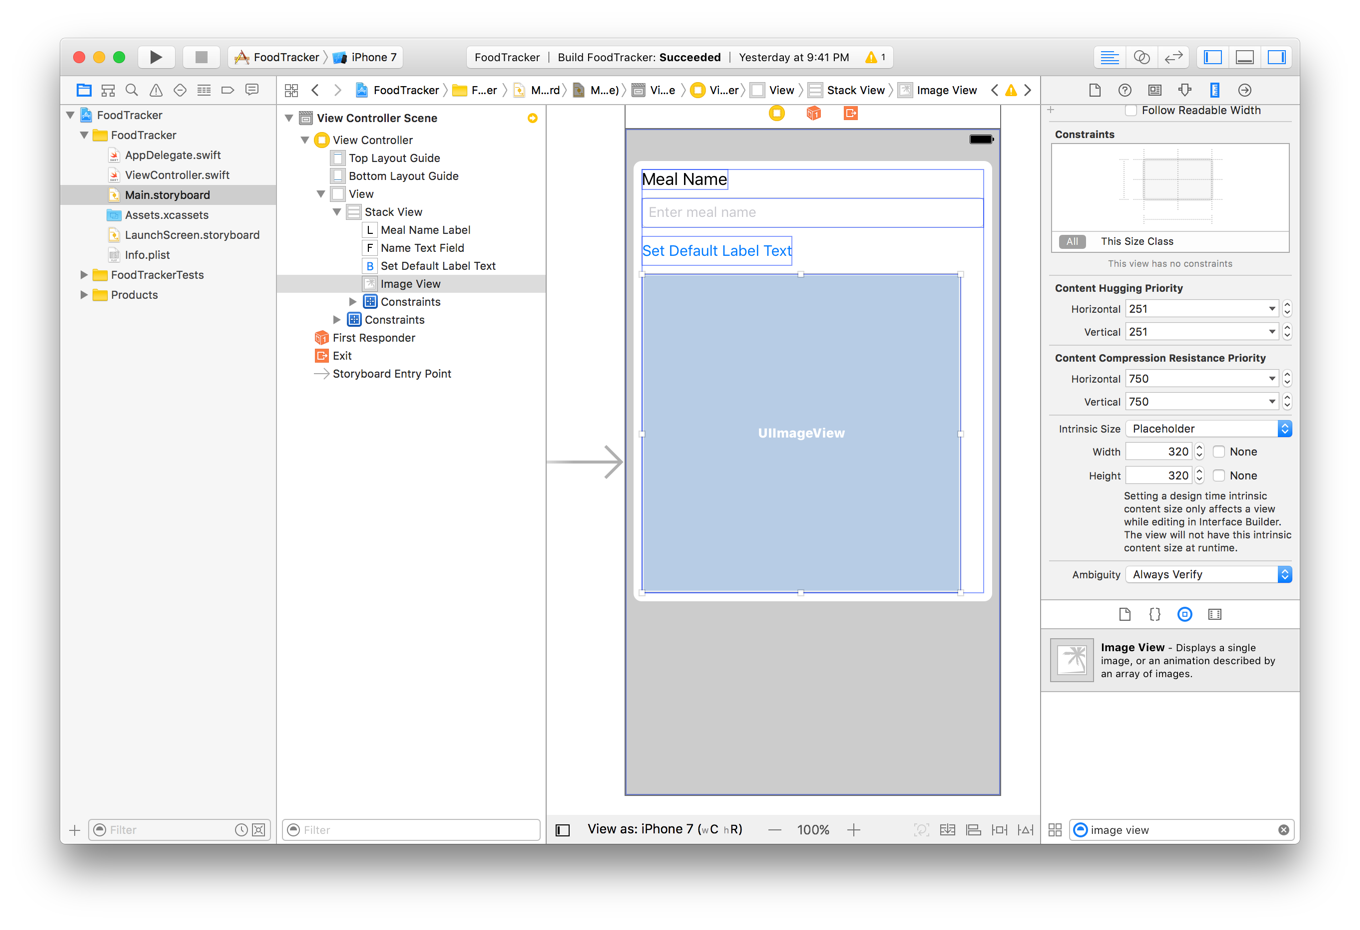
On the bottom right of the canvas, open the Pin menu.
キャンバスの1番下右で、Pin(固定)メニューを開いてください。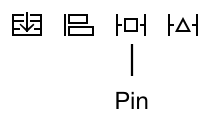
Select the checkbox next to Aspect Ratio.
Aspect Ratio(アスペクト比、縦横比率)の隣のチェックボックスを選択してください。The Pin menu should look something like this:
Pinメニューはこのようなものに見えるはずです: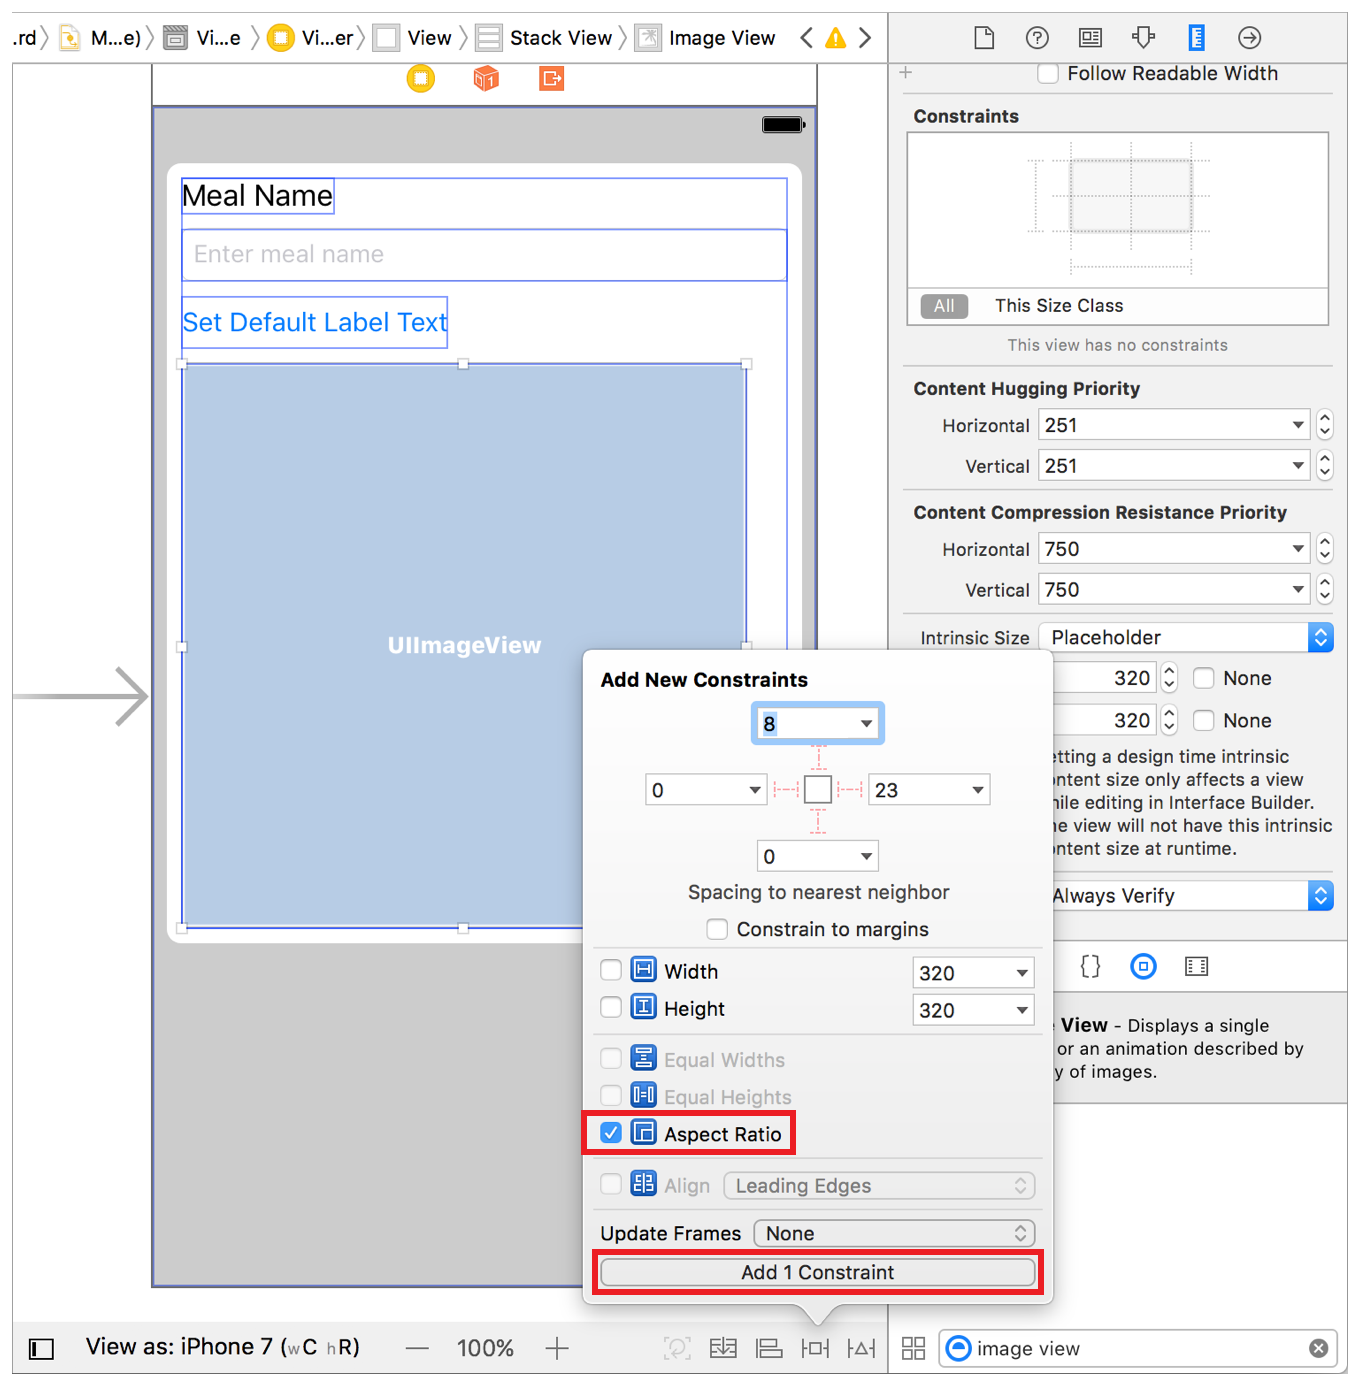
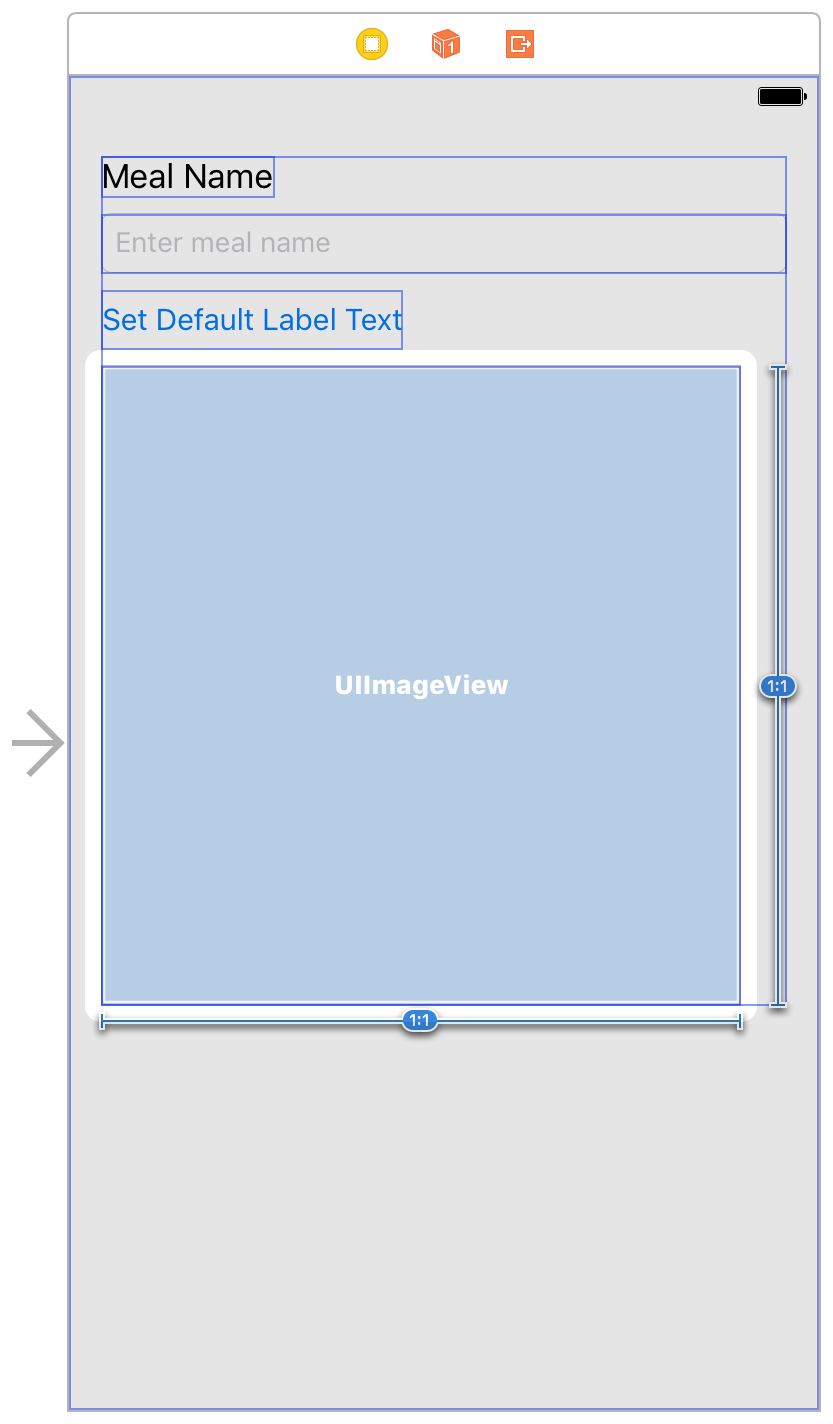
In the Pin menu, click the Add 1 Constraints button.
Pinメニューにおいて、Add 1 Constraints(1つの制約を追加)ボタンをクリックしてください。Your image view now has a 1:1 aspect ratio, so it will always be a square.
あなたのイメージビューは、今では1:1の縦横比を持ちます、それでそれは常に正方形です。With the image view selected, open the Attributes inspector
 .
.
イメージビューが選択された状態で、Attributes(属性)インスペクタを開きます。
Recall that the Attributes inspector appears when you select the fourth button from the left in the inspector selector bar. It lets you edit the properties of an object in your storyboard.
思い出してください、Attributesインスペクタが現れるのはあなたが左から4番目のボタンをインスペクタ選択バーで選択した時です。それはあなたにあなたのストーリーボードのオブジェクトのプロパティを編集させます。In the Attributes inspector, find the Interaction field and select the User Interaction Enabled checkbox.
Attributesインスペクタにおいて、Interaction(相互作用)欄を捜して、User Interaction Enabled(ユーザ相互作用を可能にする)チェックボックスを選択してください。You’ll need this feature later to let users interact with the image view.
あなたは、ユーザがイメージビューと相互作用できるようにするためにこの機能を後で必要とします。
Your scene should look like this:
あなたのシーンはこのように見えるはずです:
Display a Default Photo
初期写真を表示する
Add a placeholder image to let users know that they can interact with the image view to select a photo. Use this image from the Images/ folder of the downloadable file at the end of this lesson, or use your own image.
プレースホルダ画像を加えることで、ユーザに彼らがイメージビューと相互作用してある写真を選択できることをわかるようにしてください。この画像を、このレッスンの終わりでダウンロード可能なファイルのImages/フォルダから使ってください、またはあなた独自の画像を使ってください。

To add an image to your project
画像をあなたのプロジェクトに加えるには
In the project navigator, select
Assets.xcassetsto view the asset catalog.
プロジェクトナビゲータにおいて、Assets.xcassetsを選択してアセットカタログ(資産目録)を眺めてください。The asset catalog is a place to store and organize your image assets for an app.
アセットカタログは、アプリのためのあなたの画像資産を保管して整理するところです。In the bottom left corner, click the plus (
+) button and select New Image Set from the pop-up menu.
1番下左の隅で、プラス(+)ボタンをクリックしてNew Image Set(新規画像セット)をポップアップメニューから選んでください。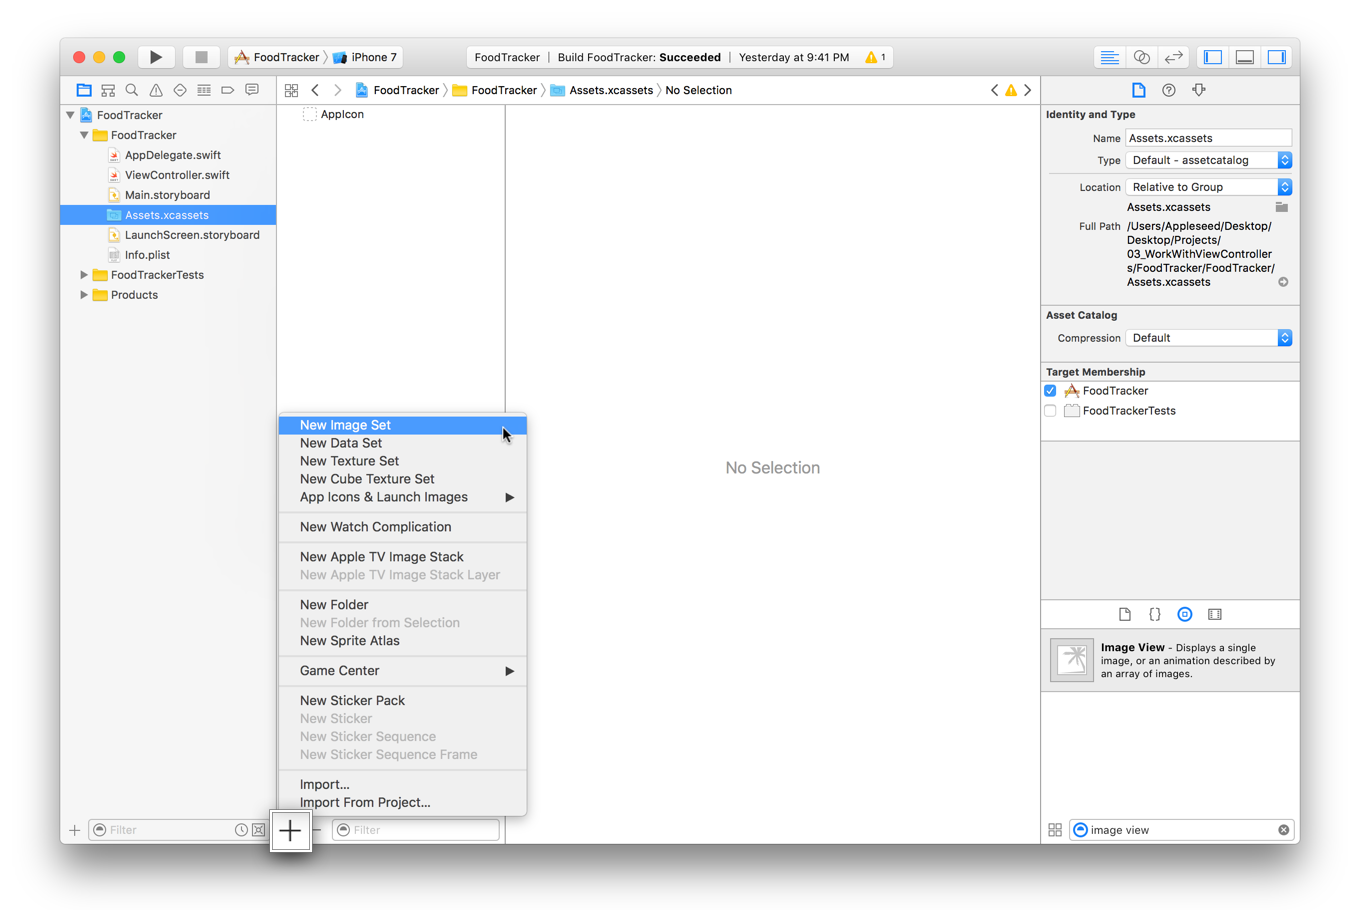
Double-click the image set name and rename it to
defaultPhoto.
画像セット名をダブルクリックして、それをdefaultPhotoに名前変更してください。On your computer, select the image you want to add.
あなたのコンピュータ上で、あなたが加えたい画像を選択してください。Drag and drop the image into the
2xslot in the image set.
その画像を画像セットの2xの挿入位置にドラック&ドロップしてください。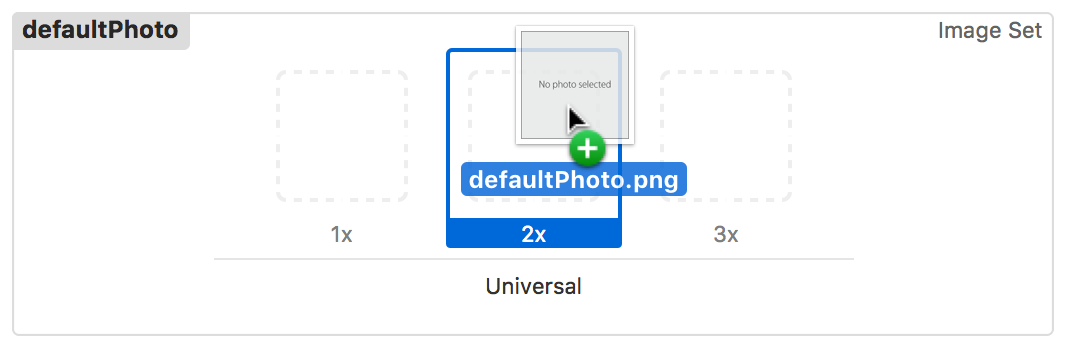
2xis the display resolution for the iPhone 7 Simulator that you’re using in these lessons, so the image will look best at this resolution.
2xは、iPhone 7シミュレータ用の画面解像度で、あなたがこのレッスンで使っているものです、それでこの解像度でその画像は最もよく見えるでしょう。
With the default placeholder image added to your project, set the image view to display it.
あなたのプロジェクトに加えた初期プレースホルダ画像をつかって、イメージビューがそれを表示するように設定します。
To display a default image in the image view
初期画像をイメージビューで表示するには
Open your storyboard.
あなたのストーリーボードを開いてください。In your storyboard, select the image view.
あなたのストーリーボードにおいて、イメージビューを選択してください。With the image view selected, open the Attributes inspector
in the utility area.
そのイメージビューが選択された状態で、Attributesインスペクタをユーティリティ区画で開いてください。
In the Attributes inspector, find the field labeled Image and select
defaultPhoto.
Attributesインスペクタにおいて、Imageとラベルをつけられる欄を探してdefaultPhotoを選択します。
Checkpoint: Run your app. The default image displays in the image view.
確認点:あなたのアプリを実行します。初期画像がイメージビューに表示されます。
Connect the Image View to Code
イメージビューをコードに接続する
Now, you need to implement the functionality to change the image in this image view at runtime. First, you need to connect the image view to the code in ViewController.swift.
現在、あなたが必要とするのは、実行時にイメージビュー内の画像を変更する機能性を実装することです。最初に、あなたはが必要とするのはイメージビューをViewController.swiftの中のコードに接続することです。
To connect the image view to the ViewController.swift code
イメージビューをViewController.swiftコードに接続するには
Click the Assistant button in the Xcode toolbar near the top right corner of Xcode to open the assistant editor.
XcodeツールバーのAssistantボタンをXcodeの1番上右隅近くでクリックして、アシスタントエディタを開いてください。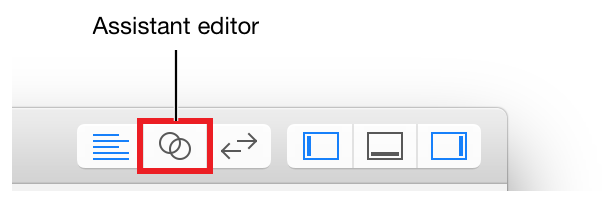
If you want more space to work, collapse the project navigator and utility area by clicking the Navigator and Utilities buttons in the Xcode toolbar.
あなたがもっと場所を必要とするならば、プロジェクトナビゲータとユーティリティ区画をNavigatorとUtilitiesボタンをXcodeツールバーにおいてクリックすることで折り畳んでください。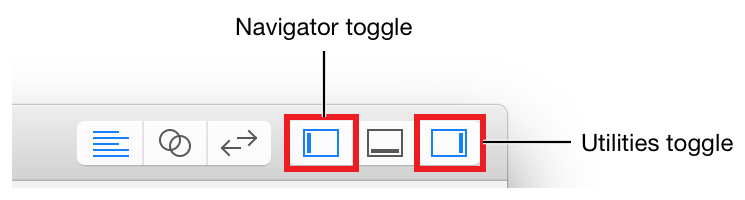
You can also collapse the outline view.
あなたはまたアウトラインビューも折り畳むことができます。In your storyboard, select the image view.
あなたのストーリーボードにおいて、イメージビューを選択してください。Control-drag from the image view on your canvas to the code display in the editor on the right, stopping the drag at the line just below the existing outlets in
ViewController.swift.
あなたのキャンバス上のイメージビューから右のエディタの中のコード表示へコントロール-ドラッグして、ViewController.swiftの中の既存のアウトレットのすぐ下の行でドラッグをやめてください。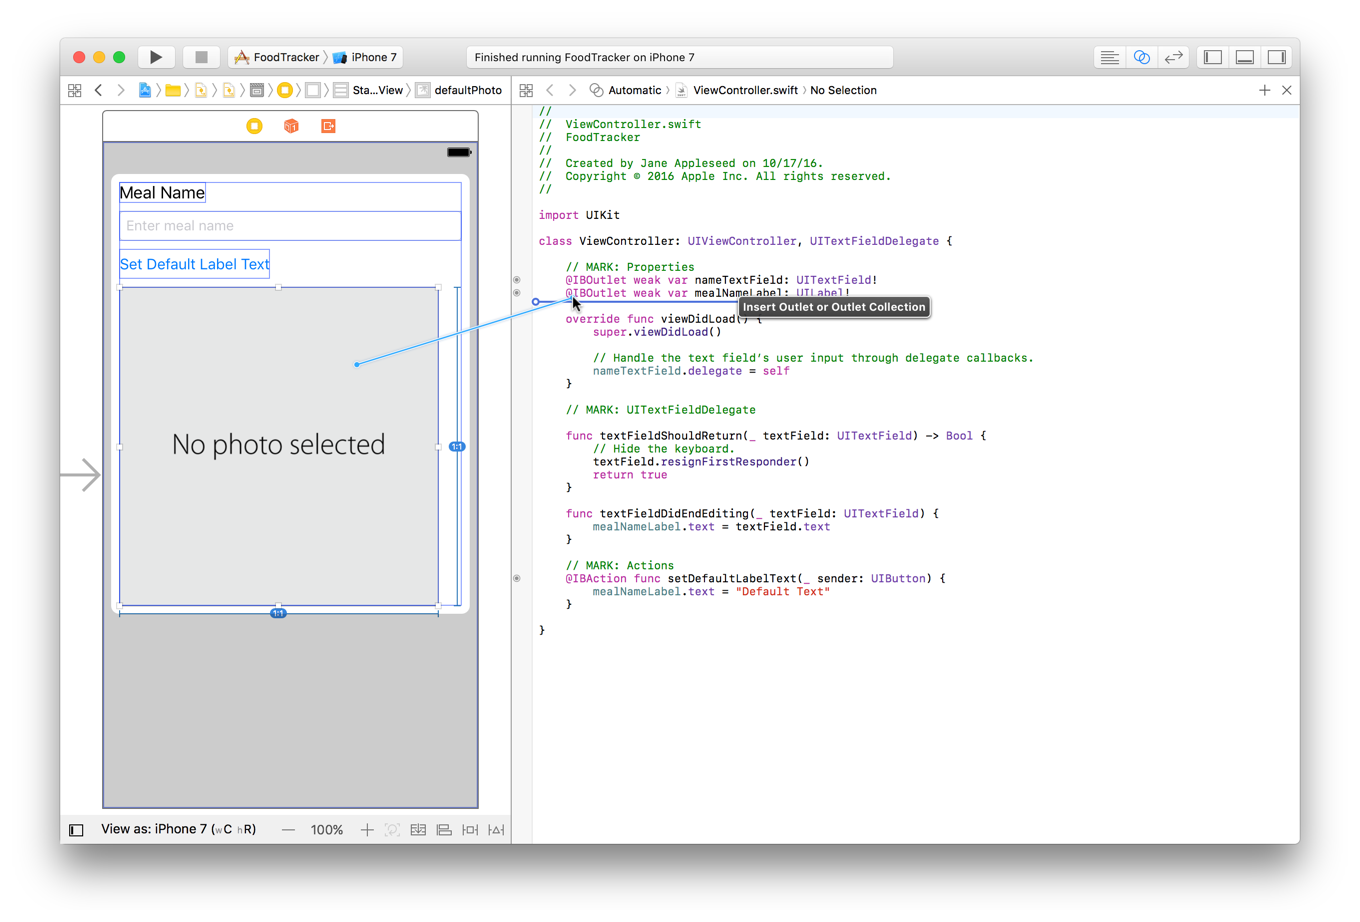
In the dialog that appears, for Name, type
photoImageView.
現れたダイアログにおいて、名前に、photoImageViewをタイプしてください。Leave the rest of the options as they are. Your dialog should look like this:
残りのオプションはそれらのままにしておきます。あなたのダイアログはこのように見えるはずです: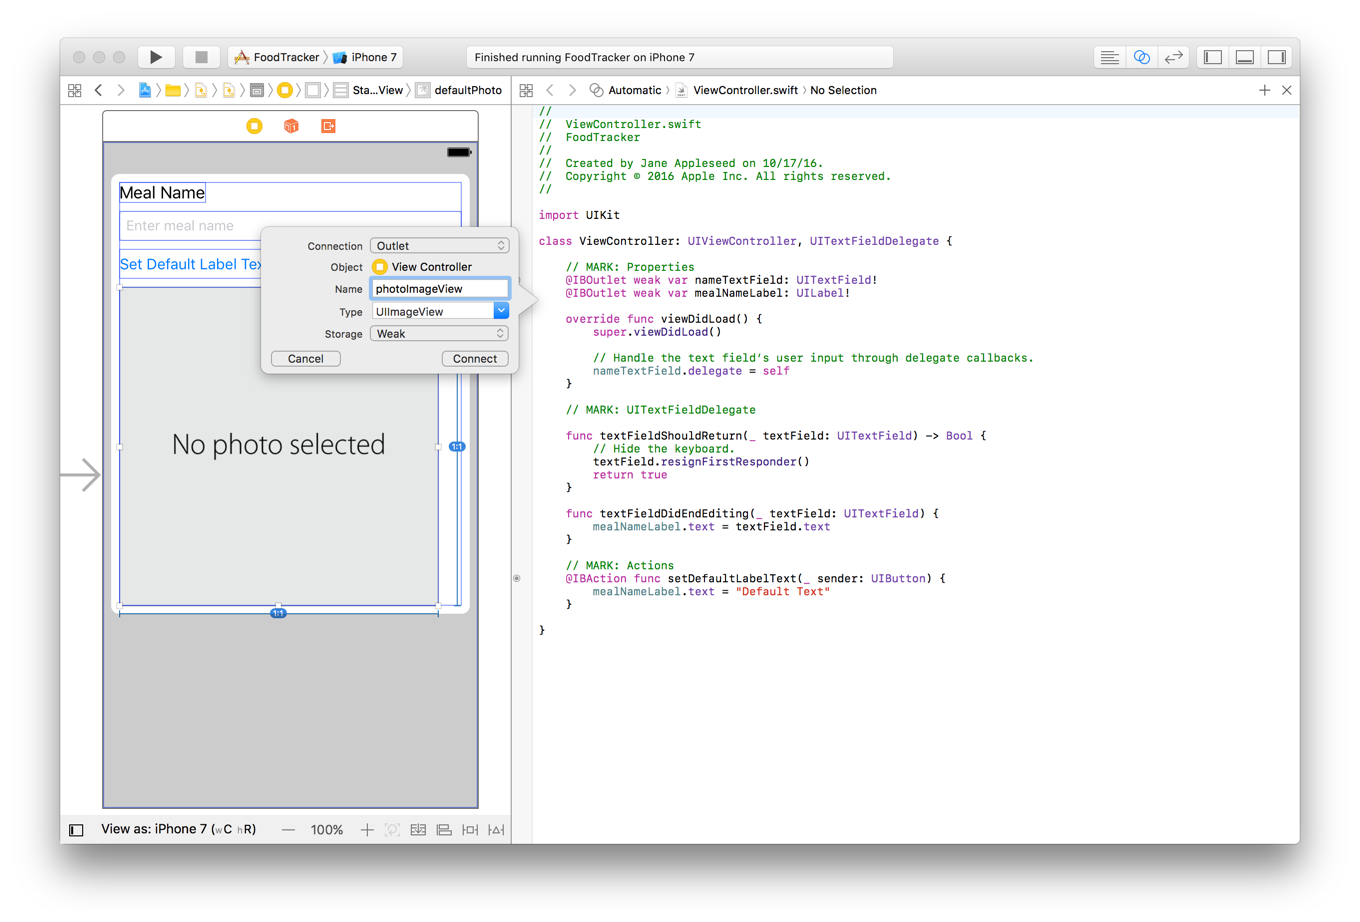
Click Connect.
Connectをクリックしてください。Xcode adds the necessary code to
ViewController.swiftto store a reference to the image view and configures the storyboard to set up that connection.
Xcodeは、不可欠なコードをViewController.swiftに加えることでイメージビューへの参照を保管します、そしてストーリーボードを修正することでこの接続を確立します。@IBOutlet weak var photoImageView: UIImageView!
You can now access the image view from code to change its image, but how do you know when to change the image? You need to give users a way to indicate that they want to change the image—for example, by tapping the image view. Then, you’ll define an action method to change the image when a tap occurs.
あなたは今やイメージビューにコードからアクセスしてそれの画像を変更できます、しかしあなたは画像を変更する時をどうやって知るのでしょう?あなたが必要なのは、ユーザにある方法を与えて、彼らが画像を変更したいことを示させることです—たとえば、イメージビューをタップすることによって。そうすれば、あなたはアクションメソッドを定義することで、タップが起こったとき画像を変更します。
There’s a nuanced distinction between views and controls, which are specialized versions of views that respond to user actions in a specific way. A view displays content, whereas a control is used to modify the content in some way. A control (UIControl) is a subclass of UIView. In fact, you’ve already worked with both views (labels, image views) and controls (text fields, buttons) in your interface.
ある微妙な相違がビューと、ビューの特殊化版でユーザアクションに特定の方法で応答するコントロールの間にはあります。ビューはコンテンツを表示します、それに対してコントロールはコンテンツをある方法で修正するために使われます。コントロール(UIControl)は、UIViewのサブクラスです。実際、あなたはすでにビュー(ラベル、イメージビュー)とコントロール(テキスト欄、ボタン)の両方をあなたのインターフェイスで扱っています。
Create a Gesture Recognizer
ジェスチャリコグナイザの作成
An image view isn’t a control, so it’s not designed to respond to input in the same way that button or a slider might. For example, you can’t simply create an action method that’s triggered when a user taps on an image view. (If you try to Control-drag from the image view to your code, you’ll notice that you can’t select Action in the Connection field.)
イメージビューは、コントロールではありません、それでそれはボタンやスライダがするのと同じ方法で入力に応答するように設計されません。たとえば、あなたはユーザがイメージビューをタップするとき切り替えられるアクションメソッドを簡単には作成できません。(あなたがイメージビューからあなたのコードにコントロールドラッグすることを試みるならば、あなたはConnection欄のActionを選択できないことに気づくでしょう。)
Fortunately, it’s quite easy to give a view the same capabilities as a control by adding a gesture recognizer to it. Gesture recognizers are objects that you attach to a view that allow the view to respond to the user the way a control does. Gesture recognizers interpret touches to determine whether they correspond to a specific gesture, such as a swipe, pinch, or rotation. You can write an action method that is called when a gesture recognizer recognizes its assigned gesture, which is exactly what you need to do for the image view.
幸いなことに、ビューにコントロールと同じ能力を与えるのは、ジェスチャリコグナイザをそれに加えることによって比較的簡単です。ジェスチャリコグナイザはオブジェクトです、それはあなたがビューに取り付けて、そのビューがコントロールが行うやり方でユーザに応答できるようにするものです。ジェスチャリコグナイザは、タッチを解釈して、それが特定のジェスチャ、例えばスワイプ、ビンチ、または回転などに相当するか判断します。あなたは、あるジェスチャリコグナイザがそれの割当てジェスチャを認識するときに呼び出されるアクションメソッドを書くことができます、それは、まさしくあなたがイメージビューにする必要があるものです。
Attach a tap gesture recognizer (UITapGestureRecognizer) to the image view, which will recognize when a user has tapped the image view. You can do this easily in your storyboard.
タップジェスチャリコグナイザ(UITapGestureRecognizer)をイメージビューに取り付けます、それは、ユーザがイメージビューをタップしたときを認識します。あなたはこれを簡単にあなたのストーリーボードに行うことができます。
To add a tap gesture recognizer to your image view
タップジェスチャリコグナイザをあなたのイメージビューに加えるには
Open the Object library (Choose View > Utilities > Show Object Library).
Objectライブラリを開いてください(View > Utilities > Show Object Libraryを選択してください)。In the Object library, type
tap gesturein the filter field to find the Tap Gesture Recognizer object quickly.
オブジェクトライブラリにおいて、フィルタ欄にtap gestureをタイプしてTap Gesture Recognizerオブジェクトをすばやく見つけます。Drag a Tap Gesture Recognizer object from the Object library to your scene, and place it on top of the image view.
Tap Gesture Recognizerオブジェクトをオブジェクトライブラリからあなたのシーンにドラッグします、そしてそれをイメージビューの上に配置します。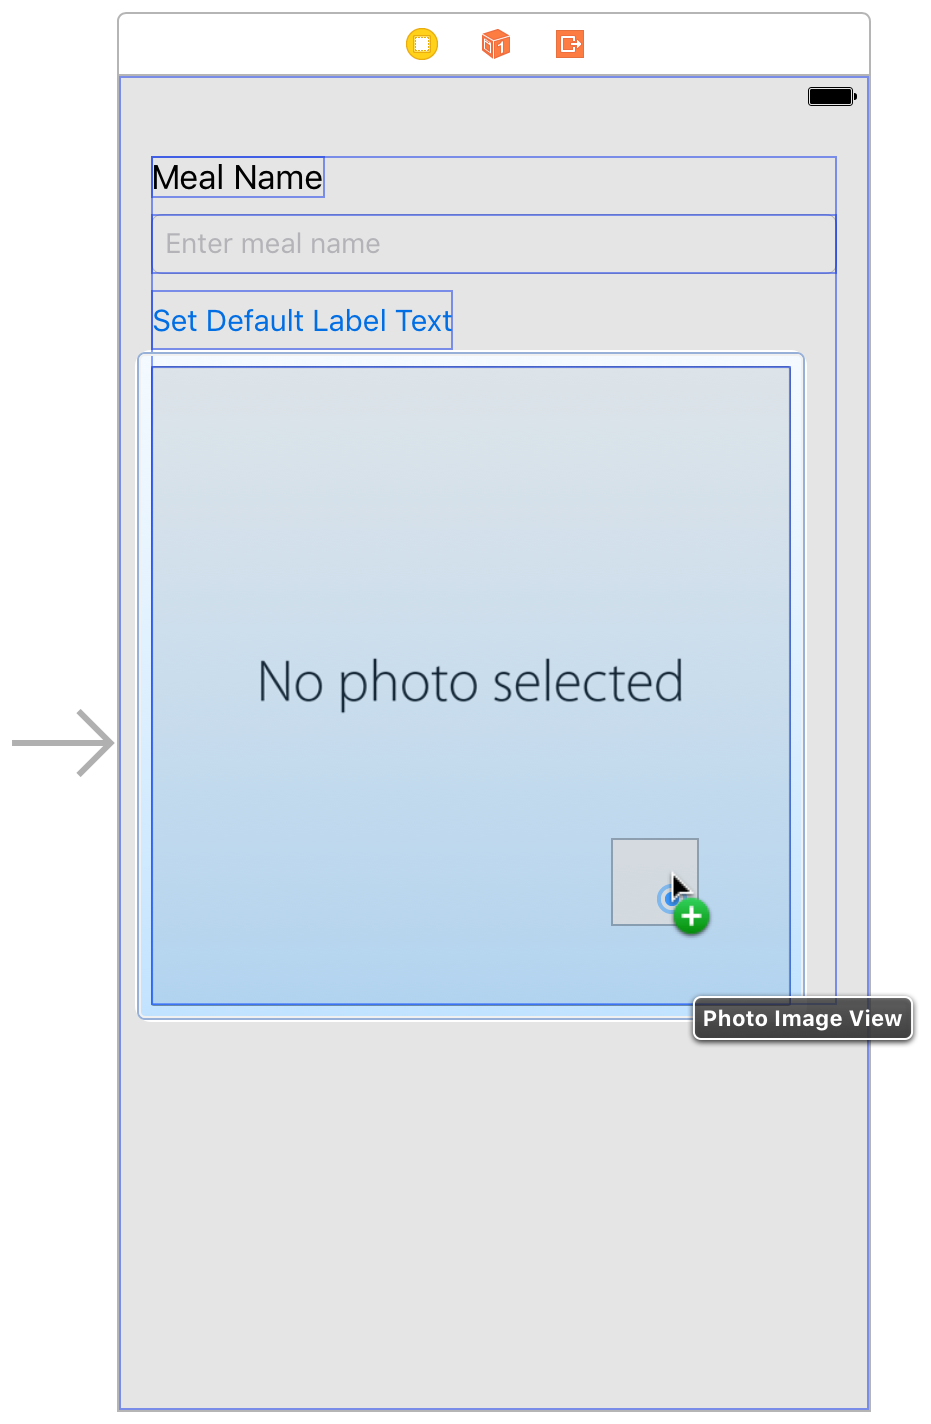
The Tap Gesture Recognizer object appears in the meal scene dock.
Tap Gesture Recognizerオブジェクトが食事シーンドックに現れます。
Connect the Gesture Recognizer to Code
ジェスチャリコグナイザをコードに接続する
Now, connect that gesture recognizer to an action method in your code.
今度は、このジェスチャリコグナイザをあなたのコードのアクションメソッドに接続します。
To connect the gesture recognizer to the ViewController.swift code
ジェスチャリコグナイザをViewController.swiftコードに接続するには
Control-drag from the gesture recognizer in the scene dock to the code display in the editor on the right, stopping the drag at the line below the
//MARK: Actionscomment inViewController.swift.
シーンドックのジェスチャリコグナイザから右のエディタのコード表示へコントロール-ドラッグして、ViewController.swiftの中の//MARK: Actionsコメントの下の行でドラッグをやめます。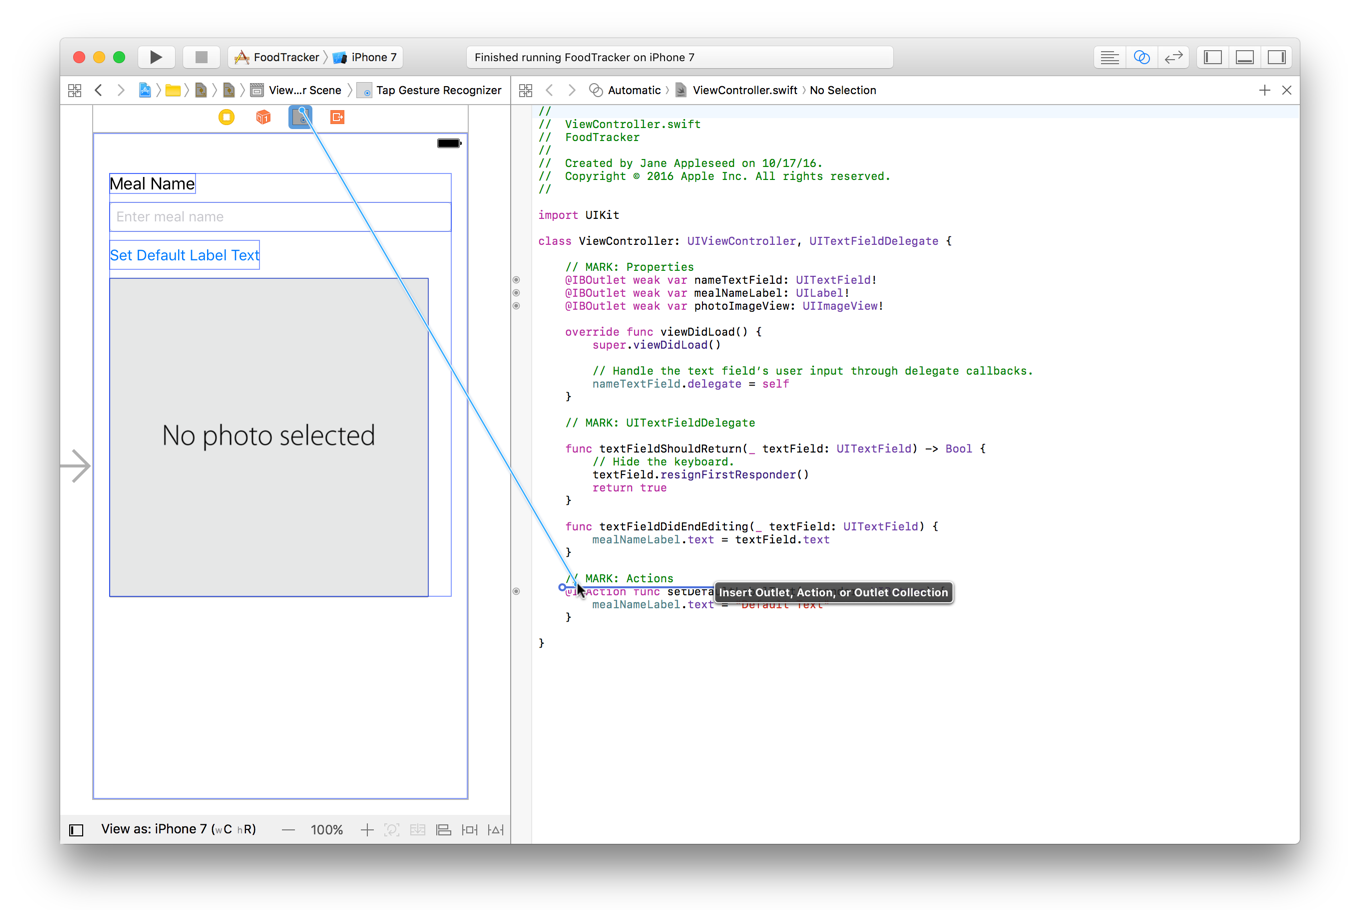
In the dialog that appears, for Connection, select Action.
現れたダイアログで、Connectionに対して、Actionを選択します。For Name, type
selectImageFromPhotoLibrary.
Nameに対して、selectImageFromPhotoLibraryをタイプします。For Type, select
UITapGestureRecognizer.
Typeに対して、UITapGestureRecognizerを選択します。Your dialog should look like this:
あなたのダイアログはこのように見えるはずです: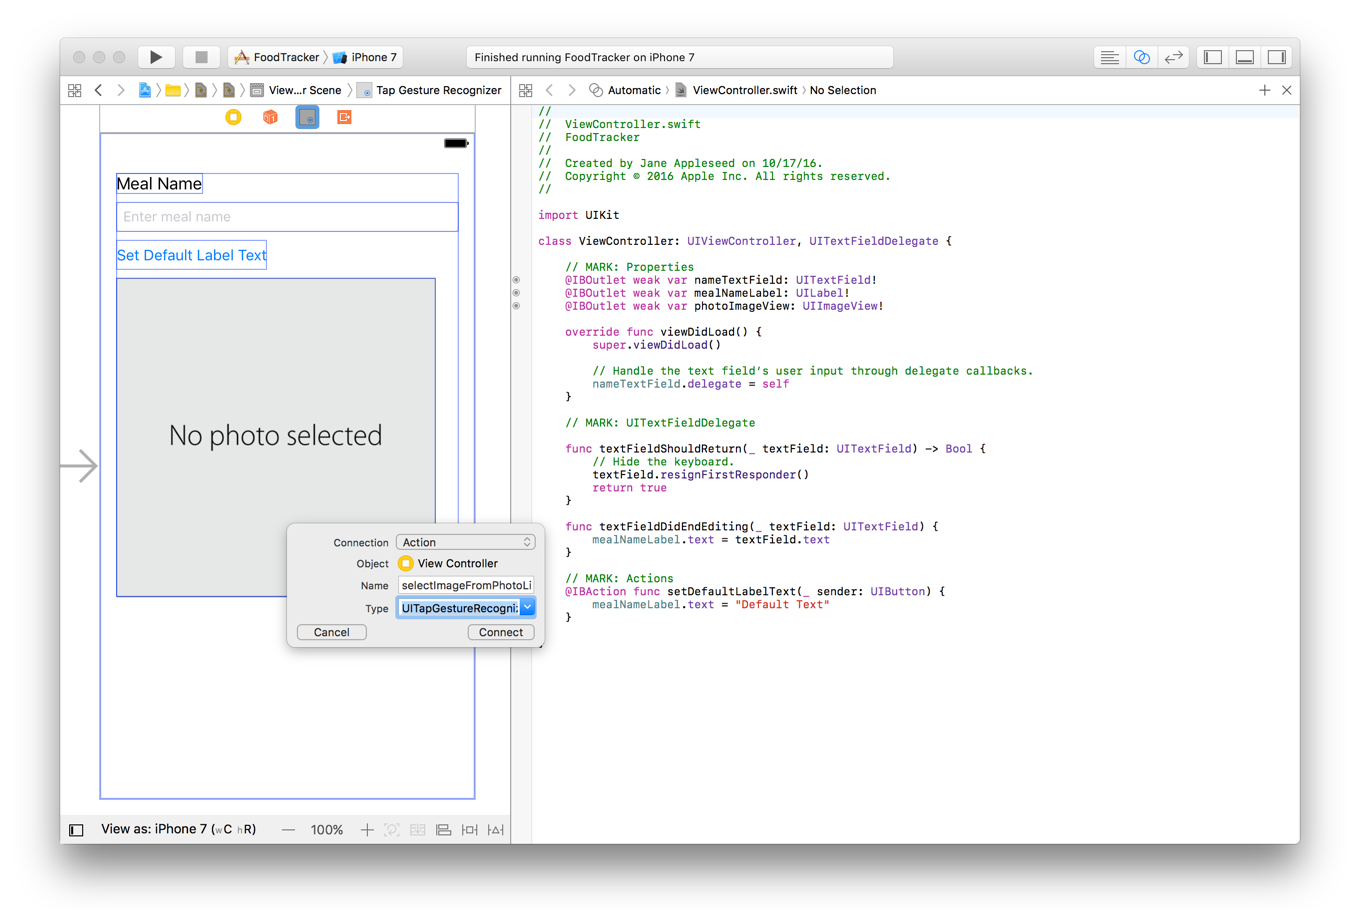
Click Connect.
Connectをクリックしてください。Xcode adds the necessary code to
ViewController.swiftto set up the action.
Xcodeは、不可欠なコードをViewController.swiftに加えることでアクションを確立します。@IBAction func selectImageFromPhotoLibrary(_ sender: UITapGestureRecognizer) {}
Create an Image Picker to Respond to User Taps
イメージピッカーを作成してユーザタップに応答する
When a user taps the image view, they should be able to choose a photo from a collection of photos, or take one of their own. Fortunately, the UIImagePickerController class has this behavior built into it. An image picker controller manages the user interface for taking pictures and for choosing saved images to use in your app. And just as you need a text field delegate when you work with a text field, you need an image picker controller delegate to work with an image picker controller. The name of that delegate protocol is UIImagePickerControllerDelegate, and the object that you’ll define as the image picker controller’s delegate is ViewController.
ユーザがイメージビューをタップするとき、彼らが写真を写真コレクションから選ぶこと、または彼ら自身のものを取得できるべきです。幸いにも、UIImagePickerControllerクラスは、この挙動をそれに組み込んでいます。イメージピッカーコントローラは、あなたのアプリで使えるように、画像の取得や保存された画像の選択のためのユーザインターフェイスを管理します。そしてまさにテキスト欄を扱うときにあなたがテキスト欄委任先を必要としたように、イメージピッカーコントローラを扱うのにあなたはイメージピッカーコントローラ委任先を必要とします。委任先プロトコルの名前はUIImagePickerControllerDelegateです、そしてあなたがイメージピッカーコントローラの委任先として定義するオブジェクトはViewControllerです。
First, ViewController needs to adopt the UIImagePickerControllerDelegate protocol. Because ViewController will be in charge of presenting the image picker controller, it also needs to adopt the UINavigationControllerDelegate protocol, which simply lets ViewController take on some basic navigation responsibilities.
まず、ViewControllerに必要なのはUIImagePickerControllerDelegateプロトコルに準拠することです。なぜならViewControllerは、イメージピッカーコントローラに起こっていることを管理することになるからです、それはまたUINavigationControllerDelegateプロトコルに準拠することもまた必要とします、それは単純にViewControllerがいくつかの基本的なナビゲーション責務を持つようにします。
To adopt the UIImagePickerControllerDelegate and UINavigationControllerDelegate protocols
UIImagePickerControllerDelegateとUINavigationControllerDelegateプロトコルに準拠するには
Return to the standard editor by clicking the Standard button.
標準エディタにStandardボタンをクリックすることで戻ってください。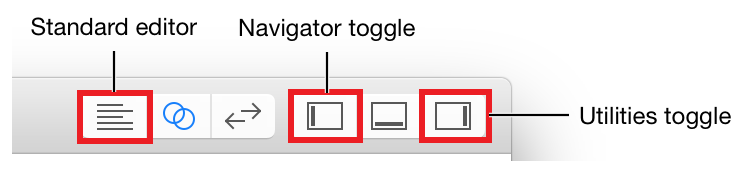
Expand the project navigator and utility area by clicking the Navigator and Utilities buttons in the Xcode toolbar.
プロジェクトナビゲータとユーティリティ区画をNavigatorとUtilitiesボタンをXcodeツールバーでクリックすることで広げてください。In the project navigator, select
ViewController.swift.
プロジェクトナビゲータにおいて、ViewController.swiftを選択してください。In
ViewController.swift, find theclassline, which should look like this:
ViewController.swiftにおいて、class行を見つけたください、それはこのように見えるはずです:class ViewController: UIViewController, UITextFieldDelegate {
After
UITextFieldDelegate, add a comma (,) andUIImagePickerControllerDelegateto adopt the protocol.
UITextFieldDelegateの後に、1つのコンマ(,)とUIImagePickerControllerDelegateを加えてください、それでこのプロトコルに準拠します。class ViewController: UIViewController, UITextFieldDelegate, UIImagePickerControllerDelegate {
After
UIImagePickerControllerDelegate, add a comma (,) andUINavigationControllerDelegateto adopt the protocol.
UIImagePickerControllerDelegateの後に、1つのコンマ(,)とUINavigationControllerDelegateを加えてください、それでこのプロトコルに準拠します。class ViewController: UIViewController, UITextFieldDelegate, UIImagePickerControllerDelegate, UINavigationControllerDelegate {
At this point, you can go back to the action method you defined, selectImageFromPhotoLibrary(_:), and finish its implementation.
この時点で、あなたはあなたの定義したアクションメソッド、selectImageFromPhotoLibrary(_:)に戻って、それの実装を完了することができます。
To implement the selectImageFromPhotoLibrary(_:) action method
selectImageFromPhotoLibrary(_:)アクションメソッドを実装するには
In
ViewController.swift, find theselectImageFromPhotoLibrary(_:)action method you added earlier.
ViewController.swiftにおいて、あなたが定義したselectImageFromPhotoLibrary(_:)アクションメソッドを見つけてください。It should look like this:
それはこのように見えるはずです:@IBAction func selectImageFromPhotoLibrary(_ sender: UITapGestureRecognizer) {}
In the method implementation, between the curly braces (
{}), add this code:
このメソッド実装において、波括弧({})の間に、このコードを加えてください:// Hide the keyboard.nameTextField.resignFirstResponder()
This code ensures that if the user taps the image view while typing in the text field, the keyboard is dismissed properly.
このコードが請け負うのは、テキスト欄にタイプしている間にユーザがイメージビューをタップしたならば、キーボードがきちんと片付けられることです。Add this code to create an image picker controller:
このコードを加えることでイメージピッカーコントローラを作成してください:// UIImagePickerController is a view controller that lets a user pick media from their photo library. (UIImagePickerControllerはビューコントローラで、ユーザに彼らの写真ライブラリからメディアを選ばせます。)let imagePickerController = UIImagePickerController()
Add this code:
このコードを加えます:// Only allow photos to be picked, not taken. (写真だけが選ばれるようにします、取得はされない)imagePickerController.sourceType = .photoLibrary
This line of code sets the image picker controller’s source, or the place where it gets its images. The
.photoLibraryoption uses the simulator’s camera roll.
このコード行は、イメージピッカーコントローラのソースを、またはそれがそれの画像を得るところの場所を、設定します。.PhotoLibraryオプションは、シミュレータのカメラロールを使います。The type of
imagePickerController.sourceTypeis known to beUIImagePickerControllerSourceType, which is an enumeration. This means you can write its value as the abbreviated form.photoLibraryinstead ofUIImagePickerControllerSourceType.photoLibrary. Recall that you can use the abbreviated form anytime the enumeration value’s type is already known.
imagePickerController.sourceTypeの型はimagePickerController.sourceTypeとして知られます、それは列挙です。これが意味するのは、あなたがその値をUIImagePickerControllerSourceType.PhotoLibraryではなく省略形.PhotoLibraryを使って書けるということです。思い出してください、あなたはその列挙値の型がすでに知られているときはいつでも省略形を使うことができます。Add this code to set the image picker controller’s delegate to
ViewController:
このコードを加えることでイメージピッカーコントローラの委任先をViewControllerに設定してください。// Make sure ViewController is notified when the user picks an image. (ユーザが画像を選んだときにViewControllerが通知をうけることを確実にします)imagePickerController.delegate = self
Below the previous line, add this line of code:
前の行の下に、このコード行を加えてください:present(imagePickerController, animated: true, completion: nil)
present(_:animated:completion:)is a method being called onViewController. Although it’s not written explicitly, this method is executed on an implicitselfobject. The method asksViewControllerto present the view controller defined byimagePickerController. Passingtrueto theanimatedparameter animates the presentation of the image picker controller. Thecompletionparameter refers to a completion handler, a piece of code that executes after this method completes. Because you don’t need to do anything else, you indicate that you don’t need to execute a completion handler by passing in nil.
と言ってもそれは明示的には書かれません、このメソッドは暗黙的なselfオブジェクトで実行されます。このメソッドがViewControllerに尋ねることはimagePickerControllerによって定義されるビューコントローラが存在するかです。trueをanimatedパラメータに渡すと、イメージピッカーコントローラの実演を動画にします。completionパラメータは、完了ハンドラを参照します、それはこのメソッドが完了した後に実行されるコード片です。あなたは何もする必要はないので、あなたが完了ハンドラを実行する必要がないことをnilを渡すことによって示します。
Your selectImageFromPhotoLibrary(_:) action method should look like this:
あなたのselectImageFromPhotoLibrary(_:)アクションメソッドはこのようなものに見えるはずです:
@IBAction func selectImageFromPhotoLibrary(_ sender: UITapGestureRecognizer) {// Hide the keyboard.nameTextField.resignFirstResponder()// UIImagePickerController is a view controller that lets a user pick media from their photo library. (UIImagePickerControllerはビューコントローラで、ユーザに彼らの写真ライブラリからメディアを選ばせます。)let imagePickerController = UIImagePickerController()// Only allow photos to be picked, not taken. (写真だけが選ばれるようにします、取得はされない)imagePickerController.sourceType = .photoLibrary// Make sure ViewController is notified when the user picks an image. (ユーザが画像を選んだときにViewControllerが通知をうけることを確実にします)imagePickerController.delegate = selfpresent(imagePickerController, animated: true, completion: nil)}
After an image picker controller is presented, you interact with it through the delegate methods. To give users the ability to select a picture, you’ll need to implement two of the delegate methods defined in UIImagePickerControllerDelegate:
イメージピッカーコントローラが提供されてから後は、あなたはそれとデリゲートメソッドを通して相互作用します。ユーザに図像を選ぶ能力を与えるために、あなたが実装する必要があるのはUIImagePickerControllerDelegateにおいて定義した委任先メソッド2つです:
func imagePickerControllerDidCancel(_ picker: UIImagePickerController)func imagePickerController(_ picker: UIImagePickerController, didFinishPickingMediaWithInfo info: [String : Any])
The first of these, imagePickerControllerDidCancel(_:), gets called when a user taps the image picker’s Cancel button. This method gives you a chance to dismiss the UIImagePickerController (and optionally, do any necessary cleanup).
これらの最初のもの、imagePickerControllerDidCancel(_:)が呼ばれるのは、ユーザがイメージピッカーの「キャンセル」ボタンをタップした時です。このメソッドはあなたにUIImagePickerControllerを片付ける機会を与えます(そして随意に、何らかの不可欠な掃除を行います)。
To implement the imagePickerControllerDidCancel(_:) method
imagePickerControllerDidCancel(_:)メソッドを実装するには
In
ViewController.swift, right above the//MARK: Actionssection, add the following:
ViewController.swiftにおいて、//MARK: Actions部分のちょうど上に、以下を加えてください://MARK: UIImagePickerControllerDelegate
This is a comment to help you (and anybody else who reads your code) navigate through your code and identify that this section applies to the image picker implementation.
これはコメントであって、あなた(そしてあなたのコードを読む他の誰でも)があなたのコードをあちこち見ていく手助けをするもので、この部分がイメージピッカー実装に適用されるとわかるようにします。Below the comment you just added, add the following method:
あなたがたった今加えたコメントの下に、以下のメソッドを加えてください:func imagePickerControllerDidCancel(_ picker: UIImagePickerController) {}
In this method, add the following line of code:
このメソッドにおいて、以下のコード行を加えてください:// Dismiss the picker if the user canceled. // (ユーザがキャンセルした場合ピッカーを片付ける。)dismiss(animated: true, completion: nil)
This code animates the dismissal of the image picker controller.
このコードは、イメージピッカーコントローラの退去をアニメーションにします。
Your imagePickerControllerDidCancel(_:) method should look like this:
あなたのimagePickerControllerDidCancel(_:)メソッドはこのように見えるはずです:
func imagePickerControllerDidCancel(_ picker: UIImagePickerController) {// Dismiss the picker if the user canceled. // (ユーザがキャンセルした場合ピッカーを片付ける。)dismiss(animated: true, completion: nil)}
The second UIImagePickerControllerDelegate method that you need to implement, imagePickerController(_:didFinishPickingMediaWithInfo:), gets called when a user selects a photo. This method gives you a chance to do something with the image or images that a user selected from the picker. In your case, you’ll take the selected image and display it in your image view.
あなたが実装する必要のある2番目のUIImagePickerControllerDelegateメソッド、imagePickerController(_:didFinishPickingMediaWithInfo:)が呼ばれるのは、ユーザがある写真を選択した時です。このメソッドはあなたにある機会を与えるので、それで何かをユーザがピッカーから選択した画像または複数の画像を使って行います。あなたの場合では、あなたは選択された画像を取得してそれをあなたのイメージビューに表示します。
To implement the imagePickerController(_:didFinishPickingMediaWithInfo:) method
imagePickerController(_:didFinishPickingMediaWithInfo:)メソッドを実装するには
Below the
imagePickerControllerDidCancel(_:)method, add the following method:
imagePickerControllerDidCancel(_:)メソッドの下に、以下のメソッドを加えてください:func imagePickerController(_ picker: UIImagePickerController, didFinishPickingMediaWithInfo info: [String : Any]) {}
In this method, add the following line of code:
このメソッドにおいて、以下のコード行を加えてください:// The info dictionary may contain multiple representations of the image. You want to use the original. (インフォディクショナリは、この画像の複数の表現を格納するかもしれません。オリジナルを使ってはどうでしょう。)guard let selectedImage = info[UIImagePickerControllerOriginalImage] as? UIImage else {fatalError("Expected a dictionary containing an image, but was provided the following: \(info)")}
The
infodictionary always contains the original image that was selected in the picker. It may also contain an edited version of that image, if one exists. To keep things simple, you’ll use the original, unedited image for the meal photo.
infoディクショナリは、常にピッカーにおいて選択されたオリジナル画像を含みます。それはまたその画像の編集されたバージョンを含むかもしれません、それが存在するならば。物事を単純に保つために、あなたはオリジナル、食事写真の無編集画像を使います。This code accesses the original, unedited image from the
infodictionary. It safely unwraps the optional returned by the dictionary and casts it as aUIImageobject. The expectation is that the unwrapping and casting operations will never fail. If they do, it represents either a bug in your app that needs to be fixed at design time. ThefatalError()method logs an error message to the console, including the contents of theinfodictionary, and then causes the app to terminate—preventing it from continuing in an invalid state.
このコードは、オリジナル、未編集画像にinfoディクショナリからアクセスします。それはディクショナリによって返されるオプショナルを安全にアンラップして、それをUIImageオブジェクトとしてキャストします。期待されることは、アンラップおよびキャスト操作が決して失敗しないことになります。それらがそうするならば、それはどちらもあなたのアプリでのバグ(不具合)に相当し、それは設計時に修正される必要があります。fatalError()メソッドは、infoディクショナリの内容を含めて、エラーメッセージをコンソールに記録して、それからアプリの終了を引き起こします — それが不正な状態で続けるのを妨げます。Add this line of code to set the selected image in the image view outlet that you created earlier:
このコード行を加えて、選択された画像をあなたが以前に作成したイメージビューアウトレットの中に設定してください:// Set photoImageView to display the selected image. (photoImageViewを選択された画像を表示するよう設定する。)photoImageView.image = selectedImage
Add the following line of code to dismiss the image picker:
以下のコード行を加えて、イメージピッカーを片付けてください:// Dismiss the picker.dismiss(animated: true, completion: nil)
Your imagePickerController(_:didFinishPickingMediaWithInfo) method should look like this:
あなたのimagePickerController(_:didFinishPickingMediaWithInfo)メソッドはこのようなものに見えるはずです:
func imagePickerController(_ picker: UIImagePickerController, didFinishPickingMediaWithInfo info: [String : Any]) {// The info dictionary may contain multiple representations of the image. You want to use the original. (インフォディクショナリは、この画像の複数の表現を格納するかもしれません。オリジナルを使ってはどうでしょう。)guard let selectedImage = info[UIImagePickerControllerOriginalImage] as? UIImage else {fatalError("Expected a dictionary containing an image, but was provided the following: \(info)")}// Set photoImageView to display the selected image. (photoImageViewを選択された画像を表示するよう設定する。)photoImageView.image = selectedImage// Dismiss the picker.dismiss(animated: true, completion: nil)}
Checkpoint: Run your app. What happens when you click on the image view?
確認点:あなたのアプリを実行します。あなたがイメージビューの上でクリックするとき何が起こるでしょう?
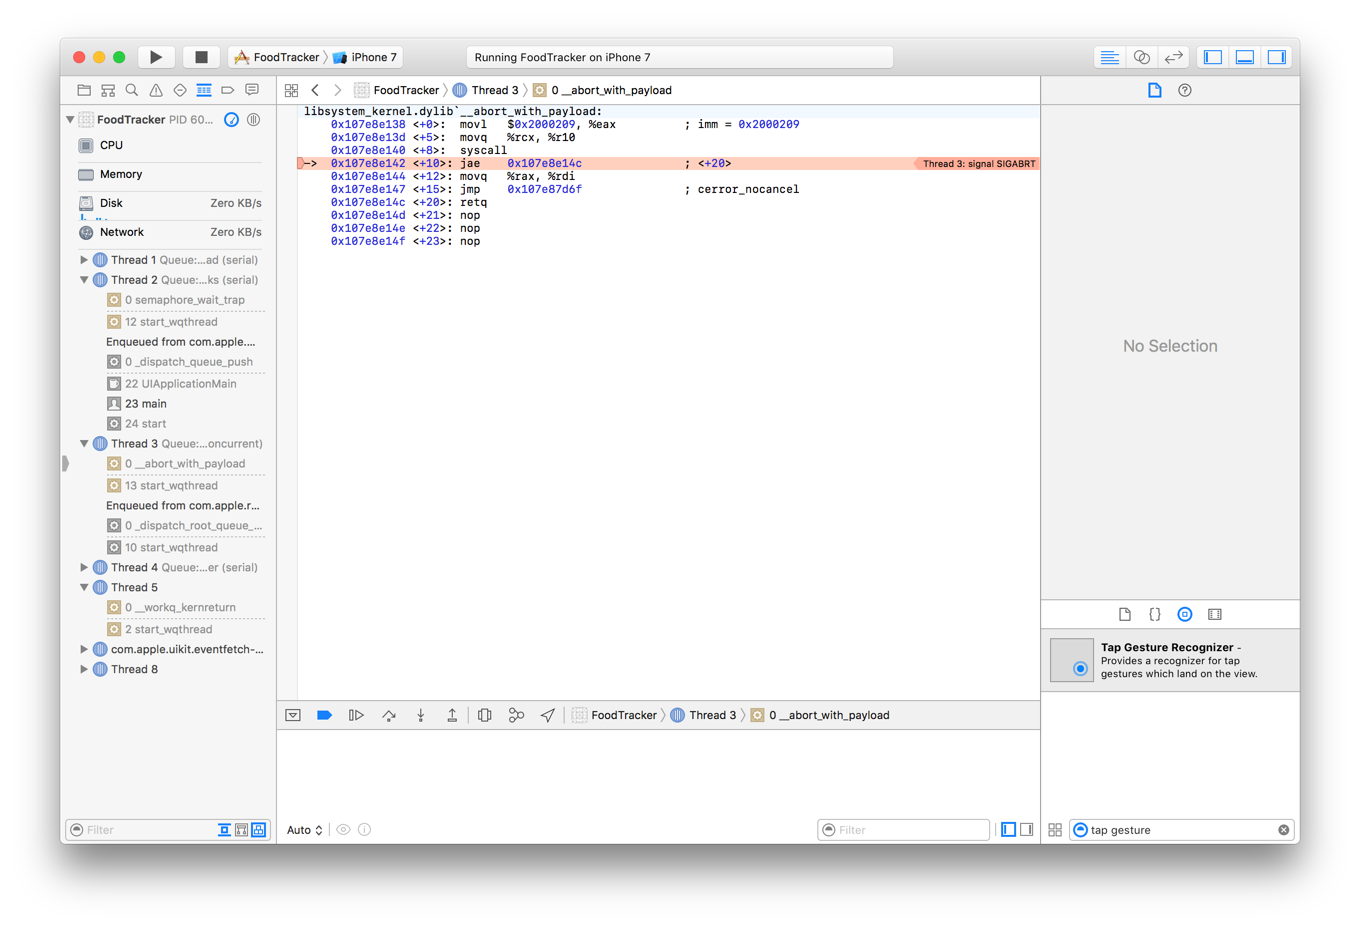
The app terminates with a SIGABRT signal. This means an error occurred that was serious enough to cause the app to abort. In this case, the problem occurs when you attempt to present the image picker. The system must ask the user for permission before accessing their photo library. In iOS 10 and later, you must provide a photo library usage description. This description explains why your app wants to access the photo library.
アプリは、SIGABRTシグナルで終了します。これは、あるエラーが起こり、それはアプリ中断の原因となるのに十分に重大だったことを意味します。この場合には、問題はあなたがイメージピッカーを生じさせようと試みるとき起こります。システムは、ユーザに彼らのフォトライブラリにアクセスする前に許可を求めなければなりません。iOS 10以降では、あなたはフォトライブラリ使用説明を提供しなければなりません。この説明は、なぜあなたのアプリがフォトライブラリにアクセスしたいのかを説明します。
To add a photo library usage description
フォトライブラリ使用説明を加えるには
In the project navigator, select
Info.plist.
プロジェクトナビゲータにおいて、Info.plistを選びます。Xcode displays the property list editor in the editor area. A property list is a structured text file that contains essential configuration information about your app. The root of the property list is a dictionary that holds a set of predefined keys and their values.
Xcodeは、プロパティリストエディタをエディタ区画で表示します。プロパティリストは、構造化されたテキストファイルで、あなたのアプリについての本質的設定情報を含みます。プロパティリストのルートは1つのディクショナリで、ひとそろいのあらかじめ設定されたキーとそれらの値を保持します。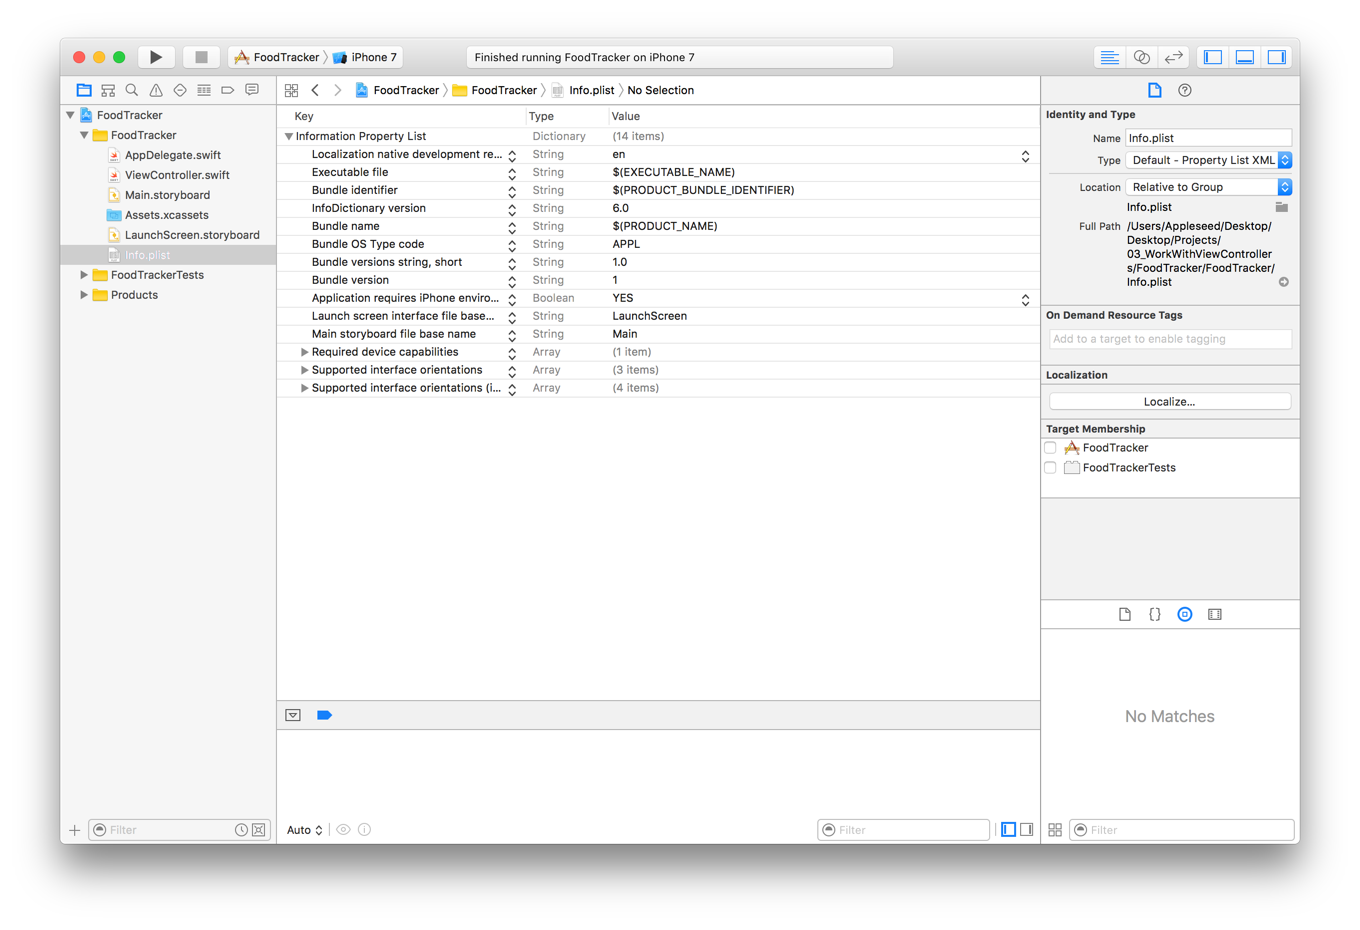
If the last item in the property list is an array, make sure the array is collapsed. If you add an item to an expanded array, it adds a child item. If you add an item to a collapsed array, it adds a sibling to the array.
プロパティリストの中の最後の項目が配列ならば、その配列が折りたたまれることを確認してください。あなたがある項目を展開された配列に加えるならば、それは子項目として加わります。あなたがある項目を折りたたまれた配列に加えるならば、それはその配列の兄弟として加わります。To add a new item, hover over the last item in the property list, and click on the add button when it appears (or select Editor > Add Item).
新しい項目を加えるには、プロパティリストの最後の項目上でマウスカーソルを動かして、追加ボタンをそれが現れたらクリックしてください(またはEditor > Add Itemを選択してください)。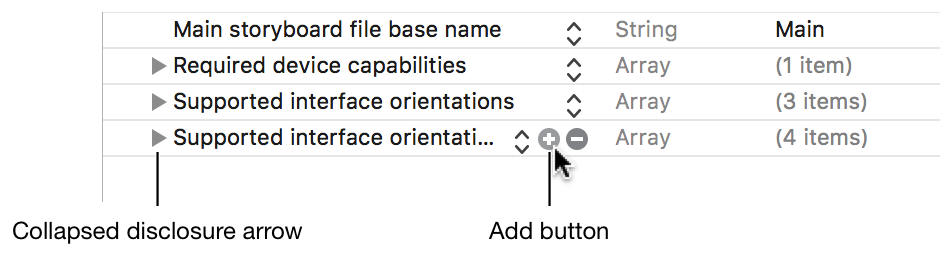
In the pop-up menu, scroll down and choose Privacy - Photo Library Usage Description.
ポップアップメニューにおいて、下にスクロールしてPrivacy - Photo Library Usage Descriptionを選んでください。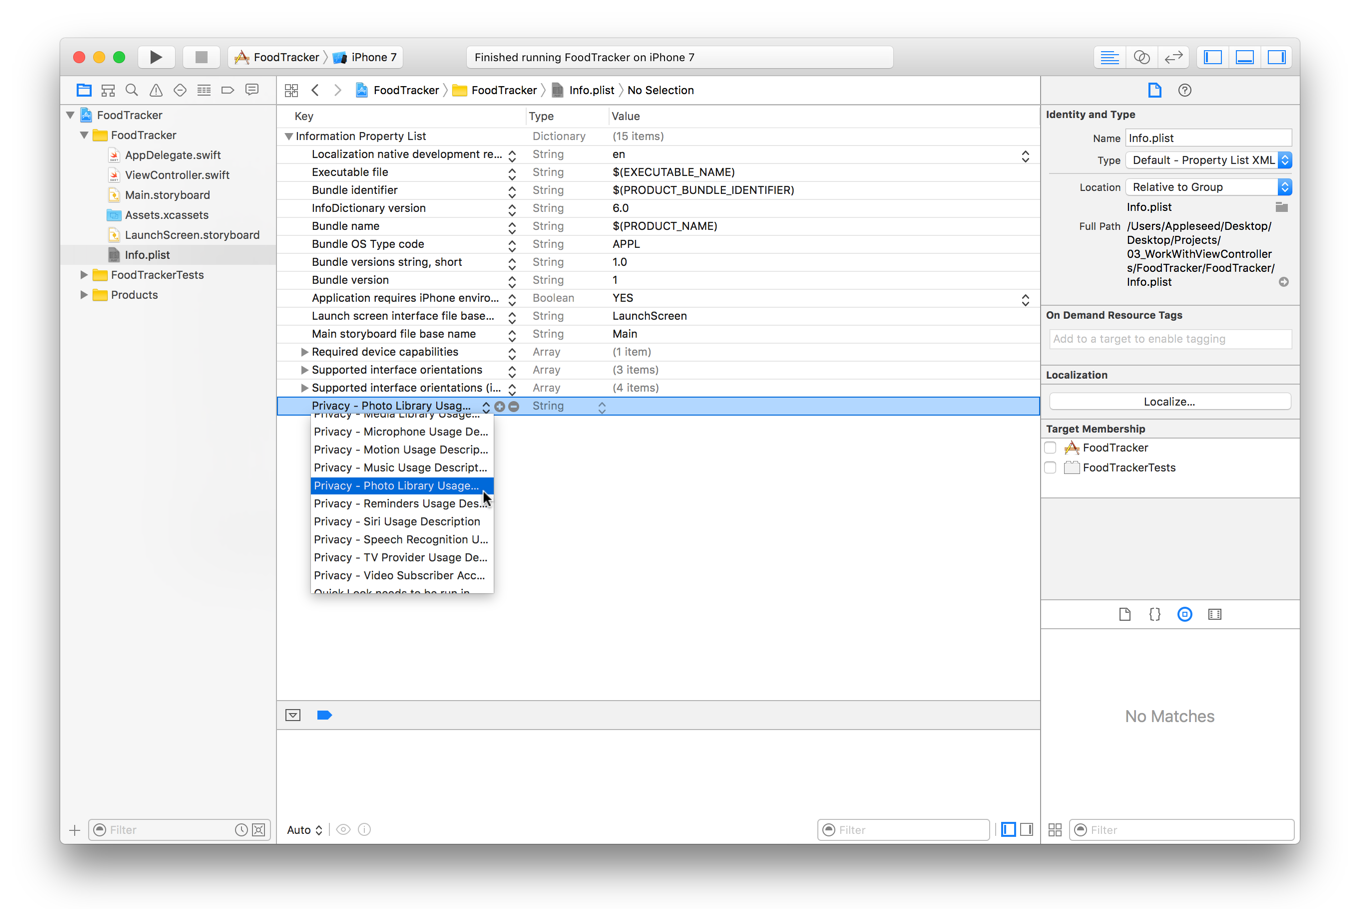
In the new row, make sure the Type is set to String. Then, double-click on the Value section and enter
Allows you to add photos to your meals.
新しい列において、TypeがStringに設定されることを確認してください。それから、ValueセクションをダブルクリックしてAllows you to add photos to your mealsを入力してください。
Press the Return key when you are done editing the description string.
Returnキーを、あなたが説明文字列の編集を終えたならば押してください。
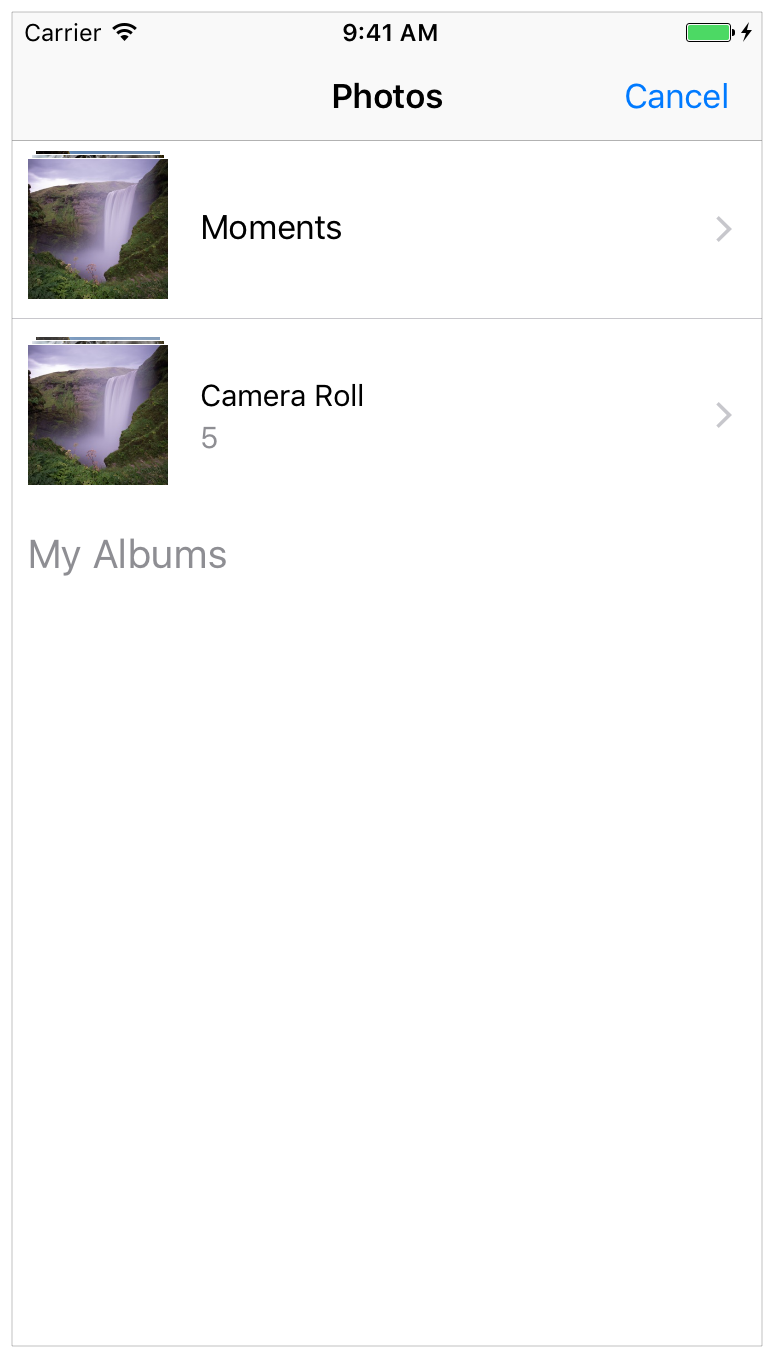
Checkpoint: Run your app again. This time you should be able to click the image view to pull up an image picker. You’ll need to click OK on the alert that asks for permission to give the FoodTracker app access to Photos. Then, you can click the Cancel button to dismiss the picker, or open Camera Roll and click an image to select it and set it as the image in the image view.
確認点:再びあなたのアプリを実行します。今度は、あなたはイメージビューをクリックしてイメージピッカーをプルアップできなければなりません。あなたは、FoodTrackerアプリをPhotosにアクセスさせるよう許可を求める警告上でOKをクリックする必要があるでしょう。そのとき、あなたはCancelボタンをクリックしてピッカーを片付けることができます、またはCamera Rollを開いてひとつの画像をクリックしてそれを選択し、それをイメージビューの中の画像として設定することができます。
If you look through the photos available in the simulator, you’ll notice that it doesn’t include any photos of food. You can add your own images directly into the simulator to test the FoodTracker app with appropriate sample content. You can find a sample image within the Images/ folder of the downloadable file at the end of this lesson, or use your own image.
あなたが利用可能な写真をあちこちシミュレータにおいて見るならば、あなたは食事の写真を何ら含まないことに気づくでしょう。あなたはあなた独自の画像を直接にシミュレータへと加えて、FoodTrackerアプリを適切なサンプル内容でテストすることができます。あなたは、見本画像をこのレッスンの終わりでダウンロード可能なファイルのImages/フォルダ内で見つけることができます、またはあなた独自の画像を使うことができます。
To add images to iOS Simulator
iOSシミュレータに画像を加えるには
If necessary, run your app in the simulator.
必要なら、あなたのアプリをシミュレータにおいて実行してください。On your computer, select the images you want to add.
あなたのコンピュータ上で、あなたが追加したい画像を選択します。Drag and drop the images into the simulator.
画像をシミュレータへとドラッグ&ドロップしてください。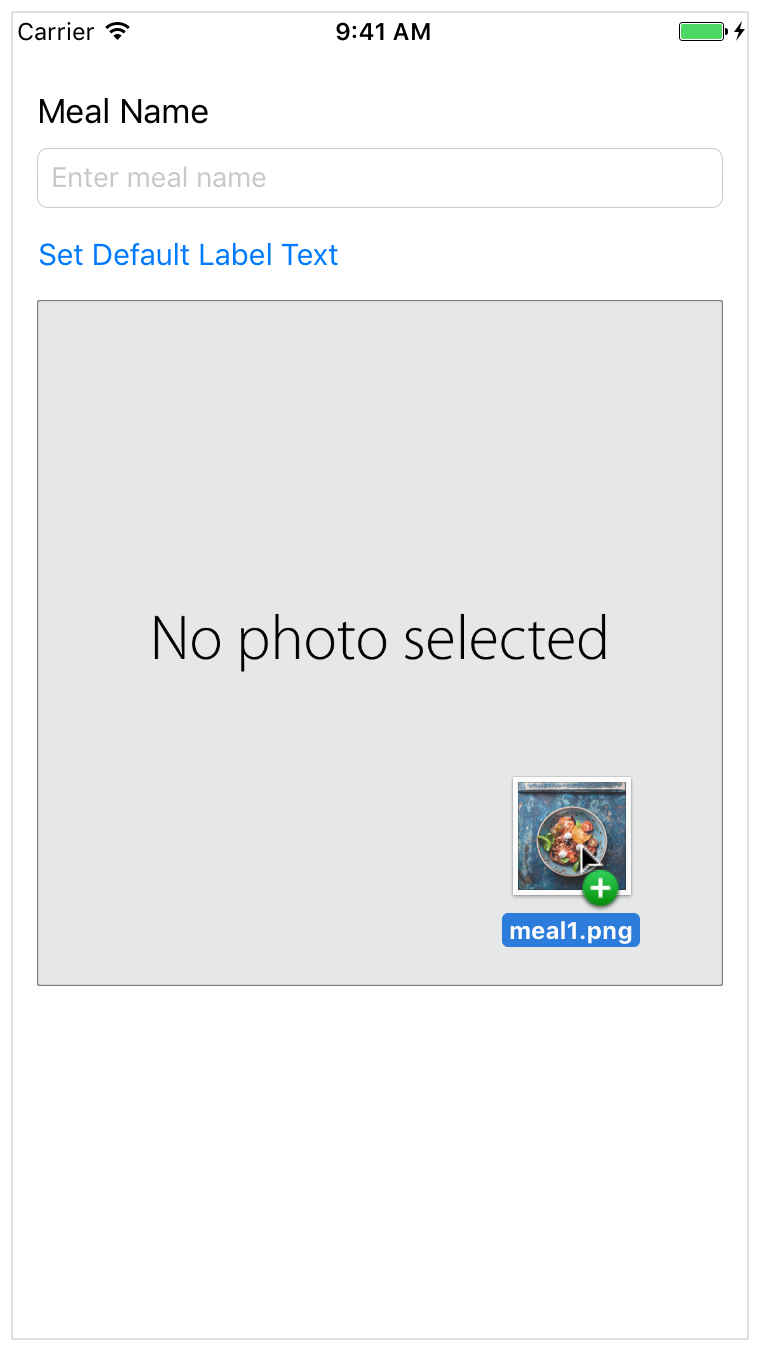
The simulator opens the Photos app and shows the images you added.
シミュレータは、Photosを開いてあなたが加えた画像を表示します。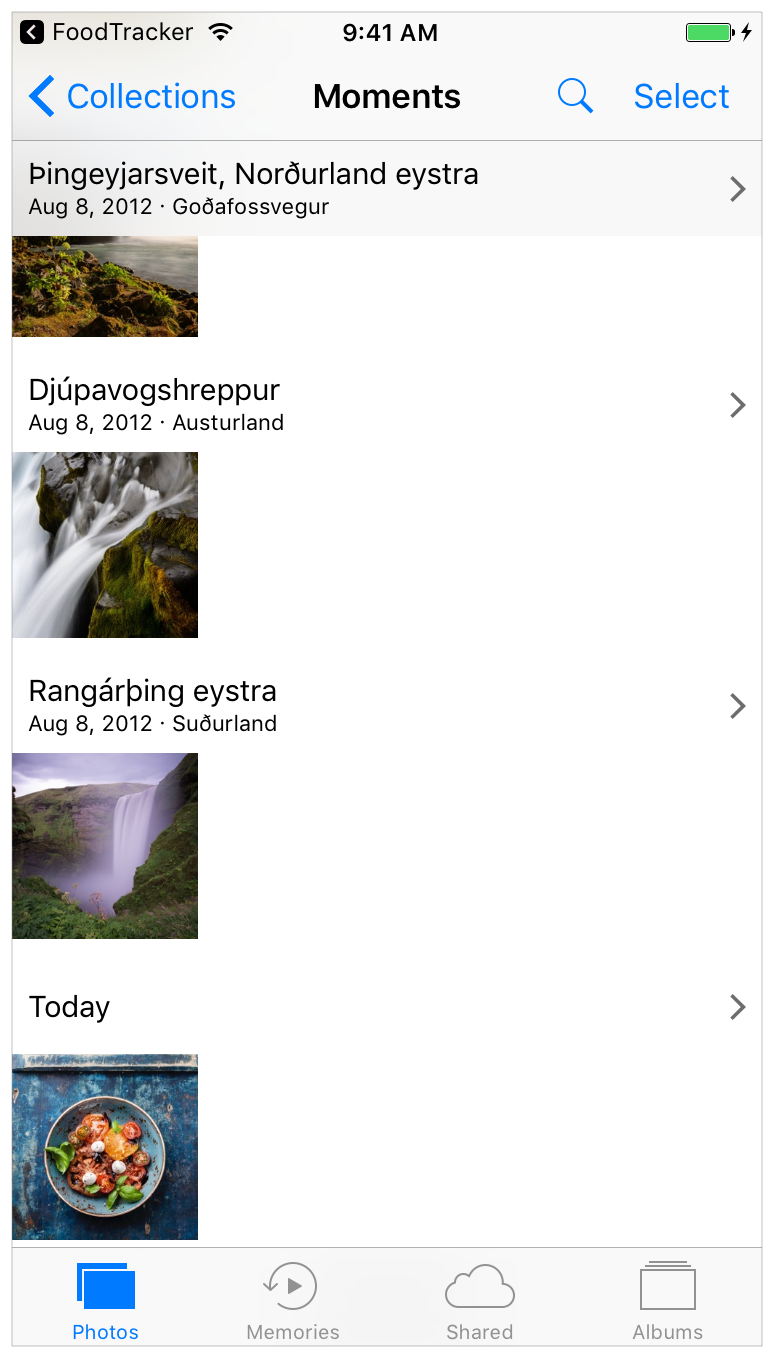
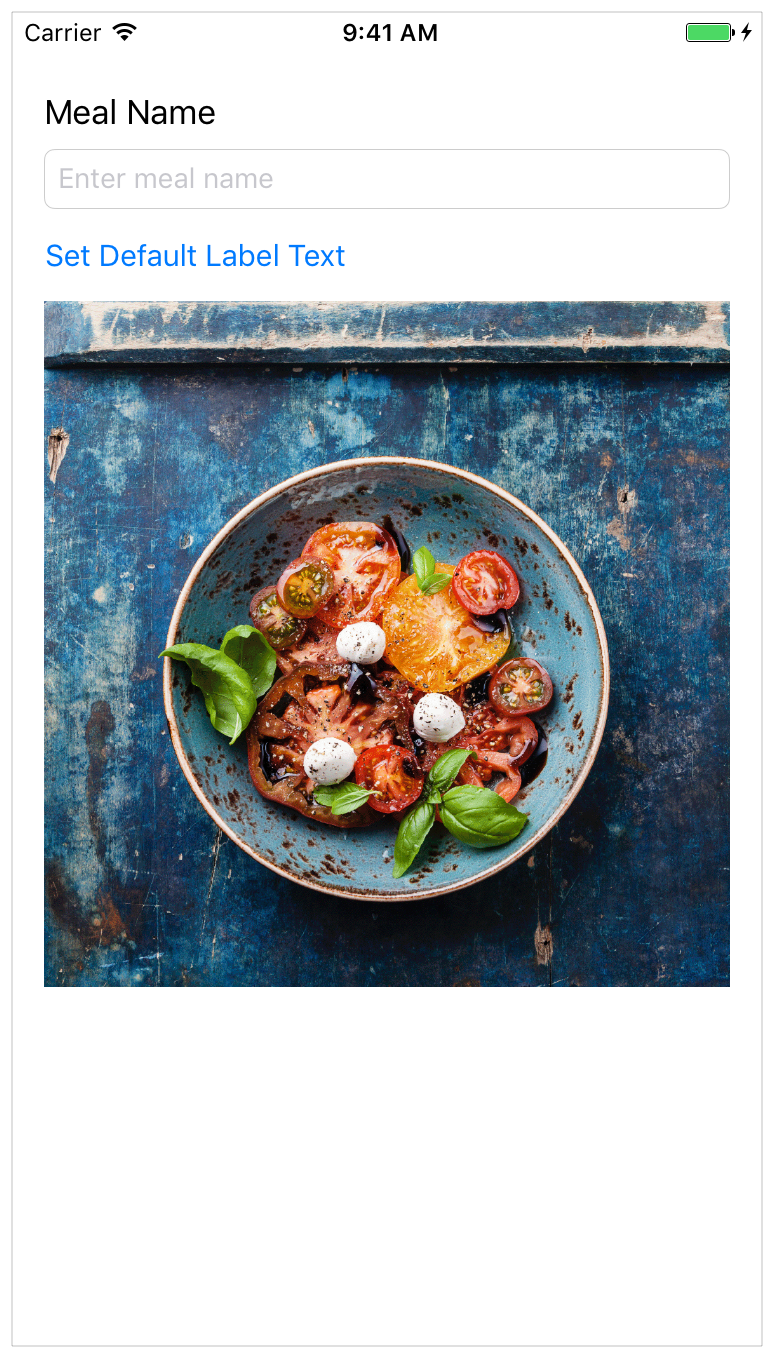
Checkpoint: Run your app. You should be able to tap the image view to pull up an image picker. Open Camera Roll, and click one of the images you added to the simulator to select it and set it as the image in the image view.
確認点:あなたのアプリを実行します。あなたは、イメージビューをタップしてイメージピッカーをプルアップできなければなりません。Camera Rollを開いて、あなたがシミュレータへ加えた画像の1つをクリックすることでそれを選択して、それをイメージビューの中の画像として設定してください。
Wrapping Up
まとめ
In this lesson, you’ve learned about the view controller life cycle methods, and used them to configure your view controller’s content. You’ve also learned how to add gesture recognizers to a view, and how to select photos from the photo library. The scene is starting to look like a real app. In the next lesson, you’ll add a custom control to the scene.
このレッスンでは、あなたはいくつかのビューコントローラライフサイクルメソッドについて学びました、そしてそれらを使ってあなたのビューコントローラの持つ内容を構成しました。あなたはまた、ジェスチャリコグナイザをビューに加える方法と、フォトライブラリから写真を選択する方法を学びました。シーンは、本物のアプリのように始まっています。次のレッスンでは、あなたはあつらえのコントロールをシーンに加えることになります。
Connect the UI to Code
UIをコードに接続する
Copyright © 2016 Apple Inc. All rights reserved. Terms of Use | Privacy Policy | Updated: 2016-12-08