

Implement Edit and Delete Behavior
編集および削除挙動の実装
In this lesson, you focus on adding behavior that allows the user to edit and delete meals in the FoodTracker app.
このレッスンでは、あなたは挙動を追加することに集中します、それはユーザにFoodTrackerアプリにおいて食事の編集と削除を可能にするものです。
Learning Objectives
学習する目標
At the end of the lesson, you’ll be able to:
このレッスンの終わりに、あなたが出来るようになるのは:
Differentiate between push and modal navigation
プッシュナビゲーションとモーダルナビゲーションの間の違いがわかるDismiss view controllers based on their presentation style
ビューコントローラをそれらの表現形式に基づいて片付けるUse segue identifiers to determine which segue is occurring
セグエ識別子を使って、どのセグエが現れているか確かめるEnable a table view controller’s editing mode.
テーブルビューコントローラの持つ編集モードを有効にする。
Enable Editing of Existing Meals
既存の食事の編集を可能にする
Currently, the FoodTracker app gives users the ability to add a new meal to a list of meals. In this lesson, you’ll enable the editing of existing meals.
目下、FoodTrackerアプリは、ユーザに新しい食事を食事リストに加える能力を与えます。このレッスンにおいて、あなたは既存の食事の編集を可能にします。
When the user tap on a meal in the list scene, you’ll display that meal in the detail scene. The user can then makes changes to the meal. If they tap the Save button, you’ll update both the meal’s data in the model and its appearance in the meal list. Note that this won’t save the model data. Every time the app launches, it starts over with the initial sample data. Still, the user can modify the data while the app is running.
ユーザがある食事をリストシーンにおいてタップする時、あなたはその食事を詳細シーンにおいて表示します。ユーザは、それから変更をその食事に行うことができます。彼らがSaveボタンをタップするならば、あなたは食事の持つデータをモデルにおいて、そしてそれの外観を食事リストにおいて更新します。注意してください、これはモデルデータを保存しません。アプリが起動するたびごとに、それは初期見本データで最初からやり直します。それでも、ユーザはアプリが実行している間にデータを修正できます。
Start by setting up the segues between meal list items and the meal detail scene.
食事リスト項目と食事詳細シーンの間のセグエを準備することで始めてください。
To configure the table view cell
テーブルビューセルを構成するには
If the assistant editor is open, return to the standard editor by clicking the Standard button.
アシスタントエディタが開いているならば、標準エディタにStandardボタンをクリックすることで戻ってください。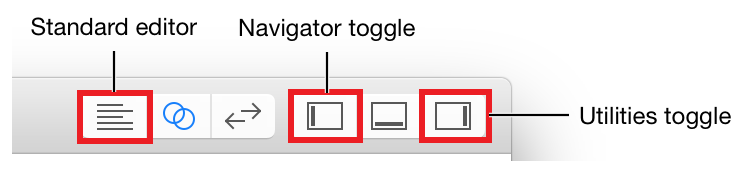
Open your storyboard,
Main.storyboard.
あなたのストーリーボード、Main.storyboardを開いてください。On the canvas, select the table view cell in the meal list (Your Meals) scene.
キャンバス上で、テーブルビューセルを食事リスト(Your Meals)シーンにおいて選択してください。Control-drag from the table view cell to the meal detail scene.
そのテーブルビューセルから食事詳細シーンへとコントロール-ドラッグしてください。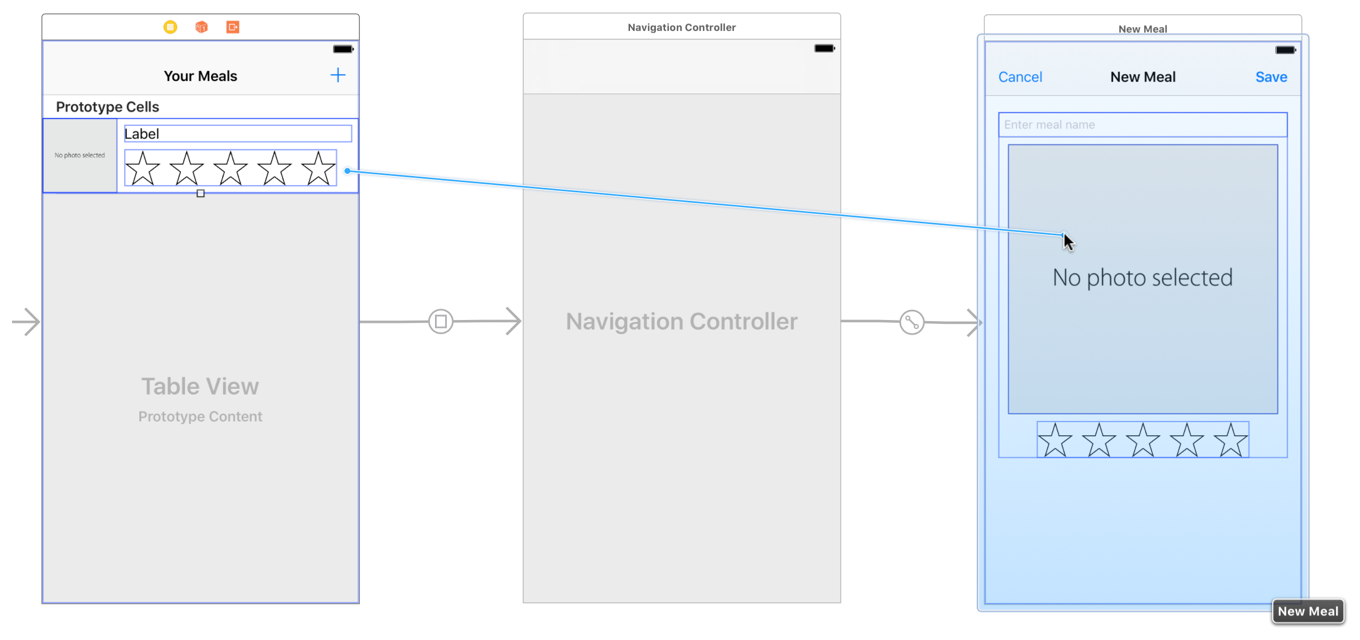
A shortcut menu titled Selection Segue appears in the location where the drag ended.
Selection Segue(セグエを選択)とタイトルを付けられるショートカットメニューが、ドラッグが終わったところに現れます。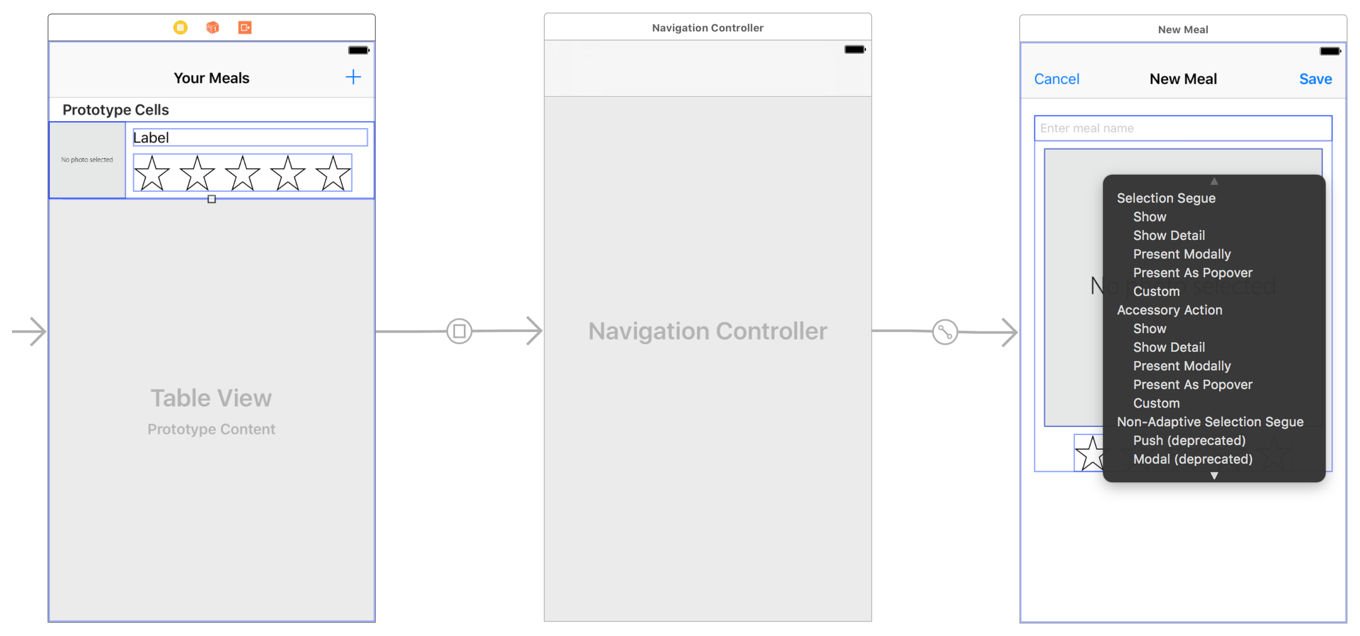
Choose Show from the Selection Segue menu. This causes the navigation controller to push the meal detail scene onto the navigation controller’s stack.
ShowをSelection Segueメニューから選んでください。これはナビゲーションコントローラに、食事詳細シーンをナビゲーションコントローラの持つスタック上へプッシュさせます。Drag down the navigation controller between the meal list scene and the meal detail scene so you can see the new segue.
ナビゲーションコントローラを食事シーンリストと食事詳細シーンとの間でドラッグして引き下げてください、それであなたは新しいセグエを見ることができます。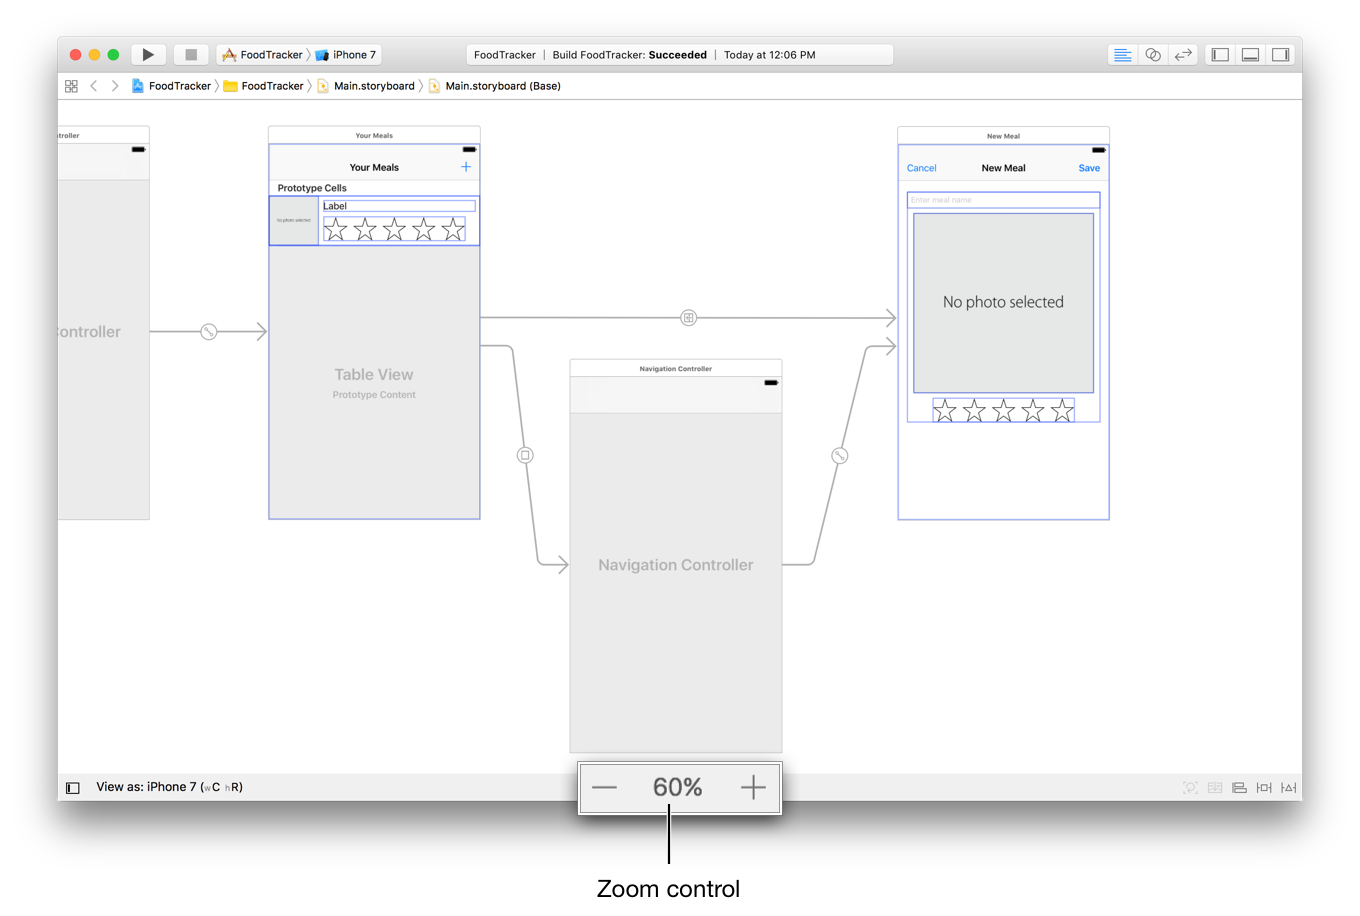
If you want, you can zoom out using the zoom command at the bottom of the canvas.
あなたが望むならば、あなたはズームコマンドをキャンバスの一番下で使って表示を拡大縮小できます。On the canvas, select the newly added segue (the segue that runs directly from the meal list (Your Meals) scene to the meal detail (New Meal) scene).
キャンバス上で、新しく追加されたセグエを選択してください(食事リスト(Your Meals)シーンから食事詳細(New Meal)シーンまで直接に駆けつけるセグエ)。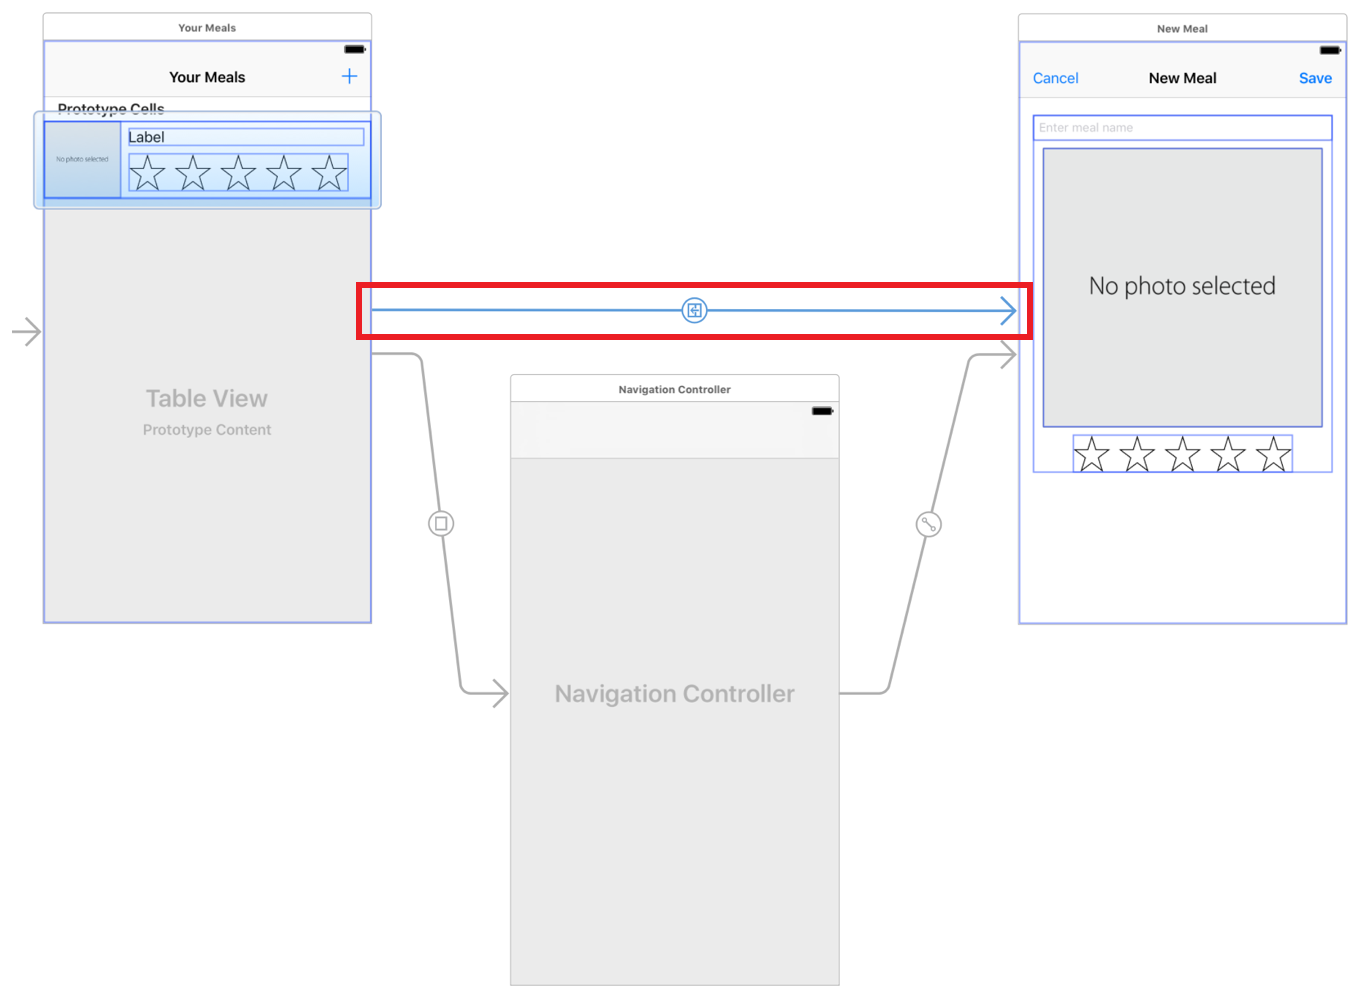
In the Attributes inspector, type
ShowDetailin the Identifier field. Press Return.
Attributesインスペクタにおいて、ShowDetailをIdentifier(識別子)欄にタイプしてください。リターンキーを押します。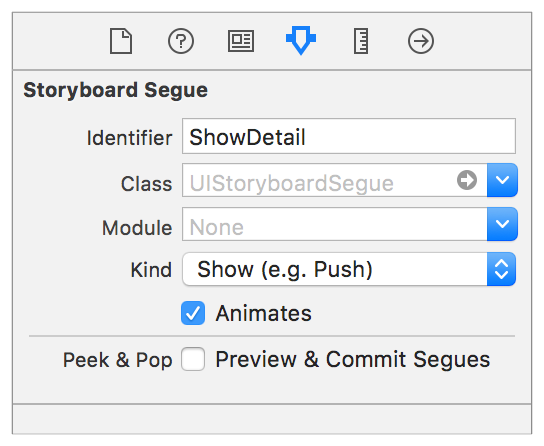
You use the identifier when referring to the segue in code.
あなたは、コードにおいてセグエを参照するときにこの識別子を使います。
When the user taps a row in the meal list, this segue is triggered. The segue pushes the view controller for the meal detail scene onto the navigation stack that contains the meal list scene. The app then animates the transition from the meal list scene to the meal detail scene.
ユーザが食事リストの中のある列をタップする時、このセグエが引き起こされます。セグエは、食事詳細シーンのためのビューコントローラを、食事リストシーンを含むナビゲータースタック上へとプッシュします(上重ねします)。アプリはそれから、食事リストシーンから食事詳細シーンへの推移をアニメーション表示します。
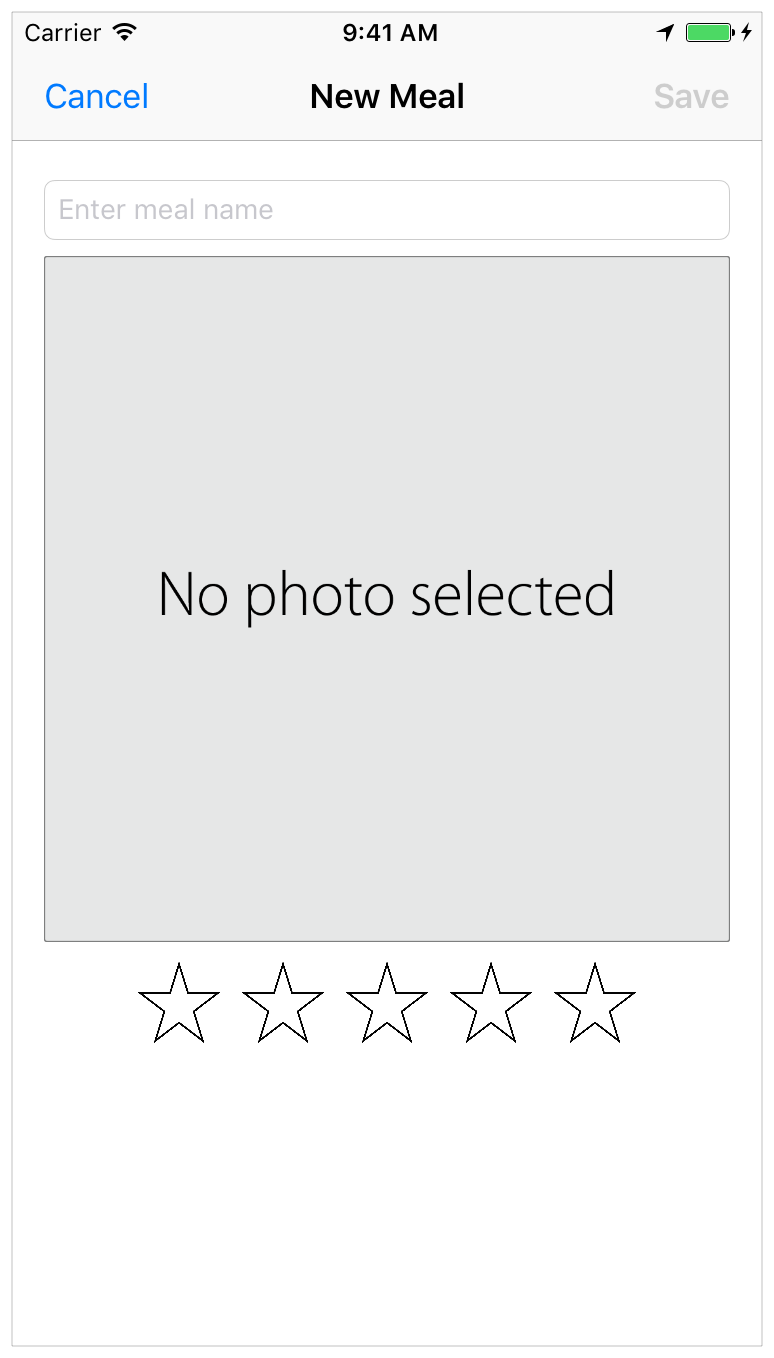
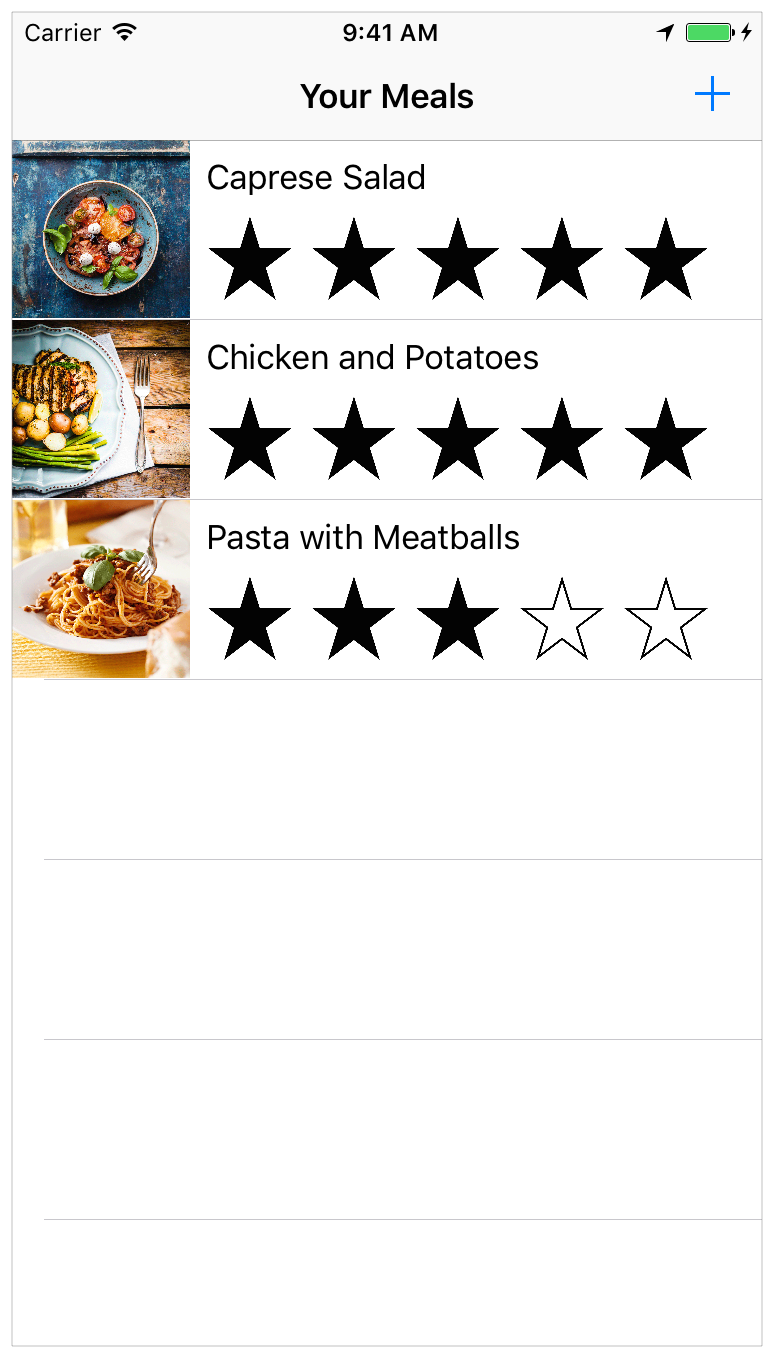
Checkpoint: Run your app. Tap on a meal from the meal list. The app navigates to the meal detail scene. Note: Unlike when you pushed a scene onto the navigation stack in the last lesson, the system does not automatically provide a back button. This is because you added your own bar button to the left side of the navigation bar.
確認点:あなたのアプリを実行してください。食事リストからある食事をタップしてください。アプリは、食事詳細シーンへと誘導します。注意:あなたが最後のレッスンにおいてシーンをナビゲータースタック上へとプッシュした時と違い、システムは自動的に戻るボタンを提供しません。これは、あなたがあなた独自のバーボタンをナビゲーターバーの左側へ追加したからです。
Creating new meals and editing existing meals are very similar operations. Therefore, you’ll use the same interface to perform both tasks. Of course, you’ll need to make some modifications both to the scene’s appearance and its behavior. You need a way to identify when the user is adding a new meal and when they are editing an existing one.
新しい食事の作成と既存の食事の編集は、大変よく似た操作です。それゆえに、あなたは同じインターフェイスを両方の作業を実行するのに使います。もちろん、あなたは幾つかの修正を、シーンの持つ外観とそれの挙動の両方にする必要があります。あなたは、ユーザが新しい食事を追加している時と彼らが既存のものを編集している時を識別する方法が必要です。
Recall from earlier that the prepare(for:sender:) method is called before any segue gets executed. You can use this method to identify which segue is occurring, and display the appropriate information in the meal detail scene. You’ll differentiate the segues based on the identifiers you assign to them: AddItem when adding new meals and ShowDetail when editing an existing meal.
初めの方を思い出してください、prepare(for:sender:)メソッドは何らかのセグエが実行される前に呼ばれます。あなたはこのメソッドを使って、どのセグエが生じているのか識別して、適切な情報を食事詳細シーンにおいて表示することができます。あなたは、セグエをあなたがそれらに割り当てる識別子:新しい食事を割り当てる時のAddItemと既存の食事を編集する時のShowDetailに基づいて区別します。
To identify which segue is occurring
どのセグエが生じているかを識別するには
Open
MealTableViewController.swift.
MealTableViewController.swiftを開いてください。At the top of the file, immediately following the import of UIKit, import the unified logging system.
ファイルの一番上で、UIKitのインポートにすぐ続けて、統合ログシステムをインポートしてください。import os.log
In
MealTableViewController.swift, find and uncomment theprepareForSegue(_:sender:)method. (To uncomment the method, remove the/*and*/characters surrounding it.)
MealTableViewController.swiftにおいて、prepareForSegue(_:sender:)メソッドを見つけてコメントを外してください。(メソッドのコメントを外すには、それを囲んでいる/*と*/文字を削除します。)After you do that, the template implementation looks like this:
あなたがこれをした後、ひな形実装はこのように見えます://MARK: - Navigation// In a storyboard-based application, you will often want to do a little preparation before navigation (ストーリーボードに基づくアプリケーションにおいて、あなたはしばしばナビゲーションの前に少し準備したいでしょう)override func prepareForSegue(segue: UIStoryboardSegue, sender: AnyObject?) {// Get the new view controller using segue.destinationViewController. (新規ビューコントローラをsegue.destinationViewControllerを使って得てください。)// Pass the selected object to the new view controller. (選択されたオブジェクトを新規ビューコントローラに渡してください。)}
Because
MealTableViewControlleris a subclass ofUITableViewController, the template implementation comes with a skeleton forprepare(for:sender:).
MealTableViewControllerがUITableViewControllerのサブクラスであることから、雛形実装はprepare(for:sender:)のための骨格を備えています。Delete the two lines of comments, and replace them with a call to the superclass’s implementation.
2つのコメント行を削除してください、そしてそれらをスーパークラスの持つ実装への呼び出しと置き換えてください:super.prepare(for: segue, sender: sender)
After the call to
super.prepare(for:sender:), add thisswitchstatement:
super.prepare(for:sender:)への呼び出しの後に、このswitch文を加えてください:switch(segue.identifier ?? "") {}
A
switchstatement considers a value and compares it against several possible matching patterns. It then executes an appropriate block of code, based on the first pattern that matches successfully. Useswitchstatements instead ofifstatements when selecting between multiple options.
switch文はある値について検討して、それをいくつかの可能なマッチングパターンに対して比較します。それはそれから、成功裏にマッチする最初のパターンに基づいて、適切なコードのブロックを実行します。複数の選択肢から選ぶ場合、switch文をif文の代わりに使ってください。The code above examines the segue’s identifier. If the identifier is
nil, the nil-coalescing operator (??) replaces it with an empty string (""). This simplifies the switch statement’s logic, since you won’t need to deal with optionals inside the cases.
上のコードは、セグエの持つ識別子を吟味します。識別子がnilならば、nil合体演算子(??)はそれを空の文字列("")と置き換えます。これは、switch文の論理を簡単なものにします、あなたはケース節内のオプショナルを解決する必要があるからです。Add the
AddItemcase to the switch.
AddItemケース節をswichに加えてください。case "AddItem":os_log("Adding a new meal.", log: OSLog.default, type: .debug)
If the user is adding an item to the meal list, you don’t need to change the meal detail scene’s appearance. Just log a simple debug message to the console. This will help you track the app’s flow if you have to debug your code.
ユーザが項目を食事リストに加えているならば、あなたは食事詳細シーンの外観を変える必要はありません。単に簡単なデバッグメッセージをコンソールに記録してください。これは、あなたがあなたのコードをデバッグしなければならないならば、あなたがアプリのフローを追跡する助けとなります。Add the
ShowDetailcase to the switch.
ShowDetailケース節をswitchに加えてください。case "ShowDetail":guard let mealDetailViewController = segue.destination as? MealViewController else {fatalError("Unexpected destination: \(segue.destination)")}guard let selectedMealCell = sender as? MealTableViewCell else {fatalError("Unexpected sender: \(sender)")}guard let indexPath = tableView.indexPath(for: selectedMealCell) else {fatalError("The selected cell is not being displayed by the table")}let selectedMeal = meals[indexPath.row]mealDetailViewController.meal = selectedMeal
If you are editing an existing meal, you need to display the meal’s data in the meal detail scene. This code starts by getting the destination view controller, the selected meal cell, and the index path of the selected cell. The guard statements check that all the downcasts work as expected, and all optionals contain non-
nilvalues. Here, the guard statements simply act as a sanity check. If your storyboard is set up correctly, none of theseguardstatements will fail.
あなたが既存の食事を編集しているならば、あなたは食事の持つデータを食事詳細シーンにおいて表示する必要があります。このコードは、デスティネーション(行先)ビューコントローラ、選択された食事セル、そして選択されたセルのインデックスパスを得ることによって始まります。guard文は、すべてのダウンキャストが正確に働くこと、そしてすべてのオプショナルが非nil値を含むことを点検します。ここで、guard文は単純に正常性検査として振舞います。あなたのストーリーボードが正しく準備されるならば、これらのguardのうちどれも失敗しないでしょう。As soon as you have the index path, you can look up the meal object for that path and pass it to the destination view controller.
あなたがインデックスパスを得るや否や、あなたはそのパスに対する食事オブジェクトを捜して、それを行先ビューコントローラに渡すことができます。Add the default case.
省略時の場合を加えてください。default:fatalError("Unexpected Segue Identifier; \(segue.identifier)")
Again, if your storyboard is set up correctly, the default case never executes. However, if you later add another segue from your Your Meals scene and forget to update the
prepare(for:sender:)method, the new segue’s identifier won’t match either theAddItemor theShowDetailcase. In this case, the switch statement prints an error message to the console and terminates the app.
再び、あなたのストーリーボードが正しく準備されるならば、defaultケース節は決して実行されません。しかしながら、あなたが後で別のセグエをあなたのYour Mealsシーンから追加して、prepare(for:sender:)メソッドを更新するのを忘れるならば、新しいセグエの持つ識別子はAddItemまたはShowDetailケース節のどちらとも一致しないでしょう。この場合には、switch文はエラーメッセージをコンソールに出力してアプリを終了します。
Your prepare(for:sender:) method should look something like this:
あなたのprepare(for:sender:)メソッドはこのようなものに見えるはずです:
override func prepare(for segue: UIStoryboardSegue, sender: Any?) {super.prepare(for: segue, sender: sender)switch(segue.identifier ?? "") {case "AddItem":os_log("Adding a new meal.", log: OSLog.default, type: .debug)case "ShowDetail":guard let mealDetailViewController = segue.destination as? MealViewController else {fatalError("Unexpected destination: \(segue.destination)")}guard let selectedMealCell = sender as? MealTableViewCell else {fatalError("Unexpected sender: \(sender)")}guard let indexPath = tableView.indexPath(for: selectedMealCell) else {fatalError("The selected cell is not being displayed by the table")}let selectedMeal = meals[indexPath.row]mealDetailViewController.meal = selectedMealdefault:fatalError("Unexpected Segue Identifier; \(segue.identifier)")}}
Now that you have the logic implemented, open MealViewController.swift and make sure the user interface (UI) updates correctly. Specifically, when an instance of MealViewController (the meal detail scene) gets created, its views should be populated with data from its meal property, if that data exists. You do this type of setup work is in the viewDidLoad() method.
あなたがロジックを実装した今では、あなたが必要とするのはMealViewController.swiftを開いて、ユーザインターフェイス (UI)が正しく更新されるよう手配することです。具体的には、MealViewControllerのインスタンス(食事詳細シーン)が作成されるとき、それのビューは、それのmealプロパティからのデータで満たされるべきです、そのデータが存在するならば。あなたがこの種の準備作業をするのは、viewDidLoad()メソッドにおいてです。
To update the implementation of viewDidLoad
viewDidLoadの実装を更新するには
Open
MealViewController.swift.
MealViewController.swiftを開いてください。In
MealViewController.swift, find theviewDidLoad()method.
MealViewController.swiftにおいて、viewDidLoad()メソッドを見つけてください。override func viewDidLoad() {super.viewDidLoad()// Handle the text field’s user input through delegate callbacks. (テキスト欄のユーザ入力を委任先コールバックを経由して取り扱います。)nameTextField.delegate = self// Enable the Save button only if the text field has a valid Meal name. (Saveボタンをテキスト欄が有効なMeal名を持つ場合にのみ使用可能にする)updateSaveButtonState()}
Below the
nameTextField.delegateline, add the following code. If themealproperty is non-nil, this code sets each of the views inMealViewControllerto display data from themealproperty. Themealproperty will only be non-nilwhen an existing meal is being edited.
nameTextField.delegate行の下で、このコードを加えてください:mealプロパティが非nilならば、このコードはMealViewControllerの中のビューそれぞれをmealプロパティに設定します。mealプロパティは、既存の食事を編集している場合にのみ非nilです。// Set up views if editing an existing Meal. (既存のMealを編集するならばビューを準備する)if let meal = meal {navigationItem.title = meal.namenameTextField.text = meal.namephotoImageView.image = meal.photoratingControl.rating = meal.rating}
Your viewDidLoad() method should look something like this:
あなたのviewDidLoad()メソッドはこのようにものに見えるはずです:
override func viewDidLoad() {super.viewDidLoad()// Handle the text field’s user input through delegate callbacks. (テキスト欄のユーザ入力を委任先コールバックを経由して取り扱います。)nameTextField.delegate = self// Set up views if editing an existing Meal. (既存のMealを編集するならばビューを準備する)if let meal = meal {navigationItem.title = meal.namenameTextField.text = meal.namephotoImageView.image = meal.photoratingControl.rating = meal.rating}// Enable the Save button only if the text field has a valid Meal name. (Saveボタンをテキスト欄が有効なMeal名を持つ場合にのみ使用可能にする)updateSaveButtonState()}
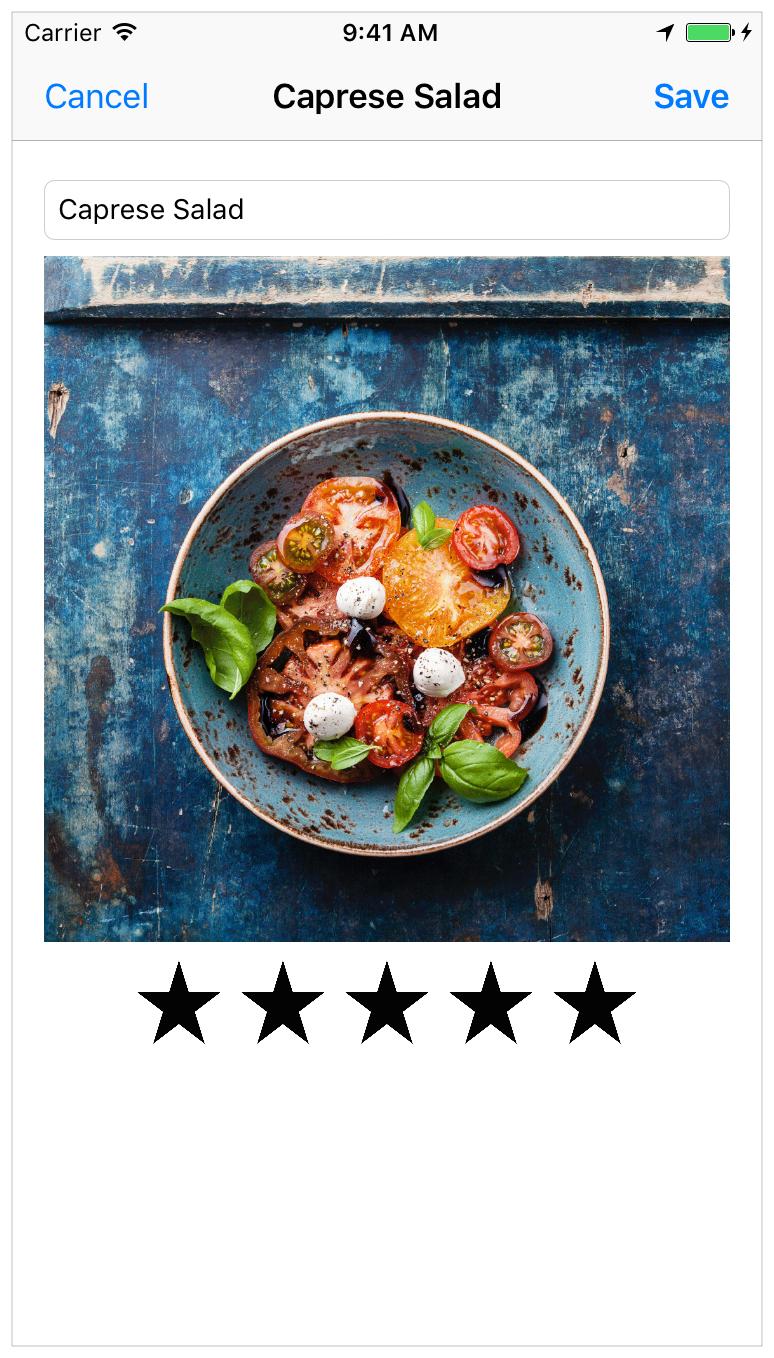
Checkpoint: Run your app. Click a meal from the meal list to navigate to the meal detail scene. The detail scene should be prepopulated with data about the meal. Unfortunately, the Save button does not work yet. If you click Save, the app does not update the meal. Instead, it adds a new meal. You’ll fix that next.
確認点:あなたのアプリを実行してください。食事を食事リストからクリックして食事詳細シーンへと進んでください。詳細シーンは、その食事についてのデータであらかじめ満たされるはずです。あいにく、Saveボタンはまだ機能しません。あなたがSaveをクリックしても、アプリは食事を更新しません。そうしないで、それは新しい食事を加えます。あなたはこれを次に修正します。
To update an existing meal, you’ll need to modify the unwindToMealList(sender:) action method to handle the two different cases: adding a new meal and editing an existing one. Recall that this method is only called when a user taps the Save button, so you don’t need to account for the Cancel button in this method.
既存の食事を更新するには、あなたはunwindToMealList(sender:)アクションメソッドを修正して2つの異なる事例:新しい食事の追加および既存のものの編集、を取り扱う必要があります。思い出してください、このメソッドはユーザがSaveボタンをタップした時のみ呼ばれます、それであなたはCancelボタンをこのメソッドにおいて考慮する必要はありません。
To update the implementation of unwindToMealList(sender:) to both add and edit meals
unwindToMealList(sender:)の実装を更新して食事の追加も編集も更新するには
Open
MealTableViewController.swift.
MealTableViewController.swiftを開いてください。In
MealTableViewController.swift, find theunwindToMealList(sender:)method.
MealTableViewController.swiftにおいて、unwindToMealList(sender:)メソッドを見つけてください。@IBAction func unwindToMealList(sender: UIStoryboardSegue) {if let sourceViewController = sender.source as? MealViewController, let meal = sourceViewController.meal {// Add a new meal. // (新しい食事を加える。)let newIndexPath = IndexPath(row: meals.count, section: 0)meals.append(meal)tableView.insertRows(at: [newIndexPath], with: .automatic)}}
At the beginning of the first
ifstatement, add thisifstatement:
最初のif文の始まりで、このif文を加えてください:if let selectedIndexPath = tableView.indexPathForSelectedRow {}
This code checks whether a row in the table view is selected. If it is, that means a user tapped one of the table views cells to edit a meal. In other words, this
ifstatement gets executed when you are editing an existing meal.
このコードは、テーブルビューの中のある行が選択されるかどうかを調べます。それがそうならば、ユーザがテーブルビューセルの1つをタップして、ある食事を編集することを意味します。言い換えれば、このif文は、あなたが既存の食事を編集しているならば実行されます。In this
ifstatement, add the following code:
このif文において、以下のコードを加えてください:// Update an existing meal. // (既存の食事を更新する。)meals[selectedIndexPath.row] = mealtableView.reloadRows(at: [selectedIndexPath], with: .none)
The first line updates the
mealsarray. It replaces the oldmealobject with the new, editedmealobject. The second line reloads the appropriate row in the table view. This replaces the current cell with a new cell that contains the updatedmealdata. As a result, when the table view reappears, the row that the user selected now shows the edited meal.
最初の行はmeals配列を更新します。それは、古いmealオブジェクトを新しいもので置き換えて、mealオブジェクトを編集します。2行目は、テーブルビューの中の適切な行を再読み込みします。これは、現在のセルを更新されたmealデータを含む新しいセルで置き換えます。結果として、テーブルビューが再度現れる時、ユーザが選択した列は今では編集済みの食事を示します。After the
ifstatement, add anelseclause and wrap it around the last four lines in the method. Make sure the lines in theelseclause are indented properly by selecting all of them and pressing Control-I.
if文の後に、else節を加えて、それがこのメソッドの最後の4行の周りを包むようにしてください。else節の中の行が適切に字下げされることをそれらのすべてを選択してコントロール-Iを押すことによって確認してください。else {// Add a new meal. // (新しい食事を加える。)let newIndexPath = IndexPath(row: meals.count, section: 0)meals.append(meal)tableView.insertRows(at: [newIndexPath], with: .automatic)}
The
elseclause executes when there’s no selected row in the table view, which means a user tapped the Add button to get to the meal detail scene. In other words, thiselsestatement executes when the user adds a new meal.
else節は、テーブルピューの中に選択された行がない場合に実行されます、そしてそれはユーザがAddボタンをタップして食事詳細シーンに行ったことを意味します。言い換えれば、このelse文はユーザが新しい食事を加える時に実行されます。
Your unwindToMealList(sender:) action method should look like this:
あなたのunwindToMealList(sender:)アクションメソッドはこのように見えるはずです:
@IBAction func unwindToMealList(sender: UIStoryboardSegue) {if let sourceViewController = sender.source as? MealViewController, let meal = sourceViewController.meal {if let selectedIndexPath = tableView.indexPathForSelectedRow {// Update an existing meal. // (既存の食事を更新する。)meals[selectedIndexPath.row] = mealtableView.reloadRows(at: [selectedIndexPath], with: .none)}else {// Add a new meal. // (新しい食事を加える。)let newIndexPath = IndexPath(row: meals.count, section: 0)meals.append(meal)tableView.insertRows(at: [newIndexPath], with: .automatic)}}}
Checkpoint: Run your app. You should be able to click a table view cell to navigate to the meal detail scene, and see it prepopulated with data about the meal. If you click Save, the changes you made should be displayed in the meal list.
確認点:あなたのアプリを実行してください。あなたはテーブルピューセルをクリックして食事詳細シーンに導かれます、そしてそれがその食事についてのデータで満たされるのを見るはずです。あなたがSaveをクリックするならば、あなたがした変更が食事リストで表示されるはずです。
Cancel an Edit to an Existing Meal
既存の食事への編集のキャンセル
A user might decide not to keep edits to a meal, and want to return to the meal list without saving any changes. For this, you’ll update the behavior of the Cancel button to dismiss the scene appropriately.
ユーザは、ある食事に対する変更を残すことを止めようと決心するかもしれません、そして何ら変更を保存せずに食事リストに戻りたいかもしれません。このために、あなたはCancelボタンの挙動を更新して、そのシーンを適切に忘れ去られるようにします。
The type of dismissal depends on how the scene was presented. You’ll implement a check that determines how the current scene was presented when the user taps the Cancel button. If it was presented modally (the user tapped the Add button), it’ll be dismissed using dismissViewControllerAnimated(_:completion:). If it was presented with push navigation (the user tapped a table view cell), it will be dismissed by the navigation controller that presented it.
退去の種類は、どのようにそのシーンが提示されたかに依存します。あなたはある検査を実装して、現在のシーンが表現された方法をユーザがCancelボタンをタップする時に特定します。それがモーダルに提示された(ユーザがAddボタンをタップした)ならば、それはdismissViewControllerAnimated(_:completion:)を使って退去させられるでしょう。それがプッシュナビゲーションで表された(ユーザがテーブルピューセルをタップした)ならば、それはそれを表したナビゲーションコントローラによって退去させられます。
To change the implementation of the cancel action
キャンセルアクションの実装を変更するには
Open
MealViewController.swift.
MealViewController.swiftを開いてください。In
MealViewController.swift, find thecancel(_:)action method.
MealViewController.swiftにおいて、cancel(_:)アクションメソッドを見つけてください。@IBAction func cancel(_ sender: UIBarButtonItem) {dismiss(animated: true, completion: nil)}
This implementation is only using the
dismiss(animated:completion:)method to dismiss the meal detail scene because you’ve only had to account for the Add button so far.
この実装は、dismiss(animated:completion:)を使って食事詳細シーンを退去させるだけです、なぜならあなたは今のところAddボタンだけを考慮すれば良いからです。In the
cancel(_:)action method, before the existing line of code, add the following code:
cancel(_:)アクションメソッドにおいて、既存のコード行の前で、以下のコード加えてください:// Depending on style of presentation (modal or push presentation), this view controller needs to be dismissed in two different ways. (表現の流儀(モーダルまたはプッシュ表現)に依存して、このビューコントローラは2つの異なる方法で却下される必要があります。)let isPresentingInAddMealMode = presentingViewController is UINavigationController
This code creates a Boolean value that indicates whether the view controller that presented this scene is of type
UINavigationController. As the constant nameisPresentingInAddMealModeindicates, this means that the meal detail scene is presented by the user tapping the Add button. This is because the meal detail scene is embedded in its own navigation controller when it’s presented in this manner, which means that the navigation controller is what presents it.
このコードは、このシーンを提示したビューコントローラが型UINavigationControllerであるかどうかを指し示すブール値を作成します。定数名isPresentingInAddMealModeが示すように、これはユーザがAddボタンをタップすることによってその食事詳細シーンが表されたことを意味します。これは、食事詳細シーンがそれ独自のナビゲーションコントローラに埋め込まれるのはこの手法で表現される時であり、それはナビゲーションコントローラがそれを提示するのを意味するからです。After the line you just added, add the following
ifstatement, and move the line that callsdismissViewControllerAnimatedinside of it:
あなたが加えだばかりの行の後で、以下のif文を加えてください、そしてdismissViewControllerAnimatedを呼び出している行をそれの内側に移動してください:if isPresentingInAddMealMode {dismiss(animated: true, completion: nil)}
Before you always called the
dismiss(animated:completion:)method when the user tapped the Cancel button; however,dismiss(animated:completion:)only works when the user is adding a new meal. Therefore, the code now checks to make sure the user was adding a new meal before callingdismiss(animated:completion:).
今まであたなは常にdismiss(animated:completion:)メソッドをユーザがCancelボタンをタップした時に呼び出しました;しかしながら、dismiss(animated:completion:)はユーザが新しい食事を加える時に働くだけです。したがって、コードは今ではユーザが新しい食事を加えていたことをdismiss(animated:completion:)を呼び出す前に確かめるため点検します。Note that this still does not dismiss the scene when the user is editing a meal. You’ll add that code next.
注意してください、これはまだ、ユーザが食事を編集している時にシーンを退去させません。あなたは、そのコードを次に加えます。Right after the
ifstatement, add thiselseclause:
if文のすぐ後で、else節を加えてください:else if let owningNavigationController = navigationController{owningNavigationController.popViewController(animated: true)}
The
elseblock is called if the user is editing an existing meal. This also means that the meal detail scene was pushed onto a navigation stack when the user selected a meal from the meal list. Theelsestatement uses anif letstatement to safely unwrap the view controller’snavigationControllerproperty. If the view controller has been pushed onto a navigation stack, this property contains a reference to the stack’s navigation controller.
elseブロックは、ユーザが既存の食事を編集しているならば呼び出されます。これはまた、食事詳細シーンがナビゲーションスタック上へとプッシュされたのは、ユーザが食事を食事リストから選択した時であるのを意味します。else文は、if let文を使って、安全にビューコントローラの持つnavigationControllerプロパティをアンラップします。ビューコントローラがナビゲーションスタック上へとプッシュされ終わったならば、このプロパティはスタックの持つナビゲーションコントローラへの参照を格納します。The code within the
elseclause executes a method calledpopViewController(animated:), which pops the current view controller (the meal detail scene) off the navigation stack and animates the transition. This dismisses the meal detail scene, and returns the user to the meal list.
else節内のコードは、popViewController(animated:)によって呼び出されるメソッドを実行します、それは現在のビューコントローラ(食事詳細シーン)をナビゲーションスタックからポップして遷移をアニメーション化します。これは食事詳細シーンを退去させます、そしてユーザを食事リストに戻します。Add a second else statement immediately below the first:
2番目のelse文を最初の直下に加えるには:else {fatalError("The MealViewController is not inside a navigation controller.")}
This
elsecase executes only if the meal detail scene was not presented inside a modal navigation controller (for example, when adding a new meal), and if the meal detail scene was not pushed onto a navigation stack (for example, when editing a meal). If your app’s navigation flow is set up properly, thiselsecase should never execute. If it does, it indicates a bug in your app. The else case prints an error message to the console and terminates the app.
このelseの状況は、食事詳細シーンがモーダルナビゲーションコントローラ内部で提示されなかった場合(例えば、新しい食事を加えている時)に、そして食事詳細シーンがナビゲーションスタック上にプッシュされなかった場合(例えば、食事を編集している時)にのみ実行されます。あなたのアプリの持つナビゲーションフローが正しく準備されるならば、このelseは決して実行されないはずです。それが動作するならば、それはあなたのアプリの中のバグを指し示します。このelseの状況は、エラーメッセージをコンソールに出力してアプリを終了します。
Your cancel(_:) action method should look like this:
あなたのcancel(_:)アクションメソッドはこのように見えるはずです:
@IBAction func cancel(_ sender: UIBarButtonItem) {// Depending on style of presentation (modal or push presentation), this view controller needs to be dismissed in two different ways. (表現の流儀(モーダルまたはプッシュ表現)に依存して、このビューコントローラは2つの異なる方法で却下される必要があります。)let isPresentingInAddMealMode = presentingViewController is UINavigationControllerif isPresentingInAddMealMode {dismiss(animated: true, completion: nil)}else if let owningNavigationController = navigationController{owningNavigationController.popViewController(animated: true)}else {fatalError("The MealViewController is not inside a navigation controller.")}}
Checkpoint: Run your app. When you select a meal, you can click Cancel to return to the meal list without saving any changes to the meal. Additionally, when you click the Add button (+) and click Cancel instead of Save, the navigation should take you back to the meal list without adding a new meal.
確認点:あなたのアプリを実行してください。あなたが食事を選択する場合、あなたはCancelをクリックすることで、その食事に対して何ら変更を保存することなしに食事リストに戻ることができます。さらに加えて、あなたがAddボタン(+)をクリックしてCancelをSaveの代わりにクリックする場合、ナビゲーションは新しい食事を加えることなく、あなたを食事リストに戻らせます。
Support Deleting Meals
食事の削除のサポート
Next, you’ll give users the ability to delete a meal from the meal list. You need a way to let users put the table view into an editing mode from which they can delete cells. You accomplish this by adding an Edit button to the table view’s navigation bar.
次に、あなたは食事リストからある食事を削除する能力をユーザに与えます。あなたの必要なのは、ユーザにテーブルビューを編集モードの状態へ置かせることです、それによって彼らはセルを削除できます。あなたは、これをEditボタンをテーブルビューのナビゲーションバーに追加することによって成し遂げます。
To add an Edit button to the table view
Editボタンをテーブルビューに加えるには
Open
MealTableViewController.swift.
MealTableViewController.swiftを開いてください。In
MealTableViewController.swift, find theviewDidLoad()method.
MealTableViewController.swiftにおいて、viewDidLoad()メソッドを見つけてください。override func viewDidLoad() {super.viewDidLoad()// Load the sample data. // (見本データをロードする)loadSampleMeals()}
Below the
super.viewDidLoad()line, add the following line of code:
super.viewDidLoad()行の下で、以下のコード行を加えてください:// Use the edit button item provided by the table view controller. // (テーブルビューコントローラによって提供される編集ボタン項目を使う)navigationItem.leftBarButtonItem = editButtonItem
This code creates a special type of bar button item that has editing behavior built into it. It then adds this button to the left side of the navigation bar in the meal list scene.
このコードは、それに組み込まれた編集挙動を持つ特別な型のバーボタン項目を作成します。それはそれからこのボタンを食事リストシーンにおいてナビゲーションバーの左側に加えます。
Your viewDidLoad() method should look something like this:
あなたのviewDidLoad()メソッドはこのようにものに見えるはずです:
override func viewDidLoad() {super.viewDidLoad()// Use the edit button item provided by the table view controller. // (テーブルビューコントローラによって提供される編集ボタン項目を使う)navigationItem.leftBarButtonItem = editButtonItem// Load the sample data. // (見本データをロードする)loadSampleMeals()}
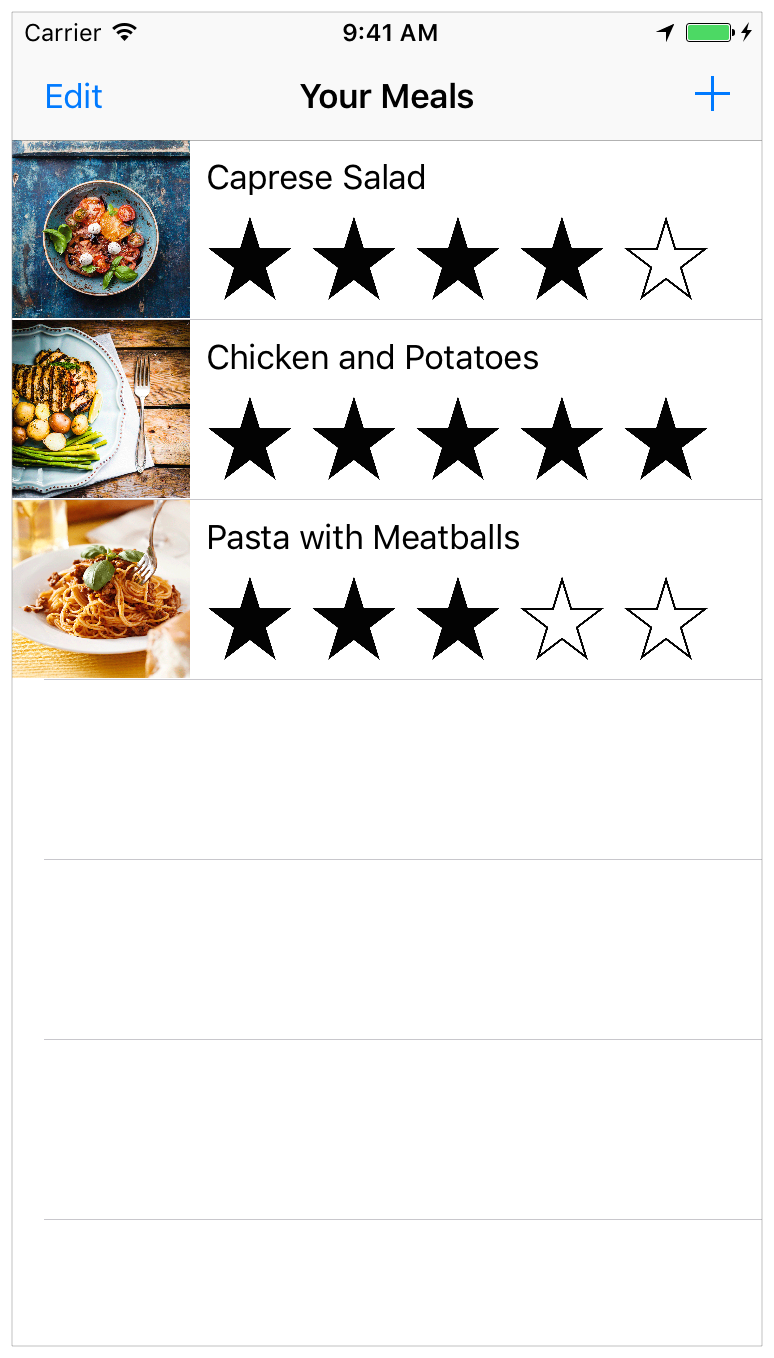
Checkpoint: Run your app. Notice there’s an Edit button on the left of the table view’s navigation bar. If you click the Edit button, the table view goes into editing mode—but you won’t be able to delete cells yet, because you haven’t implemented that.
確認点:あなたのアプリを実行してください。Editボタンがテーブルビューのナビケーションバーの左にあることに注目してください。あなたがこのEditボタンをクリックするならば、テーブルビューは編集モードにはいります—しかしあなたはまだセルを削除することができません、なぜならあなたがそれを実装していないからです。
To perform any sort of editing on a table view, you need to implement one of its delegate methods, tableView(_:commit:forRowAt:). This delegate method manages changes to the table rows when it’s in editing mode.
何らかの種類の編集をテーブルビュー上で行うために、あなたが必要とするのは、それの委任先メソッドの1つ、tableView(_:commit:forRowAt:)を実装することです。この委任先メソッドは、テーブルの列への変更を、それが編集モードの時に管理します。。
Also, uncomment the implementation of tableView(_:canEditRowAt:) to support editing.
また、tableView(_:canEditRowAt:)の実装のコメントを外して編集をサポートするようにしてください。
To delete a meal
ある食事を削除するには
In
MealTableViewController.swift, find and uncomment thetableView(_:commit:forRowAt:)method. (To uncomment the method, remove the/*and*/characters surrounding it.)
MealTableViewController.swiftにおいて、tableView(_:commit:forRowAt:)メソッドを見つけてコメントを外してください。(メソッドのコメントを外すには、それを囲んでいる/*と*/文字を削除します。)After you do that, the template implementation looks like this:
あなたがこれをした後、ひな形実装はこのように見えます:// Override to support editing the table view. (テーブルビューの編集をサポートするためにオーバーライドする。)override func tableView(_ tableView: UITableView, commit editingStyle: UITableViewCellEditingStyle, forRowAt indexPath: IndexPath) {if editingStyle == .delete {// Delete the row from the data source // (行をデータソースから削除する)tableView.deleteRows(at: [indexPath], with: .fade)} else if editingStyle == .insert {// Create a new instance of the appropriate class, insert it into the array, and add a new row to the table view // (適切なクラスの新規インスタンスを作成して、それを配列に挿入し、そして新しい行をテーブルビューに加える)}}
Below the comment that says
// Delete the row from the data source, add:
// Delete the row from the data sourceというコメントの下で、次を加えてください:meals.remove(at: indexPath.row)
This code removes the
Mealobject to be deleted frommeals. The line after it, which is part of the template implementation, deletes the corresponding row from the table view.
このコードは、Mealオブジェクトを削除して、mealsから消去されるようにします。それの後の行、ひな形実装の一部であるものは、対応する行をテーブルビューから消去します。In
MealTableViewController.swift, find and uncomment thetableView(_:canEditRowAt:)method.
MealTableViewController.swiftにおいて、tableView(_:canEditRowAt:)メソッドを見つけてコメントを外してください。After you do that, the template implementation looks like this:
あなたがこれをした後、ひな形実装はこのように見えます:// Override to support conditional editing of the table view. (テーブルビューの条件付きの編集をサポートするためにオーバーライドする。)override func tableView(_ tableView: UITableView, canEditRowAt indexPath: IndexPath) -> Bool {// Return false if you do not want the specified item to be editable. (指定した項目が編集されるのをあなたが望まないならばfalseを返してください。)return true}
Your tableView(_:commitEditingStyle:forRowAtIndexPath:) method should look like this:
あなたのtableView(_:commitEditingStyle:forRowAtIndexPath:)メソッドはこのように見えるはずです:
// Override to support editing the table view. (テーブルビューの編集をサポートするためにオーバーライドする。)override func tableView(_ tableView: UITableView, commit editingStyle: UITableViewCellEditingStyle, forRowAt indexPath: IndexPath) {if editingStyle == .delete {// Delete the row from the data source // (行をデータソースから削除する)meals.remove(at: indexPath.row)tableView.deleteRows(at: [indexPath], with: .fade)} else if editingStyle == .insert {// Create a new instance of the appropriate class, insert it into the array, and add a new row to the table view // (適切なクラスの新規インスタンスを作成して、それを配列に挿入し、そして新しい行をテーブルビューに加える)}}
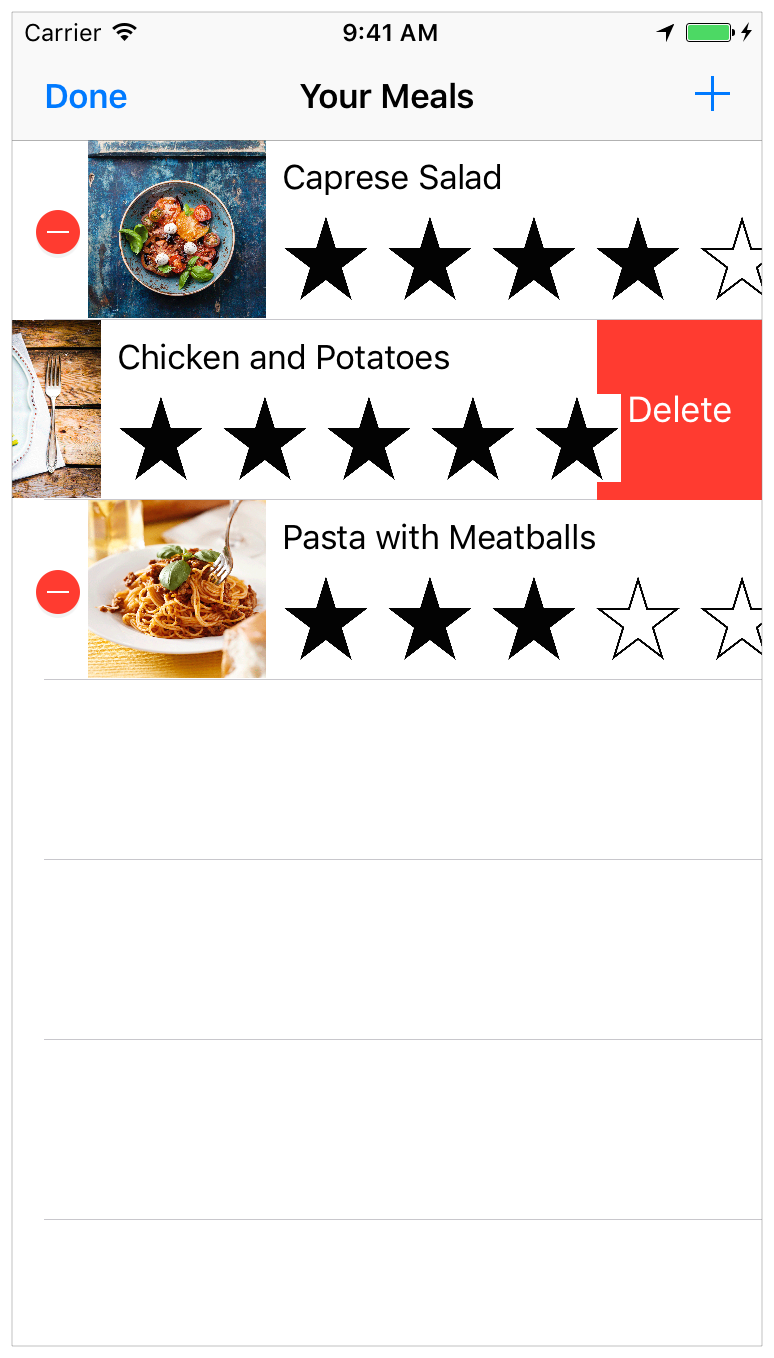
Checkpoint: Run your app. If you click the Edit button, the table view goes into editing mode. You can choose a cell to delete by clicking the indicator on the left, and confirm that you want to delete it by pressing the Delete button in that cell. Alternatively, swipe left on a cell to expose the Delete button quickly; this behavior is built into table views. When you click the Delete button for a cell, the cell is removed from the list.
確認点:あなたのアプリを実行してください。あなたがEditボタンをクリックするならば、テーブルビューは編集モードになります。あなたは、削除するセルを左の表示をクリックして選べます、そしてそのセルにおいてDeleteボタンを押すことであなたがそれの削除を望むのを確認します。その代わりに、あるセル上でスワイプして、Deleteボタンを素早く露出してください;この挙動は、テーブルビューに組み込まれます。あなたがあるセルに対してDeleteボタンをクリックする時、そのセルはリストから取り除かれます。
Wrapping Up
まとめ
In this lesson, you added support to edit and delete meals from the meal list. Because editing a meal and creating a new meal are very similar, the app uses the meal detail scene for both. As a result, you need to distinguish between when you are presenting the view controller modally (adding a meal) and pushing the view controller onto the navigation stack (editing a meal). You modified both the meal detail scene’s appearance and its behaviors based on how it was presented.
このレッスンでは、あなたは食事リストから食事の編集や削除をするためのサポートを加えました。食事の編集および新しい食事の作成は大変似ていることから、アプリは両方のために食事詳細シーンを使います。結果として、あなたはあなたがビューコントローラをモーダルに提示している(食事を加えている)そしてビューコントローラをナビゲーションスタック上へとプッシュしている(食事を編集している)場合の間を区別する必要があります。あなたは、食事詳細シーンの外観とそれの挙動の両方をそれが提示された方法に基づいて修正しました。
You can now add, edit, and delete meals. However, the data is not saved. Every time you launch the app, you start over with the initial sample data. In the next lesson, you’ll add code to save and load the meal list.
あなたは今や、食事の追加、編集、そして削除が可能です。しかしながら、データは保存されません。あなたがアプリを起動するたびごとに、あなたは初期見本データで最初からやり直します。次のレッスンでは、あなたはコードを加えて食事リストの保存とロードを行います。
Implement Navigation
ナビゲーションの実装
Copyright © 2016 Apple Inc. All rights reserved. Terms of Use | Privacy Policy | Updated: 2016-12-08