

Implement Navigation
ナビゲーションの実装
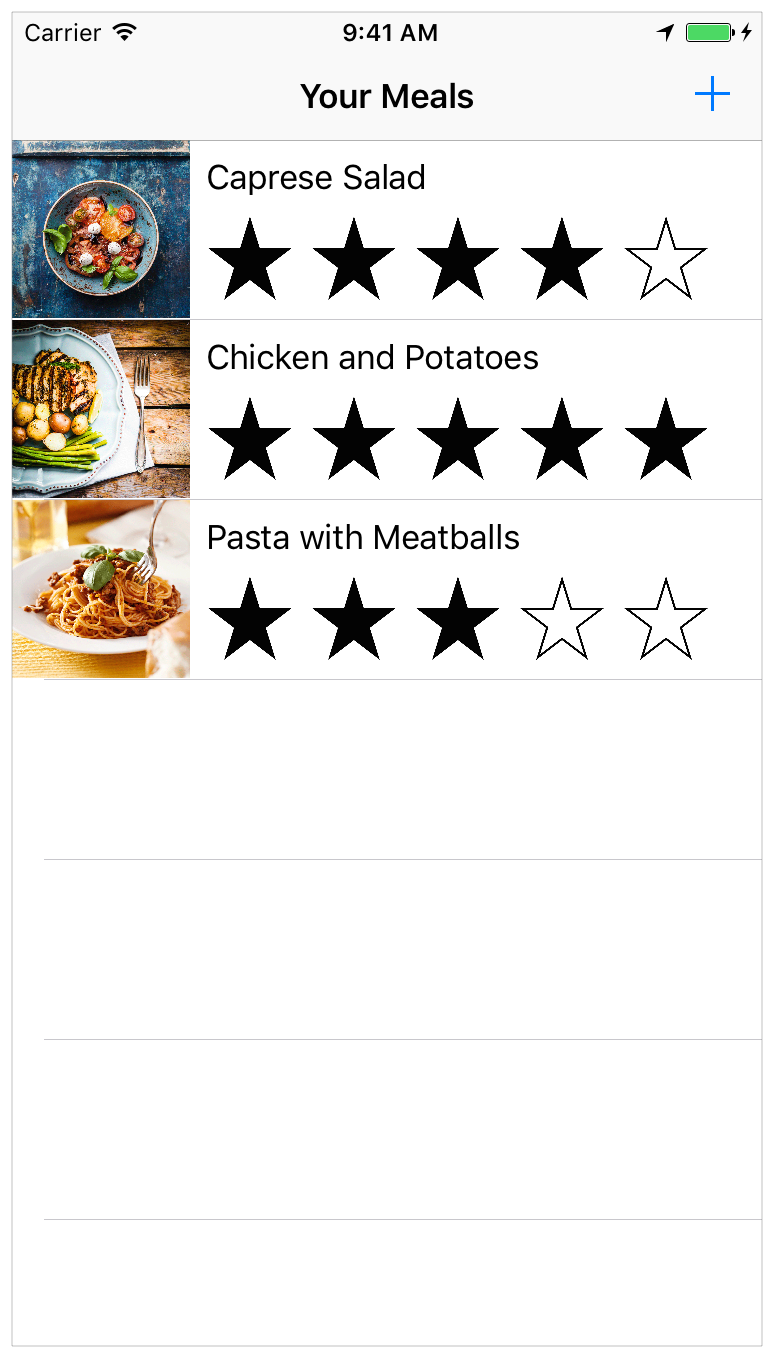
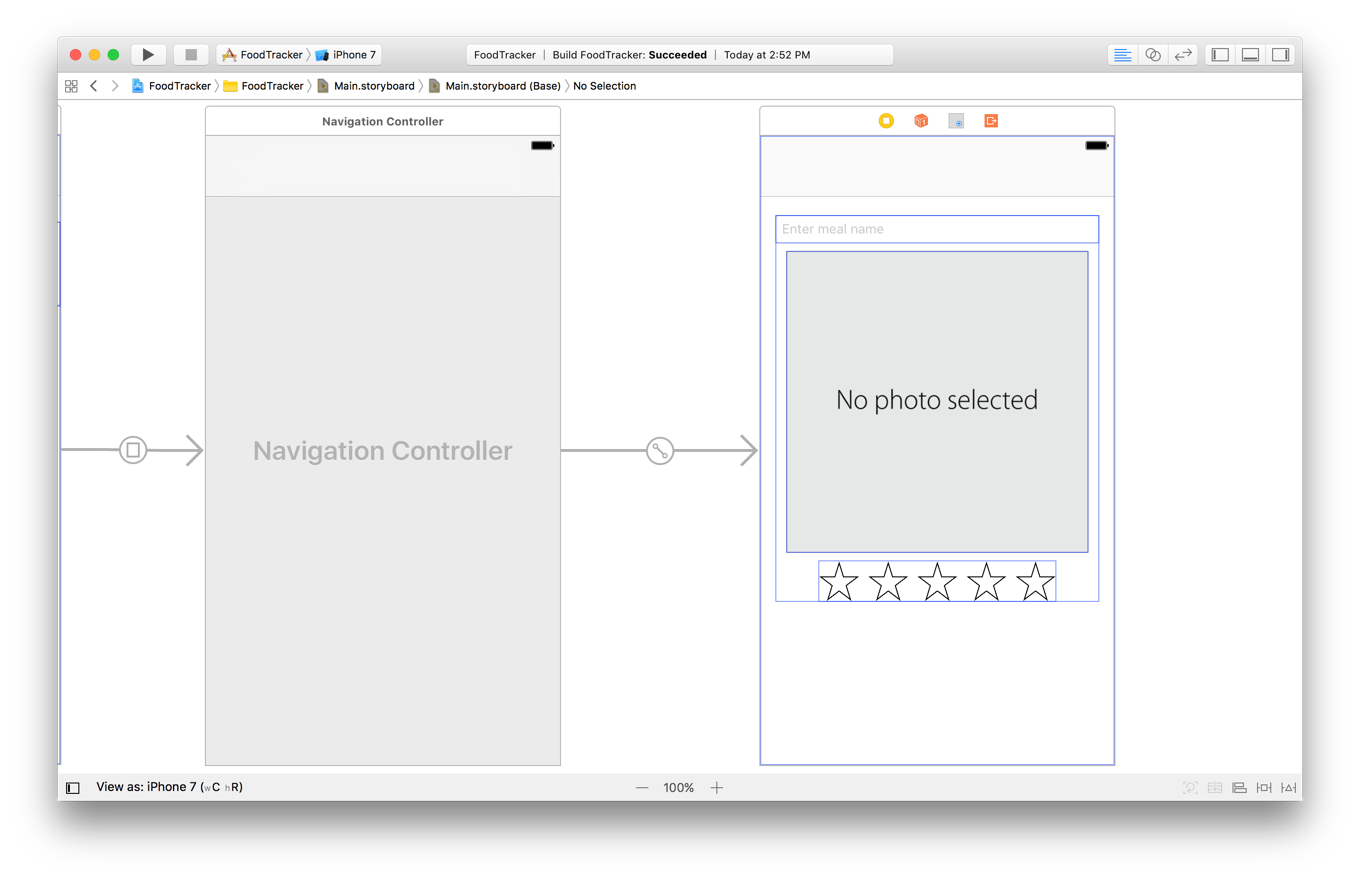
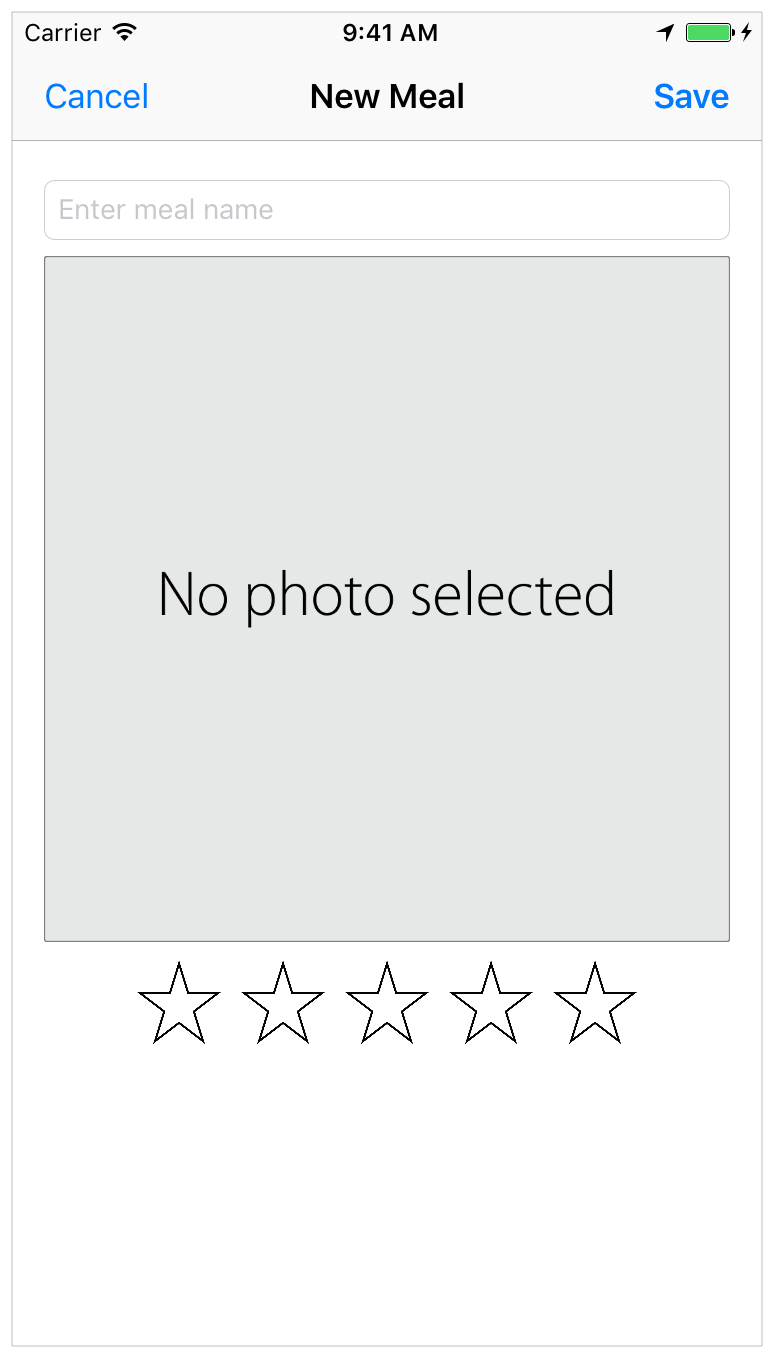
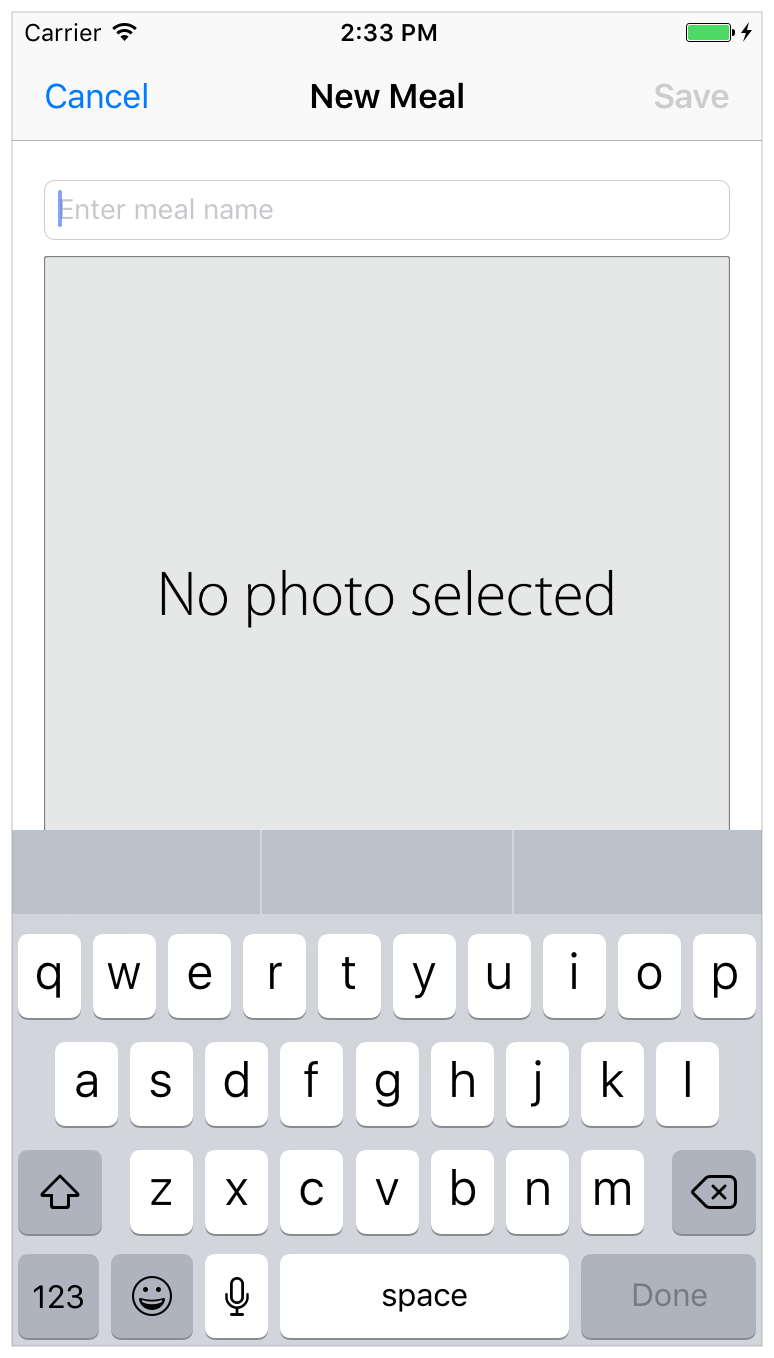
In this lesson, you use navigation controllers and segues to create the navigation flow of the FoodTracker app. At the end of the lesson, you’ll have a complete navigation scheme and interaction flow for the app. When you’re finished, your app will look something like this:
このレッスンでは、あなたはナビゲーションコントローラとセグエを使って、FoodTrackerアプリのナビゲーションの流れを作成します。このレッスンの終わりには、あなたはアプリのための完全なナビゲーションの枠組みと相互作用の流れを獲得するしょう。あなたが作業し終わった時、あなたのアプリはこのようなものに見えるでしょう:
Learning Objectives
学習する目標
At the end of the lesson, you’ll be able to:
このレッスンの終わりに、あなたが出来るようになるのは:
Embed an existing view controller within a navigation controller in a storyboard
既存のビューコントローラをストーリーボードにおいてナビゲーションコントローラ内部に埋め込むCreate segues between view controllers
ビューコントローラ間のセグエ(遷移)を作成するEdit the attributes of a segue in a storyboard using the Attributes inspector
セグエの属性をストーリーボードにおいてAttributesインスペクタを使って編集するPass data between view controllers using the
prepare(for:sender:)method
データをビューコントローラ間でprepare(for:sender:)メソッドを使って渡すPerform an unwind segue
巻き戻しセグエを実行するUse stack views to create robust, flexible layouts
スタックビューを使って、頑丈で、柔軟なレイアウトを作成する
Add a Segue to Navigate Forward
セグエを加えて前へナビゲートする
With data displaying as expected, it’s time to provide a way to navigate from the initial meal list scene to the meal detail scene. Transitions between scenes are called segues.
データが期待するように表示されているので、最初の食事リストシーンから食事詳細シーンに進んでいく方法を提供する時です。シーン間の転換はセグエ(遷移。切れ目なく続くこと)と呼ばれます。
Before creating a segue, you need to configure your scenes. First, you’ll put your table view controller inside of a navigation controller. A navigation controller manages transitions backward and forward through a series of view controllers. The set of view controllers managed by a particular navigation controller is called its navigation stack. The first item added to the stack becomes the root view controller and is never popped off (removed from) the navigation stack.
セグエの作成の前に、あなたは、あなたのシーンを構成することを必要とします。最初に、あなたは、あなたのテーブルビューコントローラを、あるナビゲーションコントローラの内部に置きます。ナビゲーションコントローラは、一続きのビューコントローラの中での前後の場面転換を管理します。ある特定のナビゲーションコントローラによって管理されるある一組のビューコントローラは、それのナビゲーションスタックと呼ばれます。そのスタックに追加される最初の項目は、ルートビューコントローラになります、そして決してそのナビゲーションスタックからはじき出される(取り除かれる)ことはありません。
To add a navigation controller to your meal list scene
ナビゲーションコントローラをあなたの食事リストシーンに加えるには
Open your storyboard,
Main.storyboard.
あなたのストーリーボード、Main.storyboardを開いてください。Select the meal list scene by clicking on its scene dock.
食事リストシーンをそれのシーンドックをクリックして選択してください。
Choose Editor > Embed In > Navigation Controller.
Editor > Embed In > Navigation Controllerを選択してください。Xcode adds a new navigation controller to your storyboard, sets the storyboard entry point to it, and assigns the meal list scene as its root view controller.
Xcodeは、新しいナビゲーションコントローラをあなたのストーリーボードに加えて、ストーリーボードエントリポイントをそれに設定します、そして食事リストシーンをそれのルートビューコントローラとして任命します。
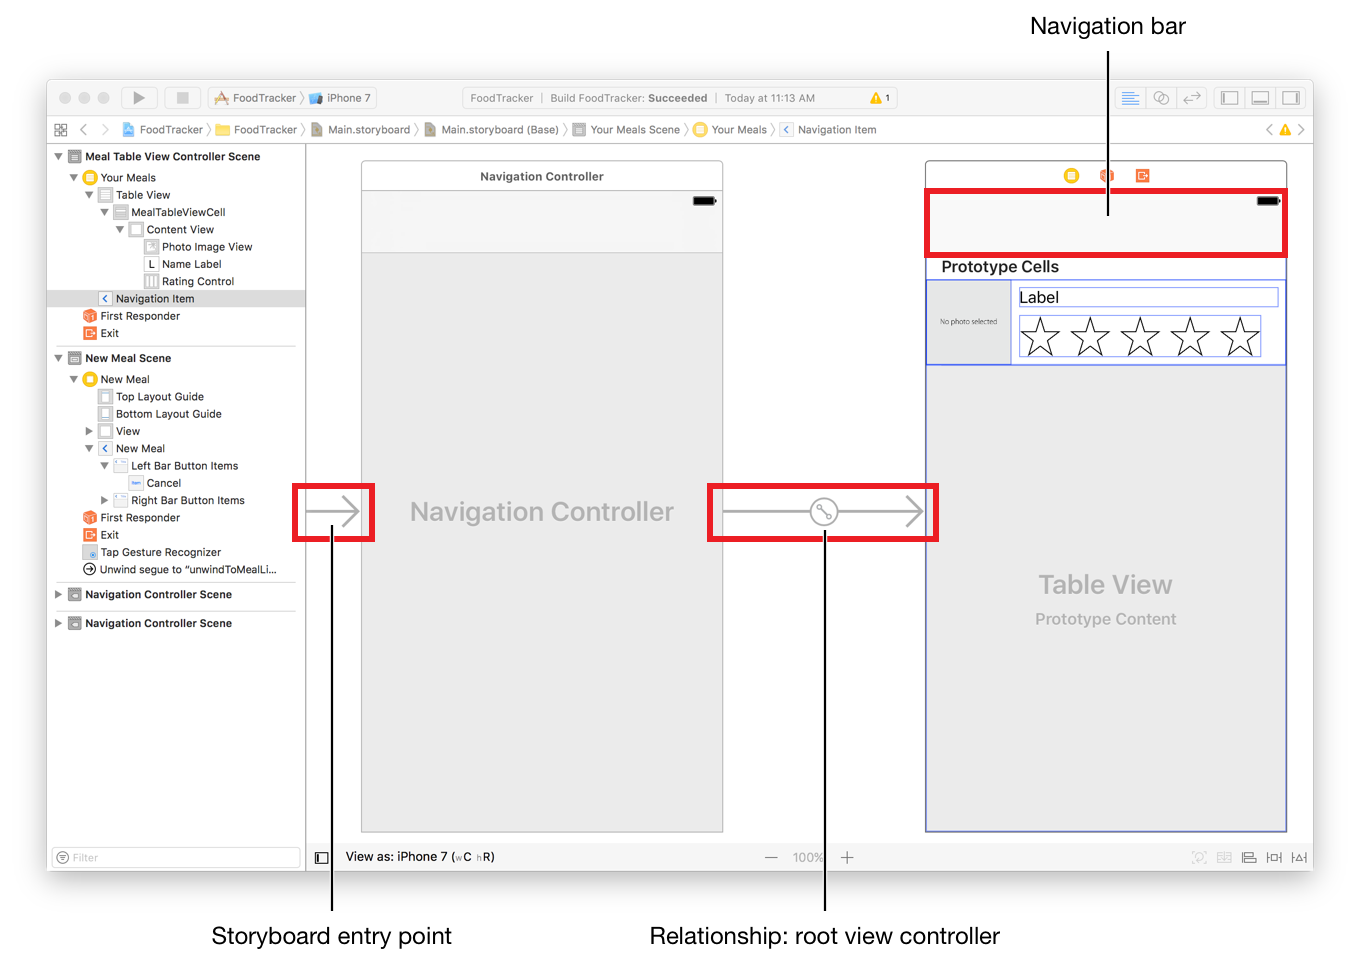
On the canvas, the icon connecting the controllers is the root view controller relationship. The table view controller is the navigation controller’s root view controller. The storyboard entry point is set to the navigation controller because the navigation controller is now a container for the table view controller.
キャンバス上で、コントローラ同士を接続しているアイコンは、ルートビューコントローラ関係です。テーブルビューコントローラは、ナビゲーションコントローラの持つルートビューコントローラです。ストーリーボードエントリポイントは、ナビゲーションコントローラに設定されます、なぜならナビゲーションコントローラは、現在テーブルビューコントローラのコンテナ(容れ物)だからです。
You might notice that your table view has a bar on top of it now. This is a navigation bar. Every controller on the navigation stack gets a navigation bar, which can contain controls for backward and forward navigation. Next, you’ll add a button to this navigation bar to transition to the meal detail scene.
あなたは、今ではあなたのテーブルビューがそれの上部にバーを持つことに気づくかもしれません。これはナビゲーションバーです。ナビゲーションスタック上のすべてのコントローラは、ナビゲーションバーを手に入れます、それは前後へのナビゲーションのためのコントロールを含むことができます。次に、あなたは、あるボタンをこのナビゲーションバーに加えて、食事詳細シーンに場面転換するようにします。
Checkpoint: Run your app. Above your table view you should now see extra space. This is the navigation bar provided by the navigation controller. The navigation bar extends its background to the top of the status bar, so the status bar doesn’t overlap with your content anymore.
確認点:あなたのアプリを実行してください。あなたのテーブルビューの上部で、あなたは今では余分な空間を見るはずです。これは、ナビゲーションコントローラによって提供されたナビゲーションバーです。ナビゲーションバーは、それの背景をステータスバーの上部まで拡げます、それでステータスバーはあなたのコンテンツと今ではもう重なりません。
Configure the Navigation Bar for the Scenes
ナビゲーションバーをシーンのために構成する
Now, you’ll add the meal list title and a button (to add additional meals) to the navigation bar. Navigation bars get their title from the view controller at the top of the navigation stack—they don’t have a title themselves. Each view controller has a navigationItem property. This property defines the navigation bar’s appearance for that view controller.
今度は、あなたは食事リストタイトルとボタンを(追加の食事を加えるために)ナビゲーションバーに加えます。これらナビゲーションバーはそれらのタイトルを、ナビゲーションスタックの最上部でのビューコントローラから得ます — それらは自身ではタイトルを持ちません。各ビューコントローラは、navigationItemプロパティを持ちます。このプロパティは、ナビゲーションバーの外観をそのビューコントローラに対して定義します。
In Interface Builder, you can configure a view controller’s navigation item by editing the navigation bar in the view controller’s scene.
Interface Builderにおいて、あなたはビューコントローラの持つナビゲーション項目を、ナビゲーションバーをビューコントローラの持つシーンにおいて編集することで構成設定します。
To configure the navigation bar in the meal list
ナビゲーションバーを食事リストにおいて構成するには
Double-click the navigation bar in the meal list scene.
ナビゲーションバーを食事リストシーンにおいてダブルクリックしてください。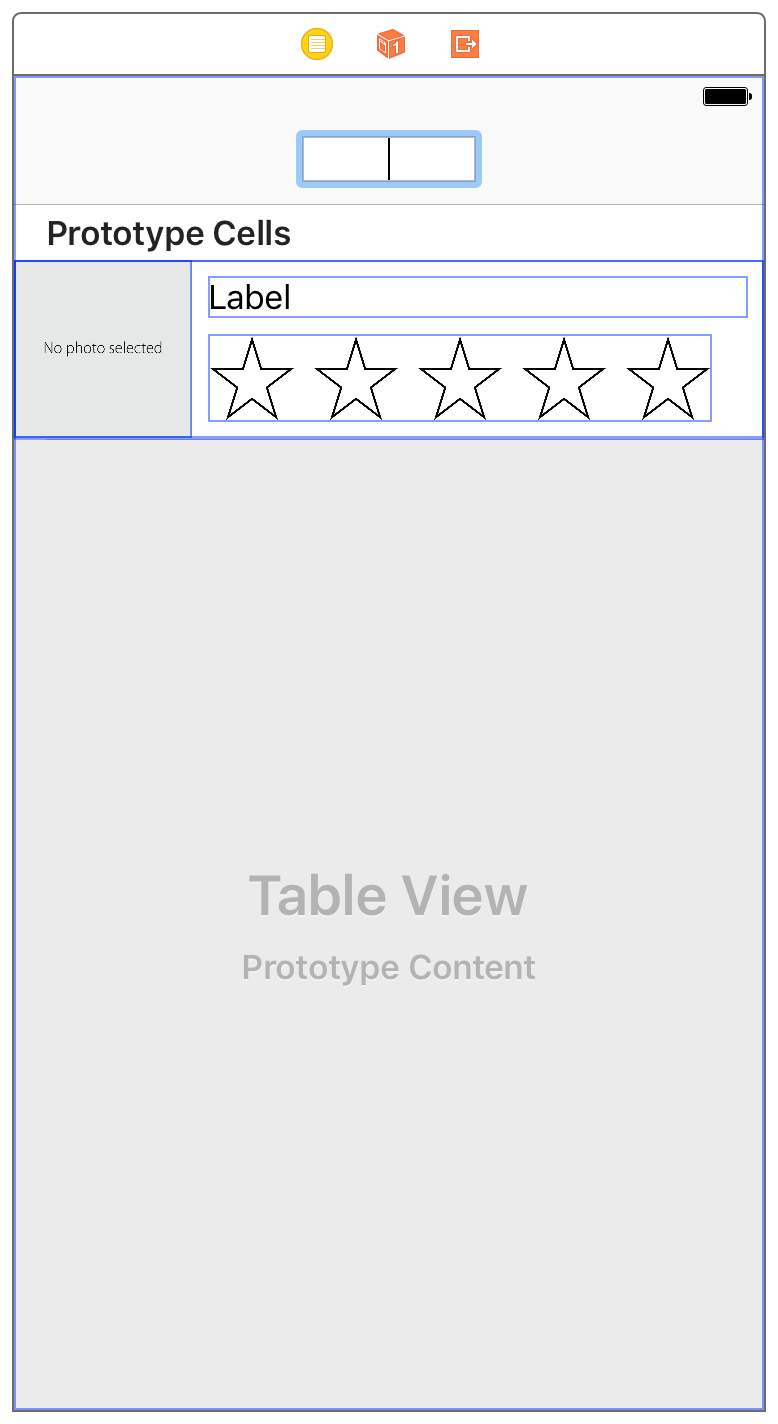
A cursor appears in a text field, letting you enter text.
カーソルがテキスト欄に現れて、あなたにテキストを入力させます。Type
Your Mealsand press Return. This sets the title for the table view controller’s navigation item.
Your MealsをタイプしてReturnを押してください。これは、テーブルビューコントローラの持つナビゲーション項目に対してタイトルを設定します。
Open the Object library. (Choose View > Utilities > Show Object Library.)
オブジェクトライブラリを開いてください。(View > Utilities > Show Object Libraryを選びます。)In the Object library, find a Bar Button Item object.
オブジェクトライブラリにおいて、Bar Button Itemオブジェクトを見つけてください。Drag a Bar Button Item object from the list to the far right of the navigation bar in the meal list scene.
Bar Button Itemオブジェクトをこのリストから食事リストシーンのナビゲーションバーのずっと右へドラッグしてください。A button called Item appears where you dragged the bar button item.
Itemという名のボタンが、あなたがバーボタン項目(Bar Button Item)をドラッグしたところに現れます。
Select the bar button item and open the Attributes inspector
 .
.
バーボタン項目を選択してAttributesインスペクタを開いてください。
In the Attributes inspector, choose Add from the pop-up menu next to the System Item option.
Attributesインスペクタにおいて、AddをSystem Itemオプションの隣のポップアップメニューから選んでください。The button changes to an Add button (
+).
ボタンが追加ボタン(+)に変わります。
Checkpoint: Run your app. The navigation bar should now have a title and display an Add button (+). The button doesn’t do anything yet. You’ll fix that next.
確認点:あなたのアプリを実行してください。ナビゲーションバーは、現在タイトルを持ち、追加ボタン(+)を表示します。このボタンはまだ何もしません。あなたはこれを次に修正します。
You want the Add button (+) to bring up the meal detail scene, so you’ll do this by having the button trigger a segue (or transition) to that scene.
あなたが追加ボタン(+)に望むことは、食事詳細シーンを画面に出すことです、それであなたは、このボタンがそのシーンへのセグエ(画面転換)を引き起こすようにしてこれを行います。
To configure the Add button in the meal detail scene
追加ボタンを食事詳細シーンにおいて構成するには
On the canvas, select the Add button (
+).
キャンバス上で、追加ボタン(+)を選択してください。Control-drag from the button to the meal detail scene.
そのボタンから食事詳細シーンまでコントール-ドラッグしてください。
A shortcut menu titled Action Segue appears in the location where the drag ended.
Action Segueとタイトルがついたショートカットメニューが、このドラッグが終わったところに現れます。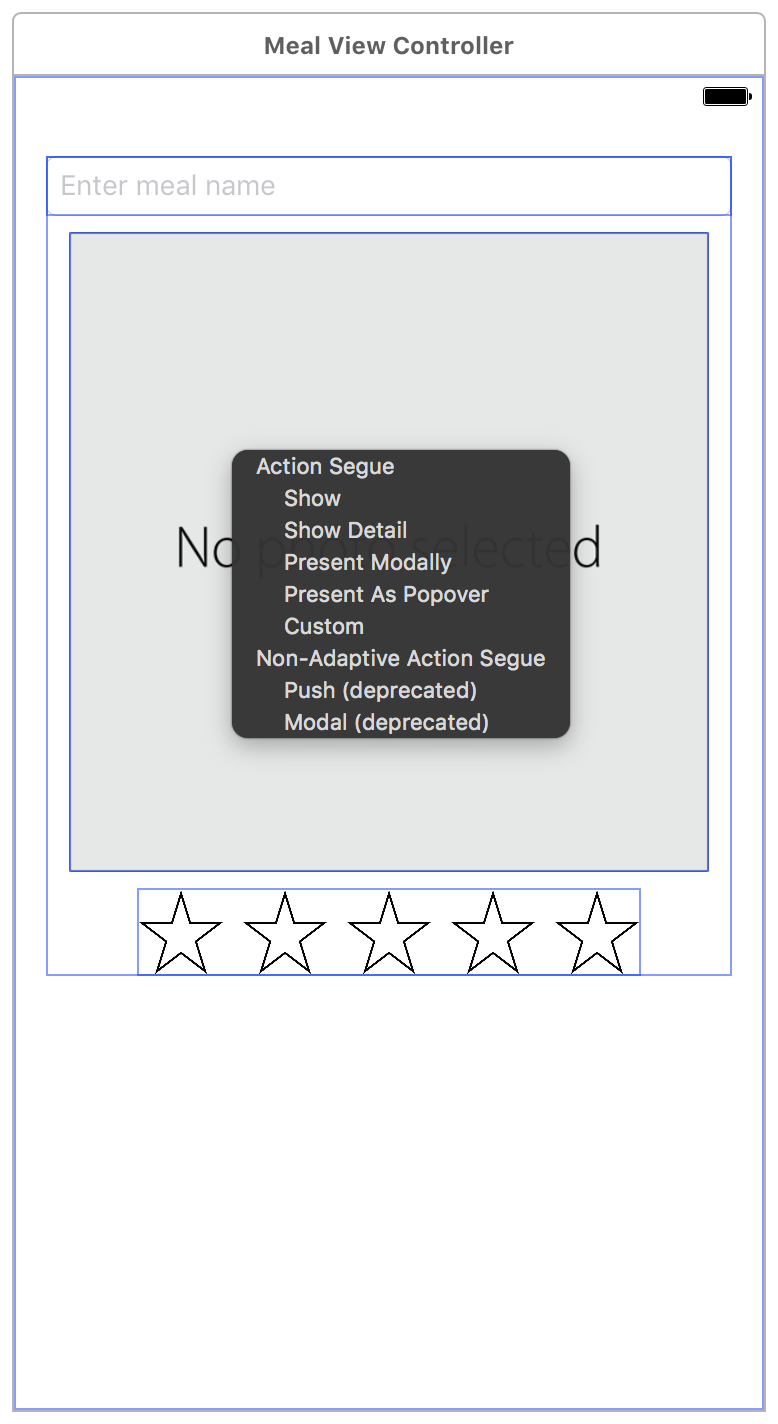
The Action Segue menu allows you to choose the type of segue used to transition from the meal list scene to the meal detail scene when the user taps the Add button.
Action Segueメニューがあなたに選ばせるのは、ユーザが追加ボタンをタップする時に食事リストシーンから食事詳細シーンに画面転換するのに使うセグエの型です。Choose Show from the Action Segue menu.
ShowをAction Segueメニューから選んでください。
A show segue pushes the selected scene onto the top of the navigation stack, and the navigation controller presents that scene. When you select the show segue, Interface Builder sets up the show segue and alters the meal detail scene’s appearance in the canvas—it is presented with a navigation bar in Interface Builder.
表示セグエは、選択されたシーンをナビゲーションスタックの一番上へとプッシュします(積んでいきます)。あなたが表示セグエを選択する場合、Interface Builderは表示セグエを準備してキャンバスにおいて食事詳細シーンの外観を改めます — それはInterface Builderにおいてナビゲータバーとともに表されます。
Checkpoint: Run your app. You can click the Add button and navigate to the meal detail scene from the meal list scene. Because you’re using a navigation controller with a show segue, the backward navigation is handled for you, and a back button automatically appears in the meal detail scene. This means you can click the back button in the meal detail scene to get back to the meal list.
確認点:あなたのアプリを実行してください。あなたは「追加」ボタンをクリックすることで、食事リストシーンから食事詳細シーンへと導かれます。あなたがナビゲーションコントローラを表示セグエとともに使っいてるので、後方へのナビゲーションはあなたに代わって取り扱われます、そして戻るボタンが自動的に食事詳細シーンに現れます。これの意味は、あなたは戻るボタンを食事詳細シーンで押すことで、食事リストに戻れるということです。
The push-style navigation you get by using the show segue is working just as it’s supposed to—but it’s not quite what you want when adding items. Push navigation is designed for a drill-down interface, where you’re providing more information about whatever the user selected. Adding an item, on the other hand, is a modal operation—the user performs an action that’s complete and self-contained, and then returns from that scene to the main navigation. The appropriate method of presentation for this type of scene is a modal segue.
あなたが表示セグエを使って得たこのプッシュ形式ナビゲーションは、まさにそれがしなければならない通りに機能しています—しかしそれは完全には項目を加える時にあなたが望むことではありません。プッシュナビゲーションが設計されるのは、ドリルダウンのインターフェイスに対してです—そこではあなたはユーザが選択したことが何であれもっと多くの情報を提供しています。ある項目を加えることは、別の面から言えば、モーダルな操作です—ユーザは完全で自己充足なひとつの動作を実行します、そしてそれからそのシーンから主要ナビゲーションに戻ります。この種のシーンを表現する適切な手法は、モーダルセグエです。
Instead of deleting the existing segue and creating a new one, simply change the segue’s style in the Attributes inspector. As is the case with most selectable elements in a storyboard, you can use the Attributes inspector to edit a segue’s attributes.
既存のセグエを削除して新しいものを作成するのではなく、単にそのセグエの形式をAttributesインスペクタにおいて変更してください。ストーリーボードの中のほとんどの選択可能な要素と同じく、あなたはAttributesインスペクタを使ってセグエの属性を編集することができます。
To change the segue style
セグエの形式を変更するには
Select the segue from the meal list scene to the meal detail scene.
食事リストシーンから食事詳細シーンへのセグエを選択してください。
In the Attributes inspector, choose Present Modally from the Kind field’s pop-up menu.
Attributesインスペクタにおいて、Present ModallyをKind欄のポップアップメニューから選んでください。In the Attributes inspector, type
AddItemin the Identifier field. Press Return.
Attributesインスペクタにおいて、AddItemをIdentifier(識別子)欄にタイプしてください。リターンキーを押します。Later, you’ll use this identifier to identify the segue.
後で、あなたはこの識別子をセグエを識別するのに使用します。
A modal view controller doesn’t get added to the navigation stack, so it doesn’t get a navigation bar in Interface Builder. However, you want to keep the navigation bar to provide the user with visual continuity. To give the meal detail scene a navigation bar when presented modally, embed it in its own navigation controller.
モーダルビューコントローラは、ナビゲーションスタックに加えられていません、それでそれはInterface Builderにおいてナビゲーションバーを取得していません。しかしながら、あなたはナビゲーションバーを保持してユーザに視覚的整合性を提供することを望みます。モーダル表示の時に食事詳細シーンにナビゲーションバーを与えるために、それをそれ自身のナビゲーションコントローラに埋め込んでください。
To add a navigation controller to the meal detail scene
ナビゲーションコントローラ食事詳細シーンに加えるには
Select the meal detail scene by clicking on its scene dock.
食事詳細シーンをそれのシーンドックをクリックして選択してください。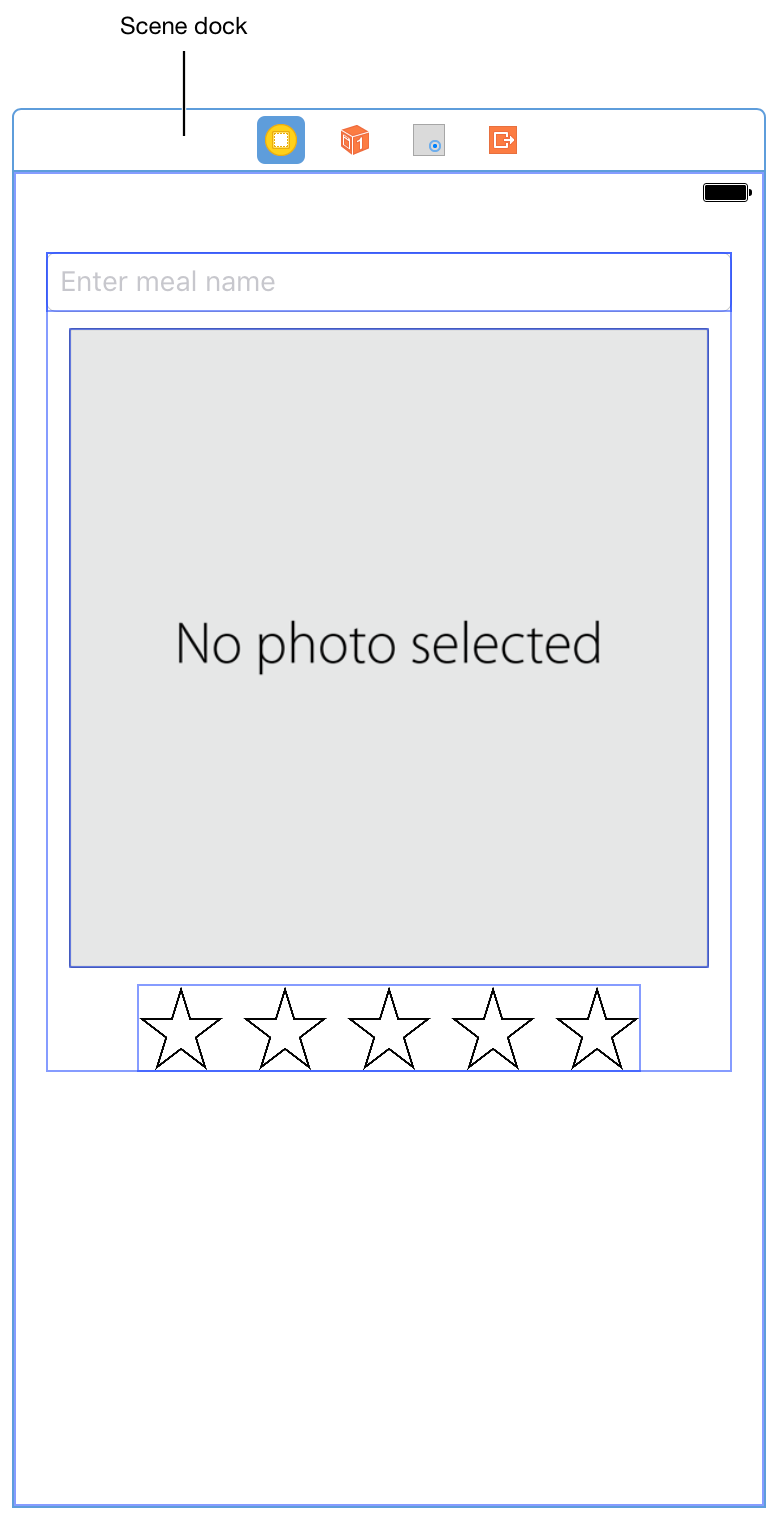
With the view controller selected, choose Editor > Embed In > Navigation Controller.
ビューコントローラが選択された状態で、Editor > Embed In > Navigation Controllerを選んでください。
As before, Xcode adds a navigation controller and shows the navigation bar at the top of the meal detail scene.
前と同じように、Xcodeはナビゲーションコントローラを加えてナビゲーションバーを食事詳細シーンの上部に表示します。
You may need to update the frames in the meal detail scene, if they don’t update automatically. If you are getting warnings about misplaced views, select the view controller and press the Update Frames button in the bottom right corner of the canvas. This will correct the position of every view in the scene, based on their current constraints.
あなたは、食事詳細シーンの中のいくらかのフレームを、それらが自動的に更新しないならば、更新する必要があるでしょう。あなたが誤って設置されたビューについての警告を得ているならば、ビューコントローラを選択してUpdate Framesボタンをキャンバスの下右隅で押してください。これは、シーン中の全てのビューの位置を、それらの現在の制約に基づいて訂正します。
Next, configure the navigation bar to add a title to this scene as well as two buttons, Cancel and Save. Later, you’ll link these buttons to actions.
次に、ナビゲーションバーを構成設定して、このシーンにタイトルを、それだけでなく2つのボタン、CancelとSaveを加えてください。後で、あなたはこれらのボタンをアクションと結び付けます。
To configure the navigation bar in the meal detail scene
ナビゲーションバーを食事詳細シーンにおいて構成するには
Double-click the navigation bar in the meal detail scene.
ナビゲーションバーを食事詳細シーンにおいてダブルクリックしてください。
A cursor appears, letting you enter text.
カーソルが現れて、あなたにテキストを入力させます。Type
New Mealand press Return to save.
New Mealをタイプしてからリターンキーを押し保存してください。Drag a Bar Button Item object from the Object library to the far left of the navigation bar in the meal detail scene.
Bar Button Itemオブジェクトをオブジェクトライブラリからナビゲーションバーの左端へと食事詳細シーンにおいてドラッグしてください。In the Attributes inspector, for System Item, select Cancel.
Attributesインスペクタにおいて、System Itemに対して、Cancelを選択してください。The button text changes to Cancel.
ボタンテキストがCancelに変わります。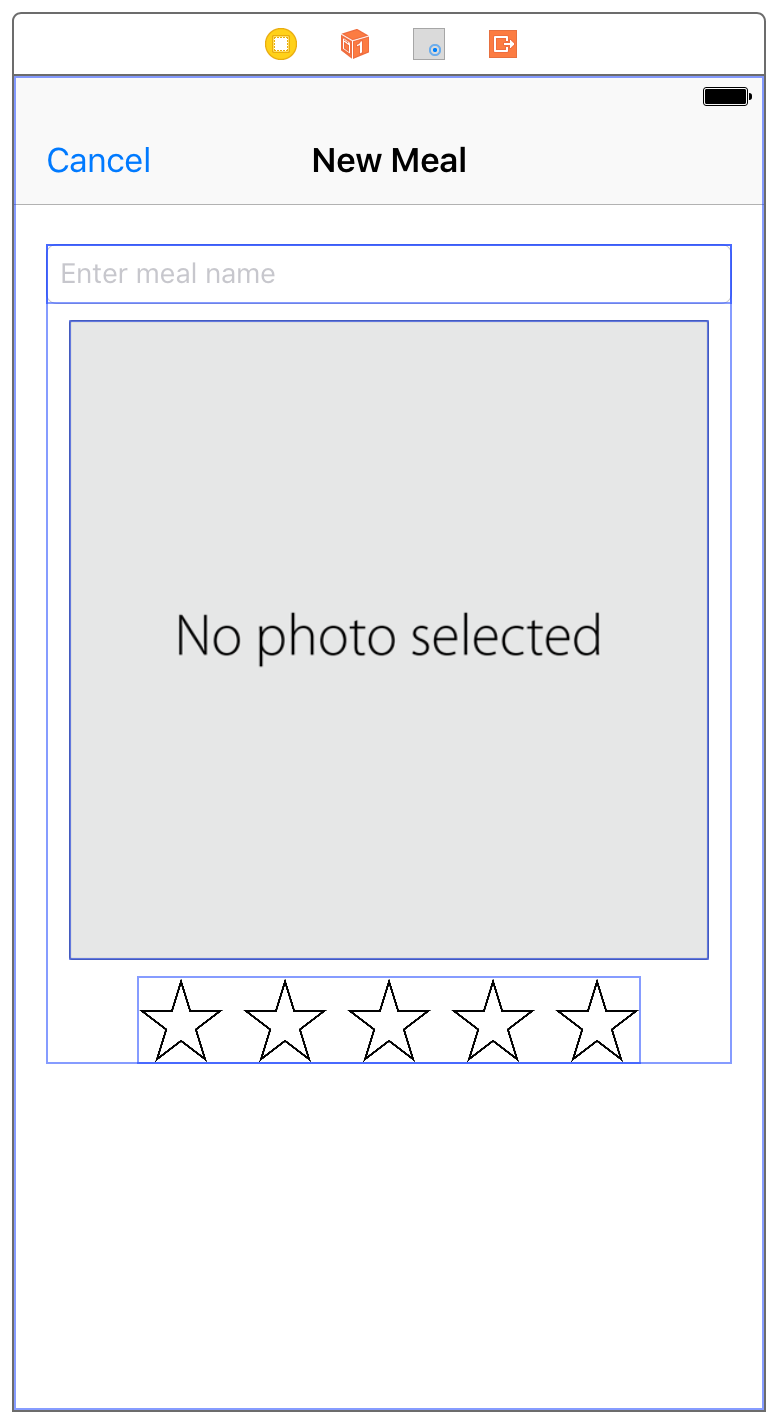
Drag another Bar Button Item object from the Object library to the far right of the navigation bar in the meal detail scene.
もう1つのBar Button Itemオブジェクトをオブジェクトライブラリからナビゲーションバーの右端へと食事詳細シーンにおいてドラッグしてください。In the Attributes inspector, for System Item, select Save.
Attributesインスペクタにおいて、System Itemに対して、Saveを選択してください。The button text changes to Save.
ボタンテキストがSaveに変わります。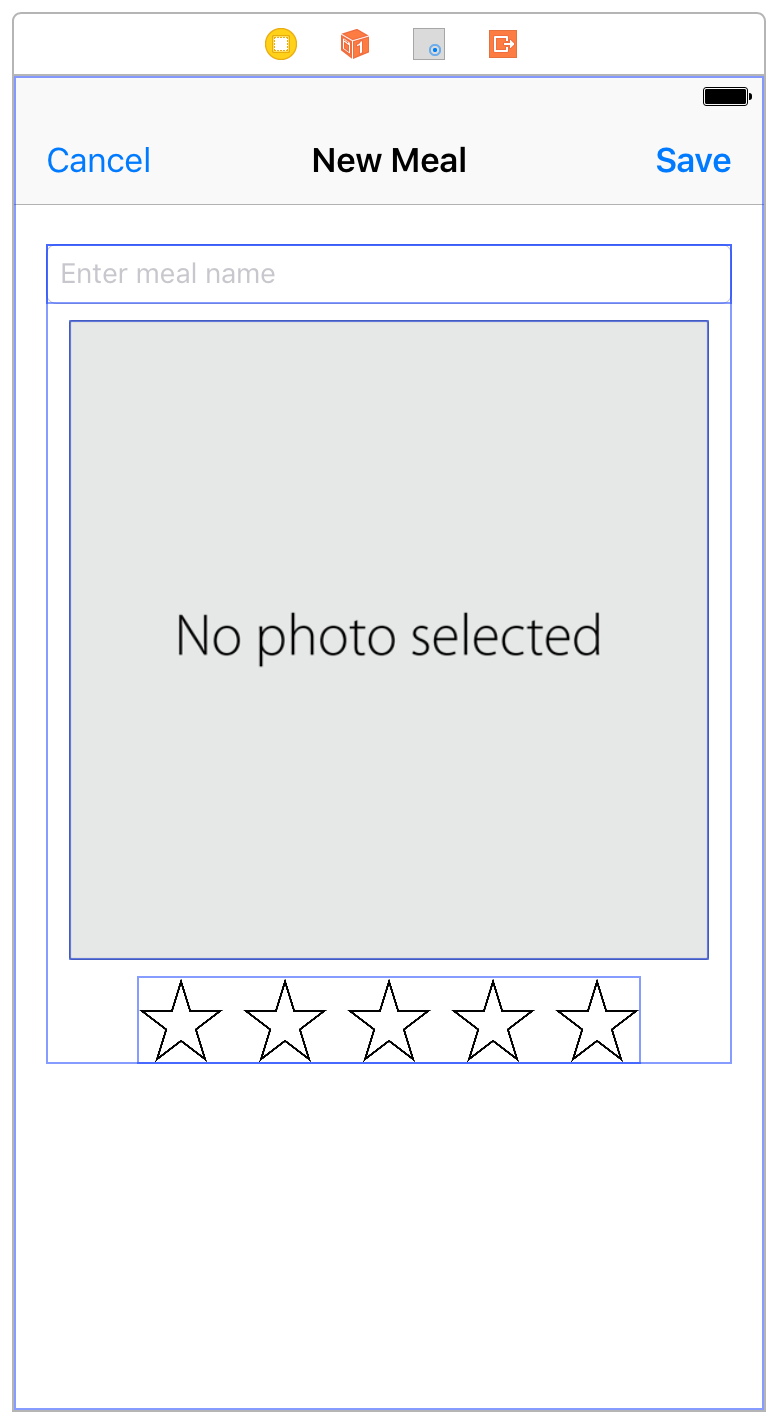
Checkpoint: Run your app. Click the Add button. You still see the meal detail scene, but there’s no longer a button to navigate back to the meal list—instead, you see the two buttons you added, Cancel and Save. Those buttons aren’t linked to any actions yet, so you can click them, but they don’t do anything. You’ll configure the buttons to save or cancel adding a new meal and to bring the user back to the meal list soon.
確認点:あなたのアプリを実行してください。Addボタンをクリックしてください。あなたはやはり食事詳細シーンを見ます、しかしもはや食事リストに戻るよう導くボタンはありません—代わりに、あなたが加えた2つのボタン、CancelとSaveを見ます。それらのボタンは、まだどんなアクションとも結び付けられません、それであなたはそららをクリックできますが、それらは何もしません。あなたはこれらのボタンを、新しい食事の追加を保存またはキャンセルして、ユーザが食事リストにすぐに戻るように構成します。
Store New Meals in the Meal List
新しい食事を食事リストに格納する
The next step in creating the FoodTracker app’s functionality is implementing the ability for a user to add a new meal. Specifically, when a user enters a meal name, rating, and photo in the meal detail scene and taps the Save button, you want MealViewController to configure a Meal object with the appropriate information and pass it back to MealTableViewController to display in the meal list.
FoodTrackerアプリの機能性の作成における次の段階は、ユーザが新しい食事を追加する能力の実装です。具体的には、ユーザが食事名、格付け、そして写真を食事詳細シーンにおいて入力してSaveボタンをタップする時、あなたはMealViewControllerがひとつのMealオブジェクトを適切な情報とともに構成して、それをMealTableViewControllerに戻して渡して食事リストにおいて表示することを望みます。
Start by adding a Meal property to MealViewController.
MealプロパティをMealViewControllerに加えることで始めます。
To add a Meal property to MealViewController
MealプロパティをMealViewControllerに加えるには
Open
MealViewController.swift.
MealViewController.swiftを開いてください。Below the
ratingControloutlet inMealViewController.swift, add the following property:
MealViewController.swiftにおいてratingControlアウトレットの下に、以下のプロパティを加えてください:/*This value is either passed by `MealTableViewController` in `prepare(for:sender:)`or constructed as part of adding a new meal. (または加えている新しい食事の一部として組み立てられます。)*/var meal: Meal?
This declares a property on
MealViewControllerthat is an optionalMeal, which means that at any point, it may benil.
これは、あるプロパティをMealViewController上で宣言します、それはオプショナルのMealです、それが意味するのはいずれかの時点でそれがnilであるかもしれないということです。
You care about configuring and passing the Meal only if the Save button was tapped. To be able to determine when this happens, add the Save button as an outlet in MealViewController.swift.
あなたがMealを構成して渡すことについて面倒を見るのは、Saveボタンがタップされた場合のみです。それが起こった時を判定可能にするには、SaveボタンをアウトレットとしてMealViewController.swiftに加えます。
To connect the Save button to the MealViewController code
SaveボタンをMealViewControllerコードに接続するには
Open your storyboard.
あなたのストーリーボードを開いてください。Click the Assistant button in the Xcode toolbar to open the assistant editor.
AssistantボタンをXcodeツールバーにおいてクリックしてアシスタントエディタを開いてください。
If you want more space to work, collapse the project navigator and utility area by clicking the Navigator and Utilities buttons in the Xcode toolbar.
あなたがもっと作業空間を必要とするならば、プロジェクトナビゲータとユーティリティ区画をXcodeツールパーのNavigatorとUtilitiesボタンをクリックすることで折り畳んでください。
In your storyboard, select the Save button.
あなたのストーリーボードにおいて、Saveボタンを選択してください。Control-drag from the Save button on your canvas to the code display in the editor on the right, stopping the drag at the line just below your
ratingControlproperty inMealViewController.swift.
あなたのキャンバス上のSaveボタンから右のエディタのコード表示までコントロール-ドラッグして、あなたのMealViewController.swiftの中のratingControlプロパティのすぐ下の行でドラッグをやめます。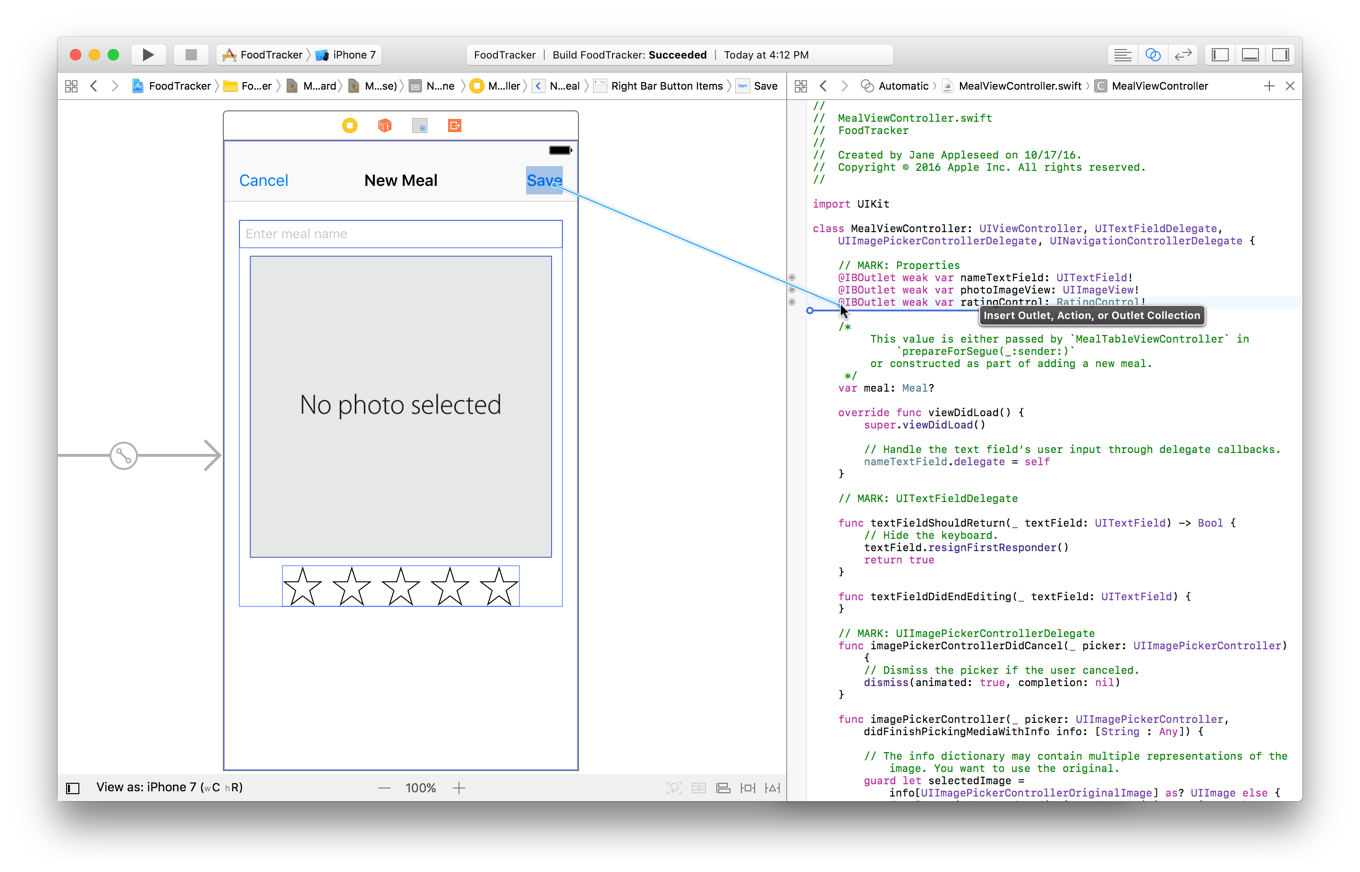
In the dialog that appears, for Name, type
saveButton.
現れたダイアログにおいて、名前に、saveButtonをタイプしてください。Leave the rest of the options as they are. Your dialog should look like this:
残りのオプションはそれらのままにしておきます。あなたのダイアログはこのように見えるはずです: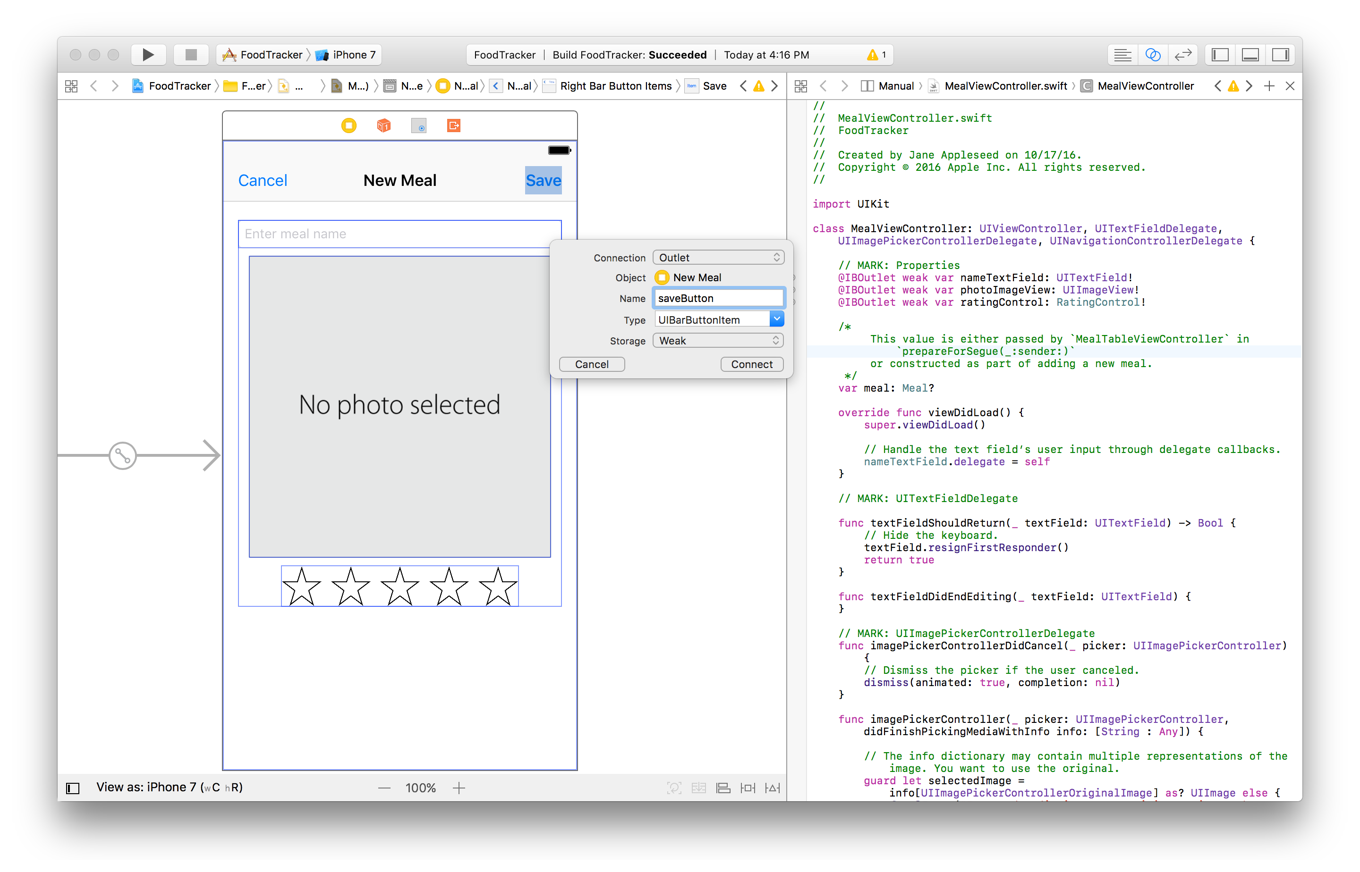
Click Connect.
Connectをクリックしてください。
You now have a way to identify the Save button.
あなたは今ではSaveボタンを識別する方法を持ちます。
Create an Unwind Segue
巻き戻しセグエの作成
The task now is to pass the Meal object to MealTableViewController when a user taps the Save button and discard it when a user taps the Cancel button, switching from displaying the meal detail scene to displaying the meal list in either case.
次の作業はMealオブジェクトを、ユーザがSaveボタンをタップする時にはMealTableViewControllerに渡し、ユーザがCancelボタンをタップする時には廃棄して、両方の場合で食事詳細シーンの表示から食事リストの表示へと切り替えることです。
To accomplish this, you’ll use an unwind segue. An unwind segue moves backward through one or more segues to return the user to a scene managed by an existing view controller. While regular segues create a new instance of the destination view controller, unwind segues let you return to view controllers that already exist. Use unwind segues to implement navigation back to an existing view controller.
これを成し遂げるために、あなたは巻き戻しセグエを使います。巻き戻しセグエは、後ろへと1つ以上のセグエを通り抜けて移動して、ユーザを既存のビューコントローラによって管理されるあるシーンに戻します。いつものセグエは行先ビューコントローラの新しいインスタンスを作成する一方、巻き戻しセグエはあなたをすでに存在するビューコントローラに帰らせます。巻き戻しセグエを使って、既存のビューコントローラに戻るナビゲーションを実装してください。
Whenever a segue gets triggered, it provides a place for you to add your own code that gets executed. This method is called prepare(for:sender:), and it gives you a chance to store data and do any necessary cleanup on the source view controller (the view controller that the segue is coming from). You’ll implement this method in MealViewController to do exactly that.
あるセグエが引き起こされる時はいつでも、それはあなたのために場所を提供して、あなた自身のコードを加えさせ、それが実行されるようになります。このメソッドは、prepare(for:sender:)と呼ばれます、そしてそれはあなたにデータの格納や何らかの必要な片付けをソース(発生)ビューコントローラ(セグエがそこから始まるビューコントローラ)上で行う機会を与えます。あなたは、このメソッドをMealViewControllerにおいて実装することで厳密にそれが実行されるようにします。
To implement the prepare(for:sender:) method on MealViewController
prepare(for:sender:)メソッドをMealViewController上で実装するには
Return to the standard editor by clicking the Standard button.
標準エディタにStandardボタンをクリックすることで戻ってください。
Open
MealViewController.swift.
MealViewController.swiftを開いてください。At the top of the file, under
import UIKit, add the following:
ファイルの一番上で、import UIKitの下に、以下を加えてください:import os.log
This imports the unified logging system. Like the
print()function, the unified logging system lets you send messages to the console. However, the unified logging system gives you more control over when messages appear and how they are saved.
これは、統合ログシステムをインポートします。print()関数のように、統合ログシステムはあなたにメッセージをコンソールへと送らせます。しかしながら、統合ログシステムは、メッセージが現れる時とそれらが保存される方法のすべてに対してあなたにさらなる制御を行わせます。In
MealViewController.swift, above the//MARK: Actionssection, add the following:
MealViewController.swiftにおいて、//MARK: Actions節の上に、以下を加えてください://MARK: Navigation
This is a comment to help you (and anybody else who reads your code) know that this method is related to the navigation flow of your app.
このコメントは、あなたが(そしてあなたのコードを読む他の誰でもが)このメソッドがあなたのアプリのナビゲーションの流れに関するものだと知る助けとなります。Below the comment, add this method skeleton:
このコメントの下に、このメソッド骨組みを加えてください:// This method lets you configure a view controller before it's presented. (このメソッドは、あなたにビューコントローラをそれが提供される前に構成させます。)override func prepare(for segue: UIStoryboardSegue, sender: Any?) {}
In the
prepare(for:sender:)method, add a call to the superclass’s implementation:
prepare(for:sender:)メソッドにおいて、スーパークラスの持つ実装への呼び出しを加えてください。super.prepare(for: segue, sender: sender)
The
UIViewControllerclass’s implementation doesn’t do anything, but it’s a good habit to always callsuper.prepare(for:sender:)whenever you overrideprepare(for:sender:). That way you won’t forget it when you subclass a different class.
UIViewControllerクラスの持つ実装は何もしません、しかしそれはあなたがprepare(for:sender:)をオーバーライドするときはいつでも常にsuper.prepare(for:sender:)を呼び出すための良い習慣です。そのようにしてあなたは、あなたが異なるクラスをサブクラスにする時、それを忘れないようにします。Below the call to
super.prepare(for:sender:), add the followingguardstatement:
super.prepare(for:sender:)に対する呼び出しの下に、guard文を加えてください:// Configure the destination view controller only when the save button is pressed. (保存ボタンが押される時のみ行先ビューコントローラを構成設定する)guard let button = sender as? UIBarButtonItem, button === saveButton else {os_log("The save button was not pressed, cancelling", log: OSLog.default, type: .debug)return}
This code verifies that the sender is a button, and then uses the identity operator (
===) to check that the objects referenced by thesenderand thesaveButtonoutlet are the same.
このコードは、センダーがボタンであることを確かめて、それから同一性演算子(===)を使ってsenderオブジェクトとsaveButtonアウトレットが同じであることを確認します。If they are not, the
elsestatement is executed. The app logs a debug message using the system’s standard logging mechanisms. Debug messages contain information that may be useful during debugging or when troubleshooting specific problems. They are intended for debugging environments, and do not appear in a shipping app.
もしそれらが違うならば、else文が実行されます。アプリは、デバッグメッセージをシステムの持つ標準ログ機構を使って記録します。デバッグメッセージは、デバッグ中にまたは特定の問題を解決する時に有用であると思われる情報を含みます。それらはデバッグ環境として意図されます、そして出荷アプリでは現れません。After logging the debug message, the method returns.
デバッグメッセージを記録した後、メソッドは返ります。Below the
elsestatement, add the following code:
このelse文の下で、以下のコードを加えてください:let name = nameTextField.text ?? ""let photo = photoImageView.imagelet rating = ratingControl.rating
This code creates constants from the current text field text, selected image, and rating in the scene.
このコードは、そのシーンにおける現在のテキスト欄のテキスト、選択された画像、そして格付けから定数を作成します。Notice the nil coalescing operator (
??) in thenameline. The nil coalescing operator is used to return the value of an optional if the optional has a value, or return a default value otherwise. Here, the operator unwraps the optionalStringreturned bynameTextField.text(which is optional because there may or may not be text in the text field), and returns that value if it’s a valid string. But if it’snil, the operator the returns the empty string ("") instead.
nil合体演算子(??)をname行において注目してください。nil合体演算子は、オプショナルが値を持つならばオプショナルの値を、またはそうでなければ省略時の値を返します。ここで、この演算子は、nameTextField.text(これはオプショナルです、なぜならテキスト欄にテキストがあるかもしれないし無いかもしれないからです)によって返されるオプショナルのStringをアンラップします、そしてそれが有効な文字列ならばその値を返します。しかしそれがnilならば、この演算子は空の文字列("")をその代わりに返します。Add the following code:
以下のコードを加えてください:// Set the meal to be passed to MealTableViewController after the unwind segue. (mealを巻き戻しセグエの後にMealTableViewControllerに渡されるようにする。)meal = Meal(name: name, photo: photo, rating: rating)
This code configures the
mealproperty with the appropriate values before segue executes.
このコードは、mealプロパティを適切な値を使ってセグエが終了する前に構成します。
Your prepare(for:sender:) method should look like this:
あなたのprepare(for:sender:)メソッドはこのように見えるはずです:
// This method lets you configure a view controller before it's presented. (このメソッドは、あなたにビューコントローラをそれが提供される前に構成させます。)override func prepare(for segue: UIStoryboardSegue, sender: Any?) {super.prepare(for: segue, sender: sender)// Configure the destination view controller only when the save button is pressed. (保存ボタンが押される時のみ行先ビューコントローラを構成設定する)guard let button = sender as? UIBarButtonItem, button === saveButton else {os_log("The save button was not pressed, cancelling", log: OSLog.default, type: .debug)return}let name = nameTextField.text ?? ""let photo = photoImageView.imagelet rating = ratingControl.rating// Set the meal to be passed to MealTableViewController after the unwind segue. (mealを巻き戻しセグエの後にMealTableViewControllerに渡されるようにする。)meal = Meal(name: name, photo: photo, rating: rating)}
The next step in creating the unwind segue is to add an action method to the destination view controller (the view controller that the segue is going to). This method must be marked with the IBAction attribute and take a segue (UIStoryboardSegue) as a parameter. Because you want to unwind back to the meal list scene, you need to add an action method with this format to MealTableViewController.swift.
巻き戻しセグエを作成する次の段階は、アクションメソッドをデスティネーション(行先)ビューコントローラ(セグエが向かっている先のビューコントローラ)に加えることです。このメソッドは、IBAction属性で記しされて1つのセグエ(UIStoryboardSegue)をパラメータとして取らなければなりません。あなたは食事リストシーンへと巻き戻し帰りたいので、あなたに必要なのはこの形式を使ったアクションメソッドをMealTableViewController.swiftに加えることです。
In this method, you’ll write the logic to add the new meal (that’s passed from MealViewController, the source view controller) to the meal list data and add a new row to the table view in the meal list scene.
このメソッドにおいて、あなたはロジックを書いて、新しい食事(それはMealViewController、ソースビューコントローラから渡されます)を食事リストデータに加えて、食事リストシーンにおいて新しい行をテーブルビューに加えるようにします。
To add an action method to MealTableViewController
アクションメソッドをMealTableViewControllerに加えるには
Open
MealTableViewController.swift.
MealTableViewController.swiftを開いてください。Before the
//MARK: Private Methodssection, add the following line:
//MARK: Private Methods節の前に、以下の行を加えてください://MARK: Actions
Below the
//MARK: Actionscomment, add the following:@IBAction func unwindToMealList(sender: UIStoryboardSegue) {}
In the
unwindToMealList(_:)action method, add the followingifstatement:
unwindToMealList(_:)アクションメソッドにおいて、以下のif文を加えてください:if let sourceViewController = sender.sourceViewController as? MealViewController, meal = sourceViewController.meal {}
There’s a lot happening in the condition for this
ifstatement.
このif文の条件では多くの事が起こっています。This code uses the optional type cast operator (
as?) to try to downcast the segue’s source view controller to aMealViewControllerinstance. You need to downcast becausesender.sourceViewControlleris of typeUIViewController, but you need to work with aMealViewController.
このコードはオプショナル型キャスト演算子(as?)を使って、このセグエのソースビューコントローラをダウンキャストしてMealViewControllerインスタンスにしようと試みます。あなたはダウンキャストを必要とします、なぜならsender.sourceViewControllerは型UIViewControllerですが、あなたはMealViewControllerを扱うことを必要とします。The operator returns an optional value, which will be
nilif the downcast wasn’t possible. If the downcast succeeds, the code assigns theMealViewControllerinstance to the local constantsourceViewController, and checks to see if the meal property onsourceViewControllerisnil. If themealproperty is non-nil, the code assigns the value of that property to the local constantmealand executes theifstatement.
この演算子はオプショナルの値を返します、それはダウンキャストが可能でなかったならばnilになります。ダウンキャストが成功したならば、コードはMealViewControllerインスタンスをローカル定数のsourceViewControllerに割り当てます、そしてsourceViewControllerでのmealプロパティがnilかどうかを確認します。mealプロパティが非nilならば、コードはそのプロパティの値をローカル定数mealに割り当ててif文を実行します。If either the downcast fails or the
mealproperty onsourceViewControllerisnil, the condition evaluates tofalseand theifstatement doesn’t get executed.
ダウンキャストが失敗する、またはsourceViewController上のmealプロパティがnilである、このどちらでも、この条件はfalseに評価されてif文は実行されません。In the
ifstatement, add the following code:
if文において、以下のコードを加えてください:// Add a new meal. // (新しい食事を加える。)let newIndexPath = IndexPath(row: meals.count, section: 0)
This code computes the location in the table view where the new table view cell representing the new meal will be inserted, and stores it in a local constant called
newIndexPath.
このコードはテーブルビューの中の場所を算出します、そこは新しい食事を表している新しいテーブルビューセルが挿入されるところです、そしてそれをローカル定数newIndexPathに格納します。In the
ifstatement, below the previous line of code, add the following code:
if文において、前のコード行の下で、以下のコードを加えてください:meals.append(meal)
This adds the new meal to the existing list of meals in the data model.
これは新しい食事を、データモデルにおいて既存の食事のリストに加えます。In the
ifstatement, below the previous line of code, add the following code:
if文において、前のコード行の下で、以下のコードを加えてください:tableView.insertRows(at: [newIndexPath], with: .automatic)
This animates the addition of a new row to the table view for the cell that contains information about the new meal. The
.automaticanimation option uses the best animation based on the table’s current state, and the insertion point’s location.
これは、新しい食事についての情報を含んでいるセルのためのテーブルビューへ新しい行の追加をアニメーション(動画)にします。.automaticアニメーションオプションは、テーブルの持つ現在の状態、そして挿入点の位置に基づいて最良のアニメーションを使用します。
You’ll finish a more advanced implementation of this method in a little while, but for now, the unwindToMealList(_:) action method should look like this:
あなたは、このメソッドのより進んだ実装を少し後でやり遂げます、しかし今のところ、unwindToMealList(_:)アクションメソッドはこのように見えるはずです:
@IBAction func unwindToMealList(sender: UIStoryboardSegue) {if let sourceViewController = sender.source as? MealViewController, let meal = sourceViewController.meal {// Add a new meal. // (新しい食事を加える。)let newIndexPath = IndexPath(row: meals.count, section: 0)meals.append(meal)tableView.insertRows(at: [newIndexPath], with: .automatic)}}
Now you need to create the actual unwind segue to trigger this action method.
次にあなたが必要とするのは、このアクションメソッドを引き起こす、実際の巻き戻しセグエを作成することです。
To link the Save button to the unwindToMealList action method
SaveボタンをunwindToMealListアクションメソッドに接続するには
Open your storyboard.
あなたのストーリーボードを開いてください。On the canvas, Control-drag from the Save button to the Exit item at the top of the meal detail scene.
キャンバス上で、Saveボタンから食事詳細シーン上部のExit項目までコントロール-ドラッグしてください。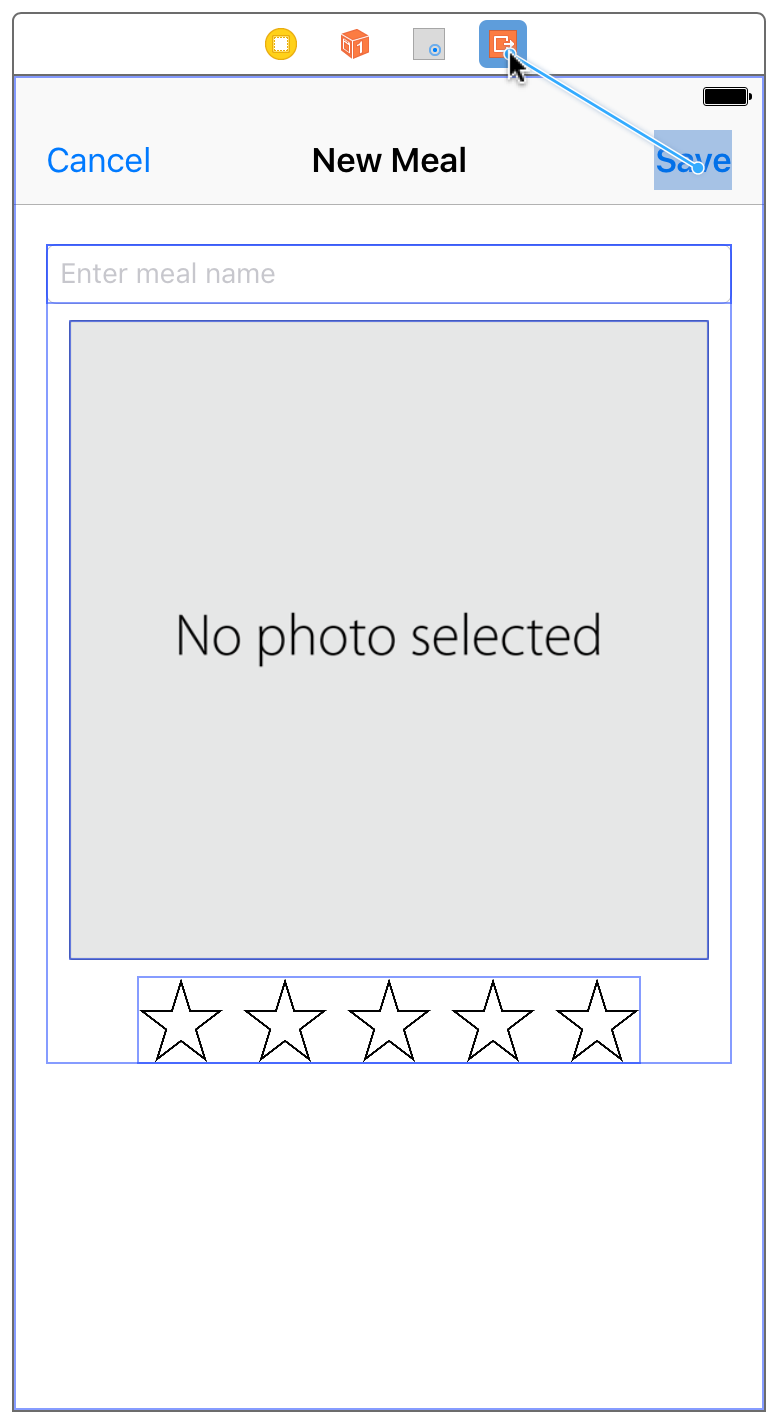
A menu appears in the location where the drag ended. It shows all the available unwind action methods.
メニューが、ドラッグが終わったところに現れます。それはすべての利用可能な巻き戻しアクションメソッドを表示します。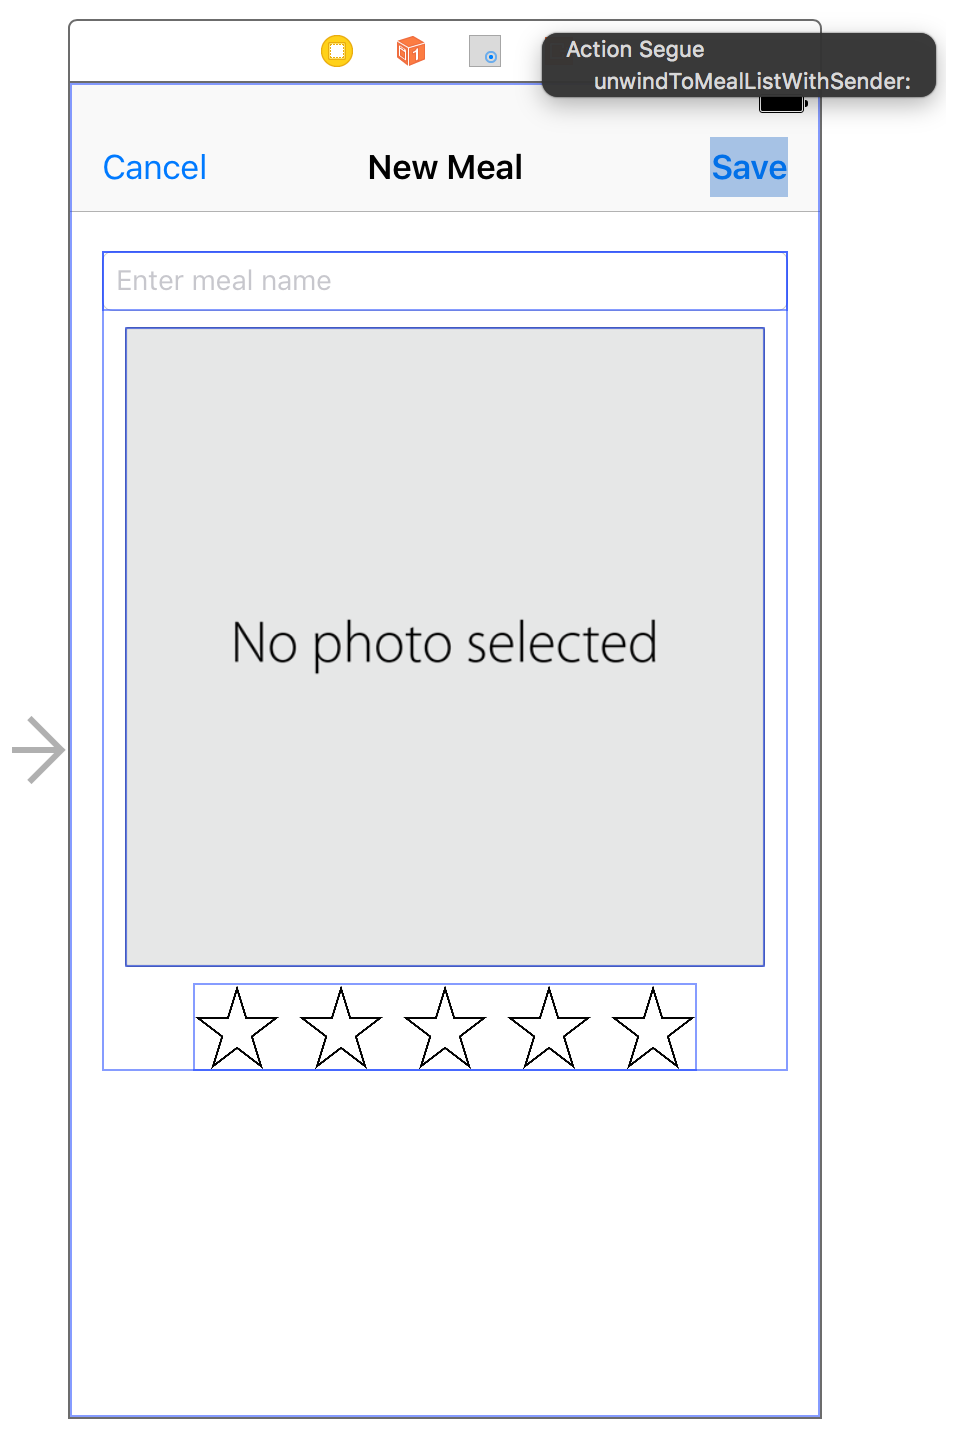
Choose
unwindToMealListWithSender:from the shortcut menu.
unwindToMealListWithSender:をショートカットメニューから選んでください。Now, when users tap the Save button, they navigate back to the meal list scene, during which process the
unwindToMealList(sender:)action method is called.
今では、ユーザがSaveボタンをタップする時、彼らは食事シーンリストへ導かれて戻ります、その処理の間にunwindToMealList(sender:)アクションメソッドが呼ばれます。
Checkpoint: Run your app. Now when you click the Add button (+), create a new meal, and click Save, you should see the new meal in your meal list.
確認点:あなたのアプリを実行してください。今ではあなたがAddボタン(+)をクリックして、新しい食事が作成され、そしてSaveをクリックする時、あなたは新しい食事をあなたの食事リストの中に見るはずです。
Disable Saving When the User Doesn't Enter an Item Name
ユーザが項目名を入力しないとき保存できないようにする
What happens if a user tries to save a meal with no name? Because the meal property on MealViewController is an optional and you set your initializer up to fail if there’s no name, the Meal object doesn’t get created and added to the meal list—which is what you expect to happen. But you can take this a step further and keep users from accidentally trying to add meals without a name by disabling the Save button while they’re typing a meal name, and checking that they’ve specified a valid name before letting them dismiss the keyboard.
ユーザが食事を名前なしで保存しようとするとき何が起こるでしょう?MealViewController上のmealプロパティがオプショナルであり、あなたが名前なしでは失敗するようにあなたのイニシャライザを設定したので、Mealオブジェクトは作成されず食事リストに加えられません—これはあなたが起こることを期待するものです。しかしあなたはこれを1段先に進めて、ユーザが間違えて食事を名前なしで加える試みをしないようにできます、それは彼らが食事名をタイプしている間Saveボタンを使用不能にすること、そして彼らが有効な名前を指定したことを彼らにキーボードを片付けさせる前にチェックすることによってです。
To disable the Save button when there’s no item name
Saveボタンを項目名がない時は使用不可能にするには
In
MealViewController.swift, find the//MARK: UITextFieldDelegatesection.
MealViewController.swiftにおいて、//MARK: UITextFieldDelegate節を見つけてください。You can jump to it quickly using the functions menu, which appears if you click the name of the file at the top of the editor area.
あなたは、素早く関数メニューを使ってジャンプできます、それはあなたがファイルの名前をエディタ区画の上部でクリックするならば現れます。In this section, add another
UITextFieldDelegatemethod:
この節において、もう1つのUITextFieldDelegateメソッドを加えてください:func textFieldDidBeginEditing(_ textField: UITextField) {// Disable the Save button while editing. (編集の間Saveボタンを利用不可能にする。)saveButton.isEnabled = false}
The
textFieldDidBeginEditingmethod gets called when an editing session begins, or when the keyboard gets displayed. This code disables the Save button while the user is editing the text field.
textFieldDidBeginEditingメソッドは、編集期間が始まる時、またはキーボードが表示される時に呼ばれます。このコードは、ユーザがテキスト欄を編集している間、Saveボタンを使用不能にします。Scroll to the bottom of the class. Before the last closing curly brace (
}), add the following line:
このクラスの一番下までスクロールしてください。最後の閉じ波括弧(})の前に、以下の行を加えてください://MARK: Private Methods
Below the
//MARK: Private Methodscomment, add the following method:
//MARK: Private Methodsコメントの下で、以下の行を加えてください:private func updateSaveButtonState() {// Disable the Save button if the text field is empty. (テキスト欄が空ならばSaveボタンを利用不可能にする。)let text = nameTextField.text ?? ""saveButton.isEnabled = !text.isEmpty}
This is a helper method to disable the Save button if the text field is empty.
これはヘルパーメソッドで、テキスト欄が空ならばSaveボタンを使用不能にします。Go back to the the
//MARK: UITextFieldDelegatesection and find thetextFieldDidEndEditing(_:)method:
//MARK: UITextFieldDelegate節に戻ってtextFieldDidEndEditing(_:)メソッドを見つけてください:func textFieldDidEndEditing(_ textField: UITextField) {}
The implementation should be empty at this point.
実装はこの時点では空のはずです。Add these lines of code:
これらのコード行を加えてください:updateSaveButtonState()navigationItem.title = textField.text
The first line calls
updateSaveButtonState()to check if the text field has text in it, which enables the Save button if it does. The second line sets the title of the scene to that text.
最初の行は、updateSaveButtonState()を呼び出して、テキスト欄がそれの中にテキストを持つかどうか調べます、それがそうならばそれはSaveボタンを利用可能にします。2行目は、このシーンのタイトルを、そのテキストに設定します。Find the
viewDidLoad()method.
viewDidLoad()メソッドを見つけてください:override func viewDidLoad() {super.viewDidLoad()// Handle the text field’s user input through delegate callbacks. (テキスト欄のユーザ入力を委任先コールバックを経由して取り扱います。)nameTextField.delegate = self}
Add a call to
updateSaveButtonState()in the implementation to make sure the Save button is disabled until a user enters a valid name:
updateSaveButtonState()への呼び出しを実装において加えて、ユーザが有効な名前を入力するまでSaveボタンが使用不能にされるのを確実にしてください:// Enable the Save button only if the text field has a valid Meal name. (Saveボタンをテキスト欄が有効なMeal名を持つ場合にのみ使用可能にする)updateSaveButtonState()
Your viewDidLoad() method should look like this:
あなたのviewDidLoad()メソッドはこのように見えるはずです:
override func viewDidLoad() {super.viewDidLoad()// Handle the text field’s user input through delegate callbacks. (テキスト欄のユーザ入力を委任先コールバックを経由して取り扱います。)nameTextField.delegate = self// Enable the Save button only if the text field has a valid Meal name. (Saveボタンをテキスト欄が有効なMeal名を持つ場合にのみ使用可能にする)updateSaveButtonState()}
And your textFieldDidEndEditing(_:) method should look like this:
そしてあなたのtextFieldDidEndEditing(_:)メソッドはこのように見えるはずです:
func textFieldDidEndEditing(_ textField: UITextField) {updateSaveButtonState()navigationItem.title = textField.text}
Checkpoint: Run your app. Now when you click the Add button (+), the Save button is disabled until you enter a valid (nonempty) meal name and dismiss the keyboard.
確認点:あなたのアプリを実行してください。今ではあなたがAddボタン(+)をクリックする時、Saveボタンはあなたが有効な(空でない)食事名を入力してキーボードを片付けるまで使用不能にされます。
Cancel a New Meal Addition
新しい食事の追加のキャンセル
A user might decide to cancel the addition of a new meal, and return to the meal list without saving anything. For this, you’ll implement the behavior of the Cancel button.
ユーザは、新しい食事の追加をキャンセルして、何も保存しないで食事リストに戻ることに決めるかもしれません。これのために、あなたはCancelボタンの挙動を実装します。
To create and implement a cancel action method
キャンセルアクションメソッドを作成して実装するには
Open your storyboard.
あなたのストーリーボードを開いてください。Click the Assistant button in the Xcode toolbar to open the assistant editor.
AssistantボタンをXcodeツールバーにおいてクリックしてアシスタントエディタを開いてください。
In your storyboard, select the Cancel button.
あなたのストーリーボードにおいて、Cancelボタンを選択してください。Control-drag from the Cancel button on your canvas to the code display in the editor on the right, stopping the drag at the line just below the
//MARK: Navigationcomment inMealViewController.swift.
あなたのキャンバス上のCancelボタンから右のエディタの中のコード表示へコントロール-ドラッグして、MealViewController.swiftの中の//MARK: Navigationコメントのすぐ下の行でドラッグをやめてください。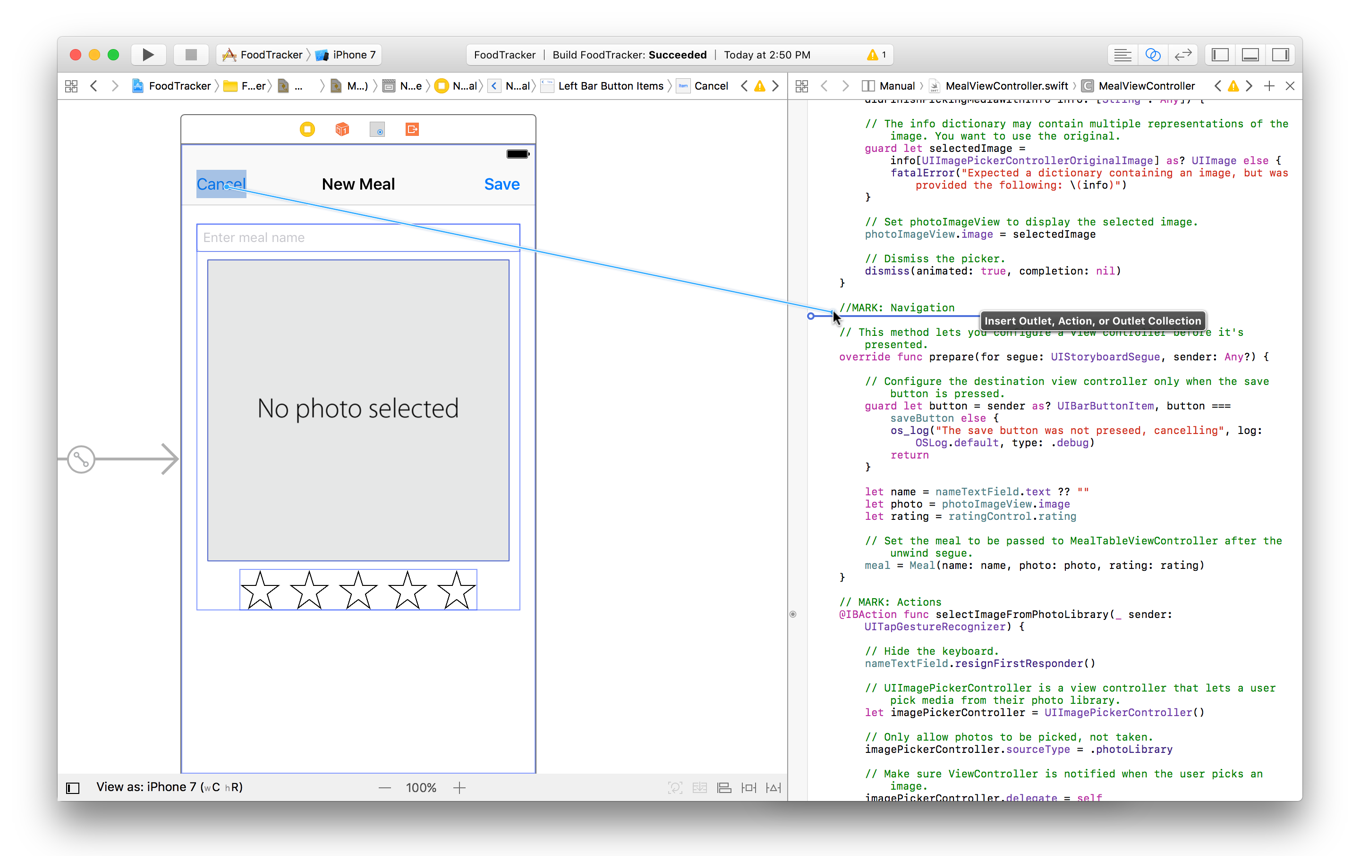
In the dialog that appears, for Connection, select Action.
現れたダイアログで、Connectionに対して、Actionを選択します。For Name, type
cancel.
Nameに対して、cancelをタイプしてください。For Type, select
UIBarButtonItem.
Typeに対して、UIBarButtonItemを選択してください。Leave the rest of the options as they are. Your dialog should look like this:
残りのオプションはそれらのままにしておきます。あなたのダイアログはこのように見えるはずです: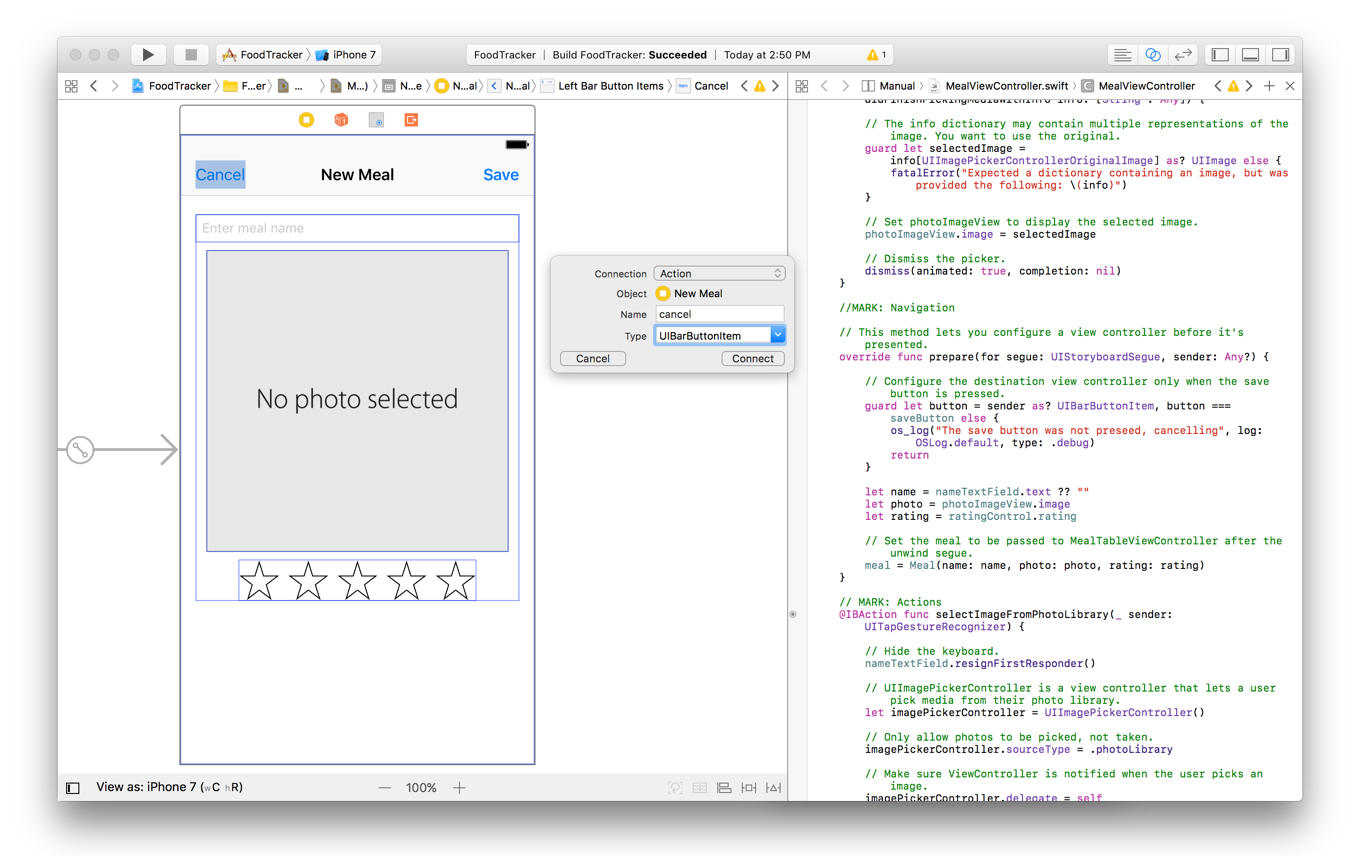
Click Connect.
Connectをクリックしてください。Xcode adds the necessary code to
MealViewController.swiftto set up the action.
Xcodeは、不可欠なコードをMealViewController.swiftに加えて、このアクションを準備します。@IBAction func cancel(_ sender: UIBarButtonItem) {}
In the
cancel(_:)action method, add the following line of code:
cancel(_:)アクションメソッドにおいて、以下のコード行を加えてください:dismiss(animated: true, completion: nil)
The
dismiss(animated:completion:)method dismisses the modal scene and animates the transition back to the previous scene (in this case, the meal list). The app does not store any data when the meal detail scene is dismissed, and neither theprepare(for:sender:)method nor the unwind action method are called.
dismiss(animated:completion:)メソッドはモーダルシーンを退去させて、以前のシーン(この場合には、食事リスト)に戻る推移をアニメーションにします。アプリは食事シーンが退去させられる時に何らデータを保管しません、そしてprepare(for:sender:)メソッドも巻き戻しアクションメソッドも呼び出されません。
Your cancel(_:) action method should look like this:
あなたのcancel(_:)アクションメソッドはこのように見えるはずです:
@IBAction func cancel(_ sender: UIBarButtonItem) {dismiss(animated: true, completion: nil)}
Checkpoint: Run your app. Now when you click the Add button (+) and click Cancel instead of Save, you should navigate back to the meal list without adding a new meal.
確認点:あなたのアプリを実行してください。今ではあなたがAddボタン(+)をクリックしてCancelボタンをSaveボタンの代わりにクリックした時、あなたは新しい食事を追加することなく食事リストに導かれて戻ります。
Wrapping Up
まとめ
In this lesson, you learned how to push scenes onto the navigation stack, and how to present views modally. You learned how to navigate back to a previous scene using segue unwinding, how to pass data across segues, and how to dismiss modal views.
このレッスンでは、あなたはシーンをナビゲーションの上へとプッシュする方法、そしてビューをモーダルに表す方法を学びました。あなたは、以前のシーンにセグエ巻き戻しを使って戻っていく方法、データをセグエを超えて渡す方法、そしてモーダルビューを退去させる方法を学びました。
At this point, the app displays an initial list of sample meals, and lets you add new meals to the list. In the next lesson, you’ll add the ability to edit and delete meals.
この時点で、アプリは見本の食事の初期リストを表示して、あなたに新しい食事をそのリストに追加させます。次のレッスンでは、あなたは食事を編集および削除する能力を加えます。
Create a Table View
テーブルビューを作る
Copyright © 2016 Apple Inc. All rights reserved. Terms of Use | Privacy Policy | Updated: 2016-12-08